In the design of a private house, both inside and outside, there are no insignificant details, because they all shape the appearance of the building, and, accordingly, the opinion about its owner. That is why it is important to pay special attention to all the nuances, carefully work out the idea and stylistic direction of the home, making it not only comfortable and cozy for yourself, but also attractive to others.
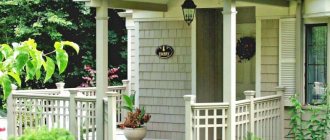
The porch is the face, the calling card of the house, welcoming friends, relatives and other guests. It can perform both a functional and decorative role. By adding a canopy to the porch, you can create a cozy area where you can hide from the rain, as well as create a chic entrance to the house. How to do this correctly, and what materials to use? Let's find out together.
Planning
Before starting work, you need to understand in detail how it will look. To do this, you need to consider the following:
- Determine which side the steps should be located on. Various options are possible here: on one, two or three sides. The choice is made based on existing preferences and financial capabilities.
- The height of this structure is selected. Usually it is installed 5-7 cm below the doorway. This will prevent rain or snow from getting inside the house. Sometimes, when exposed to frost, the surface may rise slightly. This will not block the door.
- They decide whether the porch will be made of metal, wood, brick or other materials.
- The appropriate size of the upper platform is determined. This must be taken into account. Which way will the door open? If it is outside, then the person standing on the porch should have enough space to open it. In this case, the platform should be 30-40 cm wider than the door leaf. GOST gives a recommendation that the depth of the site should be one and a half times wider than the table.
- The number of steps for the porch is determined based on the height of the structure. Usually it is calculated that the height of the step is 15-20 cm. It can rarely happen that you end up with a whole number of steps. Sometimes the length of each step is adjusted evenly, one small one is used, or one of them is made a little higher.
- Determine the width of the steps. In most cases it is 25-30 cm.
- You need to decide whether a canopy over the porch is needed.
After the main parameters of the porch have been determined, we begin to manufacture it.
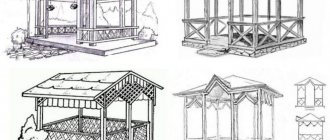
Porch types
As a rule, this building is classified according to three main criteria:
- By device type: simple, attached and built-in.
- For building materials.
- By the presence of a canopy or canopy.
Before deciding which porch to build, it is worth considering the characteristics of each of them. It is also advisable to focus on the visual aspect. So a concrete porch looks out of place with a wooden house, but a wooden one opposite will suit almost anyone.
But as they say, it’s better to see a photo of the porch once than to go into all the details and nuances of design art.
Foundation
The porch is installed on the foundation. Various options are used for it:
- Columnar or pile is suitable for a lightweight structure. When the porch is wooden or metal, it will be a reliable foundation.
- If the groundwater level is low, then you can limit yourself to a columnar foundation.
- If soil heaving may occur, then it is necessary to use a pile foundation as a base.
- For a heavy porch, a strip or monolithic foundation is used.
When making the base, you need to correctly calculate the depth. The foundation must be below freezing depth. You need to decide whether the foundations of the porch and the house should be connected. This decision is influenced by the type of structure and soil characteristics. Each option has its own advantages and disadvantages.
If there is no connection, frost heaving may result in cracking of the structure and, as a result, misalignment may occur. When the ground thaws, it may return to its place, but this does not always happen.
If the two foundations are connected, this can prevent deformation due to freezing or settlement. But if it is too strong, cracks may form in the porch structure or at the joint. A connected foundation is convenient in cases where the porch is heavy and massive.
Canopy
If you want to have a porch with a canopy, then you need to think about it at the very beginning. Because then, when making the foundation, it would be necessary to immediately install the racks for the canopy frame.
The canopy must be made pitched, and its size is calculated from the fact that it must be wider than the main platform. Almost any canopy should be equipped with a special gutter to divert water from the central part.
Having a closed porch is very convenient and practical from the point of view of the safety of the building. After all, this way it will be additionally protected from bad weather. And at the same time perform a decorative function.
Made of wood
If the porch is made of wood, then you will have to spend much less labor and money on it. This material is easy to process, it is flexible and aesthetic. A wooden porch is the most common option in our country.
However, this material is very vulnerable to fire, moisture, insects, rodents, and fungus. To prevent this, special impregnations are needed to increase security. This type of porch requires regular maintenance.
Made of brick
A brick porch is strong, reliable and durable. It is heavy and its construction requires a reliable foundation. Most often, a monolithic slab is used for this purpose. It will require double reinforcement. The size of the base must exceed the area of the porch. The choice of brick is determined by the availability of porch tiles. If it is not there, the brick should look more aesthetically pleasing.
If the porch is high, it is not profitable to completely fill the inside. For example, it can be left empty and used for household purposes.
Note!
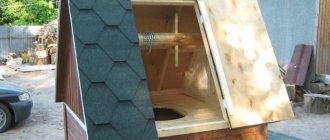
DIY brick barbecue: diagrams, drawings, photos, dimensions. Review of simple and complex structures on a summer cottage!
- House with a bay window - 150 photos of the best planning and design ideas. Overview of all features of an architectural element
- Do-it-yourself tandoor made of brick: ready-made drawings, dimensions, step-by-step instructions + 100 photo ideas
Instructions for carrying out work
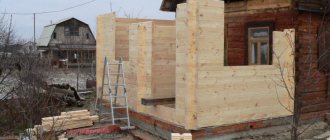
There are many manufacturing options. Each case has its own important features. Here, as an example, we will consider one of the simplest options - a wooden porch to a house on a metal frame.
Preparatory work
Before making the porch, the type and design were chosen, and a detailed diagram was drawn up indicating the dimensions. First you need to dig a small pit; it is made 25 cm deep and of such width and depth that the porch can fit in it.
A uniform layer of sand 10 cm thick is poured onto the bottom of the pit. A layer of gravel of the same thickness is placed on top. Next, a reinforcing mesh is placed. All this is poured with concrete. After complete drying, a monolithic foundation will be made.
Video description
How to properly make a polycarbonate canopy, watch the video.
A canopy with a tiled roof is best done during construction work of the entire building. In this case, the remaining material will be suitable for the visor, which will allow you to make the entire roof in one design. Since the roofing material is not lightweight, it is recommended to build the canopy on support pillars.
Corrugated roofing
This material is not particularly original and it will not be possible to make the canopy decorative. But modern manufacturers have begun to produce profiled sheets with multi-colored coatings. A canopy made from this coating has a number of advantages:
- the roof is durable and withstands impacts well;
- the material is light;
- the roof is covered without much effort;
- low cost of material.
The advantage of corrugated sheeting is its ease of installation Source gidlestnic.ru
Metal carcass
A frame for the side parts of the porch is welded from a metal corner (70×5 mm). It was made to become the base on which the wooden parts will be attached.
Two symmetrical lateral metal pieces were exposed on the right and left sides of the monolithic foundation. They are attached to the concrete using pins. Metal parts are cleaned of traces of rust (rust converter was used), primed and painted. In this case, a layer of paint is applied twice.
Wood laying
The steps were made of well-dried material. They were cut according to the size of the porch and impregnated. They are attached to a metal frame using bolts. For them, it is necessary to drill holes of the appropriate diameter in the boards and metal frame.
Installation of wooden parts occurs in two stages. First, wooden beams are attached to the frame, then steps and boards for the porch surface are mounted on them. It is recommended to make the steps slightly larger than the width of the frame. Then the moisture will drain out of them and will not fall on the metal parts. Gaps 5-8 mm wide are made between the boards. This is necessary so that when the wooden porch swells it does not become uneven.
Note!
How to make a gate with a wicket with your own hands: step-by-step instructions, drawings, design dimensions, design, assembly and installation
- Veranda attached to the house - 150 photos of beautiful and practical DIY options
Do-it-yourself greenhouse - a review of the best ideas on how to build a good greenhouse on a summer cottage (80 photo ideas)
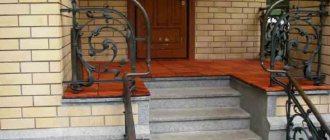
Final finishing and design
Proper cladding of the porch will help create an elegant appearance and will be the final stage during construction. A variety of materials can be used for finishing. This includes wood, siding, stone, and porcelain stoneware.
Thus, it can be seen that some types of porches do not require any special skills. Numerous bright photos with examples of the variety of choices confirm this. You can always choose an option that suits both cost, beauty, and personal capabilities.
Finishing
After installation is completed, the parts are sanded and painted. Additionally, you can build a canopy over the porch or a bench. A wooden porch will require regular maintenance in the future. If this condition is met, the porch for a private house will serve the owner for decades.
How to make a canopy over a door?
The canopy on the door can be made in the form of a simple lean-to structure:
- There are 2 parallel beams reinforced on the wall of the house for support. The distance from top to bottom depends on whether you want to increase or decrease the slope.
- For a canopy with front supports, poles are installed and dug into the ground. The pillars are connected by a horizontal bar.
- A horizontal frame (for rigidity) and inclined rafters (to support the roof) are placed between the top of the post and the rafters; the distance between the rafters is 50-70 cm. The sheathing is attached to the rafters.
- The roof is secured with self-tapping screws and pressure washers.
To install a canopy over the door with your own hands with a flake attachment, you must first knock down 2 right-angled triangles from wood or weld them from metal. These brackets will hold the entire visor in place, so they need to be strong. Attach the supports to the wall at the required distance from each other, which will determine the size of the structure.
To support the rafters, you need to attach an additional rafter to the wall. Construct the rafter system as indicated above.
For a gable or arched structure, 2-3 semicircular or A-shaped trusses are made, which must be connected at the bottom, at the free ends and at the highest points. For connection, a tube or strip is used, the length of which is determined by removing the canopy from the wall. Supports for the roof frame are made on poles or brackets, as indicated above. Install roofing felt according to general principles.