Other interesting projects of economy baths
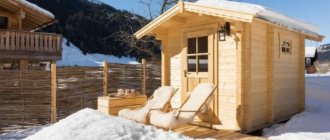
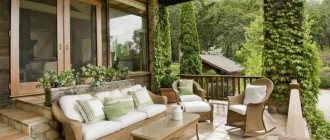
A very unusual, but no less comfortable barrel sauna is a cylindrical wooden structure on two supports, internally divided into 2-3 compartments, the farthest of which is a steam room.
The sauna is mobile, takes up little space, is economical and economical (very little fuel is needed to warm up a small steam room). Barrel sauna
Sectional view of a bathhouse barrel
Turnkey barrel baths cost from 35 to 220 thousand rubles. In practice, to assemble such a bathhouse yourself, it takes half as much money and not a lot of effort and time.
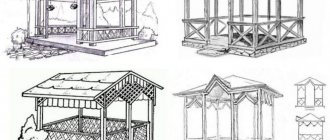
Barrel sauna project
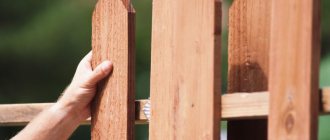
Assembly and disassembly of the bathhouse is possible due to the boards used 45x90 or 50x90 mm with a tongue-and-groove connection. The length of the barrel, depending on the boards used, is 2.5-5 meters. The structure is secured with metal hoops. Additionally, the bathhouse can be equipped with a porch, roof, and canopy.
The water in the barrel bath is drained through holes in the floor. If you plan to install such a bathhouse at your dacha, you should remove the layer of soil, fill it with crushed stone, compact it, and install the bathhouse itself on a pair of stable, massive concrete blocks. The rules for installing a stove and laying electrical wiring are standard for any type of wooden bathhouse, including economy class.
Fastening elements for sauna barrels
Do-it-yourself barrel sauna
Which foundation for a bathhouse is better?
I considered the following types of foundations for a bathhouse:
- Columnar
- Pile
- Block tape
- Filling tape
Brief characteristics and prices of each type
- Columnar foundations are the cheapest. Cement blocks 20x20x40 cm (4 blocks for each support, 48 blocks in total) with a pitch of 2.0 m along the perimeter of the future structure will cost only 2,500 rubles. Taking into account an additional 1.5 tons of sand and cement, we get a total amount of about 5,000 rubles. This is where the advantages of such a foundation end. For its construction and reliable operation, stable sandy soils without winter swelling of the soil are required. Only in this case will the foundation be stable, and the bathhouse will not “move” in the spring. We also do not forget about the need for additional floor insulation, because... The bathhouse hangs on foundation pillars. Waterproofing the floor insulation is also necessary, since there is a lot of water in the bathhouse. Additional costs, as we see, cannot be avoided.
- Pile foundations are used in places with complex relief and geological conditions. Swampy soils, slopes, unstable soils - these are the reasons for constructing such foundations. Their cost is quite comparable with tape ones, which will be discussed further. Given the calm construction conditions, I did not consider this type of foundation.
- Block strip foundation is used, perhaps, most often. Its use is explained by its relative cheapness (for a 4x4 m bathhouse, the cost of installing a block foundation will be only 8,000–9,000 rubles). In this case, it will no longer be necessary to insulate the floors, i.e. an important expense item is eliminated. Perhaps the only difficulty in construction is that such foundations are not easy to build alone - you need at least two people.
- My option is a poured strip foundation. It is most convenient for building a bathhouse. The advantages are obvious: such a foundation is quite strong and durable, inexpensive, and quickly and easily constructed without special tools and equipment. Formwork and reinforcing mesh are installed in the dug trench, which is filled with monolithic concrete. The cross-section of the reinforced monolithic foundation in formwork is 40×60 cm, the length is along the perimeter of the building. The cost of a foundation for a 4x4 m bathhouse is about 8,000 rubles.
Economy sauna in the country: we build it with our own hands
To build an economy bath, it is important to choose inexpensive and high-quality material. Possible options include:
Marking
Construction begins with choosing the location where the bathhouse will be built. For marking you will need four stakes and a plumb line:
Frame
A beam of 100*100 or 150*150 cm is used as a frame.
To install a non-leaking floor, you need to use perforated corners and self-tapping screws.
Roof
The installation of the roof is preceded by the installation of the ceiling. For this operation you will need the same boards and fasteners as for installing floor joists. Gable options are suitable for economy baths - they allow you to use the space under the roof as a warehouse.
Bath shelves
Their width is about forty centimeters. They are usually made from pine or oak.
How to make a steam room
- Linden and aspen boards are used to decorate the steam room. Stone and ceramics are also suitable.
- Coniferous wood is not used because it releases resin when heated.
How to correctly plan a bathhouse for a summer residence
When deciding how to build a bathhouse, consider various projects. An important point is the layout inside. This takes into account the number of people who will be in the room at the same time. In the video below you can see how to do the planning yourself.
Practical solutions include a scheme that includes a mini steam room for two people and a compact dressing room.
Compact construction
For a small family, a mini sauna with an area of 3x4 is suitable. In this case, the building must include additional premises. Even a small bathhouse should contain a changing room and a washing room. In the photo you can see miniature buildings, the size of which is 2x3. The construction of spacious premises involves increasing the steam room and shelves.
The diagram shows a project for a small 2*3 bathhouse
A bathhouse in combination with a guest house is also popular. Ready-made drawings will help you choose the best project, according to which you can make a structure with your own hands. Turnkey construction can also be ordered. In this case, the price will depend on the materials used and the project option. This could be a mini sauna or a spacious bathhouse with additional rooms.
Combination with guest house
Communications
It is necessary to design the location of communications at the initial stage of developing a mini-bath. The wiring must be hidden under the casing, and it is laid in special metal sleeves. The cable should be taken with double braid. It is also necessary to make grounding. For lighting, choose sealed lamps. They can be mounted both on the ceiling and on the wall.
Ventilation is an important element in the design of every bathhouse.
It is more logical to use a tank in which the water will be heated from the heat of the stove. An important point is the arrangement of ventilation; for this purpose, ventilation grilles are made in the ceiling with exits under the roof slope. Don't forget to build a drainage hole where the water will flow. It should be of unusual size; a porous stone is poured inside, which serves as a certain filter.
Budget technology for building a bathhouse
You can create a budget sauna with your own hands if you use frame or monolithic technology during construction. When building using the first technology, a wooden frame, plywood, OSB, boards or other economical option is used. The second technology requires the purchase of sawdust concrete or polystyrene concrete.
Frame budget sauna
This construction technology has a number of advantages:
But there are also significant drawbacks. The frame turns out to be quite cold and easily ventilated. These problems can be solved by the correct choice of materials. If you make a frame bath using a vapor barrier film, basalt wool and dry wooden boards, the price will be approximately 8,000 rubles per 1 square meter.
The construction of the bathhouse takes place in several stages:
1. The foundation is installed. Since the frame turns out to be light, it would be most appropriate to make a columnar foundation. For its installation, twenty-centimeter wells are drilled. In which asbestos pipes are placed. The cost of one pipe with a diameter of 10 centimeters is approximately 300-400 rubles. Next, the outer and inner spaces of the pipe are filled with concrete.
2. Then the floor is laid. It will consist of several layers, including a subfloor, joists, hydro- and thermal insulation, and a finished floor.
3. Next the walls rise. They can be built directly on the foundation, using strapping, or assembled on the ground and then raised.
4. After this, the rafter system is assembled and the roof is laid. The most inexpensive material with high practical properties will be ondulin. It is easy to install, lightweight, environmentally friendly and durable. The price is approximately 200 rubles per 1 m2.
5. The final stage will be the interior decoration of the bathhouse.
You can make a frame bathhouse in a short time. If there is a large amount of labor, it can be completed in 2-3 weeks.
Monolithic budget sauna
The main advantages of a monolithic sawdust concrete bathhouse include high frost-resistant qualities, light weight, good heat conservation and absolute non-flammability. The stages of its construction are in many ways similar to the construction of a frame bath:
1. First, a columnar foundation is prepared. The construction technology is described above.
2. Extruded polystyrene foam is laid on the floor, over which a mesh is stretched. Next, the floors are filled with sawdust-concrete mortar.
3. Then walls are erected from sawdust concrete blocks or the wall is filled with mortar. The first construction method is similar to building with bricks. When using the second, formwork is erected into which a sawdust-concrete mixture is poured.
4. The wall is insulated and waterproofed. Since sawdust concrete easily absorbs moisture, it is additionally protected from dampness.
5. The roof is being erected.
6. Interior finishing work is being carried out.
The final cost may slightly exceed the price of a frame bath, but it will also not be great.
In both cases, it is most convenient to install the water tank in the attic. But it’s better not to rush with the installation of the shower stall. It is much cheaper to equip a bathhouse with a traditional Russian tub. Moreover, dousing with cold water brings special pleasure to every avid bathhouse attendant.
Even with minimal construction skills and a limited budget, you can build a good budget sauna that will delight the whole family for many years
During construction, it is important not to forget to measure the level so that the walls and walls of the baths are level. A crooked design can lead to unpleasant consequences in the form of shrinkage, cracks and other defects
Making the foundation
Mini-bath, do-it-yourself sauna
As soon as you have decided on the plan and dimensions of the mini-bath for your dacha, you need to start considering the foundation. For a small room with frame walls there is no need for a powerful foundation, but its type will depend on the location of the bathhouse and the type of soil on the site.
First, you need to clear and clean the area where construction will take place. We get rid of weeds to facilitate excavation work, after which we carry out markings. By calculation it is necessary to determine the diagonal and check it by measuring the distance between the corners: they must be equal, in which case we will get right angles.
Marking the construction site
Marking the trench for the foundation
We stretch the string between the pegs, then step back a distance the width of the foundation and secure four more pegs in the corners. For sandy soil, take 40 cm, for clayey soil - 25 cm. Next, a trench is dug, the depth of which is approximately 50 cm. If your design includes a partition, you also need to build a foundation under it. Sand is placed at the bottom of the trench in a layer of 10 cm. Sometimes gravel is used, which must be leveled and compacted well.
1 3
Taking a metal rod with a diameter of 10 mm, a lattice is made for a reinforced concrete structure. Using boards or sheets of plywood, we construct formwork, the height of which is about 20 cm. The metal lattice should be 10 centimeters narrower than the width of the trench; it must be laid using special brick linings. The next step will be making the solution. The finished solution is poured into the trench, and the top is leveled with a trowel, after which it is necessary to wait a certain time for the foundation to harden. It is worth placing waterproofing material on top of the reinforced concrete structure.
Grating for reinforced concrete structure
Formwork for pouring the foundation
Strip foundation
Sometimes a columnar foundation is used: in this case, the filling occurs not in a continuous layer, but in segments. Supports are placed every meter. If you plan to use a heavy stove, you also need to pour a foundation under it.
Columnar foundation is suitable for small buildings
Making a sauna from boards with your own hands: a cheap and simple option
Features and advantages of a plank bathhouse
A bathhouse made of boards is an inexpensive project that will be a good alternative to buildings made of logs. The presence of a log house is not a prerequisite for the construction of a wooden steam room.
In its manufacture, only flat boards are used - without timber or round timber. The base of the building is a frame that connects the entire structure and rests on the foundation.
The price of the project depends on the method of its use:
A bathhouse made of boards has two main advantages. It does not shrink and provides complete freedom in choosing sizes and layout. The simplicity of the design allows you to quickly complete construction - with a partner, it will take only 2-3 months to build a steam room.
Choosing a site for construction
The location of the building is chosen taking into account its design; if the building is erected on a foundation, its placement in the dacha is determined by SNiP standards. If it is a mobile or ergonomic structure, or a converted shed without a foundation, it can be placed literally anywhere.
General requirements:
- it is prohibited to place a bathhouse closer than 5 m from the red line;
- if the building is wooden, it should be 10–15 m away from the residential building;
- It is better to remove the bathhouse from the reservoir or block - 15 m;
- It is recommended to build on a hill.
To save on insulation, choose a place protected from the wind.
The better to sheathe
The bathhouse is lined inside and out, but not always. Sheathing or finishing is vital for the frame and concrete; interior is necessary for brick. Log houses may only need caulking and prevention of cracking with oil, for example, but sometimes they are also insulated and lined from the inside with clapboard (usually not because of a good life). See the section on bath finishing materials.
The inside of the bathhouse is finished in the vast majority of cases with clapboard or regular boards (edged or unedged). So there is only one contender for the title of “best material for a bathhouse” - wood. And we are confident that you will agree with us. Although there are options, more about them here.
- Practical interior and exterior decoration of a bathhouse made of foam blocks. How to finish it so that the eye is pleased?
- Finishing with unedged boards in the bathhouse
- Let's figure out how to line a bathhouse with clapboard
- All about covering a steam room: what kind of lining, how to properly cover a steam room in a bathhouse
But with insulation, it’s not so simple.
What insulation to use
Insulation materials come in the form of sheets, rolls or bulk. The first include expanded polystyrene (foam plastic, Penoplex), mineral wool, foamed polyethylene with or without foil, etc. Bulk materials are expanded clay, vermiculite, perlite, ecowool.
Bulk ones are easier to use for floors, but they can also be used for insulating walls. In this case, the bulk material needs voids into which it is poured or blown under pressure. Ecowool has the ability to be applied to the wall while wet.
Sheets and rolls are also used for walls and ceilings.
As for the best, we will say this: it is advisable to use expanded polystyrene in a bathhouse only for insulating the floors of the first floor. They are flammable, harmful and undesirable. However, they are also suitable outside the steam room. But in the steam room this is taboo.
Bulk ones are good for floors, this has already been said.
Basalt wool for baths
In general, we have thought about mineral wool more than once and eventually came to the conclusion that, despite all its shortcomings, it is still the optimal material for insulating a bathhouse. Its disadvantages are known: it becomes saturated with moisture and ceases to insulate, therefore it needs steam and waterproofing (we have written a lot about them, enter these words at the very top of the page in the site search, you will find a lot of materials).
Here we did not take a vote, since different structural parts of the bathhouse (foundation, floor, walls, ceiling, roof) have different requirements for insulation. We recommend that you familiarize yourself with our materials on this topic:
- Basalt insulation for a bath or natural? What insulation for a bath is better? Review of the most popular
- Which insulation to choose for a bathhouse on the inside walls: with or without foil? And is it even needed inside the bathhouse?
- Are we installing a log house or timber? Interventional insulation for a bathhouse: which one to choose, which is better, natural or modern?
- Should I insulate the bathhouse ceiling with clay and sawdust or sawdust and cement? Which is better and is there a difference?
- Let's look at it in detail: how to insulate a steam room in a bathhouse
- Insulating the walls of a frame bath: the right “pie”
- Choosing which insulation to use for a bath in a steam room: so that the steam room is hot and environmentally friendly
- We insulate a bathhouse from inside blocks: foam blocks, expanded clay concrete, cinder blocks, gas silicate. What do they have in common and what are the differences?
- About insulating a bathhouse under the lining
- How to insulate a bathhouse from foam blocks: inside and out. Don't let the walls crumble
Exterior finishing
The outside of the bathhouse can be finished in different ways depending on the original wall material. If it is concrete, then you can plaster it. The same goes for brick, but it is usually left “as is”.
You can make siding - this is a broad concept that also includes wood trim, for example, “American” clapboard, which, in general, gave rise to all sidings. The tree can be either an ordinary board, which is sewn in a herringbone pattern, or a plank, which is sewn onto the frame.
In addition, there are sidings made of vinyl and metal, cement, imitating stone and wood. In general, there are many options for covering a bathhouse.
But we believe that metal siding for a bathhouse is unnecessary.
High-quality plastic will not be cheap, although truly high-quality material has such characteristics that it can last for many years. But the bathhouse is a risky structure, and the plastic burns and releases poisons.
As for cement siding, think for yourself. From the set of options for what material is best to cover a bathhouse, this one does not seem very successful. Maybe the basement one - for covering the foundation.
So we vote for wood paneling. What will you vote for?
Loading …
Project #2 - wood concrete is used
Here's what the construction process looks like:
- Step 1. We dig a drainage hole with dimensions of 1.2 x 1.8 x 1.4 m. We fill up the OPGS with stones on both sides, make formwork, and fill it.
- Step 2. We dig a foundation 30 cm wide and up to 50 cm deep. We fill it with sand and tamp it.
- Step 3. We put up the formwork, reinforce two rods at the top and bottom. We place vertical rods every meter. We pour the foundation.
- Step 4. We lay EPS, mesh in the washing and steam room and fill the floors. In the washing room we additionally organize drainage.
- Step 5. Lay the blocks, check the evenness of the walls with a level.
- Step 6. We make the roof using 50x100 boards. The optimal distance between the rafters is 55-80 cm. Cover.
- Step 7. Cook the oven or buy a budget ready-made one. The ventilation scheme is suitable as follows: outside air goes to the gap between the stove and the brick wall, where it heats up.
- Step 8. Install the shower tank in the attic.
- Step 9. Finish the walls from the inside. If possible, use Izospan FB - a material special for baths, plus heat-resistant tape. Izolon is good for ceilings, as it can withstand temperatures up to 150°C.
This is such a budget-friendly and quite successful bathhouse.
When choosing wood concrete, pay attention: according to its density, it can be thermal insulating and structural. The first has a density of 400-500 kg/m, the second - 500-850 kg/m
This material is used for the construction of self-supporting walls and has good heat and sound insulation.
Budget options for baths in stages
- Minimum costs:
- the foundation is columnar. It will require a 2-meter auger drill, but the casing pipes can be replaced with ordinary sewer pipes, 110 mm;
- the strapping is 500 mm studs, and the structure itself is 150 × 150 with a frame stand of 2200 mm. Do not forget to treat the material with Neomid 440;
- modify the walls while tying, lifting them. The sheathing is made of DSP, so first prepare the holes in the slabs, and then screw them in with self-tapping screws with a semicircular head;
- roof - eight-wave slate;
- insulation - any inexpensive material suitable for a steam room, for example, Linerock Light;
- the stove is inexpensive, if you have the necessary skills, then homemade;
- finishing - lining, skirting boards, casings.
- From timber:
- level the area for the foundation;
- erect the formwork, leaving an opening for drainage;
- lay out the EPS;
- tie the reinforcement structure;
- fill with concrete and make a slope for drainage;
- lay out the log house. Under the initial crown, place boards treated with an antiseptic, which should be covered with roofing felt on three sides;
- After erecting the walls, leave for a couple of months to allow shrinkage to take place;
- erect a roof frame and do not forget about the hole for the chimney;
- make a frame partition between the steam room and the dressing room. Insulate it with mineral wool and trim it with clapboard on both sides;
- in the area of the stove, lay the floor with porcelain stoneware;
- leave a hole for fresh air ventilation;
- remove the chimney;
- conduct electricity.
Remember! The most economical bathhouse is one made by yourself.
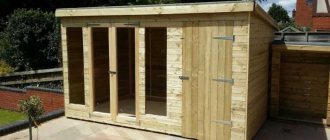
Other interesting projects of economy baths
A very unusual, but no less comfortable barrel sauna is a cylindrical wooden structure on two supports, internally divided into 2-3 compartments, the farthest of which is a steam room. The sauna is mobile, takes up little space, is economical and economical (very little fuel is needed to warm up a small steam room).
Barrel sauna
Sectional view of a bathhouse barrel
Turnkey barrel baths cost from 35 to 220 thousand rubles. In practice, to assemble such a bathhouse yourself, it takes half as much money and not a lot of effort and time.
Barrel sauna project
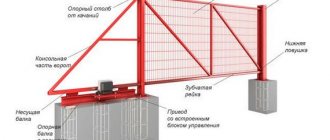
Assembly and disassembly of the bathhouse is possible due to the boards used 45x90 or 50x90 mm with a tongue-and-groove connection. The length of the barrel, depending on the boards used, is 2.5-5 meters. The structure is secured with metal hoops. Additionally, the bathhouse can be equipped with a porch, roof, and canopy.
The water in the barrel bath is drained through holes in the floor. If you plan to install such a bathhouse at your dacha, you should remove the layer of soil, fill it with crushed stone, compact it, and install the bathhouse itself on a pair of stable, massive concrete blocks. The rules for installing a stove and laying electrical wiring are standard for any type of wooden bathhouse, including economy class.
Fastening elements for sauna barrels
Do-it-yourself barrel sauna
Construction stages
To build a bathhouse on your own site, you will need to perform the following steps:
- foundation equipment;
- walling;
- roof installation;
- finishing walls using insulation;
- construction of a stove and chimney;
- performing finishing works;
- installation of plumbing;
- placement of furniture.
Foundation
Having decided on the project and location of the bathhouse, they begin to build the foundation.
For a bathhouse, a support-column foundation is used.
Before making the foundation, it is necessary to carefully level the surface.
Then pillars are made from brick, the space is filled with crushed stone and filled with screed.
You can also build on a strip foundation. It is used quite often. Such a foundation can withstand any load from the walls.
To carry it out, a trench is dug, a reinforced mesh is installed and a mixture of cement, sand and water is poured.
Formwork can be used to raise the foundation above the soil level.
Walls
For them it is necessary to choose high-quality and reliable materials. You can use wooden beams, bricks, cinder blocks.
The choice of solution directly depends on the material used.
Wooden beams allow you to install a prefabricated bathhouse.
Be sure to level all surfaces. When building walls, do not forget to make door and window openings.
Often, interior finishing is done using lining. Various materials can be used for external walls.
Roof
You should not choose a roof design that is too complex. The simplest option is enough.
To complete the roof, rafters are installed, a layer of waterproofing is laid, and then the roofing is laid.
The roof can be made single-pitch or gable.
Installation of the first option is simpler and less expensive. However, a gable roof is more often used.
Doors and windows
It is preferable to choose wooden windows and doors
When installing them, it is important to carefully seal all cracks to avoid heat loss.
You should not choose plastic, as it quickly becomes unusable when exposed to high temperatures.
Sometimes doors are made of glass.
Floor
It must be thoroughly insulated. For a more comfortable stay in the bathhouse, you can install a heated floor.
It is worth considering the following nuances:
- the foundation is covered with waterproofing and insulation;
- water supply pipes and sewerage are located in the washing room floor;
- boards are most often laid on top of this.
Finishing
The decoration of the room plays an important role. Wall insulation will help ensure good heat retention. For this, mineral wool or polystyrene foam is often used.
Insulation of internal walls and ceilings is carried out in the following sequence:
- fix the waterproofing layer;
- attach wooden sheathing;
- fix vapor barrier and mineral wool;
- surfaces are finished using lining.
The outer surface is painted and lined with bricks or boards.
Arrangement of the bathhouse
In addition to all of the above, it is necessary to supply electricity, water and sewer pipes. Keep in mind that the steam room and washing room have high humidity, so you need to take this into account when installing electrical wiring.
Finally, the necessary furniture is installed.
After reading this article, it becomes clear that building a bathhouse yourself is quite simple. To do this, it is imperative to take into account all the requirements for its construction and choose high-quality materials.
Numerous photos of the inside of the bathhouse will help you decide on the design and layout. If all requirements are met, the bathhouse will serve you for many years. This will be a great place for family holidays and receiving guests.
Floors
The design of the floor depends on the type of room. In the recreation room, ordinary wooden floors are made. In the wash and steam rooms, the floors are made of two levels:
- The first level is made of concrete and has a slope towards the drain hole.
- The second level is a finished floor made of boards with gaps for draining water.
If you want to make a floor of porcelain stoneware or tiles, then they are simply laid on the first level at a slope towards the drain hole.
In order to make a concrete floor and drain in a bathhouse you need:
- In the center of the steam room and washing room, install plastic pipes with a diameter of 5-10 centimeters with a socket at the end. The pipes should go out through the foundation to the street and connect to the sewer system.
- Lay down a layer of waterproofing material.
- Spread a layer of gravel 10-15 centimeters thick over the entire area of the rooms.
- Make a cement mortar and pour the floor with a slope towards the hole installed on the drain pipe.
- Install a screen over the drain hole to prevent debris from entering the drain.
At the second stage, wooden floors are made:
- Install wooden logs in all rooms of the bathhouse. Make the distance between the logs 30-40 centimeters. As logs you can use bars with a section of 3x5 cm or 4x6 cm.
- Nail boards with a section of 2x15 cm or 5x20 cm onto the logs.
- In rooms where water is expected to drain, leave gaps of 0.5-1 cm between the boards.
Do not forget, before installing wooden floors, to treat all parts with wood impregnation. When making floors, keep in mind that they should be higher, or at the level of the upper edge of the foundation.
Water supply and drainage
The costs of building a miniature bathhouse can be minimized if you arrange a compact and efficient drainage system. To create it, it is necessary to carry out excavation work and dig a small hole with a volume of 100 liters at some distance from the structure. Inside it should be installed a barrel that does not have a bottom. Thanks to it, the walls of the pit will be prevented from collapsing.
The next step is to install a pipeline, which should go directly from the steam compartment. If the bathhouse will be used in winter, then the plastic pipe should be deepened to a depth of 1 m. To ensure that there is always hot water in the bathhouse, you need to spend money on purchasing an electric heating element.
It can be used to easily heat a small volume of water. This will significantly save time on lighting the stove in the mini-bath. The water container should be placed higher. In this case, it will be possible to use it without swapping. Some owners of such structures additionally install a mixer to control water flow.
The drain installed in the mini-bath can, if desired, be connected to the sewer system of the garden house. This option makes it possible to reduce the costs of installing this system. Communications should be located at a slight slope. This will prevent liquid from stagnating in them. At the bottom of the pit into which the used water will flow, it is worth laying a layer of expanded clay or coarse crushed stone. It is necessary to install an insulation structure on top so that the pit does not freeze over in winter. For this, laying a layer of soil and clay will be quite sufficient.
Bathhouse-dugout
Moving away from the purchased option, we can recommend the optimal price-quality ratio in the form of a dugout bathhouse. Such structures are built, or more precisely, swarmed on their own. Hence the first point of saving. The work of hired craftsmen is assessed not in favor of the bathhouse owner.
The second point of savings can be considered an independent basis. That is, a foundation for a dugout bathhouse is not needed. The third point will be to reduce costs for wall materials. The disadvantage is the difficulty of preparing the pit.
Even one person can build such a bathhouse, but in this case the work will drag on for months. Bringing in equipment will speed up the process, but will affect the pricing policy. If time constraints do not bother you, then this option is the most profitable. Unlike a mobile structure, a dugout bathhouse will have a permanent registration, so its location must be decided in advance.
Recommendations for choosing material
Followers of traditions are recommended to build a bathhouse from high-quality coniferous wood. This material is not fragile, and most importantly, it lasts a long time. The needles are also distinguished by their environmental cleanliness and low thermal conductivity, that is, they do not release heat and at the same time interfere with air exchange. A unique property of this tree is its resistance to various climate conditions.
Such a wooden building must stand on a reliable foundation
For construction, you can take one of two types of coniferous wood:
- rounded round logs;
- solid beams.
Experienced builders advise building a bathhouse from beams, since this material is cheaper and it is much easier to build walls from it. In addition, timber construction works well without a bulky foundation.
The timber structure looks simple, but is easy to assemble
If you opt for rounded logs, you may be severely disappointed: a log structure takes a long time to settle, which is why it will not be possible to put it into operation earlier than a year and a half after construction. Unlike a log bathhouse, a timber structure can be safely used six months after the completion of construction work.
When purchasing beams, you should use a tape measure to check the material for compliance with the specified dimensions, and then make sure that the building materials are of good quality. To do this you need to do the following:
- visually examine the material and remove defects from the prepared batch, that is, bars whose color is uneven or unnatural and indicates poor drying of the product;
- see if there are any building materials with large cracks, bluish spots, wormholes or other damage among the beams, and put them aside;
Every beam needs inspection
- pay attention to the edges of the material and make sure that the growth rings on both sides are exactly the same in size.
Interior decoration for a small bath
A bathhouse at the dacha with your own hands, drawings, must be sheathed from nutria with proven materials. Wooden lining, FBA spruce plywood, etc. are perfect for this. Avoid materials that may release toxins when exposed to heat.
Material like plastic lining is acceptable, however, the material is questionable. Before sheathing the ceiling in the bathhouse, you need to install a vapor barrier. Spilled floors are very suitable for frame baths. They combine quite harmoniously with the raised structure. Regular wood floors deteriorate very quickly in a constantly humid indoor environment.
A frame bathhouse is an excellent choice for the whole family; this bathhouse will provide a good time, and, unlike its expensive analogues, will save a considerable amount of money. For the interior, you can use metal stoves, which have very affordable prices, this will make it possible to save even more money. You can understand the above in more detail using the video for this article.
Common mistakes in construction
In order for the bath to turn out well, it is necessary to pay attention to the mistakes that are made by both professionals and amateurs:
- The tree must be dense coniferous species: spruce, pine.
- Incorrectly calculated foundation.
- The logs should be from 20 to 25 cm. Too thin will only be suitable for a rustic “temporary shed” and will lead to heat loss.
- To preserve heat, it is necessary to use moisture-resistant wood in finishing; Alder, poplar or aspen can handle this.
Due attention should be paid to the bricks for the stove. Firstly, it must be red fireproof
Secondly, solid ones cannot be used hollow ones. An error is considered to be a window that is too large or small. For a bath it should be at least 50*50.
What to build warm, neat walls from
The time-honored material for the Russian bath is rounded logs. Warm, reliable, solid. If you promptly treat the lower crowns with an antiseptic and monitor the condition of the gaps between the logs, such a construction will survive your grandchildren. However, there are other materials for bath walls.
Sauna made of rounded logsProfiled timber. It turns out elegant, but using timber is associated with some problems. It can “lead” under the influence of rain, it can crack. Brick
Like wood, brick does not require external finishing, but has higher thermal conductivity, so special attention will have to be paid to the insulation of such walls. Foam blocks. The most affordable and lightweight material
A bathhouse made of foam blocks is erected in record time, but cannot boast of external aesthetics and will force you to fork out for finishing. For lathing under the insulation, you will need a frame made of a plasterboard profile.
What is the difference between Finnish and Russian?
The Finnish sauna uses heat-reflecting screens that create a “thermos” effect in the steam room. They are corrugated metal or crumpled foil with a shiny surface.
It is enough to install screens under the wall cladding of the heater furnace. There are also a few additional differences:
- The Finnish sauna is often dry. The heat will be evenly distributed throughout the body, warming painful areas and joints.
- In the bathhouse, due to high humidity, the temperature can reach 65 degrees. In this case, even the internal organs will warm up.
Before starting design, it is advisable to consult a doctor. Not every person today can afford to visit a Russian bathhouse.
Ventilation in the bath
There are two types:
- natural;
- forced.
Two windows will serve as a natural one. Fresh cold air will enter through one window, and heated moist air will exit through the second.
Forced - these are built-in wall fans that are powered by electricity and provide constant air circulation indoors. They don't cost much.
A modern alternative is automatic ventilation systems. Using the control panel, the required level of humidity and temperature in the room is set. They are more expensive, but much more convenient and efficient to use.
The recommended range of air renewal in the bathhouse is 2-3 times per hour. Ventilation is installed not only in the steam room, but also in other rooms. This is especially true for the shower room, where there is high humidity.
You can do the construction of a small frame bathhouse with your own hands, but it is better to undertake the construction of a massive structure made of bricks or blocks if you have experience in masonry
When choosing materials for a bathhouse, it is important to take into account the style of the house and yard itself, because the finished structure must fit harmoniously into the architecture of the site and be combined with other buildings
Finishing facilities
For exterior finishing, plastering and painting would be an excellent option. For plastering, a solution of cement and sand is prepared in a ratio of 1:4.
The walls are plastered twice and then rubbed down. After the plaster has completely dried, acrylic paint is applied to its surface. The choice of colors depends on your taste preferences.
When starting interior decoration, it is necessary, first of all, to insulate the walls. At intervals of 50 centimeters, beams are fixed to the walls. Next, insulation is placed in the gaps.
A vapor barrier membrane or foil is attached to the insulation. Foil is often used as such a membrane, and indeed recommended. The sheathing is attached on top of the foil. The facing material is fixed to it.
Wood is most often used as a facing material for a bathhouse. For long-term use, the wood must be treated with water-repellent impregnation.
More information about insulation
Cheap modifications cannot be called useless; a budget DIY sauna will be quite warm and airtight with such materials
When choosing a specific manufacturer, you need to pay attention to permission to use such a component for buildings of this type.
Among environmentally friendly thermal insulation solutions, it is worth noting basal wool and penofol. The properties of both materials have proven themselves quite well, and the price will be affordable for every average family.
Thanks to convenient rolls and a wide selection of product thicknesses, you can easily choose the right option at an affordable price.
Construction of a bathhouse from boards step by step
The wooden steam room is distinguished not only by its affordable price, but also by its ease of construction. To cope with the task you need to strictly follow the instructions:
1. Build a foundation - columnar or strip (at the owner’s choice). The foundation is waterproofed using mastic or roofing felt;
2. Place a strapping beam on the foundation. Make a base frame from boards (i.e. the floor) using the herringbone technology, which involves an end connection.
3. Insulate the floor according to the following scheme: lay out the subfloor from an unedged board, put insulation on it (if it is penoizol). If mineral wool is used, it is placed according to the “film-insulation-film” principle;
4. Cover the floor with a screed, build a slope to drain liquid under the steam room and washing area, lay a pourable finishing floor on top and treat it with an antiseptic;
5. Lay out the external and interior walls according to the frame scheme - put together according to the existing design and cover with a protective substance. The inside walls of the bathhouse are lined with clapboard;
6. Carry out cladding and other work on heat, steam and waterproofing. Foil taped with metallic tape is suitable as a vapor barrier in a steam room. For waterproofing, a membrane or perforated polyethylene film is used;
7. Lay the roof with slings over a lightweight structure (the same boards are used as during the construction of the bathhouse itself), carry out insulation work and cover it with roofing material (such as corrugated sheeting);
8. Make a deck ceiling under the finished roof - place the boards on the framing beams and insulate them with ecowool on top.
Frame construction
There are many options for constructing bath walls. We will use the simplest and fastest - frame. For its construction we will need the following materials:
- wooden blocks (5x5 cm);
- boards (minimum thickness – 2.5 cm);
- foil/film for waterproofing;
- thermal insulation.
Frame mini bath: the simplest and fastest construction option
According to a previously prepared project, a frame of beams is assembled. The inside is lined with boards. You can use ordinary screws or anchors as fasteners. Don't forget about heat and waterproofing. The first thing we install is a material that does not allow heat from the bathhouse to pass out. For this purpose, you can use expanded clay, sawdust or mineral wool (rarely used). Bitumen mastic is suitable for creating a waterproofing layer. The final stage of wall construction is the internal board covering (not mandatory, but a desirable element).
All that's left to do is build the roof. First, we prepare the rafter system and mount it on the frame. Then we begin laying the roof: metal tiles, slate, etc. will do. Don't forget about the chimney - you need to leave a free opening on the roof for it.
To complete the appearance of the bathhouse, lining or a block house is used as a protective and at the same time decorative element. Lining is the most common option for finishing the external frame of a bathhouse. This material is cheap, practical and durable. In addition, it is a fairly successful imitation of a wooden beam. The block house is similar in appearance to the lining, but differs in a more presentable appearance and quality of wood.
A mini bathhouse sheathed externally in wood will delight with its aesthetic appearance
Examples of country baths
In photo No. 1 we see a simple bathhouse, reminiscent of Diogenes’ barrel. You can only take a steam bath in it. You won't be able to wash yourself here because there is no sewage system in the building. However, if desired, it is not difficult to do. To do this, you need to install a standard shower tray in the corner of the bathhouse and lead the drain pipe into the septic tank.
Photo No. 1 Build such a “barrel sauna” at your dacha and steam to your heart’s content
An important advantage of this design is its low weight, allowing it to be placed on a plank terrace. The construction of the simplest bathhouse from the container category is shown in photo No. 2
The construction of the simplest bathhouse from the container category is shown in photo No. 2.
Photo No. 2 Option for a container country bath
It consists of one steam room. For washing, the owner needs to attach a canopy with a summer shower or add a sewerage system to the room, and the stove - a tank for heating water.
Photo No. 3
Improvising on the theme of a barrel-shaped bath, let's turn our attention to cellular polycarbonate. You can quickly and easily assemble an original design from it
In order for it to retain heat well, you will need two large sheets of this material and a frame made of metal or wooden blocks. A mineral wool insulation 10 cm thick is laid between them.
Photo No. 4
The ends of the building can be made from boards, stuffed onto an insulated wooden frame. Place such a bathhouse anywhere: at your dacha, on a polar ice floe or on the top of Everest and you will always be comfortable in its steam room (photo No. 5).
Photo No. 5 Simple barrel-shaped bathhouse
A small Russian bathhouse, made from scraps of timber, can be installed on oak posts. We see an example of such a structure in photograph No. 6.
Photo No. 6 Oak posts are an excellent support for a small wooden bathhouse
Larger structures require their own foundation. There are three possible options here:
- Rubble concrete tape.
- Brick columns.
- Piles made of asbestos cement pipes.
Do not forget that the type of foundation affects the choice of material and wall design. Pile and columnar foundations are used to install a wooden frame, as well as for bathhouses made of timber or logs (photos No. 7 and No. 8).
Photo No. 7 Bathhouse made of SIP panels on screw piles
Photo No. 8 Brick columns - the best option for timber, log and frame structures
The “tape” of rubble concrete is suitable for any walls (made of gas silicate blocks, logs and frames).
Photo No. 9
A cheap, reliable and simple version of a bathhouse is obtained using a technology called “clay mortar”. For such a structure you will need little: a truck of firewood, a cart of straw and a dump truck of clay (photo No. 10).
Photo No. 10
The best shape for a wood burning structure is round. It eliminates the need to reinforce masonry corners and looks aesthetically pleasing and original.
By borrowing from birds the technology of building nests from branches and clay, you can build such a simple and warm bathhouse (photo No. 11).
Photo No. 11 Wicker frame coated with clay - “know-how” of an inexpensive bathhouse design
Project #4 - steam room on a light frame made from improvised materials
The beams for the bathhouse frame can even be made from collected firewood, if desired.
The main thing is to choose one without defects and knots, and be sure to treat it with an antiseptic. So, let’s build a budget sauna from improvised means:
- Step 1. We make beams for the frame, process and dry.
- Step 2. We build a pile-rubble foundation: we dig up a meter of soil with a drill, put thick pine stakes there and make a backfill of concrete and stones on top. Next, fill the pillars to the top.
- Step 4. Assembling the frame.
- Step 5. We dig a hole for the drain, insert a barrel with broken bricks and crushed stone inside, and put a drain there. This is a non-insulated summer option, but for winter you can lay insulation or a heating cable.
- Step 6. We insulate the floor and ceiling, put a film on top of the insulation. We use Finnish foil paper for saunas on the walls and ceiling.
- Step 7. Put on the oven. Take it with a register, because... you need to heat the water for washing - so as not to purchase a boiler separately. So, the Vulcan stove has proven itself well - it’s inexpensive and heats well.
Such a bathhouse lasts a surprisingly long time, the steam makes you happy, and spending time in it is a pleasure. And you can always find disadvantages.
What will be the cost of an affordable frame bath?
If you are primarily interested in the price and speed of construction with appropriate quality, then you still need to choose a bathhouse made using frame technology. When ordering a building of this design from a specialized company, the nodal system allows you to install a bathhouse on the site in just 1-3 days.
Turnkey frame bathhouse 2 meters by 4 meters without external processing of wooden structures
At the production site, wall panels are pre-fabricated and delivered ready-made for subsequent assembly on site. Such a bathhouse does not require an expensive foundation; it is installed on concrete blocks measuring 20x20x40.
Under good weather conditions, assembly on site actually takes place within one to three days. The advantage is that such a bath does not require shrinkage, so it can be used immediately after installation.
Turnkey frame bathhouse 2 meters by 4 meters with external finishing
In order to get a little bearing on the price, let’s take, as an example, a frame bathhouse with the following characteristics (photos and diagrams are given above!):
- Size: 2 m by 4 m (terrace not provided);
- Insulation: 50mm thick stone wool (all walls and ceiling) with a wind-moisture-proof membrane;
- Interior and exterior finishing: lining;
- Roofing: galvanized corrugated sheeting,
- Doors: 2 pcs. (wood), plus an attic hatch;
- Windows: 2 pcs. (deaf);
- Floor: board 40x150, unrebated;
- Foundation: block, 9 blocks (blocks 20x20x40);
- Rafter system: timber 50x100 and 50x50mm;
- Lathing: board 25x150;
- Shelves in the steam room.
The cost of a bathhouse of this design, almost turnkey (including delivery of materials and installation) is 110-130 thousand rubles.
However, the price does not include the stove, external treatment of wooden structures of the building and electrical
It would not be amiss to give another approximate calculation of the cost (price) of materials for the independent construction of a frame-type bathhouse.
Features and advantages of small bath buildings
For a summer house you can build a small wooden bathhouse
The most popular material for building a bathhouse is wood, which is highly flammable. This imposes a number of fire safety restrictions: the need for treatment with fire retardant compounds, strict adherence to fire safety standards when installing the stove and chimney. When building any bathhouse, even when using non-combustible material, it is necessary to maintain the regulated distance to neighboring objects located on the site.
Construction of a steam room is a fairly simple and quick procedure. In most cases, small baths for a summer residence do not require a solid foundation and the purchase of a large volume of raw materials. In addition, in the process you can use up timber and other available materials left over from the construction of other structures.
The raw materials used should not have rotten areas, wormholes, cracks or other signs of destruction.
Other advantages include:
- no need to spend money on a massive foundation;
- speed of construction;
- small area occupied by the object, which is especially advantageous if the site is small;
- the ability to fit the building into different types of landscapes due to its compactness.