The need for an extension arises among owners for various reasons. Changed circumstances dictate their own rules and force us to take them for granted.
However, coping with the current task is not easy. To build an extension with your own hands, you must have at least minimal construction skills.
One-story houses
Photo: trendir.com
The project of the original small cottage in the photo was implemented on the island of Terschelling in the Netherlands. This is a summer house made of cedar beams, designed for relaxation by the sea. It stands out against the backdrop of the dunes with its very unexpected design. This type of architecture is a good example of how the topography of the landscape determines the height of the house - the sea should be visible from the attic windows.
The small summer house in the photo is a wooden architecture originally from Austria. The building is “dressed” in wood from the tip of the roof to the ground - the plank cladding of the facades extends to the roof and looks very unusual. The cottage's gable roof has no overhangs and perfectly completes its minimalist appearance.
Photo: Chartered Architect
The most common version of a wooden prefabricated house in Scandinavian countries is a cubic-shaped cottage with a gable roof and a glazed pediment.
Photo: trendir
Two slopes with different slopes are a rational solution for a small frame house with an attic, allowing you to illuminate the attic space and organize a full-fledged bedroom or children's room there.
Photo: Painted Rusted Roofing
The gable seam roof is organically woven into the design of private houses, bathhouses and gazebos in country style, sheathed with colorful rustic boards.
Another example of architectural harmony is a one-story log house under a colorful seam roof with fragmentary rusting, made in production conditions.
See also: Cottage interior design: 60 photos in a modern style
"Fundamental" questions
If the foundation was not originally shared with the house, then make it as strong as the scale of the extension requires. For a massive stone veranda, it is better to build a strip one, for a log house - a columnar one, and for a frame - a perimeter beam.
Here is a good example of how to build a strong columnar foundation:
- Step 1. We dig holes in the ground up to 1 meter deep.
- Step 2. Next, we install pipes from rolled roofing felt in them.
- Step 3. We pour sand inside these pipes and then pour concrete. In the process, we pat these pipes on the sides, thereby replacing the work of the vibrator.
- Step 4. Now we install the ceiling. To do this you will need 6 bars 50x150 and 8 bars 50x100 two meters each. We make the ceilings along the contour, and in the middle of the beams, with a span between the boards of about 1 meter.
- Step 5. Now we lay down the floor boards, for which it is most convenient to use a regular inch.
Here's what it looks like in practice:
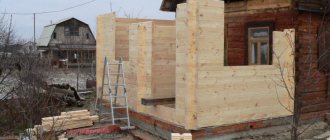
With walls it’s even easier; such a veranda is built no more difficult than any other extension:
Two-story houses
The versatility of a gable roof lies in the fact that it can complement the architecture of a house built from any material: wood, brick or concrete.
Photo: proroofingsv.com
For private estates that include several buildings, multi-level gable roofs with the same slope are best suited.
The gable roof of the main house can be combined with the hip roof of an extension - porch, veranda, terrace or garage.
See also: Hip roof: 65 photos of private houses
Roofing pie device
The veranda belongs to the category of extensions that are built for such purposes as evening tea, barbecue, billiard room and setting up a summer kitchen in a country house. All this suggests that on the veranda there will always be water vapor from food and people, and, due to its closed nature, the temperature will always be higher than outside. This means that you cannot build a simple roof without the necessary insulation from vapors and condensation.
On the other hand, for pitched roofs the arsenal of roofing coatings is much more open, while for the same flat roofs one often has to limit oneself to rolled materials or liquid rubber. Therefore, if your veranda is open, like a terrace, and you don’t plan to cover it with the same as on the house, seriously consider modern rolled materials - these perfectly protect the interior space of the veranda from precipitation and do not require additional roofing layers:
In other cases, you will need reliable waterproofing. This film or the membrane does not allow moisture to enter the insulation, and we will definitely use insulation in the gable roof of the veranda.
Next, under the waterproofing film, if you look from top to bottom, the insulation itself should be located. This can be mineral wool, glass wool, ecowool and any other modern insulation. The main thing is only to protect it from rain moisture and melt water, for which a film or membrane is spread over it:
But on the ceiling side of the veranda, the insulation also needs to be protected from moisture. We are talking about a vapor barrier film. This insulation is designed to withstand, as far as possible, invisible water vapor rising upward, which can cause a lot of damage to the insulation.
As a vapor barrier, we do not recommend that you use unusual inexpensive films that protect the insulation by only 50-70%, but modern dense membranes. You don’t want to completely go through the rotten gable roof of the veranda in 2-3 years, do you?
In addition, if according to the plan there will be something like tea and coffee on your veranda, then take a waterproofing film that is anti-condensation and must be breathable, with special drainage holes. Such, if moisture does penetrate into the insulation (and it will, for example, a high-quality vapor barrier film can withstand water vapor up to 90%, and yet there is this 10% that penetrates the vapor barrier), then it will bring these droplets out through itself, where they will be picked up by the ventilation flow.
This is how we smoothly approached the issue of gable roof ventilation:
Ultra-modern gable roofs
Photo: homedit.com
The architecture of the one-story house is created on a contrasting combination of ultra-modern metal frame with continuous glazing and reed roofing. Metal beams seem to grow from under the thatched roof and symbolize the symbiosis of progress and tradition.
Photo: contemporist
The originality of the modern cottage in the photo lies in the absence of any covering on the gable roof. Both the walls and the roof of the house are cast from monolithic concrete. An interesting detail of the architectural concept is the square and rectangular slots in the roof slopes, which provide access to light onto the balconies and terraces.
Photo: Daily TV-Shows for You
Rusty metal in the design of the house in the photo is not a sign of neglect of the building, but a stylish trend of recent years that came to us from America.
The cascading roof project in the photo was created on the basis of a gable structure and implemented using artificially aged corrugated sheeting.
See also: Beautiful interiors of cottages: 60 photos inside country houses
Installation of the rafter system
The rafter system is the basis of the entire roof and the strength of the future structure depends on its configuration. According to the principle of structure and nature of application, the support frame differs into two opposite types: hanging and layered .
- Hanging rafters . They rest only on the outer walls of the building, and the triangle-shaped truss remains in a hanging position. Used for lightweight structures.
- Layered rafters . They rely both on the external walls of the building and on the internal ones. The rafter legs “lean” onto the racks, and they, in turn, rest on the bed, which lies on the internal main wall. Used for large and heavy structures.
The functionality and stability of the entire roof depends on the correct choice of the rafter system.
Attaching the rafters to the mauerlat
In private construction, rafters are attached to the mauerlat in the two most common ways: rigid and sliding connections.
In brick and stone houses, the rafters are fastened to the mauerlat in a rigid way using a mortise and non-mortise connection . In the first case, tight fixation is achieved by creating a gash in the rafter leg, and in the second, a support beam is used that supports the beam from the reverse side. These are the most labor-intensive, reliable and universal fastening methods - applicable for both layered and hanging rafter systems.
Slip joints are most often used in timber structures because they exhibit the greatest shrinkage. The rafters are fastened using “floating” fasteners - slides, which avoids deformation of the roof when the position of the upper row of beams changes.
Fastening the rafters in the ridge
Today, only three main methods of installing the upper part of the rafters are actively used:
- Overlapping . In this case, half the cross-section of the adjacent elements is cut out to create a groove and a hole is prepared for the bolted connection.
- Butt . The upper ends of the beam are cut to obtain an ideal vertical joint, and metal plates or wooden linings (notches) are used as fastening elements.
- For a run . The rafter legs are laid close to each other and connected directly to the support beam.
How to strengthen the system?
In order to strengthen the roof frame with a span length exceeding 6 m, it is necessary to reduce the free span of the rafters. This can be achieved by creating an additional horizontal support beam (beam) on the internal load-bearing wall and installing inclined posts.
To add additional rigidity and to reduce the expansion of the rafters, tie-downs are used. They are attached to both sides of the rafter beam using self-tapping screws, nails, and studs at a distance of approximately 1/4 from the top.
To prevent the created frame from being torn off by a strong gust of wind, the rafters themselves can also be attached to load-bearing walls. To do this, twists based on two wires with a diameter of 4 mm are used - they are wrapped around the legs, and then connected from the inside and fixed with an anchor at a distance of 4-5 rows before the cut.
If you are not sure about the reliability of your structure, we recommend not only reading the step-by-step instructions for building a house roof with your own hands, but also contacting specialized specialists.
broken roofs
Broken gable roofs are usually used if the cottage design includes a balcony, porch or veranda. In this case, one of the slopes turns into a flatter plane above the extension.
Broken roofs of bright colors are colorfully combined with the rustic style of houses built from logs and timber.
Types of extensions
There are several types of design. Let's look at each of them.
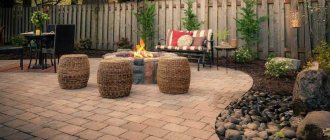
Open (summer)
The main details of such a summer extension include:
- Foundation elements (pillars or piles).
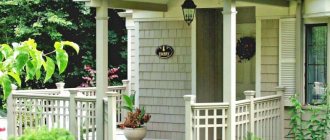
- Terrace posts (often made of wood) with a diameter of 10*10 cm. They are fixed at a distance of 1.3 to 2 m from each other.
- Boards for flooring. They are taken planed or tongue-and-groove.
- Corrugated sheets, regular ondulin, and metal tiles are suitable for roofing materials.
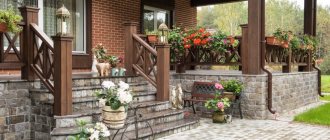
- Additional finishing elements. This should include wooden carved balusters and railings.
Photo: wooden terrace overlooking the sea
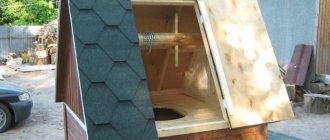
Closed
Full living space. It is being built as a harmonious extension of the house under a common roof. It can be made completely glazed with panoramic windows or with partially glass windows and solid walls. The choice is at the discretion of the owners, depending on the interior design idea.
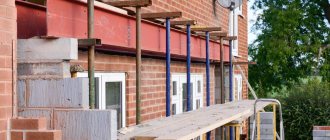
Photo: insulated brick extension with glazing
Building materials you will need:
- Frame elements in the form of pillars. They are assembled from boards measuring 4*10 cm. Jib beams 4*10 cm.
- For exterior decoration, siding or lining is used, less often - plastic.
- Entrance door with a set of fittings and double-glazed windows according to the number of window openings.
- Material for roofing (slate, tiles, corrugated sheets).
- Bricks are used for the walls, and aerated concrete blocks are used to quickly build walls.
- Mortar for masonry and foundation. Mixed by hand or ordered ready-made, fed from a concrete mixer.
- The floor is laid from tongue-and-groove boards with a thickness of 3.5 cm.
Closed extensions can be warm or cold.
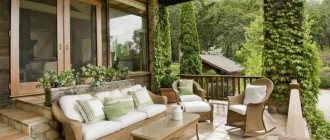
Warm
The attached structure can be used all year round. Therefore, it will be necessary to pour a reliable foundation with thermal and waterproofing. The installation of screw piles will speed up the work.
Photo: veranda under the same roof as the house
If the house is made of fresh logs, then an additional room must be built from wood. It will take more time to lay brick walls, but such a room will last many times longer.
At the request of the owners, part of the walls is replaced with panoramic windows.
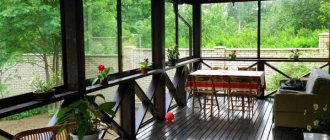
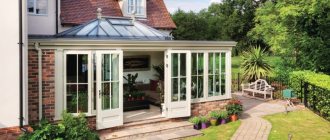
Cold
This is a covered room with windows, access to the street, but without heating. Used as a greenhouse in warm weather, a dining room, or an extension of the porch.
Photo: veranda with panoramic glazing
It can serve as a boiler room on the ground floor if a large house is heated with wood or coal. In this case, fireproof materials (gas silicate, brick) are used for construction and cladding.
Refers to complex structures.
Not suitable for a one-story house. Suitable for large cottages.
The most popular option is a balcony. It can be open, fenced with forged metal bars, or glazed. Colored stained glass looks beautiful. The lower part is covered with siding and plastic.
Gable hip roof
A gable hip roof is also called a half-hip roof - it has truncated slopes and is optimally suited for regions with difficult weather conditions: heavy snowfalls, showers, winds.
An important feature of half-hip and hip roofs is the complex design of the rafter system, which significantly increases the cost of building a private house, especially if it has a complex layout, as well as extensions, bay windows, and balconies.
Step-by-step guide to laying the foundation for an extension
Let's look at the example of a columnar base of an additional structure:
- Preparation and cleaning of the area followed by leveling.
- The marking is done according to calculations and plan.
- Wells are being prepared whose depth is below the soil freezing threshold.
- Sand is placed at the bottom of the hole, filled with water and compacted to form a cushion.
- Installing reinforcement or fiberglass to strengthen the base 20 cm above the soil level.
- The formwork of the above-ground part is constructed.
- Pouring with concrete mortar. Climatic conditions and soil characteristics of a given region affect its composition and must be included in the project.
- Waterproofing is done in four layers alternately: bitumen, roofing felt, etc. in the same way.
The finished base should be moistened with water or sprinkled with wet sawdust. The moistening process begins 8-10 hours after pouring. This procedure will help the base dry evenly without cracks, and should be continued for 3 days.
Houses with an attic
Projects of houses with an attic are distinguished by the practicality of the planning solution - in such a cottage the entire internal space, including the attic space, is used to the maximum.
Window openings can be cut into the plane of the attic roof or be designed in the form of dormer birdhouse windows, as in the photo.
Photo: metalroofingsalesinc.com
The house with attics in the photo attracts attention with its modern appearance with echoes of rustic style. Here attics are provided not only above the first floor of the main building, but also above the garage.
See also: Beautiful mansard roofs of private houses: photos, design examples
Insulation and vapor barrier
Using high-quality roof insulation can significantly reduce heat losses and save on space heating. Companies provide a large variety of materials with their own advantages and disadvantages. However, the most common are still:
- mineral wool;
- basalt wool;
- glass wool;
- Styrofoam.
Installation is carried out from the inside into the space between the rafters. The sheets should be cut so that their width exceeds the distance between the rafters by 15-30 mm, which allows for more reliable fixation of the material, that is, “in space.” When insulating in several layers, the materials should be placed in a checkerboard pattern to prevent the appearance of a cold bridge.
In order to protect the insulation from evaporating moisture from the lower floors of the building and, accordingly, prevent the appearance of fungus, it is imperative to lay a vapor barrier film from the inside. Its fastening should be done using a stapler, maintaining an overlap of 4-6 cm, and the seams must be sealed with sealing tape.
Insulation is especially important if you have an attic space.
Roofs from Ondulin
The gable roof made of green Ondulin looks harmoniously paired with wooden facades made of timber.
The two-story house with an attic in the photo was built in Colombia, and its modern architecture, which has some ethnic motifs, is successfully emphasized by a gable roof made of brown Ondulin.
The house on stilts in Malaysia is an interesting example of how traditional island architecture is combined with modern roofing such as Ondulin. The soft green facades of the cottage subtly harmonize with the darker, green color of the gable roof.
The architecture of a spacious two-story mansion in the Philippines received a second wind thanks to the renovation of the roof using terracotta-red Ondulin.
Ondulin is widely used in the construction of children's playgrounds - gable roofs for slides and children's houses can be easily assembled with your own hands.
A gable roof made of green Ondulin will add a cheerful accent to the design of a playhouse for children built on a country plot.
See also: Ondulin: Beautiful photos of house roofs, types of roofs
Drainage system
The roof drainage system allows you to reduce the negative impact of moisture on the lower elements of the roof, maintain a beautiful appearance of the building facade, and also helps remove water from the base. For novice craftsmen, the main difficulty at this stage of work is the installation of gutter brackets.
If the roofing material has not been installed, the fasteners are fixed on the lower rows of the sheathing. This option is the most optimal because, if necessary, the bracket leg can be bent to achieve the correct angle of inclination of the gutter.
If the roofing has already been installed, then you can try installing fasteners on the side surface of the rafters or using a front board. In the first option, brackets are used on a leg bent 90° for more convenient mounting. In the second, a board is installed along the perimeter of the roof at the edge of the eaves, onto which a profile with hooks is attached. At the same time, in order to avoid water overflow in the gutter, the hooks must be secured so that the roof covers the drain by half or a third of its width.
It should also be noted that the latter method is only possible if the rafter legs have a sufficiently large cross-sectional size, for example, 120×50 or 150×50 mm.
Roofing from Onduvilla
Onduvilla's uneven terracotta-brown shade, combined with its characteristic relief, perfectly imitates the appearance of a classic ceramic tile roof.
The natural brown tones of Onduvilla perfectly set off the white facades and subtly combine with wild stone masonry, such as slate.
You can always choose a color for the roof from Onduvilla that will harmonize with the brick walls, be it beige, peach, terracotta or red brick.
The house in the photo with a gable multi-level roof made of sandy yellow Onduvilla subtly harmonizes with the surrounding nature: both due to the configuration and due to the tint palette.
Roofing from Onduvilla can emphasize the originality of Russian architecture - in the photo you see a log house with a green gable roof, which seems to merge with the natural environment.
The gable roof from Onduvilla became the logical conclusion for the design of a timber mansion built in the UK.
The photo shows a cottage community in China, where all the houses are covered with Onduvilla.
A wooden house made of pine beams, white joinery and a brown gable roof is a traditional combination for a country cottage in a country style. In this trio, an important place is given to roofing from Onduvilla under classic tiles.
The gable roof from Onduvilla became a successful addition to the painted facades of a summer house built in Korea.
See also: Beautiful brick cottages: 60 photo ideas
Materials
A shed roof for an extension is the most affordable solution to protect the structure from precipitation and wind, thanks to the low price of the materials used. Everything you need for DIY construction can be found in the most ordinary hardware store. The assembly of this structure requires less materials than the construction of gable, hip and hip roofs. To begin installation work, you need to purchase:
- Lumber. To build a truss frame for a pitched roof, you need to purchase coniferous timber with a section of 100x100 mm or 150x150 mm, an edged board of 50x150 mm, an unedged board of 40x150 mm, slats of 25x50 mm. Buy high-quality lumber without cracks and chips, the moisture content of which is 15-16%. To protect wood elements from moisture penetration, mold or rot, treatment is carried out with deep-penetrating antiseptic preparations.
- Roofing material. The construction market provides a wide selection of roofing materials in different price categories. The cheapest option is slate, roofing felt or corrugated sheeting; it will cost 200-300 rubles per 1 square meter of coverage. More modern and attractive materials (metal tiles, ondulin, soft tiles) cost 2-3 times more. For the roofs of extensions used as greenhouses and greenhouses, transparent polycarbonate is used, which has high thermal insulation qualities and transmits light.
Permissible slope slope for popular roofing materials
Weight of popular roofing materials - Waterproofing material. To protect the wood of the rafter frame from moisture penetration, a waterproofing material is used. For this purpose, roofing material, polyethylene film or diffuse membrane are used. Experienced craftsmen prefer the most inexpensive option - roofing felt, which is stronger than analogues.
- Fastening elements. To install a roof, many different fasteners are required: metal corners, overlays, nails, anchor bolts and roofing screws with rubber press washers. To calculate how many screws are required, multiply the area of the slope by 10, since this is how many fasteners are needed to fix 1 square meter of coverage.
Important! To make the extension look like part of the architectural ensemble of the house, and not spoil the appearance, choose the same roofing material for the roof. If you still want to save money, choose a coating of the same color. In order not to build a complex rafter frame, give preference to lightweight materials (corrugated sheets, ondulin, roofing felt).
Metal roofs
Photo: nikas-trade.com
Metal tiles almost reliably imitate their ceramic counterpart, but at the same time they are much cheaper. Gable roofs made of metal tiles not only look catchy, but also harmonize perfectly with brick and log facades.
The photo shows a private house with a roof of an interesting two-level design, implemented using metal tile roofing.
Many color and texture varieties of metal tiles allow you to choose a roof for any architectural style: classic, modern or rustic.
Waterproofing
It is laid directly on the rafter legs using small nails or a construction stapler. Work should be carried out from the bottom up, overlapping the bottom layer by 10-15 cm to prevent moisture from getting under the material. The tension should be strong enough to prevent moisture from accumulating on the surface - the sagging should not exceed 2 cm. However, you should not force the material too much, as it is easily damaged.
It is recommended to use a high-quality vapor diffusion membrane, which, in addition to moisture protection, provides vapor exchange and helps create a favorable under-roof microclimate. The seams must be treated with sealing tape.
Corrugated roofs
A gable roof made of corrugated sheets is a budget-friendly type of metal decking that has good wear resistance and a fairly beautiful surroundings.
Photo: cortenroofing.com
In the architecture of modern cottages, corrugated sheeting is often used not only as roofing, but also for cladding facades.
A fashionable trend in individual construction is gable roofs made of rustic corrugated sheets, which are subject to artificial rusting and aging.
Counter-lattice and sheathing
The counter-lattice is designed to ensure air circulation inside the roofing “pie” and more reliable fixation of the waterproofing material. To create it, bars with a cross section of 25/30 mm with a pitch equal to the pitch of the rafters are usually used.
High-quality roof ventilation helps protect the structure from mold, fungi and destruction.
The sheathing is laid on top of the counter-lattice and is used as a frame for the roof elements. Depending on the type of roofing material, two types of lathing are used: solid and sparse . The first is used for soft and roll roofs, the second for metal and slate roofs.
For classic sheathing with gaps, use boards with a cross-section of 100x25 mm and a length sufficient to cover two steps of the rafter legs. The pitch of the lathing is determined by the type of covering material - the heavier the material, the faster the step.
It is also recommended to reinforce the outermost elements of the sheathing along the lines of the ridge and cornice with an additional board.
Green gable roofs
Photo: Greenroofs.com
A green gable roof is an excellent option for a wooden country house - this way the building completely merges with the natural environment and looks simply charming.
Photo: mychickentracktor.com
In addition to its aesthetic appearance, a green roof has many advantages - it protects the house from cold and heat, purifies the air, and absorbs extraneous sounds. On such a roof you can create a small vegetable garden or flower bed.
In Iceland, on the Faroe Islands, houses are traditionally covered with a layer of peat and a green lawn is grown, and to make the grass easier to cut, the roof slopes are made quite flat.
Even the two-story office buildings in Tórshavn, the capital of the Faroe Islands, boast green roofs that set off the reddish-brown facades in an original way.
Photo: The Family Adventure Project
Black houses under gable green roofs - this architecture has a deep meaning. In the Arctic Circle, where the sun is a rare visitor, black walls absorb thermal energy as much as possible, and the soil cover on the roof helps retain heat inside the building.
See also: Beautiful roofs of private houses: photos, design options, views
Determine the height to which you want to raise the wall
To ensure the found slope angle of the pitched roof, it is necessary to raise one of the walls higher. How much higher we will find out by remembering the formulas for calculating a right triangle. Using them we also find the length of the rafter legs.
How to calculate the parameters of a pitched roof
When calculating, do not forget that the length is obtained without taking into account overhangs, and they are needed to protect the walls of the house from precipitation. The minimum overhang is 20 cm. But with such a small protrusion beyond the building, the pitched roof looks short. Therefore, overhangs of at least 60 cm are usually made on one-story buildings. On two-story ones they can be up to 120 cm. In this case, the width of the overhang is determined based on aesthetic considerations - the roof should look harmonious.
Example of a drawing in ScratchUp
The easiest way to determine how much the roof needs to be extended is in design programs that allow you to draw the building to scale and “play” with the overhangs. Everything should be displayed in 3 dimensions (the most popular program is ScratchUp). Twist through different sizes of overhangs, decide which one looks better (if there is no project), and then order/make rafters.