Woodsheds or woodsheds are devices for storing firewood until it is used. Almost always they are located in the open air (less often in sheds and other utility rooms), and they always have a canopy and enclosing structures. A wood shed is more often called a shed for firewood adjacent to the wall of a residential building, while a wood shed is a separate storage facility.
Types of woodsheds
Each dacha owner uses it in his own way. Some people come there occasionally, while others need it only in the summer season. There are also those for whom a dacha is actually a house in which they live all year round. Regardless, everyone needs firewood. They act as raw materials for heating or are used only to light a fireplace or bathhouse. In any case, they need to be stored somewhere. There is a special woodcutter or woodcutter for this purpose. The spelling of the words is slightly different, but they have the same meaning - a woodshed. This outbuilding comes in several types.
- Canopy . This is the simplest type of design. It consists of several supports (at least four), over which a roof is made. A floor is constructed below, raised above the ground. If this building is supposed to store a large amount of firewood, it is divided into sections. Thanks to this approach, the firewood will not be mixed. Partitions are sometimes made between sections.
A small shed can be used as a firewood storage Source nehomesdeaf.org
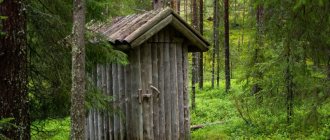
- Extension to the wall of the house . This design is also not complicated, since it already has one part - the wall of the country house. In such an outdoor woodshed, a roof and floor are required. Side walls - optional. This type should not be used if the house is made of wood. The building will be too fire hazardous. In addition, firewood often contains wood-eating beetles. They can switch to absorbing the wood from which the wall of the house is made. If the choice is made in favor of an extension, it is necessary to treat the wall surface with a special preparation that protects against pests. And in the design of the woodshed, provide a sheet of metal that will separate it from the house.
A small extension to the house is finished with the same material as the entire building Source pinterest.com
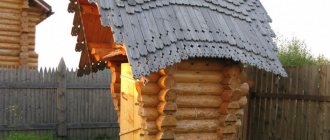
- Separate design . This is the most solid structure that is built if you need to store a large amount of firewood. It can be made in different versions. The simplest one is several pillars with an overhanging roof. Jumpers are installed between them, and a floor is made below. To ensure that snow falls as little as possible in winter, sheets of plywood are attached to the back and sides. Most often, the walls of such a structure are made of boards, between which gaps of 2 to 10 cm in size must be left. Thanks to this, the firewood is ventilated. The front wall is usually absent. Although sometimes there is one, and a door is made in it. In fact, it turns out to be a full-fledged shed, which is designed for storing logs.
A large wood firebox is suitable if you need to prepare firewood for winter heating of the house Source anglicanaorlu.org
How to fold a round woodpile
You have probably seen firewood stacked in a cylindrical woodpile (or photo) many times. They look good, and, more importantly, the wood dries quickly in them.
Round woodpiles for drying firewood
Everything is very simple, but without knowing the secret it’s impossible to do it well. Below is a photo report that shows step by step how to fold a round log of chopped wood.
First, dig in and securely fasten a pole about 2 meters high. Place small diameter logs around. The distance to the center is twice the length of the firewood (if the firewood is 40 cm, the distance to the center is about 80 cm).
The first step of laying a round woodpile
Next, lay out the chopped firewood. One end of them rests on the laid out logs, the other lies on the ground. Lay it so that everything lies almost end to end along the inner edge (with small gaps). There will be gaps on the outside. It's not scary - the second row will fit in them.
Lay out the first row
Place the second row on top of the first. Trying to fill in the gaps as much as possible. We begin to stack the firewood tightly around the pole while standing.
Continuation: lay out the second row, start filling the middle
We continue to stack the firewood in a circle and fill the middle
As soon as you notice that the outer edge of the firewood has begun to slope down, lay out a row in a circle that will raise it. Then you continue to stack the firewood in the same way: in a circle until half the height of the firewood (20 cm), then fill the middle. The second row in the middle is not just placed, but stuck into the cracks. Try to insert the pieces of wood tightly.
Continuation of the process
View of the woodpile from above
Woodpile installation completed
The same process can be repeated with more wood. Lay two or even three rows in a circle. The sizes of such firewood loggers can be enormous. The photo gallery shows an example of how to fold a large woodpile.
Since you have started arranging your site, perhaps you will find this article useful on how to make paths (from the same wood, for example) or benches.
What are they built from?
The best material for building a woodshed in a country house is wood. These can be boards and beams, logs and wood boards. Sometimes plywood is also used. Constructions made from this material look aesthetically pleasing, blending harmoniously into the country landscape. However, it must be borne in mind that before use, the wood must be treated with agents that reduce the degree of flammability and susceptibility to harmful insects.
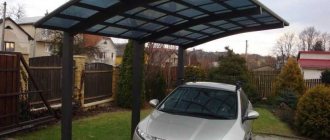
Also, firewood storage can be made of bricks or blocks. This is the most reliable, durable option, but it is expensive. Polycarbonate will cost much less, but it cannot be used to make a closed structure, since there will be no ventilation in it. However, polycarbonate can be used to make the roof or side walls. It is easy to install and transmits light well.
Metal frame with polycarbonate canopy Source oz90.ru
Another material for the construction of woodsheds is metal. It makes the structure durable, but it must be protected from corrosion. In addition, it is best to make only the frame from metal, and large sheets are not suitable for such buildings. They get too hot in the sun, which will create the effect of an oven inside the woodshed. This is not suitable for storing firewood. But you can make an excellent forged structure from metal, which will not only be useful, but also decorate your summer cottage.
Forged woodshed attached to the wall of the house Source kovka-na-zakaz.ru
In general, when constructing devices for storing firewood, combined options are often used. For example, if the firewood shed is made of wood, the roof is covered with slate. Or the frame is made of metal and the roof is made of polycarbonate. You can choose different combinations of materials.
See also: Contacts of companies that specialize in the construction of small architectural forms.
Shed size
It's very individual. If a family needs a large supply of fuel, then the woodshed should not be small. The key criterion is the area of the heated area. For example, the average consumption of logs for a house of 100 m2 is 4-5 cubic meters. Plus 2 more cubes for a fireplace or bath. For such a volume of firewood, the floor area is 2x4 m, and the height is 2 m. But even here we must not forget about the gaps under and above the ceiling (from 10 cm).
Mariska
“I have a woodshed with a height of 2.7 and a width of 2.0 m. It is “filled with logs” 40 cm long in 3-4 rows and this amount of firewood is enough for us to burn the “winter part” (50 m2) of the house 2-3 times a day. week from October to May."
Criterias of choice
In order to understand which type of woodshed to build in your dacha, you need to know the selection criteria. The most important thing, of course, is the availability of funds. After all, you may want a forged metal structure, but there simply isn’t enough money for it. But these are things that go without saying. The main thing is to decide on four points :
- dimensions of the building;
- location ;
- view;
- materials for manufacturing.
As for the size, you need to take into account how much time is spent at the dacha. If these are rare raids to cook barbecue, you need a very small building. If in the summer the dacha is fully used and there is a fireplace that is lit in the evenings, it is worth thinking about more storage. And it is better to provide decent dimensions if the dacha is heated with wood all winter. But storage is always necessary so that the firewood does not get wet in the rain.
To avoid problems with heating in winter, woodsheds should be equipped so that the firewood does not fall under precipitation Source www.tproekt.com
When the size has already been determined, you need to figure out where to put the woodshed. To do this, you need to consider the following:
- If the firewood is intended only for the barbecue , it is advisable that the storage facility be located next to it. However, you should not place the woodshed too close so that sparks do not fly.
- If there is a vegetable garden and green spaces in general on the dacha plot, the building should not shade them . This is especially true for large structures. In this case, the option of adding an extension to the house is a good option.
- There should be a good approach , but it should not be located in the very center of the site. It will look inharmonious.
- The soil on which the firewood will be located should not be fertile .
- If the dacha plot has an uneven surface, firewood storage should not be placed in lowlands . Moisture accumulates there, which has an unfavorable effect on the firewood. In addition, during or immediately after rain it will be difficult to reach the structure.
- Since firewood will be transported, you need to choose the most accessible location . Otherwise, you will have to move the logs for a long time.
- It is desirable that the surface is flat . Otherwise, you will have to carry out additional work to level it.
The firewood is placed on a prepared pallet, which should rise above the ground Source roomester.ru
Now you need to choose the type of structure in which the firewood will be stored. In this case, the two previous criteria are taken into account, that is, size and location. But there are some general points. For example, you can make a woodshed with open walls, that is, one frame, floor and roof. Or you can make two walls on the sides or add a third wall at the back. If the storage is small, there is a gazebo-type design option. And if, on the contrary, it is a massive structure, you can build a full-fledged barn with a door. When the type is determined, the last thing is decided - the choice of material. This could be a metal woodshed or any other options.
Wooden woodshed built into the foot of a small hill Source houzz.com
Requirements for firewood storage
Wood is a material that is capricious in terms of storage conditions. Excess moisture leads to dampness and rapid deterioration of firewood. Heating a bathhouse or lighting a stove like this is not the most pleasant experience.
To protect the woodshed from moisture, it is arranged:
- in enclosed spaces with good ventilation - a barn, dressing room, garage or fireplace room in the house;
- outdoors - under a canopy, on a terrace, in a gazebo, an extension or a summer kitchen.
Firewood should not come into contact with wet ground or tall grass, so outdoors it is placed on waterproof bases. The wall-mounted design requires protection from precipitation flowing from the roof of the house directly onto the woodpile.
Fences are made with a large number of slots for air circulation. Do not allow wood to come into prolonged contact with heated surfaces, for example, a sauna firebox or a stove. It is prohibited to store fuel in boiler rooms or other places where sparks from open fire may occur. In addition to optimal storage conditions, it is necessary that the structure be durable, stable and ensure compact stacking of firewood.
By the way, recently subscribers described how to make a rabbitry with your own hands and detailed instructions for creating a chicken coop for 10-20 chickens, it will be very interesting to read.
Construction stages
Any construction has clear stages. If the storage facility is built from wood, they are as follows:
- The site is marked . The places where the corner and intermediate logs will be installed are outlined. Holes are dug under them, the depth of which should reach half a meter. Their size is at least 30 x 30 cm. About 15 cm of crushed stone is poured into them.
- The wood is treated with an antiseptic . The lower part of the supports is wrapped in roofing felt. The logs are placed in holes and concreted. They must go to a depth of at least a quarter of a meter. Thanks to this, the structure will be strong and will not collapse even from the strongest gusts of wind.
- To make the roof slope , the rear logs are set 3 cm higher than those in front.
- The base for the floor is installed - transverse joists. They are attached to supporting logs so that they do not touch the ground. There should be a distance of at least 10 cm from the ground. In this case, there will be good ventilation and the wood will not come into contact with moisture.
- Boards are laid on top of the logs . Leave 2 cm between them to allow ventilation.
- The woodshed at the dacha on three sides with boards , between which there is a gap of up to 15 cm.
- The supporting roof system is being built : rafters, transverse logs.
- The woodshed is covered with slate , roofing felt or other material.
- For aesthetics, the wood is painted or varnished.
Large wooden firewood shed with a door, varnished Source eurolain.ru
In principle, these stages are characteristic of construction not only from wood. In any case, markings are first made, the base, floor, then walls and roof are made. If a door is provided, it is installed last.
We build a woodshed with our own hands
In this section we will describe how the woodshed was built near the house. The construction and painting took three days “without stress.” It was built like a frame barn.
Materials
Internal dimensions are 1.8 * 3.7 m, the height of the front pillars is 2.45 m, the rear pillars are 2.2 m. The total volume is 13 cubic meters, but a maximum of two cars are loaded - no more than 10 cubic meters. Moreover, they leave paths inside - to make it easier to take, they don’t load it to the top - not everyone in the family is tall. If the load is full, it is advisable to install additional jibs so that the weight of the firewood does not squeeze out the sheathing boards.
The frame is made of timber - racks, the lower and upper trim are made of 100*100 mm timber. The timber is pre-impregnated with used machine oil. Everything was assembled end-to-end, with nails, and reinforced with corners on screws. For the supports, standard small foundation blocks 200*200*600 mm were purchased in the amount of 6 pieces.
Construction step by step
The beginning of the construction of the firewood shed is standard - leveling the site and aligning the blocks. If the soils are viscous (clay loams, black soil), it is better to make a sand and gravel bed. Dig small pits 20-25 cm deep, pour and compact crushed stone, and place blocks on top.
Leveling the site is the first step in building a woodshed
Two layers of roofing material are laid on the blocks, timber is laid on top. The harness does not connect with the support in any way. If you wish, you can drill holes and hammer in the studs.
First, we laid out the beams of the lower frame and fastened them with nails (80*3 mm). Then screws were screwed into the corners. The next step is installing the racks. They are placed in the corners and above the intermediate support. The rear pillars are shorter than the front ones - so that there is a roof slope. They, too, were first placed vertically (checked with a plumb line), and hammered in obliquely with nails - two on each side. Then they secured them with corners on screws - two per rack. If there are concerns, you can also screw/nail the plates to each rack from the outside.
The racks are attached to the bottom frame beam
The entrance to the woodshed is located in the center. Because of this, the racks are offset and not installed above the support block. As a result, there is a slight deflection. To eliminate it, place four blocks in the first row, taking into account that the middle will be occupied by the entrance. Especially if there are doors: they place a significant load on the racks, so they need support.
In front, the intermediate posts are not above the support
Once the posts are in place, it's time to assemble the roof. First I nailed the side boards at the top. They are installed on the same level with the upper trim of the rear, shorter part (seen in the photo below). They and the rafters are made of 50*100 mm boards, the lathing is made of 30*100 mm boards.
Corrugated sheets were used as roofing material, and the boards were laid flat under it. The roof overhangs are about 35 cm, the side projections are about the same. The size of the roof was selected so that there were no scraps: exactly four sheets were used.
Roofing felt is laid under the corrugated sheet to prevent condensation from dripping onto the firewood: the costs are small, but there are benefits. Ruberoid began to be laid from below, laid along the overhang. The next one goes in 10 cm. It turns out that the drop that fell at the top simply flows down without getting inside.
This is what a woodshed with a finished roof looks like
The next step is to lay the floor. It was made from a 100*40 mm board. They were laid with gaps of 2-3 cm. Next, the wall sheathing was nailed. It was decided to make a gap equal to the width of the board (100 mm). The boards were nailed down, two on each edge. The structure turned out to be well ventilated, however, with a side wind it gets heavily clogged with snow.
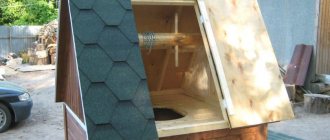
Do-it-yourself woodcutter is almost ready
The last stage is painting. Here, take any composition for wood with bio-protective properties: so that the bugs eat less. In this version it is painted with BioTex, rosewood color.
Ready for use after painting
That's it, the woodshed is built. You can repeat this: nothing complicated. The complexity of carpentry work is at the level of high school students. The most complex components are the roof, but it is made very simply.
See the video for another construction option.
You can read about how and what to decorate the site in this article.
Peculiarities
When building a log storage facility, there are important nuances that must be observed:
- the roof must be sloped so that water can drain;
- it is necessary that it protrudes beyond the structure by 25 cm or more;
- in any type of woodshed there must be a wooden floor installed at a distance from the ground;
- wood or iron used in construction are treated with special compounds.
If these points are met, the structure will be durable, and the firewood will be well protected from moisture.
Firewood cover
A woodpile stacked outdoors in the open air can be protected from precipitation with a simple device. You will need a piece of durable tarpaulin, such as a used awning or canopy, strong nylon thread, scissors and a sewing machine.
Before starting work, you need to test the machine and adjust the thread tension and seam width. Optimal seam quality is achieved with maximum tension on the upper thread and minimum tension on the lower bobbin thread.
Manufacturing algorithm:
- Fold the tarpaulin in half and sew a zig-zag stitch at equal intervals. Take the width of the pockets so that you can put a log inside (about 30 cm). Make bartacks at the ends of the seams.
- If it is difficult to stitch the outer layered edges, it is better to cut them off and remove the grommets with a flat-head screwdriver.
- A piece of tarpaulin that is too wide can be cut in half. Don't forget to tack the seams.
- Insert as even, identical logs into the pockets as possible, and cover the stack with a tarpaulin.
Drovniks can become a reflection of an entire art
The firewood shed can be designed as a small fairy-tale house Source remboo.ru
Bee honeycombs for storing firewood Source pinterest.com
Round small firewood box for storing firewood for the barbecue Source pinterest.es
An artist will always find time for art, even when stacking firewood in the woodshed Source pinterest.com
The funny man's head will entertain you, but you should take care to protect it from the rain Source classifieds24.ru
A “fallen tree” from a distance looks almost like a real one Source pinterest.com
Firewood can be stacked according to Feng Shui Source roomester.ru
A firewood box with a window can become a partition in a recreation area Source lavozdenadie.com
Firebox built into the barbecue area Source pinterest.com
Foundation for woodshed
In some cases, when storing firewood, a foundation is made of blocks, beams or piles. This is done to ensure free air circulation and also reduce the likelihood of flooding during rain or melting snow.
Most often, the foundation is replaced with ventilated plank flooring. In order to withstand the weight of the wood located above, sometimes reaching several hundred kilograms, it must be strong enough.
Anchors, holders, corners, staples and brackets are used to attach the frame to the foundation. There are 2 installation methods possible:
- Embedded fasteners are installed during the concreting or masonry process, and then the posts are fixed to them.
- If the foundation is made of blocks or timber, the frame is secured in place using metal anchors or screws.
Beam support, galvanized, 140 x 76 x 100 x 2 mm, opened Metalist 1198462
Galvanized or stainless steel hardware is used. When connecting wood to concrete, a waterproofing gasket is required.
Work on the sheathing
If you are faced with the question of how to make a simple woodshed with your own hands, then at the next stage you should cover the walls with bars or boards. The first ones are packed in increments of up to 30 mm. There should be a small gap between the boards so you can provide natural ventilation.
Wooden parts are treated with antiseptic and fire-resistant impregnation. The top is covered with colored polyurethane varnish or paint. This way you can ensure an attractive appearance of the structure and extend its service life.
Drovnitsa
There are many options for a firewood rack as a storage facility for the consumable batch of fuel for a fireplace (on the left in the figure), but it is not functional. To carry firewood, you still need a separate firewood basket, and when you transfer it to the firewood stand, debris spills onto the floor.
Metal firewood racks
There are also a lot of combined firewood racks (other items in the figure) of varying capacity, complexity, convenience and cost. But in this series, a firewood box made from an old barrel or small barrel deserves special attention, see fig.:
Diagram of a firewood maker made from a keg or small barrel
- Original, stylish, fits perfectly into most interiors with a stove or fireplace.
- Made from a barrel, it holds a load of firewood for the daily heating of the stove.
- A firewood box made from a barrel/barrel can be dragged through the snow like a sled by attaching a strap to it, but an armful/bundle of firewood weighs a lot.
If you find a suitable blank for a firewood box from a barrel/barrel, then keep in mind that you cannot knock out both bottoms at once or the remaining one will crumble. You must first fasten the hoops with rivets with self-tapping screws, having first drilled holes in the hoops for them. You need to drill with a drill with a drill depth limiter, but a construction drill is not suitable, its probe is too far to the side. The drill tucked into the tool must be tightly wrapped in thin sheet metal (for example, from a coffee can), so that its tip protrudes from the wrapper to the thickness of the hoop, and the wrapper must be wrapped with thin wire. You need to screw the tin stop onto the drill AGAINST the direction of its rotation so that it does not turn around when the wrapper rests against the metal of the hoop.
Photo gallery
The listed methods of stacking firewood differ in the amount of material used, placement, and labor costs. Today, woodshedders have another interesting function - decorative. They have interesting architectural forms, laid out in the form of a spiral, balls, animals, paintings and outbuildings.
To build such compositions, you need to have a lot of experience, since decorative stacking of firewood in a woodpile requires patience and artistic taste. You can see unusual woodpile options in our photo gallery.
Making doors
Not all woodsheds have doors. If you install this structural element, then your structure will be called a woodshed. Note that sometimes woodsheds do not even have a front wall. This ensures more active ventilation. The front wall and doors are necessary if the area is turbulent, but in general the owners can do without them.
Before you make the doors to the woodshed with your own hands, you must take into account that they load the racks. Therefore, additional support will be required. If you have chosen this particular solution, you will need to make a door frame. For this, pine wood (50 mm thick) is used. The box is made flush with the wall. If suitable boards are not available, you can connect two together.
For the threshold, a product thinner than 20 mm is used. The box parts are cut out with the following dimensions: 155 x 90 cm. All manufactured parts are processed with an electric plane and connected to each other with furniture dowels. You should drill holes in the end parts of the board and add wood glue to them. Next, dowels are inserted there. Holes are drilled in other parts, where glue should also be dropped, connecting the workpieces together. At this stage, it is important to pay special attention to the markings so that the walls are in the same plane after joining.
Before making a woodshed with your own hands, it is recommended to look at photos of such structures. After familiarizing yourself with them, you can understand what the frame and door look like. At the next stage, the details of the box are set aside to begin making the door itself. 40mm boards are used for the canvas. Their length should be 152.5 cm. On one side, the wood is processed with an electric planer. To prevent the boards from spreading, they should be connected to each other with furniture dowels and glue.
The internal width of the box is 80 cm. This distance must be measured by subtracting 0.5 cm, which will go towards the gap. The excess is cut off with a circular saw. The dimensions of the door should be 152.5 x 79.5 cm. Before making a woodshed with your own hands, examples of such buildings should be studied. As mentioned above, usually such structures do not even have a front wall. If you decide to add a door to the storage space for solid fuel, then it is important to eliminate problems associated with its impressive weight.
To prevent the canvas from falling apart during finishing work, it should be strengthened. For this, three planks are prepared. These elements are attached with self-tapping screws in the place where the cuts were not processed with a plane. The first and third strips can be attached straight, and the second one can be made diagonally.