When arranging a country house, cottage, or yard, it is worth setting aside a place to park your car. To protect your car from rain, snow, hail and other negative weather conditions, you can build a carport made of wood. This design is obtained quite quickly, but at the same time it is fully capable of ensuring safety for the iron horse. But before you do it, it’s worth considering important features. The strength and durability of the structure depends on knowledge of all the nuances and details.
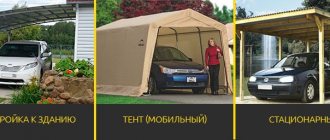
Types of awnings
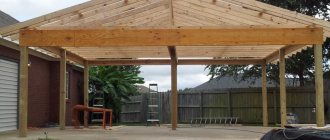
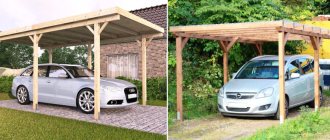
A carport made of wood is a convenient design that has many positive features. First of all, it protects the car from negative weather conditions. At the same time, it is quite easy to install; for this reason, even a novice home craftsman can make a canopy.
Carports made of wood can be of several types:
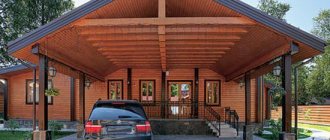
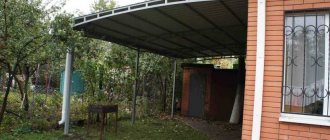
- Extension. One side of the structure rests on the wall of a house, garage or other building. A carport attached to a house can be made of wood; it can also be combined with metal products, brick, and slate.
- Stationary canopy. This is a stand-alone design. Its roof rests on free-standing posts. It can be made not only of wood, it can be supplemented with red brick, slate, and polycarbonate.
- Sheds with roofs without slope. This is the simplest design; many summer residents make it without much difficulty. But this type of canopy has some disadvantages - a large amount of debris, various branches, and dry leaves often accumulate on the roof surface. All this must be removed with your own hands, otherwise the roof can quickly rot.
- Structures with a complex roof shape. Making a carport of this type with your own hands is quite difficult; for this you need to be able to read drawings. It is not possible to build this structure without a diagram, because many mistakes can be made during the work process.
Description of species
To build a wooden structure yourself, you need to decide on the type of structure. Depending on the location, canopies are divided into:
- free-standing;
- integrated into the overall architectural ensemble.
According to their purpose they can be divided into:
- decorative - they are created to decorate a site, to create a place to relax;
- canopies-shelters - for protection from bad weather, storage of things, etc.
The form is:
- single slope type;
- gable type;
- curly.
Canopy materials
To make a high-quality and durable carport made of wood with your own hands, you need to thoroughly prepare. To begin with, it is worth understanding what parts the structure consists of, usually it includes the frame and roof. The frame is considered the most responsible, so it must be made of durable materials.
The frame for a car canopy can be made from the following material options:
- Tree. This material is considered the most affordable and practical. It is easy to process and does not require the use of special tools for cutting and joining. But still, compared to other types of bases, wood is not durable. Over time, the material cracks, deteriorates, rots, and becomes covered with fungus. And to increase its service life, special care must be taken. Additionally, it is recommended to treat the wood surface with impregnations, varnishes, and protective paints;
- Steel profile pipe. In order to make a carport with your own hands from metal, you need a welding machine. But the finished structure can last for several decades. However, steel profile pipes have negative aspects - the creation of curved trusses is required for the roofing of wide canopies. If this is not done, the entire structure may collapse under the weight of snow;
- Combined options. Often, when constructing a carport, two types of material are used at once. Structures with a steel frame and cladding made of wooden slats look beautiful and stylish. They combine durability and stylish design.
The second part of the carport is the roof. It can be made from profile sheet or polycarbonate material. Both materials have good strength characteristics, durability and beautiful appearance. Polycarbonate carports will look more airy and aesthetically pleasing.
For areas where large hail frequently occurs, it is recommended to use more expensive types of polycarbonate that have a protective film.
General requirements for structures
The main list of rules that must be taken into account during construction: Racks are created from the strongest materials that can withstand heavy loads: logs DM from 10 to 20 centimeters. The length of the cross-sectional sides is from 9 to 15 centimeters. All materials must be treated with bactericidal impregnation. It is also necessary to treat with fire retardants. Typically, cellular polycarbonate is used to create a canopy. Advantages of the material:
- affordable price;
- weighs little;
- flexible:
- you can arrange an arched canopy;
- transparent;
- variety of color solutions.
Flaw:
- high coefficient of thermal expansion.
The dimensional characteristics of the canopy are determined by its purpose: the minimum permissible height for the roof is 2 m, 2.5 m is also suitable.
Features of site preparation
It is recommended to start building a carport with organizing the space. Its size depends on the number of machines that will be installed. If a small structure is planned, then the area of the space should accommodate one standard car.
When preparing a place for a canopy, you should follow these recommendations:
- Once a construction site has been selected, all grass, turf, and weeds must be cut off.
- The top part of the soil must be removed to a depth of 12-15 cm. Instead, a cushion of sand and crushed stone is laid, and compaction is additionally used.
- During preparation, a small slope is constructed along the way. And if the area is low-lying, then drainage pipes are laid around the perimeter.
- After making the canopy, any parking covering can be laid on the sand bed.
If the canopy is being built for a heavy SUV, then a reinforced concrete screed is suitable for the base.
To do this, plank formwork is created, it needs to be filled to the middle with concrete, then a reinforced mesh is laid out and the concrete mixture is added. Complete hardening of the site occurs within a month.
How to lay out the site
The easiest and most inexpensive way to make a platform under a carport is to fill it with gravel. To do this, you will need to remove the turf, dig the curb, pour crushed stone and compact it well using tamping platforms. Then the platform will be rigid and ruts will not form.
Compacted crushed stone is a good surface for car parking
Recently, areas paved with paving slabs or paving stones have become more popular. They have a more attractive appearance, but their construction is more expensive. Preparation begins the same way: first the soil is removed. But the pit is made about 20-25 cm deep. Crushed stone is poured onto the bottom, which is also compacted well. Then it is advisable to spread a layer of geotextile on the crushed stone. This is a non-woven material that will prevent the sand that will be poured on top from spilling out and mixing with gravel. Geotextiles also redistribute the load more evenly, preventing the base from sagging under the wheels of a car (it is used in road construction). A layer of sand is already poured onto it, which is also compacted. Paving slabs, clinker bricks, cobblestones and other similar materials are laid in the sand.
Paving slabs
In the middle in terms of costs is a concrete site. The base is also prepared from compacted crushed stone. Wooden planks are laid on it at a distance of 1 m, which are set level or with a slight slope to drain water. These strips serve as beacons during pouring, and then play the role of damping joints, compensating for the thermal expansion of concrete. With this structure, cracks appear less frequently.
A metal mesh made of galvanized wire is laid between the slats. You can, of course, use stainless steel, but it is expensive. The thickness of the wire is 3-4 mm, the cell is 10*10 cm. The top is filled with concrete not lower than M 250. The thickness of the concrete layer is 7-10 cm.
Concrete platform under a carport
Optimal dimensions of the building
In order for carports made of wood to be convenient and comfortable, it is important to consider the dimensions; this must be done at the preparation stage, which will allow you to avoid serious problems in the future.
To accommodate a standard car with a length of about 4 meters, a canopy with dimensions of 5x2.5 meters will be convenient. But for parking large cars, for example a minivan or jeep, it is worth making a structure with dimensions of at least 6.5 x 2.5 meters.
Be sure to remember to maintain the required height level. The design should not only include the car itself, but its cargo on the roof rack. But still, you should not make the canopy too high, this may negatively affect its service life. The fact is that in strong winds there is a possibility of the roof and its supporting elements becoming loose, and this often leads to the destruction of the entire structure.
If you are planning carports made of wood with a height of more than 3 meters, then it is important to think in advance about the arrangement of cross beams with a strong base. They should cover the entire perimeter of the structure, this will greatly increase the strength of the wooden canopy. The roof should be gable; this roofing option is considered the most durable and stable.
Tips and tricks
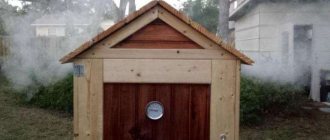
When installing a wooden structure with a carport, the roof gables can be completely enclosed. Typically, this solution is resorted to in order to avoid rainwater from pouring through the pediment. Everything seems to be correct, but in this case, under a wooden canopy, when the car engine is running, a cloud of exhaust gases forms.
Over time, the under-roof surface begins to rust, and wooden parts may crack due to condensation. To avoid stagnation, you can install vents and ventilation windows on the roof.
Preparatory stage
To make a strong and durable carport attached to a house or a permanent structure, it is important to prepare the necessary tools and materials. First of all, we mark out the place for the future structure - for this, a machine is installed in the construction area, and places for supporting elements are outlined. It is imperative to check that the supporting elements do not interfere with installing the car and opening the doors.
Usually the roof is longer than the canopy. It can extend beyond its perimeter by 50-100 cm, this is considered normal.
If polycarbonate carports are planned, the drawings will be the most important stage of construction. They are the ones who will help you do everything correctly and exactly according to the given parameters. You can make the drawings yourself or find them ready-made on the Internet.
When making it yourself, it is recommended to draw the planned structure on paper in several projections - from above and from the side. It is important to correctly calculate the required amount of material. It is advisable to add 10%, this will eliminate the need to purchase additional funds for construction.
For the frame, you can use a steel pipe or a wooden beam, it all depends on the desire of the owner. But if a tree is chosen, it will definitely need to be treated with special protective coatings.
Carports are manufactured using tools and materials from the following list:
- saw;
- hammer;
- if a canopy is being built from timber, then nails will be needed to secure it;
- to work with a profiled pipe you will need a grinder and a welding machine;
- level;
- plumb line;
- pegs;
- twine, any strong rope or cord will do;
- shovel;
- clamps;
- Self-tapping screws will be needed for fixing and fastening;
- screwdriver
Design
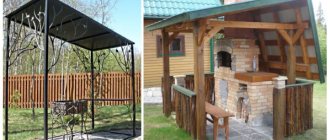
Quite often a situation arises when it is necessary to erect a canopy or canopy over a building. This is a fairly simple design that any man can build without any special skills. There are many ideas for this building on the Internet. However, it is necessary to take into account certain design features to ensure that the canopy lasts a long time and properly.
It is necessary to take into account the climatic features of the area in which the canopy is created, the location of the building on the cardinal points, and the features of the foundation of the building
It is equally important to choose the right coating
The easiest way to create a canopy or canopy is when it is attached to an already finished building. The more thoughtful the project, the easier it is to make all kinds of calculations of the required material. There are no small details in construction, and absolutely everything needs to be taken into account. If the calculations are made correctly, and the project includes a variety of little things, then construction will proceed with ease.
How to make an attached lean-to carport out of wood
As was said earlier, in order to make a strong and durable lean-to carport from wood, the drawings must be completed in advance. Without them, the construction process will not be entirely correct; they will help you perform preliminary calculations and allow you to purchase the required amount of materials.
When everything is prepared, you can begin the process of constructing a lean-to structure:
- The first step is to install the supporting elements. For them, it is worth using durable timber; preference should be given to options made of pine. Its cross-section should be 7.5-16 cm.
- Holes are drilled in the ground into which the support pillars will be installed. The depth of the holes should be 4.5-6.5 cm.
- The installation of the pillars must be correct. To do this, you can use a level or a rail; it is placed on top of the supporting products. Usually there is a space left between the hole and the pillar; it is recommended to fill it with cement mortar, this will strengthen the pillars and they will stand firmly in place.
- At the next stage, the rafter system is assembled. It is made of timber with dimensions of 15x5 cm. The distance between the rafters should be no more than 100-120 cm. On one side they are attached to the surface of the wall, and on the other side to the supporting elements. For fastening you will need screws and metal corners;
- Edged boards are nailed perpendicular to the rafters; they should have a thickness of about 4 cm and a width of 15 cm. The result is small cells with dimensions of 90x90 cm;
- Roofing sheets are laid along the grid. For a pitched roof, slate or metal covering options are suitable.
- To extend the service life of the canopy, the wood must be treated with special protective mixtures - impregnation, varnish, paint.
Standard solution
Small, “ladies’” cars require the construction of a simple structure, their dimensions are small, it is quite possible to set aside a “nook” next to the entrance to the yard. For jeeps and vans, the local area will have to be greatly reduced and a significant piece of land will have to be allocated for the car. And if there are two or more cars in a family, then the minimum you need to count on is a canopy size of 6 m2.
Canopies are:
- In close connection with one side of the house . In this case, the canopy is attached to the wall, and the opposite part is placed on 2-3 supports.
- Freestanding . They are located anywhere in the garden, the main thing that the gardener must remember is unhindered entry and the ability to maneuver both on the site and on the road near the house.
The easiest way is to make a pitched roof; it does not require a lot of additional elements or fasteners. In addition, it is cheaper than a gable roof.
Making a stationary canopy
Many people often wonder how to make a polycarbonate carport with a free-standing structure? Of course, it is not necessary to use polycarbonate; slate or metal roofing will do, but that’s not the point at all. To make a durable and strong structure, it is important to stock up on the necessary materials in advance.
To make a small carport for one car you will need the following consumables:
- three bags of cement;
- sand;
- crushed stone with a fine structure;
- wooden supports – 6 pieces;
- board with dimensions 3x10x60 cm - 15 pieces;
- timber 5×15×60 cm – 13 pieces;
- roofing materials, polycarbonate, slate, metal tiles are suitable. A total of 18 square meters will be required;
- bolts with dimensions 10x150 - 10 pieces;
- self-tapping screws for metal tiles – 160 pieces;
- 500 grams of nails.
To make a canopy with a gable roof, it is important to do everything correctly in accordance with the diagram. Drawings in this matter will be necessary; they will help calculate all the elements and allow you to mark the location of all important parts of the structure.
Before making polycarbonate carports with your own hands, prepare all the necessary lumber. They are treated with antiseptic coatings, which will protect them from insects, mold and fungal infections.
Using a tape measure, the length and width of the building are marked. Next, a rope or cord is pulled along which the supporting elements will be installed. One support column is installed in each corner of the future canopy, and they are also placed along the walls every 3 meters. Then holes are dug in the ground to a depth of half a meter.
The process of erecting a canopy
After this, the following actions are performed:
- Posts are lowered into holes in the ground. It is important to make sure that they are evenly deepened; for this, use a level or a long board.
- Once the outer support elements are completely aligned, you can begin installing the intermediate pillars.
- It is necessary to ensure that residues from precipitation and debris do not linger on the roof surface. To do this, you need to make a height difference between the left and right sides of the building. The size of the difference must be at least 4.5 cm.
- To ensure that the supports stand firmly in place, they are filled with cement mortar. It is prepared from crushed stone, cement and sand in a ratio of 4:2:1.
- A beam with dimensions of 5x15x60 cm is placed on top of the racks. The distance between each beam should be about 80 cm.
- Beams are also laid across the canopy. In the center and along the edges, the beams are fastened using 3x10x60 cm boards and nails.
- Finally the roof is installed. It is attached using self-tapping screws, and all excess is cut off.
It is imperative to build a drainage system through which water from rain and snow will drain from the roof.
To do this, ebb tides are installed around the perimeter of the canopy. Special fastenings for gutters are fixed along the entire length; they are screwed with self-tapping screws. And then ebbs are mounted into the fasteners.
Building carports is not an easy task, but it can be done. The main thing is that everything needs to be thought out and prepared in advance, and calculated correctly. Drawings or diagrams that you can make yourself or use ready-made options will help in this matter. Preliminary calculations will help you purchase the required amount of material, and will also allow you to do everything as needed.