When for some reason there is a need to increase the living space of a country house, the easiest and most economical way to do this is to build a frame extension to the house. Its main advantage is that it can be erected independently in a minimum amount of time and no serious skills in using carpentry tools are required.
In order for the building to turn out not only useful, but also beautiful, it is best to familiarize yourself in advance with how it should be built.
Options for extensions to the house
An extension is a general name for many buildings that are designed to expand the area of the house.
Some, for example, prefer to make a closed veranda as an extension to the house, while others prefer a different structure.
Each owner of private property must independently decide which type of extension is suitable for him and can be designed on the site:
- porch - can have any shape and be equipped with a staircase with railings. Typically, a porch is built from blocks or wooden beams;
- canopy - the simplicity of this design allows installation in any part of the cottage. At the same time, the canopy performs an important protective function. Because it protects the house from rain, snow and sun rays;
- garage – some extensions to the house are used as a garage. This helps save some space on the site.
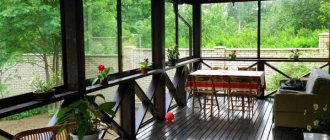
But often an extension to the house is equipped as a summer room for relaxing with the whole family. This is an excellent option both for houses located within the city and for country cottages.
Foundation
A correctly chosen foundation ensures the reliability of the entire building . When laying it, the materials, the planned load and the nature of the soil are taken into account. Sheds or light summer structures can do without a foundation.
There are several types of base: screw, monolithic, columnar, tape. Any base must be waterproofed.
Let's consider the last two options as the most common.
Tape
A massive building made of heavy materials requires a solid foundation. This is what a strip foundation is. It is a closed strip of various materials passing under the load-bearing walls of the housing.
Columnar
Great for a veranda . Supports are installed at the corners of the site. It can be a brick, a log, a metal profile. The holes dug under the posts are filled with sand, creating a cushion. The supports are fixed in the ground and filled with concrete. For complete hardening, 5-7 days are enough.
Legal subtleties
When becoming the owner of a private home, many people make a common mistake. Because they believe that they can change the layout depending on their own desires. This is true. But this statement is only half true.
It is imperative to provide a legislative basis for a new extension project to a wooden house. Indeed, in the future it may be necessary to demolish the building if it turns out that it was erected without obtaining permits.
To prevent this from happening, you must:
- send a notice of planned construction work to the local administration;
- wait for the administration's decision;
- in case of obtaining a construction permit, it is necessary to conduct soil studies and document the data obtained;
- assess the condition of the house, making sure to document it;
- obtain permission to build an extension from the fire department and utility services.
Remember that you must also include written permission from your neighbors along with the package of collected documents.
In their application, they must state that they have no claims regarding the start of construction work on the neighboring site.
Floor: wood or concrete
A concrete or wooden floor is installed on a strip foundation. The base on pillars is obviously designed for arranging a wooden floor. Let's look at both technologies.
- Concrete. Inside the foundation, soil is selected to a depth of 35 cm. A sand cushion is arranged and compacted well. Then you can fill it with crushed stone, but expanded clay is used to insulate the screed. A 20 cm layer is enough. A reinforcement grid is laid on top. Using a level, beacons are set, along which the cement screed is subsequently poured. Lay tiles or wooden flooring on top.
Arranging a wooden floor - The wooden floor is laid on floor beams, which are laid on the base on top of the waterproofing. The beam is connected to the foundation using through fasteners, anchors or self-tapping screws. In the corners they are connected with a straight lock and additionally fixed with corners. Next, the logs are installed, insulation is laid and the flooring is laid.
Advice. It is recommended to treat all wooden structures with an antiseptic.
Nuances regarding construction work
Once the home owner has completely resolved the legal issues, he will be able to begin organizing the process of building an extension. Of course, it is better to turn to professionals who can quickly complete the work without making any mistakes.
But if a person is interested in building an extension on his own, then this issue must be approached thoroughly.
You must first draw up a project, select building materials and decide what design the building will have.
After all, it should complement the main structure. Therefore, it is better to familiarize yourself with photo examples in advance.
The foundation is what your extension stands on.
In every sense, if you make a mistake in this place, the construction will not go further. If there are problems with the soil (for example, its instability), seismic instability of the surrounding area or flooding.
Even if some other ground work has recently been carried out near the construction site, do not ignore this fact, even it can lead to bad consequences.
Expansion joints and connecting the foundations of both buildings are necessary things. Without this, in any unfortunate event, your veranda will ''move'' away from you somewhere deeper.
Materials for building an extension
Even if a professional architect is developing the project, he will definitely take into account the wishes of the home owner. This also has some influence on the choice of building materials.
In addition, a lot depends on the financial capabilities of the owner. You can build an extension from different materials. And the cost of the project will therefore vary.
timber
Any type of timber can be used to build an extension. An extension to a house made of timber is an opportunity to save a lot, but at the same time build a durable structure.
An important advantage of the material is that it has excellent thermal insulation characteristics. This is an environmentally friendly raw material that has an attractive appearance.
Chipboard, OSB boards
You can only use moisture-resistant boards, which are excellent for frame buildings. A distinctive characteristic of the material is a high degree of noise insulation. Its price is affordable. And that's why it's a common option.
Brick
This material has excellent strength and is durable. However, this is not the cheapest option available. In addition, it is possible to build a brick extension only if a strong foundation is laid.
Foam blocks and aerated concrete blocks
Due to its affordable cost and high thermal insulation, the material is in great demand. And therefore, it is not surprising that an extension to a house made of foam blocks or aerated concrete blocks is currently actually a trend.
What material to choose for the walls of the extension?
When thinking about how to make an extension, you first need to think about what materials will be used for the walls. With panel or frame technology, as a rule, this is a sandwich:
- Wind protection, that is, external waterproofing film
- Stone wool or polystyrene foam placed between OSB sheets
- Vapor barrier membrane for internal protection
If you are interested in expensive methods, then you can do the masonry from any lightweight blocks. It can be foam or aerated concrete. When purchasing foam concrete blocks for a developer without any construction experience, it is worth considering that this material has its own characteristics:
Firstly, in almost 90% of cases, even walls made today from the most expensive foam concrete will in the future be covered with a large number of small cracks.
Secondly, all facades will need to be plastered using pre-selected compounds directly along the grid.
When choosing walls from various foamed concrete, it is worth paying attention to the fact that for any roofing materials, such as ceramic / slate tiles, they are all not strong enough. For this reason, the ideal option for covering a building is corrugated sheeting or ondulin.
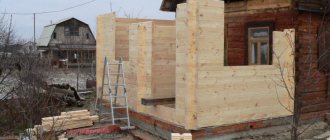
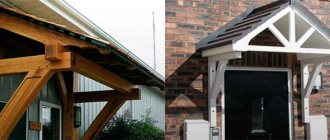
Frame extension
The installation process of this type of extension is simple. And that’s why this option is more popular. An important advantage is that the frame extension can be installed on a columnar or pile foundation.
In other words, its construction does not require a strong foundation, the installation costs of which can be quite high. This is possible due to the relatively light weight of the structure.
It is usually covered with slabs. But other options are also possible. It is only important to use materials that will not weigh it down too much. Because in this case there will be a need to think about strengthening the foundation.
Selecting the base
The veranda can be attached or built-in. If the second is planned at the stage of building a house, then a separate foundation will need to be built for the first. With a gap from the wall of about 40 mm. Otherwise, during shrinkage, the monolithic base will collapse due to the different weights of the veranda and the house. The seismicity of the soil and the weight of the future building are taken into account. A lightweight foundation built on soil prone to heaving will “lead” and the extension will move away from the house. Such a base is designed for light walls; shrinkage is inevitable under the weight of the brickwork.
Brick columnar foundation
Different materials are used for construction: concrete, brick, stone, piles made of wood, metal or concrete. It is important to choose the right depth and type of foundation for the extension:
- tape;
- slab;
- columnar;
- pile;
- pile-grillage.
In private construction, when constructing a base for a veranda, a columnar or strip structure is most often used. Let's take a closer look at the step-by-step instructions for arranging foundations.
Floor and walls
Even if the extension to the house is made of a frame and is lightweight, it must be strengthened with the help of floors and walls.
The floor in the extension can be made from ordinary pine beams, the cost of which is relatively low. A prerequisite is the treatment of all wooden elements with a special protective compound. With its help, it will be possible to increase the resistance of wood to the negative effects of external factors.
For a frame extension, panel walls can be erected. It is also possible to replace them with frame ones. They definitely need to be insulated. At the same time, it is necessary to insulate not only the internal, but also the external layers.
Step-by-step instruction
Foundation installation
Scheme of options for a columnar foundation for a frame
The first stage of construction is foundation work. Usually, a separate foundation is arranged for an extension, which must be connected to the base of the old house using special embedded reinforcement.
Strip foundation reinforcement scheme
Of course, the most preferable option is the common foundation laid at the stage of construction of the first house, however, few of our compatriots look that far, which, however, in everyday life is quite understandable and understandable. When laying a new foundation, it is necessary to ensure maximum identity not only in shape, but also in the depth of both structures.
Diagram of the floor arrangement of a frame house
If it is impossible to achieve full solidity, then a so-called expansion joint must be left between the two foundations so that when the soil moves in the spring, cracks do not form on the walls of the extension and at the very foundation.
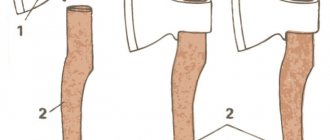
Installation of strapping beam
Strapping is the second stage of building an extension. The thickness of the frame walls is usually 20 cm. Living rooms are rarely placed in extensions, which makes it possible to reduce the wall thickness to 10 cm. Therefore, the diameter of the timber for piping and the cross-section of the vertical posts will also be 10 cm.
Installation of strapping beam
The figure below shows a possible installation diagram for the lower trim of the extension:
Frame installation
Frame installation
When assembling the frame, the greatest attention should be paid to fastening the racks. The figure below explains its features.
It is recommended to make the step between the vertical posts 60 cm, then there will be no difficulties when laying mineral insulation slabs. Accordingly, the distance between the floor joists and the rafters should also be taken as 60 cm.
Installation of the top trim and installation of floor beams
Installation of the upper trim and installation of floor beams
The fastening of the upper trim is carried out according to the same principle as the lower one. The side view is shown in the figure below.
Ceiling cladding and insulation
The ceiling, like the walls inside, is best covered with clapboard. This is the most favorable option from a price and aesthetic point of view. Pine eurolining will last at least 30 years, and even more with proper care. To insulate the ceiling, in order to save money, you can use expanded clay, pouring it on top in a layer of 10–12 cm.
Assembling the rafter system
Assembling the rafter system
A possible installation option for the rafter system is shown in the figure below:
Roof sheathing
Sheathing the roof
The process of attaching the roofing material does not differ in any nuances, except for one thing: the upper part of the sheets should be under the roofing material of the main building. To do this, you may need to remove some of the fasteners. An approximate diagram of the roofing “pie” is shown in the figure below.
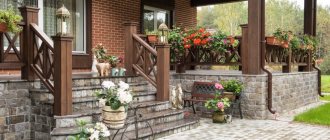
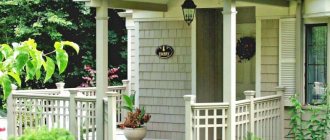
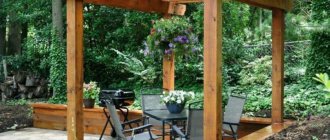
Veranda or terrace?
It is these two buildings that are most often erected near the house as an extension. A terrace is usually called an open structure that has restrictions around the perimeter.
A veranda is an enclosed space. It can be used to equip any room. And therefore this option is more preferable for many cottage owners.
After all, you can even install a stove or fireplace on the veranda. And then this room will be warm even in the winter season. In addition, this room can be used as a reception room.
What's next?
At the final stage, lamps are installed inside the premises, contact connections are covered with switches and sockets, making sure to check the functionality of the system.
If the extension is intended for winter living, install heating radiators and connect them to the general heating system of the house or make an individual one
Taps are attached to the supplied water supply and plumbing fixtures are installed in the right places.
If the extension includes a bathroom or other rooms with high levels of humidity, take care of their reliable waterproofing.
Don’t forget about exterior work, which does not end with finishing the façade. The final stage may include installing a canopy, concreting steps or installing a wooden staircase, pouring a blind area and finishing decor.
To ensure that the extension fits in organically, read How to plan a plot of 10 acres?
Beautiful extension design
Working with a professional architect will simplify the process of choosing a design for your addition. After all, they will be offered a variety of options. And the home owner will definitely like one of them. But, if the construction is carried out by a novice amateur who is the owner of the house, then difficulties may arise.
It is important to understand that the building must correspond to the design of the main building. And therefore it is better to familiarize yourself with the different design options for the extension in advance.
Of course, you can completely copy the project you like or combine several ideas into one. And then the design will be unique.
Roof
of roofs for extensions :
- single and double slope;
- ceiling and attic;
- steep and sloping;
- multi-pincer and flat.
It is important that one side is raised to allow water to drain away. Polycarbonate, metal tiles, corrugated sheets, and soft roofing are suitable for roof covering. It is better to use the same material as on the roof of the house, or choose compatible types. As one of the high-quality and affordable options, you can consider Ondulin or Ondulin Tile:. Thanks to the large selection of colors, this material will fit seamlessly even if the roof of the main house is made of a different roofing material.
Photo examples of extensions to the house
Frame installation
The construction of the frame is also carried out in accordance with certain rules. At the initial stage, a horizontal beam is installed, which will serve as the basis for the entire structure. The beam is mounted directly on the foundation. To do this, holes are drilled in the concrete and dowels are driven in for the fastening element.
After this, vertical racks are installed. A beam is also used here, which is attached to the wall of the house and the horizontal base at the corners of the extension. The connection is made with self-tapping screws; the racks can be reinforced with a metal corner. The height of the horizontal pillars is selected so that the extension can be placed under a common roof with the house.
At the stage of installing the frame, the location of window and door openings is thought out. In these areas, additional bars are installed, which are fastened to the basic elements of the extension. When the frame is installed, it is better to immediately cover it with boards or moisture-resistant plywood. This will give the frame structure additional rigidity, which will significantly simplify the subsequent stages of construction.
If you decide to add a bathhouse
With the addition of a bathhouse, everything is much more complicated than with an ordinary extension. The reason for this is the need to supply all communications.
And if, as a rule, there are no difficulties with the light, then difficulties may arise with the drainage system and the supply of water to the bathhouse.
Bathhouse as an extension
What to pay attention to:
- All materials for adding a bathhouse must be labeled “for rooms with high humidity.” All wooden elements must be processed with high quality.
- Water can come from inside the house (this often requires raising the floor or otherwise accessing laid pipes) or it can come from a separate water source - a well or borehole. Often the second method is simpler and cheaper.
- Wood for a bathhouse should not release resin when heated, so we do not use coniferous wood.
Otherwise, the extension bathhouse differs little from a regular bathhouse, the construction of which can be read here.