A wooden veranda is the most harmonious combination of a house and a garden, as well as a place where you will spend a lot of time in the summer. The veranda is the ideal area for grilling, sharing a meal or drinking espresso on a sunny morning. It is also an excellent recreation area for sunbathing, playing with children or other forms of free time. A wooden veranda allows you to fully enjoy the summer because it does not heat up, encouraging you to walk barefoot, in contact with pristine nature.
Technical features
When changing the configuration of a building and constructing a permanent structure, it is necessary to register a veranda for the house or an attached terrace with the relevant authorities.
According to the Housing Code of the Russian Federation, an extension without a foundation, used seasonally, does not need to be registered. Before construction work, the following factors need to be considered:
- the location of the extension relative to the house and its entrance;
- type of construction (veranda or terrace, open or closed);
- type of building (major or non-major);
- insulation, electrification, heating during the construction of a capital structure;
- materials for construction;
- roof shape;
- finishing of the extension.
Important! Requirements for the construction of extensions are regulated by Article No. 15 of the Housing Code of the Russian Federation and SNiP 30-02-97. If you are building a permanent structure with a foundation and load-bearing elements, its design will need to be registered with the BTI. Properly design the type of construction in order to comply with fire safety standards between residential buildings
The distance between permanent buildings must be at least 3 m
Carefully design the type of building to comply with fire safety standards between residential buildings. The distance between permanent buildings must be at least 3 m.
Types of verandas
The attached structure can be built from the same material as the house or cottage itself, or from any others. The choice of building elements depends on the preferences of the developer and the features of the project. A combination of different types of building materials is more often used. By building a terrace or veranda, you can hide the shortcomings of a building or make an architectural accent.
Verandas are classified into:
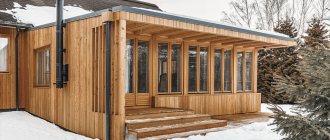
- open. The structure is built under the same roof as the main building. The extension is built in the form of a large canopy mounted on poles. The walls of the structure are not completely covered or the lower segment is partially covered. An open veranda can be built both during the construction of a house and at any other time. The space is used for summer holidays, family dinners in the fresh air, and home celebrations. Additional square meters are furnished with furniture made from weather-resistant materials;
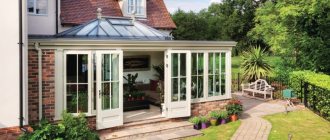
- closed. The extension is a full-fledged room in the building, making it possible to use the additional space for various purposes. The walls of the structure are made solid, hinged, with window openings. A closed building is built at the entrance. It protects the house from wind, rain, snow, and cold. In an insulated structure, it is possible to arrange a kitchen, office, hallway, living room, gym, botanical garden, which can be used all year round.
To make the extension last longer, start construction by building a high-quality foundation flush with the foundation of the house. Build the veranda floor at the same level as the floor.
Types of terraces
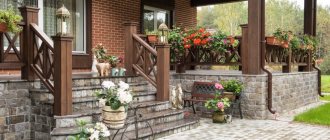
Terrace buildings are areas fenced with railings with a canopy raised to a height of 10-15 cm from the ground surface. The structure is erected close to the house, built at a distance from the building, or attached to the porch. The main elements of a terrace are posts, railings, floor and roof. The walls of the structure are made open.
Landscaping the courtyard of a private house with your own hands with photos Landscape design is traditionally thought of when the bulk of the construction work has already been completed. Depending...
The terrace structure is used as:
- gazebos for relaxation;
- summer dining room under the same roof as the house;
- play area for children or sports activities;
- places for relaxation, family celebrations.
Arranging a terrace near the house allows you to fully relax in nature and shelter from precipitation
During construction, pay great attention to high quality materials that will be resistant to temperature changes, humidity, solar ultraviolet radiation, and practical. The structure is installed on racks laid on compacted soil, or built directly on the ground
Terraced buildings are classified according to the type of location - attached to a dacha or house, separately erected, built along the perimeter around the building, roof terraces. The structure is furnished with furniture made from practical, moisture-resistant materials.
042cfdd615f616bd565 cbaa8214e1b51.jpe aa4fbfc55afd8b054a497bc4cc0ce3bf.jpe 835494a52533261d30968caea70d088e.jpe
06d42685e2b0ab074f3926ffee93f7ab.jpe
Location of your terrace
The location of the terraces is completely different. Mostly there are attached terraces. These terraces are notable for the fact that they open directly from your dacha. This is a very convenient way considering that you don’t have to go far.
You can also put all unnecessary things there, or things that you rarely use and they take up space in the house.
There are also closed terraces for summer cottages. They are usually placed to store some things that should not be exposed to external influences.
Open terraces. Open terraces are the complete opposite of closed terraces. They are great for tea parties and meals outdoors. Such terraces are also very similar to summer kitchens.
Summer terraces. Used for any work in it in the summer.
We recommend reading:
How to build a bathhouse from timber - 125 photos of the best projects and ideas on how to build a bathhouse correctlyDo-it-yourself canopy: step-by-step description of how to build a canopy correctly. The best ideas and beautiful design options (95 photos)
Beautiful canopy over the porch - installation options, design options and installation tips (95 photos)
Dimensions and materials for its construction
After choosing the location for the construction of an open terrace or a closed veranda, calculate the dimensions of the extension, select the type of frame, and building materials.
Terraced extensions and verandas are built from:
- metal Metal structures have a service life of at least 30-50 years. In construction, steel profiles or welded frames are used. Install railing barriers from wood, brick or forged elements. An extension on a metal frame requires the construction of a foundation (screw piles, blocks, strip foundation);
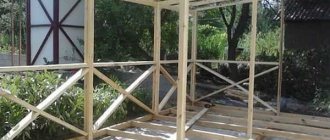
- tree. A popular building material for the construction of terraces and gazebos of any type. The frame is built from timber or logs with a minimum diameter of 15 cm. The railings and rafter system are made of boards;
- brick. To build brick extensions, it is necessary to install a foundation. A foundation is laid under the brickwork in the form of blocks, concrete pouring or tape. The frame is built on pillars of 1.5 or 2 bricks, build the rafter system from boards or a metal structure;
- combination of materials. Durable and attractive structures are obtained by combining different building materials. For example, a brick or metal frame with wood, glass, polycarbonate.
Important! When designing the roofing system of an attached veranda or terrace, take into account spring snow melting. It is necessary to install stoppers on the edge of the slope of the building or select the optimal angle of inclination of the roofs of both structures. The roof of extensions is often made in one slope
If the veranda or terrace is adjacent to the building, the roof of the structure is made a continuation of the common building. When constructing a separate building, the roofing shape can be gable, broken, domed, or pergola. The total cost of the structure depends on the materials chosen for construction.
The roofing of extensions is often done in one slope. If the veranda or terrace is adjacent to the building, the roof of the structure is made a continuation of the common building. When constructing a separate building, the roofing shape can be gable, broken, domed, or pergola. The total cost of the structure depends on the materials chosen for construction.
The dimensions of the extensions depend on the area of the site, the project being implemented, and the location of the structure. On a large terrace or veranda, arrange several areas at once - for relaxation, cooking, family dinners. Dimensions are calculated based on the planned purpose of the structure, the number of vacationers, and interior elements.
Materials
The rest area is made from any material: wood, stone, brick, metal, concrete, WPC (wood-polymer composite). Each material has pros and cons:
To create a terrace, it is not necessary to purchase everything new; you can use the leftover building materials after the construction of the main building. Then, the extension will definitely match the color and texture of the house.
Construction stages
- construction of the foundation;
- flooring assembly;
- installation of auxiliary structures.
You can skip the last point, but the additional parts greatly decorate the extension and make it more efficient and practical.
Projects of country houses with a veranda
If the dacha is going to be built from wood - timber or logs - it doesn’t matter, the most popular design is 6x6 meters. This is due to the fact that the standard length of lumber is exactly 6 meters
With the size of the house, waste is minimal. When considering projects, we notice that it is necessary to look at six meters - this is only the residential part or together with the veranda.
For example, in a timber project, the photo of which is located below, the entire building area is 6*6 meters, 2*6 is a veranda, the habitable part is only 4*6 meters. The internal area will be even smaller - it is necessary to take into account the thickness of the walls and finishing materials.
Project of a small cottage made of timber with an open veranda
In another project, 6*6 meters is just a building, and a veranda is attached to it. The total building area is larger (see photo).
10d389f65d1b5c01e43b950c917b4982.jpe 42abbad027ddc8278dab4da0ef2d9abe.jpe c4e3c4ade7c1a7b5fb1b1bede459bdd3.00_jpg_srzIn this project, the house stands on a strip foundation, the veranda is on a pile foundation to reduce the cost
Country houses with an attic and a veranda (as in the photo above) are popular. With this layout, having occupied a small area for the house, you use it to the maximum. Another one of these dachas is in the picture below.
Cottage with veranda and attic
In this project, the attic floor occupies a larger area than the premises on the ground floor, overhanging a spacious corner veranda that spans two sides of the house. Since the load from the attic is transferred to the veranda posts, a common strip foundation was made.
A small country house with an attic floor and a veranda along the facade
The following project was created for a country house made of foam concrete. The asymmetrical roof gives it an oriental flavor, which is echoed by the design style of the veranda.
Veranda decoration
It is clear that the attached structure significantly changes the total area of the house; in order to avoid future problems with the sale or donation of real estate, it should be legalized. To do this, before starting construction, you must sign the necessary documents with the supervisory authorities:
- administration;
- fire department;
- SES;
- electricians, etc.
After this, register the property with the BTI, providing them with a complete package of documents: application, consent of the owners, project, technical passport, and certificate of ownership.
You can submit this package yourself, or you can fill out an application through State Services. After completion of construction, report this to a higher authority and obtain a new certificate by paying the state fee first.
Terrace styles
An additional decoration of country houses is a modern terrace. A properly designed transition from home to garden will become a favorite vacation spot for the whole family. To make the extension look original and cozy, its functional purpose should be taken into account during construction. The interior space of the verandas can be decorated in one of the following popular styles:
- Modern. Explicit minimalism includes comfort, coziness, simplicity and functionality. The furniture used is high-quality designer furniture. There are no or very few decorative elements. These can only be functional items (auxiliary furniture, floor lamps, fireplace, etc.). The materials used are stone, metal, PVC;
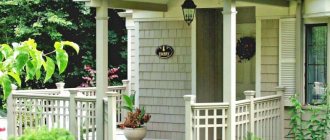
- Traditional. The main features of this style are rigor and pedantry. The mood here is set by dull pastel colors. Bright colors are excluded. Such verandas are considered as a replacement for an office. It is allowed to use decor on railings and supports. Stone and wood with a unique natural pattern are used as building materials.
- Colonial. The highlight of the style can be any item that matches the theme of the former British colonies. Lush green spaces will help create the appropriate atmosphere and climate on the terrace. Ideal furniture is wicker or wood. A colonial-style terrace can be filled exclusively with natural materials (wood, ceramics, stone, colorful textiles);
- Beach. It is better to use this design if the dacha is located on the seashore. For complete harmony with the surrounding landscape, a thematic imagery is used - all shades of blue, sand, green. Wooden, textile, leather furniture is suitable;
- Country. A good solution for houses made of timber. It is characterized by rough furniture, a maximum of textiles and wood, and the presence of decorative household items. For the floor you can use wide deck boards and logs. Clay pots with vegetation look great on a wooden shelf.
Open type
An open veranda is a frame building without walls, and the roof is mounted on beams. This design has a number of advantages and disadvantages.
Advantages and disadvantages
Among the undeniable advantages of an open veranda, it is worth noting the following:
- Easy to install. Its construction requires a minimum of materials and time. It is not difficult to erect it.
- Easy care. Such a veranda is more of a part of the street than of a house. Therefore, to keep it clean, it is enough to sweep the floor regularly.
- An open veranda will allow you to enjoy the view and breathe clean air while on it.
Open terrace
Like all man-made works, open-type construction also has disadvantages:
- Not suitable for use in the cold season.
- It is impossible to install upholstered furniture on an open veranda, since it will be impossible to care for it, and, therefore, staying here will be deprived of a certain home comfort.
- Difficulties may arise with the choice of finishing materials, as they will be subject to negative environmental influences.
Tools and materials
For construction you will need:
- Concrete pillars for the foundation.
- Beam for the frame with a section of 150×150 mm.
- Cement and sand.
- Beam for strengthening the frame with a section of 120×120 mm.
- Bracket for connecting timber.
- Lathing for the lower part of the veranda. This can be OSB, forging or slats in the form of slabs or balusters.
- Wood screws 100 mm and 25 mm for fastening OSB or wooden lining.
- Wooden lining.
- Beams for roof installation 150×150 mm.
- Anchors 150–200 mm.
- Krokva 60×120 mm.
- Roofing material, for example, metal tiles or ondulin.
- Boards for making roof sheathing.
- Logs 100×100 mm.
- Wind board.
- Floor board 30–40 mm.
- Paint and varnish products for wood processing.
- Rolled waterproofing for foundations.
- Drill and saw.
- Level.
You have already become familiar with the method of making a foundation, so we will skip this point in our description of the construction of an open-type building. Let’s immediately move on to the features of flooring.
Features of flooring
To carry out high-quality installation of the floor, you must first prepare the base. To do this, first of all, the earth is leveled and compacted. Adjustable supports can serve as supports for the joists. Moreover, their number will directly depend on the planned loads on the floor. This idea is great for open verandas.
e882098372279eceac4762f868ec67b2.jpe 6121c5e10783550ebf63cd78bcbe91b7.jpe
a792c92be2172937a8c77bd5980a74ce.jpe
1be20e4dd287c04f5e158131997b42ff.jpe
Then install the joists on the adjustable supports and fasten them. Thanks to these supports, you can adjust the slope of the floor and level it. Installation of boards begins from the edge of the veranda parallel to the joists. The boards must be level and dry. They should be placed closely. The boards are fastened to the joists using nails or wood screws.
The structure of the frame and roof does not differ from the technology described in this article.
Finishing features
In order for the wooden elements of an open veranda to last longer, they should be impregnated with special antiseptics and covered with paints and varnishes. Among other things, these actions will highlight the structure of the tree and help make the extension more attractive.
The lower part of the veranda also needs finishing. To do this, you can use slats that are fixed at an angle of 45º, forged elements or balusters. If you use a wooden or plastic lining for this, then you will need to make a frame of beams under it.
To finish the ceiling and pediment you need to use the same material. It can be wooden lining or OSB boards
At this stage it is important to install electrical cables for lighting the veranda and make corresponding holes in the ceiling lining
Tips from the editor:
- how to build a brick grill with your own hands;
- how to build a winter greenhouse with your own hands;
- how to build a gazebo with your own hands from wood.
How to attach
A do-it-yourself veranda at the dacha is not only built from scratch. Much more often it is attached to a finished house. In most cases, the foundation for the veranda is made columnar (on posts) or piled. For a light veranda made of wood or built on a frame principle, such a base is more than enough. But you need to take into account the geology of the site, otherwise the extension will “walk” in height in winter. Then in the spring you will have to correct the distortions.
Foundation for a veranda at the dacha
We'll tell you how to build an open veranda at your dacha. On sandy or sandy loam, gravelly soils that are not prone to heaving, it is quite possible to get by with shallow posts. They are buried 20-30 cm below the level of fertile soil. Crushed stone is poured into the bottom of the excavated pit and compacted well. To be safe, you can spill it with liquid concrete mortar. Solbiks made of bricks or rubble are placed on this pillow (ruble ones are more durable when laid correctly). To make the work even easier, you can put concrete blocks-pillows down, and, if necessary, build columns on them to the required height.
On sandy soils, the foundation can be made columnar. In this case, country houses with a veranda are inexpensive
If the soil is prone to heaving - clay, loam, posts - you cannot install them: they will be pushed out every year. In this case, it is better to make a pile foundation, digging below the soil freezing depth for your region. You can make holes for them using a hand drill. On not very viscous clay you can handle it alone, or in extreme cases - together. For greater stability, it is better to make piles with an expansion at the bottom - TISE piles.
A little about how many piles or posts are needed. They are placed at a distance of 1-2 meters. The distance depends on the cross-section of the pile or column and on the materials from which the veranda is built. Open wooden country verandas adjacent to the house weigh little. Therefore, supports can be placed under them with a distance of 1.5-2 meters. If glazing is expected on the veranda, the step should be smaller - at least 1.5 meters. In general, it would be a good idea to calculate the load and determine the required cross-section of the piles.
Table of bearing capacity of piles depending on soil
Consider the mass of all materials that will put pressure on the piles: frame beams, joists, floor boards, insulation, racks, rafter system, roofing, supposed heavy furniture. In general, you count everything. Add 20-30% percent for snow loads (if winters are very snowy, then more) and safety margin. Divide the resulting number by the estimated number of piles. You get a mass that will put pressure on one support. Using the table, find the line that indicates the type of soil on your site. Moving along it, find the nearest higher value of the bearing capacity of the piles. In the upper part above the found column the diameter required for this load is indicated.
Now let’s talk about how tall the pillars should be. The floor in the extension should be slightly lower than the floor in the country house. This will prevent rainwater from entering the house. The height difference is required to be small - about 25-50 mm. And the height of the pillars or piles should be such that after assembling the entire structure (framing, beams, floor boards), the flooring will be at the required height. On the wall of the house, this height is achieved using a beam on which the ends of the floor joists will rest (its upper edge is set below the required level of the flooring by the thickness of the board).
The beam is fixed at the required level, and the upper level of columns or piles is marked along its lower edge
Before starting construction, do not forget to remove the fertile layer from the site, which will be under the veranda. Otherwise the smell from there will be unpleasant. The resulting pit after pouring the piles on heaving soils is covered with the same soil and compacted well; on well-drained soils it can be filled with crushed stone. If, for example, you fill a hole with crushed stone on clay, then water will collect in the pit, which sooner or later will end up under the foundation, or will bloom and smell accordingly. Therefore, spare no effort, compact the soil well.
We think it’s clear in general terms how to make a foundation for a veranda at the dacha. Having chosen its type, you will need to thoroughly understand the details, and this is unrealistic within the framework of one article.
Construction of a veranda at the dacha
After the foundation is ready, the construction of the veranda itself begins. Let's divide the process into stages.
- It all starts with tying pillars or piles. They are first covered with waterproofing, then racks are attached to them. After installing all the racks, the lower frame beams are laid between them. There is a second option: first, attach the harness and the stands to them. This is a worse option: if you need to change the strapping bars (they are closest to the ground and are most often affected by fungi, even though they are treated with antiseptics), you will have to disassemble the entire structure of the veranda, including the roof.
How to attach veranda posts to the foundation - After the bottom trim, floor beams are installed. When building country verandas adjacent to the house, pillars or piles are rarely placed at a distance closer than one meter to the main foundation. With this arrangement, the second end of the beams is attached to the support beam. One end of them rests on the harness, the other on a beam attached to the wall of the house. If the width is sufficiently large, there are also intermediate supports. The logs are also attached to them with nails driven diagonally.
How to attach joists and floor boards on the veranda - Now install the top trim, which connects all the racks. The next step is laying the ceiling beams. They are installed in increments of at least 1 meter. These beams can be open, but then the rafter system must be assembled carefully, or they can be hemmed underneath with clapboard, edged board, drywall, etc.
Assembled top frame and ceiling beams - The roof on the veranda must have a slope. Therefore, a rafter system is also required: the roof of the veranda is connected to the wall or to the roof of the house. Since the veranda is adjacent to the wall, timber is nailed to it at the required height. The difference between the height of this beam and the trim determines the angle of the roof slope. Its minimum value depends on the type of roofing material.
Rafter system of a veranda attached to the house - Next, the veranda rafter system is installed. One edge of the rafter legs rests on the upper support beam, the second - on the outer beam of the upper frame. You can attach it to the harness by making a notch in the timber (the depth of the cut is no more than 50% of the thickness of the timber). The second option is to cut out a recess in the rafter legs and nail it through the top with nails. The third one is to simply lay the lag and secure it to the beam with corners.
One of the ways to attach the veranda rafter legs to the top frame: on metal corners - If the rafter system is of considerable length, the beams may sag. To minimize deflection, spacers must be installed between the ceiling beams and the rafters. The number of spacers depends on the depth of the veranda. On average, they need to be installed every meter.
In order to prevent the roof from sagging over the veranda, spacers are installed between the ceiling beams and rafters - Next the floor is laid. If the veranda is open, it is better to take a decking board: it has an uneven surface (wavy) and does not slip when wet. If you need a floor with a smooth surface, use edged boards. One important point: on open verandas, the floor should be made with a slight slope away from the house. This way, any trapped water will quickly drain away. A floor board with a tongue and groove is needed only if the veranda is covered and the floor needs to be insulated. Then, first, they make a subfloor from edged boards, put joists on it, insulation between them, and then finish the floor on top.
One of the stages of building a veranda: flooring - After laying the floor, you can install side rails. They will give the building even more rigidity.
This is what the assembled frame of a veranda attached to a house looks like - The roof covering is laid last. There are no special features: they make a sheathing, the pitch of which depends on the weight of the material, and install the roofing material according to the manufacturer’s recommendations. After this, it is important to make the connection to the wall correctly so that there are no leaks in this place. The most universal option for dachas made of bricks or building blocks: make a groove above the level of the roofing material, lay a beam in it, and trim one of the edges (see photo below). Below, another beam is nailed, a slightly larger cross-section and also with a cut edge. From above, this entire structure is covered with an apron made of roofing iron.
The second option for connecting the roof of the veranda to the wall of the house
From this we can assume that the veranda at the dacha was built with our own hands. There are still issues of finishing and protecting the wood. This is a very difficult question and very important.
Read how to decorate a veranda here.
Selecting a location
The construction site is selected taking into account many factors:
- Location of the entrance to the home. The extension can combine the functions of a porch and a resting place.
- The location of the house relative to the cardinal directions. For example, a terrace in the northern part of the house will provide an opportunity to enjoy coolness in the summer heat.
- Opening view.
- Soil characteristics - the type of foundation depends on the type and characteristics of the soil on the site.
- Features of the relief - the extension should not disturb the overall style of the yard and be combined with the house.
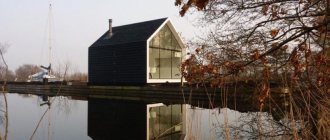
If there is a pool or natural reservoir on the site, the terrace is often placed as a separate building. The location of the structure relative to the house determines the following types of terraces:
- detached terrace;
- attached to one of the walls of the house;
- a terrace surrounding the entire house is an ideal option for a house with a small plot, where it is impossible to build a large terrace along only one of the walls.
Terraces come in any shape: oval, polygonal, asymmetrical.
A good option for implementing the project is a multi-level terrace, a practical and beautiful building. This type of terrace makes it possible to get rid of the construction of separate steps or stairs, especially steep ones, and also allows for the implementation of a high-quality drainage system.
Work on the construction of the foundation part
For a wooden veranda attached to a house, the foundation is laid separately. The connection is then secured with special fasteners. If the house has not yet been built, then the foundation part is being built. The type is selected taking into account the weight and size of the extension. If construction is carried out on stable soil, then preference is given to a simple columnar foundation. Humidity or friability of the soil will require a durable tape structure.
- The first type is quite simple in terms of the amount of physical effort expended. More economically profitable. The foundation part is created by several rectangular supports. In each, the pillars are located according to the size of the designated horizontal perimeter. For each column, a meter-long depression is prepared, filled with a mixture of crushed stone and sand to a depth of fifteen centimeters. The mixture is compacted and concrete is poured. At the same time, the pillars are installed equal to the level of the foundation part of the house.
- The second type requires more effort, but has better strength characteristics. First, the inner foundation side must be marked with tapes. Then a trench is dug. Concrete is poured twice. First up to a level of ten centimeters. After one layer hardens, another is poured. The level should be equal to the top.
The concrete mixture is poured taking into account the subsequent settlement of the structure. It should not be connected to the main foundation. Given the smaller mass of the veranda, it may skew towards the main structure.
Simple terrace designs for a one-story house.
A ground level terrace is the simplest type of structure. Its level coincides with the ground level or is slightly raised above it. The railings serve a decorative function, so you can do without railings, but you need to find other ways to visually emphasize the perimeter. Due to the fact that the building is located close to the ground, its main task is to be well protected from moisture and rot. For these purposes, a special board made of wood-polymer composite (WPC) is used, which, having all the advantages of wood, is not subject to rotting due to the presence of 30 to 80% polymer in its composition.
To build a platform near the house, you can use any other material intended for direct contact with the ground, for example, tiles. Please note that all construction materials are treated with at least two coats of sealant to increase the life of the underside of the deck. In addition, I would like to say that elements such as a canopy, benches, gazebo or grill provide style and functionality to such layouts.
How to cover the floor on the veranda at the dacha
First of all, let’s make a reservation that by “painting” the floor in a dacha we mean changing the color of the wood, increasing its security, but not painting over its texture. That is, we will actually talk about stains, but with protective properties. Rather, we will tell you how to cover the floor on the veranda at the dacha. Opaque paints that create an opaque film on the surface, even the best ones, will definitely swell and crack on the floor. Especially if it is an open summer veranda. In this case, it is better to use stains.
Impregnations for protection
Please note that all wood must be treated with antiseptics before construction. This is especially true for the open veranda. Here the side rails, all the racks and the floor - all these elements - require careful protection. For impregnation, you can use the SENEZH IMPRA composition. It is even suitable for processing wood that has direct contact with the ground. What is important is that it does not change its color, does not wash out, and does not create a vapor-proof film. That is, after treatment, the wood continues to dry.
Protective antibacterial impregnation Senezh has excellent characteristics, but colors the wood greenish
The same campaign has another impregnation “Senezh” with similar characteristics. But it gives the wood an olive tint. If you apply a dark color later, it will have almost no effect on the final result, but will be visible under light colors.
Pinotex Tinova Professional - primer for dry wood. Protects against blue staining, darkening, mold and rot. Penetrates deep into the fibers. Apply to clean, dry wood (humidity not higher than 18%). This is its disadvantage: verandas are rarely built from dry lumber.
Color Changing
There are the following options for coloring compositions:
- Tikkurila Valtti Puuoljy (Tikkurila Valtti Puyoli). This composition is intended for surfaces constantly exposed to atmospheric factors. Its base is oil. Therefore, it is necessary to use on dried wood: maximum humidity 20%. Apply with a brush to a clean surface, one coat is usually sufficient.
- Pinotex Terrace Oil (Pinotex terrace oil) - oil for Pinotex terraces. This composition is applied to the base and also: it must be tinted by adding the desired pigment. Designed for processing wood on terraces, verandas, stairs, etc.
Both of these formulations are oil-based. They need to be updated once every year or two - check the condition. But at the same time apply it to the old coating, simply by cleaning it first. Easy to apply and leaves no streaks. It is usually absorbed quickly: if after 15-20 minutes there is some unabsorbed composition somewhere, you need to blot it with a dry cloth. Moreover, even after a year the surface looks attractive, no cracks, chips of the coating or other troubles.
If the wood you use is not dry enough, here’s the solution: impregnate it with antibacterial impregnations that do not create a vapor-proof film on the surface. After some time it will dry out enough (in a year - for sure). During this time, of course, it will get darker. Remove the top layer with a sander and then cover the floor on the veranda at the dacha with oil.
This is what the floor looks like, only covered with an oil composition. A little later it will become a little darker, there will be less shine
If you look at the prices, then Pinotex is cheaper, but under it you must apply its own “Base” - a basic impregnation. Tikkurila can be used directly on boards (but on dry ones). If water gets on surfaces treated with these compounds, it remains in separate puddles, not absorbed until it is wiped off or it dries.
Sometimes verandas are covered with yacht varnish. If you take expensive, high-quality ones, the coating lasts for several years. Cheaper yacht varnish cracks and lifts in places after a year. Before applying a new layer, the old one must be removed and the surface sanded. If you want to varnish, try Eurotex alkyd varnish or Eteral urethane varnish. They have good reviews. But keep in mind: varnished surfaces are slippery in winter. So if you want shiny surfaces, paint your walls, counters and side rails. Still, it's better than oil on the floor.
Extension to a house made of timber and timber trim for the terrace
Since the terrace has no walls, the load on the foundation will be minimal. But before installing it, you still have to mark the area. Using the marks obtained, they dig recesses for the pillars to the freezing depth, into which sheathing and reinforcement are installed and then concrete is poured. For the foundation, it is mandatory to make waterproofing and timber lining, to which subfloor logs made of timber with a cross section of 100 x 50 mm are subsequently attached.
f22c02c93e214a41cedf7b9ca97a5194.jpe 417eb10159520351529ac71de8c10d81.jpe d04fb9817512684cc64d7dcf6c68f6b6.jpe
208814bf67aa6f32f4dcd9670468a967.jpe
b4fe98f6cf36b4efcac97620c08061dc.jpe 43c198d07ee31745fb803d5d910e2da4.jpe
520d7fd58a7267cc3f1b95dfbc973c35.jpe
The best material for building a wooden terrace is larch boards
The subfloor is covered with OSB or edged boards, and insulation is filled or laid. It is covered with wicker insulation, which, in turn, is covered with OSB boards.
The boards must be treated with an antiseptic compound and laid, leaving a gap for better ventilation
Brick veranda attached to the house
If a metal or wooden structure is considered universal and can be used for almost any type of private house (frame, log house, permanent), then a brick veranda with plastic windows is suitable only for permanent construction.
Here, unfortunately, it is not possible to provide a diagram or sketch with a layout of materials - construction from brick or block is too individual. However, we can highlight the main stages and nuances:
- For such a structure, columnar and pile foundations are not suitable; a serious strip foundation with good waterproofing is required. It can be made monolithic or block, the depth is calculated depending on the depth of soil freezing in a given region. Read more about the design and waterproofing of foundations in the article;
- the structure can be solid - with full walls that take the load from the roof - or with column-shaped supports. The second option is more economical in terms of materials and time. Columns with 4 bricks or more in a row of masonry must be placed in the corners of the veranda and, if its area is large, additionally in the gaps. The photo above shows just such an option, with columns, the space between which is filled partly with metal-plastic windows, partly with single-row brickwork;
- the covering of a brick veranda can be arranged on wooden beams or on metal trusses, depending on the weight of the roofing material;
- The installation of metal-plastic windows in this case is carried out after the initial finishing of the walls and installation of the roof. Otherwise, there is a high risk of damage to frames and sashes under the influence of a suddenly increased load or during construction work;
- The best finishing option for a brick veranda is considered to be facing bricks and tiles, including those imitating wild stone, plaster, and painting.
To build a veranda that is combined with the house as successfully as possible, you will have to use mortgages - metal parts that will connect the main wall of the house with the new extension.
The main connection is at the foundation level; the reinforcement of the strip base for the veranda is connected to the foundation of the house.
Similarly, the connection is made between the walls/columns of the veranda and the wall of the building.
If possible, roof trusses/rafters are also driven into the main wall of the house. This will allow for better waterproofing of the seam between the wall and the canopy, and will increase the stability and strength of the structure as a whole.
Glazing: what and how
Even a large open veranda can be glazed if desired. The easiest way is to call a measurer from a company that sells metal profile windows and listen to their proposals. They may offer windows that open or not. Here the choice is yours. The glazing of the veranda looks like the photo below. For a summer residence, this option may be unsafe: if the territory is not guarded, it can be broken up.
Glazing of a large veranda
Even with this solution, questions arise:
- Install single or double frames. If you have finances, it’s better to bet double. They hold heat much better. Even if you only come to your dacha in winter to check how things are going, in spring or autumn it will be much warmer. To the point that if the veranda is on the south side, while the house is heated, you will bask on the veranda: the sun heats the air, and the frames retain the heat. It will be especially warm if you make an insulated floor. But even with a single deck, the temperature in the glazed extension will be much higher than in the house.
- The windows must be burglary resistant or not. If there is no security nearby, then even the best ones will be able to break into it. Even tempered reinforced glass will not last long against brick. And in order not to provoke thieves, the entrance to the house should be behind a reliable metal door, but the entrance to the veranda can be equipped with simple doors.
Read how to install plastic windows here.
In the photo below, the veranda at the dacha was glazed with double windows. With a cracked floor in the spring, the extension is much warmer than in a log house.
When deciding how to glaze the veranda at the dacha, keep in mind that double races retain heat better even in an unheated extension
Large glazing area - large sashes. If you order double frames made of wood, they will open inward (the same as fiberglass). If the veranda area is small, they can get in the way. There are several options here. First: order ones in which both frames will open outward (there are some). The second is to install sliding ones. One point: sliding ones are made only from aluminum profiles. Even if they can make you one from wood, they will cost a lot (this type of window, even made from aluminum, is not cheap at all). You can see the glazing of the country veranda with sliding metal-plastic windows in the photo.
Sliding windows made of aluminum profiles on a country veranda: comfortable and warm
If the veranda in a house is made of logs, and it was cut down along with the house and was originally planned as open, the white windows in it will look, to put it mildly, “not very good.” Not everyone can afford windows with wooden frames over a large area; metal-plastic is still cheaper. The solution is simple: there is laminated aluminum. A film imitating the surface of wood is glued onto it. You select the required color and everything looks good (an example of such glazing of a veranda on two floors is in the photo below).
Glazing of a veranda at the dacha made of logs (the mounting foam is visible, it will then be covered with flashings)
After the veranda has been glazed, I want to build an open gazebo. How? Read here.
Another option is frameless glazing. In this case, a strong strapping is made at the top and bottom, special glasses are inserted between them, and the gaps between them are sealed with rubber seals or covered.
Frameless glazing of the veranda in combination with a log house is not the best solution
Wood and polycarbonate combine better. Its advantage is that you can install it yourself: make frames with a quarter removed, install polycarbonate sheets in them with sealant. They are attached to the frame with self-tapping screws with special thermal washers that compensate for different temperature expansion. The seams between the sheets are filled with transparent sealant, but there are special mounting profiles for joining the sheets.
Glazing the veranda with polycarbonate: you can do it yourself
You can glaze the veranda yourself in this way. Polycarbonate weighs relatively little, is not so demanding on transportation conditions, and is easier to work with than glass. Due to its cellular structure, it retains heat even better than glass: it is used in greenhouses and greenhouses. So a veranda at the dacha can not only be built with your own hands, but also glazed.
Having glazed the veranda, you will want to have an open area. Read how to build a gazebo from polycarbonate here, and about pergolas and their construction is written here.
Foundation for a veranda and foundation for a terrace
Summer - this is the definition that naturally pops up in thoughts when mentioning a terrace, and for good reason. Such objects are simply created in order to spend warm summer days and evenings on them. In essence, they are an extension consisting only of a floor raised onto the foundation. In this case, the foundation itself is usually individual for the object and is not created together with the main one. As a rule, monolithic foundations are not used for terraces. Most often, only tape and columnar versions of such structures are used. Much less common is the pile option. Piles are placed only when there is a body of water nearby that can quickly raise the groundwater level, or if the site has very loose or sandy soils that cause severe shrinkage.
Preparing the base base
Scheme of a wooden terrace
Flooring installation