A sandbox is a good way to organize leisure time for both boys and girls while adults are busy with their own affairs. And a design made independently is also a good option for saving the family budget. Especially considering the fact that this is temporary entertainment. Let's figure out how to make a sandbox at the dacha with your own hands: you will see the drawings, dimensions and materials necessary for this in our article.
Tips for making and placement
You need to choose the location for installing the future sandbox and the materials for its manufacture, taking into account the following factors:
- Children, even those who are passionate about play, need supervision. Therefore, the sandbox must be installed so that the child is always in sight of adults.
- The sun's rays can harm a child's health, leading to sunstroke and burns, but solid shade is not the best option. Therefore, it is advisable to place part of the sandbox in the shade, and part in the open, so that the sand can dry out after rain.
- Drafts and excess moisture also negatively affect children's health. Therefore, the sandbox should be located away from water and not exposed to the wind.
- Trees, especially old ones, often fall into dust and dry leaves. Therefore, in order to avoid sand contamination, it is better to install the structure away from them.
- Some plants cause allergies, and some attract stinging insects. Therefore, you need to make sure that there are no honey plants or plants that cause allergies nearby.
- Well-processed wood and reliable fastenings will help avoid splinters and injuries.
- Hard materials such as stone, brick or iron can also cause harm, so it is advisable to avoid using them. And of course, you need to make sure there are no sharp corners, nails, cords, and so on.
In addition to the entertainment function, playing with sand has a developmental and psychological function. Soft bulk material calms and relaxes the nervous system, promotes the development of creativity, fine motor skills, and perseverance.
Features of finishing of a wooden structure
Having completed the construction of the sandbox, it is necessary to treat it with special means that will make it look beautiful. It is important to choose the right paint. Cheap options can evaporate in the hot sun and release harmful chemicals that can enter a child’s lungs. Also, some paints and varnishes begin to stick to your hands after drying, and this is extremely undesirable. Therefore, it is worth contacting a specialized store, where they will tell you the safest and most convenient option for a children's sandbox.
To make the design look original, you can paint it more than one color or decorate it with various figures of characters from your favorite cartoon or fairy tale. This option will undoubtedly be appreciated by both the baby and the guests.
Photo gallery: exterior finishing options
Different types of sandboxes: pros and cons (table)
| Classification parameter | View | Description |
| Design features | Open sandbox | A typical simple design that performs the main function of a playground |
| Closed sandbox |
| |
| Material | Tree |
|
| Plastic |
| |
| Other materials | To this day, other materials are used to make sandboxes: brick, stone, metal. But these materials do not guarantee the safety of children. Hard, sharp surfaces increase the risk of injury. | |
| Type of allocation | In-depth | The sandbox can be deepened into the ground, which is very effective for strengthening the foundation. In this case, drainage about 15 cm thick is necessary to avoid moisture accumulation. Then it is covered with agrofibre or a dense film, in which holes are made every 10 cm. Such a base will prevent the germination of grass, the appearance of insects and the mixing of sand with the soil. |
| Elevated | This design is installed on a concrete base or grass. It is necessary to ensure that even the smallest child can climb into it independently; for this purpose, low sides 380–400 mm high are made, which are half filled with sand. | |
| Configuration | Figured sandboxes | Structures in the form of cars, boats, flowers, animals, and so on, serve as additional game details. |
| Game centers | The simplest example is a sandbox made of stumps. The child can not only play with sand, but also run around the structure itself. |
Sandboxes made from leftover building materials
Everyone at their dacha will have leftovers from the construction of the house and auxiliary materials. Some are used to decorate the play area, some for the sandbox.
Many building materials are suitable for sides:
- bars of cut trees, dug vertically;
- board scraps;
- small concrete pillars;
- brickwork in 3-4 rows;
- blocks of foam concrete or aerated concrete.
The simplest option would be a sandbox pit. It is proposed to equip the playing area between two garden alleys. The sand reservoir can be of any format and design. The main thing is that the child sits comfortably.
For sand, a tin or plastic tank dug into the ground is suitable. It is important to consider comfortable seating and adequate drainage to prevent water from accumulating. In all other respects, this is a full-fledged country sandbox that organically fits into the landscape design.
Photo gallery of options
You don't have to stick to the traditional square shape
Use of car tires
It is necessary to protect the child from the sun's rays: a bright, large umbrella will help
The cover will help protect the sand from debris and moisture
The bright cover transforms into comfortable seats, thereby adding a place to relax
An easier-to-use, but more difficult to manufacture option with a solid lid
Can also serve as a separate game element
Such a sandbox allows the child not only to play with the sand, but also to walk along the sides and warm up a little
Standard sandbox - easy to make
To protect children from the sun, you can make a canopy
Also protects sand from contamination
An original boat will delight your child
Another version of the sandbox in the form of a ship
Selecting materials
What to make a sandbox from at the dacha? There are several options, the choice depends on your preferences.
- Many manufacturers have plastic models in their lineup. Their main advantages: safety and mobility. However, if you are a supporter of an eco-friendly lifestyle, this model is unlikely to suit you.
- Wooden ones are the best choice both from a safety and environmental point of view. But, if you want to make a sandbox for children at your dacha with your own hands, you will have to try.
- By the way, fans of recycling things can also appreciate play areas made from car tires.
- Metal models are not the best choice. Firstly, metal easily heats up in the sun, and secondly, poorly processed edges of parts can pose a danger to children. In addition, such models are more difficult to manufacture and are susceptible to rust.
Instagram @wood_design_belarus
Instagram @cherkasovwoodcraft
Instagram @cherkasovwoodcraft
Instagram @anasmru
Preparatory work
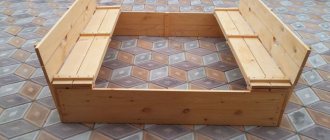
Considering all of the above, it is more convenient and practical to make a deep wooden sandbox with a lid.
Drawings and dimensions of a children's sandbox
Initially, you need to decide on the dimensions of the future structure. If there are a lot of children and there is enough space on the site, then you can make a large sandbox measuring 2x2 m. For one or two children to play, it is enough to make a square structure measuring 1.5x1.5 m.
Despite the simplicity of the design of the future sandbox, it is better to have a visual diagram before your eyes. Thus, you first need to draw a drawing that will help you decide on the necessary materials and correctly calculate the dimensions and quantities.
A visual diagram allows you to more accurately calculate material consumption
Looking at the drawing, you can see that the side boards on both sides should be slightly longer in order to form the correct closed corner.
How to choose material
Consider the following facts:
- Tree is different from tree. The durability of a structure may depend not only on the quality of processing, but also on the type of wood: pine, linden or larch are less susceptible to rotting.
- The sides of the future design must withstand heavy loads. To ensure strength, it is necessary to use boards with a thickness of at least 30 mm.
- Sanding and sanding an already assembled structure is extremely inconvenient. It is advisable to sand the prepared parts well and treat them with an antiseptic before assembly, which will avoid unprotected areas. It would be prudent to paint the iron hinges in advance as well.
- The main thing is not to forget what’s inside. The sand must be clean, free of foreign impurities, and mold well. Therefore, it is better to give preference to river or quartz sand, having first sifted it through a fine sieve, which will help get rid of dust, possible insects, and foreign objects.
Materials and tools (for a structure measuring 1500x1500 mm)
When purchasing materials, one cannot discount the presence of a foundation. To build the foundation you will need:
- expanded clay, small stones or river pebbles for drainage;
- agrofibre, dense polyethylene or plywood sheet.
The basis of the sandbox is a frame with sides 1500x1500 mm. To make the frame you will need:
- timber 50x50x450 mm (for corner elements) – 4 pieces;
- beam 50x50x1000 mm (for strengthening corners) – 1 piece;
- board 30x150x1500 mm (short side walls) – 4 pieces;
- board 30x150x1560 mm (long sides) – 4 pieces;
- seal - 1620mm;
- self-tapping screws 45 mm - 50 pieces.
The transforming cover will be attached to the finished frame. For it you need to prepare the following materials:
- board 20x125x1560 mm - 12 pieces;
- timber 30x30x250 mm (for fastening the seat) – 4 pieces;
- timber 30x30x450 mm (to strengthen the back) – 4 pieces;
- hinges (canopies) 40 mm - 12 pieces;
- self-tapping screws 45 mm - 50 pieces;
- self-tapping screws 25 mm - 60 pieces.
For processing and registration you need:
- antiseptic for wood processing;
- wood primer;
- paint or varnish for coloring.
The materials are ready, but without tools the process will not move forward. Therefore it is necessary:
- roulette;
- pencil;
- pegs with a rope tied to them;
- shovel;
- hacksaw or jigsaw;
- sanding machine or sandpaper;
- drill and drill bits;
- screwdriver or set of screwdrivers.
Nuances of the construction process
Having carefully double-checked the drawing of the children's design, according to the chosen scheme, they proceed to the purchase, cutting and preliminary preparation of the material.
Material
Wood is the most commonly used material for the manufacture of children's structures. With proper treatment and timely preventive maintenance, a wooden sandbox will last more than 10 years. Parts cut according to prepared drawings are coated twice with a water-polymer emulsion.
Comment! Elements of the children's sandbox that will be in the soil are treated with bitumen mastic.
If you do not plan to use the children's sandbox for a long time, you can use aspen or alder to make it. Coniferous trees will help increase the service life. For construction it is convenient to use quarter or tongue and groove boards. How to assemble a box from them is clearly shown in the following diagram:
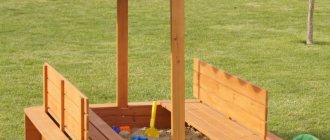
Step-by-step instructions: making and installing a wooden sandbox with a lid
It is better to carry out the work in several stages. First of all, it is advisable to assemble the frame of the sandbox, then make the base and install the box in the prepared place. And only after that install the cover.
Housing assembly
We fasten the sanded and antiseptic-treated boards together in a square shape using corner elements - long bars, not forgetting to first mark and drill holes for the screws.
Boards in two tiers are attached to the bars
If you glue regular insulation between the first and second tier, the boards will fit closer to each other and sand will not spill out into the cracks.
To avoid sand spilling out through the cracks between the boards, it is advisable to glue regular insulation
To give greater strength to the future sandbox, you need to securely secure the corners with the help of additional bars.
An additional bar attached diagonally will add reliability to the structure.
The ends of the corner bars, approximately 15 cm long, will be in the ground, so they must be covered with drying oil, bitumen or waste machine oil. Now the frame of the future sandbox can be carefully moved to the installation site.
The frame of the future sandbox is ready for installation
Construction of the base and installation of the frame
The area chosen taking into account all the tips and recommendations is leveled and cleared of debris. For more accurate markings, it is necessary to add 15–20 cm on each side to the dimensions of the future sandbox. We make markings using pegs with a rope stretched over them, checking the correctness of the angles.
Pegs and rope are required for marking
We remove the top layer to a depth of approximately 20–25 cm, making a slight slope towards the center. This is necessary so that water that gets into the sandbox does not accumulate, but ends up in the drainage. In the center we make a hole with a diameter of about 50 cm and approximately the same depth. We fill it with the material prepared for drainage.
Then you need to pour a five-centimeter layer of sand and compact it thoroughly.
On the resulting “pillow” lay the base itself, which can be made of different materials. The main thing is not to forget to make holes in it at a distance of about 10 cm from each other, again to prevent moisture accumulation.
A base with holes made in it is laid in the prepared hole.
We install the finished frame on the resulting base. Now you can proceed to the main stage.
Installation of a cover that transforms into seats
We thoroughly screw two boards on each side to the sides. Then we proceed to assembling the moving parts of the lid. To do this, we fasten the remaining boards in pairs using bars.
We firmly attach two boards to the side sides
The attached boards will serve as the basis for the future cover.
Moreover, for two pairs we use bars 25 cm long, to connect the other two pairs we use bars 45 cm long.
The elements obtained from the first pairs will serve as a seat, and the elements with long bars will serve as a backrest. The protruding parts of the beam will serve as a support, preventing the backrest from reclining.
We assemble the future back and seat from the remaining boards using bars
The protruding part of the beam on the back will serve as a support
We attach the “seat” element to firmly screwed boards using three loops located at the same distance from each other. The hinges should be on top, and the bars connecting the seat boards should be on the bottom.
Using loops we attach the future seat
Here the master used wicket hinges to give greater strength
We attach the backrest to the seat, also using hinges, not forgetting that this time the hinges “look” inside the box, and the bars are on the outside.
The bars for future support should be on the outside
You need to check that all parts move easily
In this version of the assembly, the last stage is quite problematic, because the back part has to be screwed in almost by weight. There is another way. First fasten the back and seat together, and only then put them on top of the box and attach them to the rigidly attached boards.
Attention! To avoid possible injuries, it is important to “drown” the screw heads. You should also check that the lid opens and closes easily.
Final finishing
So, the sandbox is ready! Now it is advisable to smooth out possible corners with sandpaper or a grinding machine. After this, even if all the wooden and iron parts have already been treated, it is better to go through the antiseptic again.
You can simply varnish the resulting structure, but it is best to paint it. And here fantasy comes to the rescue. Don't forget that this is a children's play area. And kids really love bright colors. Color the sandbox with different colors. Additionally, you can draw patterns, funny pictures by hand or apply using a stencil. The main thing is that the children are happy and feel comfortable in the new sandbox.
Just a few colors, but the result is a bright design
To prevent little builders from spreading sand all over the site, it is better to make a separate path to the sandbox.
Video: master class on making a transforming sandbox with your own hands
It’s easy to please your child by making a bright, beautiful sandbox with your own hands. It doesn’t matter whether it’s a simple box of sand or an interesting design. The main thing is that the sandbox is pleasing to the eye, safe, and comfortable. And then the child will receive incomparable pleasure. And if the children are happy, then the parents are happy.
- Author: Zoya Ralnikova
Hello! My name is Zoya. I am an educational psychologist by training, but... a theorist, not a practitioner. I haven’t worked a single day in my specialty. But there are several professions: flight attendant, administrator, assistant manager, designer. Rate this article:
- 5
- 4
- 3
- 2
- 1
(11 votes, average: 5 out of 5)
Share with your friends!
Determining the dimensions
The size of the sand clearing should be such that nothing interferes with the children while playing. You should focus on the number of children and their age:
- It will be difficult for children under 3 years old to step over a side with a height of 20 cm. If the child has already crossed this threshold, then the sides can be made a little higher - 30 cm.
- For one child, an area of 1.2 x 1.2 m is quite enough. If friends join him, then there may not be enough space. In such cases, it is better to expand the area to 1.7x1.7 m. The volume of backfill is chosen so that the child cannot reach the soil. On average, 1 ton of sand is consumed per standard box.