Craft product Birthday Modeling design Waterfall mini MK Natural material
Good afternoon Country!!
I would like to immediately say thank you to my inspiration Natalya Burtseva for the excellent imitation of water and the use of epoxy, thanks to her help and advice everything turned out very realistic, and Olesya for the idea https://stranamasterov.ru/node/423122?c=favorite. My MK is probably more suitable for beginners who are deciding on such a waterfall for the first time, about small difficulties in creating how to solve. Don’t judge strictly, but I will accept criticism))) And so let’s start, an ordinary mayonnaise lid, paint it in a blue or turquoise tone, let it dry completely. Next is the usual bath salt, but as you can see it is already such a sandy color, I didn’t paint it, it already resembles sand.
I stocked up on various things at a regular zoo store, glass shells, pebbles and some artificial vegetation, and at a sewing store I bought some beads resembling pearls. Pour salt onto the dried, painted lid and place our glass pebbles, beads and shells.
Well, something like this. Next comes the most interesting part, the creation of water.
I bought 2-component epoxy glue, this is the only one they sell in our store. It was my first time working with him, but I really liked him. This particular glue is completely odorless. Mix it according to the instructions.
I heat it in hot water for about 5 minutes, then I mix the two components into a pre-prepared sour cream container or you can cut off a bottle, but because... the glue has a slightly yellowish color, I would like it to be more blue, I added small blue glitter for the nails and mixed everything well. Now you can fill.
Carefully fill our lid, this is what happens.
The surface of the water. The most important thing is not to touch it until it dries COMPLETELY so that there are no traces left. It dries in about a day. I poked my finger to check whether it had dried or not and left an ugly fingerprint (((
Then it’s all up to your imagination to arrange the stones and shells. I still have stones from the sea, purchased shells, and purchased vegetation. I glued stones and shells onto a hot gun, I glued my first waterfall onto titanium, the structure was constantly falling apart, but the hot gun sets instantly, you don’t have to wait for it to dry, it makes the work much easier.
The water that flows from the shells was made with titanium, but it was liquid and streams did not work out right away, and I also didn’t like winding it up and pulling it, it didn’t lie down nicely. I made the central stream from the largest shell much simpler, and as a result it turned out even and transparent. I poured titanium glue straight from the bottle onto the shell, it very naturally began to flow down from it, (here is the whole secret) I just blew lightly on this descending stream, it immediately thickened and so on until the stream touched my pond, I added glue and blew until it flowed evenly. It froze quickly and did not spread. I did all the trickles like this.
And this is the other side of my waterfall, I didn’t like the holes between the stones, so I decided to seal them with the same bath salts, here on Titan. She smeared titanium thicker between the stones and poured salt. Let it dry a little, then I covered the entire back side with acrylic glossy varnish along with salt so that it would stick more firmly, and the effect turned out to be interesting, the salt and stones seemed to be wet from water. I will paste a blue satin ribbon along the edge of the lid. I’ll post the final photo of the work a little later, let the waterfall dry.
Source
Caring for decorative structures
The lifespan of the waterfall depends on how the waterfall is cared for.
To extend the life of a waterfall, it is necessary to provide it with proper care. The main activities are as follows:
- systematically add water to the tank as it evaporates;
- clean the water surface from accumulated debris (leaves, branches);
- add special anti-blooming drugs to the water;
- Aquatic plants are planted in the pond (if possible), which will not only decorate, but also purify the water;
- Clean the pump filters 2 times a month;
- drain the water for the winter;
- Regularly inspect the wires for damage.
Morskay10. Artificial tabletop waterfall (master class)
I saw enough of dry waterfalls online and decided to try making such a miracle for my own home!
I collected stones from the road.
I coated them with varnish.
I took out an old plate.
I covered the plate with a napkin. and varnished
I did not decoupage the bottom. left it white.
And she began to slowly glue the stones. constructing a wall-slide from them.
The gaps between the stones were filled with ground coffee. and here and there I stuck some greenery - leftovers from artificial flowers...
When I glued the stones and the fountain had the desired shape, I started pouring glue on top, creating “streams of water”! Good “water” is obtained from glue for gluing ceiling tiles - “Titanium”, “Dragon”, etc.
You need to pour slowly. To make the jets harden, you can pour glue into any container in advance so that it thickens a little in the air.
But, even if the stream does not stay in place somewhere, it is easy to return it to its place by twisting glue from the bottom onto any stick (I used ear sticks, removing the cotton wool), you can do this with a knitting needle!
You wind the glue onto a stick and drag it up to the desired place, and attach it there by rolling it on the pebble and pressing the “stream” against it. In general, the work is very interesting and fun!
And this is the fountain I got.
The crab on top is all that remains of an old, crumbling souvenir, once brought from Adler.
Flying mug made of beads
Pearls are the most noble decorative element that will add festiveness and pomp to any craft! A simple white tea pair can be transformed into such a pearl miracle!
A very delicate floating bowl will be made from soft pink satin flowers and matching pearls. A white dove will perfectly complement the composition).
Beads of different colors will also help create a unique spill cup. Flowers and ribbons of the same shade as the mug will perfectly decorate and complete the image of your cup.
Master - Irina Khokhlova
Basic instructions for preparing shells
Cleansing
Before you start making crafts from shells, you need to prepare them well.
- If the shells are “dead” and there are no shellfish remains left in them, then you just need to soak them in a solution of water and any chlorine-containing product (for example, bleach, “Duckling”, etc.) in a 1:1 ratio for 30 minutes. If the shells are very dirty or you want to remove the dark outer layer (periostracum), soak them longer. After soaking, brush the shells and rinse in clean water.
- If the shells are “live”, that is, they have the remains of mollusks (even if they died long ago) and have an unpleasant odor, then they need to be thoroughly cleaned. To do this, put the shells in boiling water for 5 minutes, and then remove the remains of the shellfish using tongs, nail scissors, etc. There is a second way: heat the shells in the microwave for 30 seconds, then try to remove the remains with tongs.
After processing, inspect the sinks for chips and, if any, sand them with a sanding block, disc or sandpaper. If desired, you can add shine to them using clear nail polish or furniture polish, as well as using oil or rich cream. True, in this case, before treating the shells with glue, the gluing areas will have to be additionally degreased with alcohol.
Drilling holes
To make some types of crafts from shells (for example, wind chimes, garlands, beads, bracelets and other jewelry), you need to drill a hole in them. This task is quite simple, the only difficulty is that the shells can crack or delaminate at the drilling site.
Therefore, remember the main rule: the thinner the shell, the smaller the hole should be in it and, accordingly, the thread/accessories of the decoration.
To make these beads, you need to drill holes in the shells and string them on a silk cord, securing the location with knots. Next, all that remains is to clamp the ends of the laces in the crimp ends and attach the fasteners to them
To make these beads, you need to drill holes in the shells and string them on a silk cord, securing the location with knots. Next, all that remains is to clamp the ends of the laces into the crimp ends and attach the fasteners to them.
There are two ways to make holes in shells - manual and automated.
Method 1. Select a drill bit for a drill, screwdriver or straight grinder with a diameter of 0.8 - 2 mm. Place the shell on a wooden or plastic board and secure it with masking tape. Drill a hole directly through the tape - it will prevent the shell from splitting or delaminating.
Method 2. If you do not have a screwdriver or drill, then you can make a hole in the sink using a nail and a hammer. To do this, first cover the shell with masking tape, put a mark on the inside of the shell, then place a nail and gently tap it with a hammer several times to make the initial hole. Next, widen the hole by moving the same nail back and forth inside it until you reach the desired diameter.
If you don’t have a nail or a hammer at hand, then use an ordinary needle, nail scissors or a knife and “drill” the hole by hand. The result will appear in about 10 minutes.
Flying mug of fruits and berries
With the help of plastic fruits, berries, and mushrooms, you can create such an abundance of fruits and berries pouring out of a cup. Butterflies will perfectly complement your fruit and berry cornucopia.
A floating cup can be decorated with bright gifts of autumn. Dried leaves and flowers can also be used. The mug can be replaced with a wooden barrel made from simple ice cream sticks.
Flowers and fruits are harmoniously combined in a floating stream. Butterflies, dragonflies, and ladybugs will be a wonderful “live” addition.
Idea 1. Inlay frames, frames and frames
You can decorate the frame of a mirror, painting or photo frame with shells. We present examples of such crafts in the following collection.
Today we suggest you decorate a mirror frame with shells, but using the same principle you can decorate any photo frame or painting frame.
Shells of small, medium and large sizes and, if desired, additional decorations (eg starfish, pearls, figurines of skates, etc.). Glue gun and several sticks of glue or clear epoxy glue. Newspaper or any unnecessary paper to protect the mirror from glue. Masking or regular tape.
Step 1: Protect the mirror with paper and secure it with masking tape. At this stage, the frame can be painted if you are not satisfied with its original appearance.
Step 2. Sort the shells by size to make it easier to create your future composition.
Step 3: First glue the first row of small to medium shells (about the same size) around the mirror.
Step 4: Now start gluing on the largest shells. Beforehand, you can play with the layout options and choose the best one. If you are using epoxy glue, once all the parts are glued, leave the frame to dry overnight.
Step 5: Next, fill in the gaps between the large shells, medium shells, and small shells.
Flying mug with birds
The bird is a symbol of lightness and freedom; it is very often found in interior solutions in various styles and variations. This motif is also reflected in the decoration of the floating mug.
A floating mug can become a wonderful house for a nest of birds. The nest resembles a home and an idyll in it.
A cup with daisies and a bird with a nest looks like a real symbol of family, love and fidelity.
A bird with delicate roses, fluttering butterflies and other decorative elements will help create a summer soaring composition.
Idea 2. Making a Valentine panel
From a collection of shells of different shapes and sizes, you can make a panel in the form of a valentine. However, you can cut out any other shape from cardboard/plywood, say, the same seahorse or a letter.
Glue gun or any strong adhesion glue; Collection of river and sea shells; Cardboard; Scissors; Leg-split.
Step 1. Cut out the base for the heart-shaped panel from cardboard.
Step 2. Using a knife or awl, make two holes for the twine.
Step 3. Start gluing the shells, trying to leave minimal gaps between them. Leave the loop holes open.
Step 4. Cut the twine to the desired length, thread the two ends of the rope into the holes on the back of the panel and tie with double knots.
In the next video you can see a visual master class on making crafts from shells with your own hands in the form of a Valentine panel.
Below are more ideas for creating a shell panel.
Pasta Spill Cup
You can decorate the flying cup with simple pasta. It’s better to take bow-shaped pasta, paint it with acrylic paint, and decorate the middle with pearls. We decorate the mug with them and the waterfall of bows is ready!
This mug looks elegant both in pastel colors and in classic colors - black and white.
Black and white pasta in a floating cup
Idea 3. “Painting” a picture on canvas
Here is another idea for creating a wall craft from seashells.
- Canvas on stretcher;
- Shells;
- Glue gun or other strong adhesion glue, for example, “Moment”;
- A template or stencil of the desired design, printed on paper;
- Acrylic paint to create a background (optional);
- Brush (optional).
If you want to repeat the idea of the painting in this master class, then first create a background for the composition from shells. To do this, use a brush and acrylic paint of the desired color. Wait for the background to dry and proceed to the next step. Secure the template or stencil to the canvas using masking tape, and then trace its outline with a pencil. Start gluing the shells onto the drawing without going beyond its boundaries.
Also see our other materials:
Materials
1) tea or coffee pair (cup and saucer)
2) glue for connecting the “flowing” structure with the bowl and saucer. It is better to use the universal Moment gel adhesive for ceramics, plastic or glass. An alternative can be any other adhesive designed to work with smooth surfaces. A glue gun is also used, but it is intended mainly for working with rough surfaces. There is a possibility that the cup will come off in the near future after gluing.
3) thick wire or triple wires. You can use other flexible items, such as old aluminum forks or spoons, or a metal hanger.
4) polymorphus ( superplastic ) – self-hardening thermoplastic. When heated, it becomes plastic and convenient for giving it the desired shape. When cooled, it becomes hard, elastic and durable.
5) masking tape - it can replace superplastic
6) modeling mass , can also replace polymorphus. It resembles plasticine, but unlike it, it hardens well in air. Contains natural ingredients (dough made from cereal flour), so it is absolutely safe for children.
7) decoration items : coins, flowers, pine cones, feathers, candies, beads, buttons, ribbons and much, much more.
Idea 4. Cooking candles for mini-candlesticks
Shells are almost ready-made miniature candlesticks that are just waiting to be supplemented with paraffin and wick. You can use the resulting candles for table setting, a romantic picnic, or simply for interior decoration.
- Sea or large river shells;
- Small round candles in tin molds;
- Water and a saucepan for a water bath;
- PVA glue or double-sided tape.
Step 1. Remove the candle itself from the tin container, and then remove the wick from it by pulling the metal base at the bottom of the candle (see photo). Set the wicks aside and return the candles to the molds.
Preparation of paraffin and wick
Step 2. Glue each wick with double-sided tape or PVA glue in the center of the shell.
Step 3. Now we need to melt the paraffin until it is completely liquid. You can do this in three ways:
Bring the water in the pan to a boil, then reduce the heat until the water stops boiling and lower the ramekins into it. Place the candles on the stove over low heat, and make sure that the paraffin does not burn. Warm up the paraffin using a hairdryer.
Step 4. Once the paraffin has melted, remove the molds from the heat and begin filling the shells. It is best to use some kind of tongs or a pair of Chinese chopsticks for this. Don't forget to protect the table surface with newspaper first.
If the shells are too unstable and you are afraid that the paraffin will harden unevenly, then it is better to arrange the candles in the cells of the egg packaging or fix, for example, with soft plasticine that does not leave marks.
After about 20 minutes, the paraffin will completely harden and you will be able to enjoy the light of the shell candles.
Unusual flying cups
Instead of a flying cup, you can make a flying teapot. This composition will look very original on your kitchen table. When performing such a craft, it is better to choose a teapot of small size and weight so as not to overload the structure. It is better to make a “stream” from a teapot from thin, strong wire (for example, knitting needles) and superplastic.
Hanging flying cups with flowers can become an original decoration! The main thing is to securely fasten them.
A floating cup can be imagined as a mountain waterfall. Moss made from natural sponge or sisal, pebbles and a bear will complete this mountain landscape in miniature)
With the help of LEDs, the bowl can be used as a lamp
Happy creativity and inspiration! Author of the article: Tatyana Babikova
SHARE! "Cross" will not give bad advice! 
Idea 6. Making a flower candlestick
If you have enough bivalve shells, you can use them to make beautiful flower-shaped candle holders.
Today we propose to make such a craft from mussel shells.
- Bivalve shells;
- Any round base of small diameter;
- Glue gun;
- PVA glue (optional);
- Glitter (optional).
Step 1. Prepare the shells - wash them with soap, remove any remaining organic matter and, if desired, bleach them using chlorine-containing products (see instructions at the beginning of the article).
Step 2: Paint the round base of the candle holder a neutral color such as white.
Step 3: While the base is drying, sort your sink set by size.
Step 4: Start gluing 1 row of shells to the sides of the base using hot glue.
Step 5. Once the first row is slightly dry, begin creating the second row, placing each new shell overlapping the previous one so that it is located between the two shells of the first row. As a result, you will have a checkerboard layout of shells in two rows as shown in the photo.
Step 6. Glue the third and all subsequent rows using the same principle, but not on the base, but on the joints of the shells of the previous row (the place is highlighted by the arrow in the photo below).
Step 7. Once you have glued the last row, look around the candle holder and add another row or two where you think it is needed.
Step 8. Hooray, the shell candle holder is ready! If you wish, you can additionally decorate it with sparkles. To do this you need to do the following:
Treat the shells with PVA glue on the inside or just around the edges. Sprinkle glitter generously onto your craft, let the glue dry, and then shake off any excess.
Easter flying mug
The bright holiday of Easter can be decorated with such a cute mug with yellow chicks in a nest with eggs. The nest can be woven from thin twigs, sisal or jute.
Plastic eggs and hatched chicks look cute on their own:
Artificial flowers will make your Easter composition more lush and elegant:
Handicraft masterpieces cover in their master class how to make an Easter floating bowl:
DelkiRu talks about another type of Easter composition in his master class:
Idea 7. Create wind chimes
Shells are an ideal material for making wind chimes, because the “chime” of such sea bells is very pleasant to the ear.
Twine, fishing line or any thread. A twig or wooden stick. Scissors. Hot glue gun or a tool for drilling small holes (drill with a 2 mm drill bit or just a needle and nail scissors). Seashells.
Step 1. If you want the shells to be tied to the threads, then first drill holes in them (see basic instructions at the beginning of the article). If you don’t have a tool, and you are satisfied with the adhesive method of fastening, then immediately proceed to the next stage.
Step 2. Tie twine to the branch as shown in the photo, measure approximately 7 cm in length from it and cut off the excess.
If you use shells with holes, then the twine must be cut immediately to the desired length with a margin for knots.
Step 3: Glue the shell to the twine using a drop of hot glue. Then glue another 7cm strand of twine to the other end of the shell. Continue working until you are satisfied with the length of the first row.
Shells with holes can be tied to a thread in at least two ways: by tying knots around the holes or under them (the knot must be larger than the hole).
Step 4: Continue hanging the shell strings until you reach the desired number. In this case, you can play with the length of the rows to form, say, an arch or a ladder. In this case, the wind chime has alternating short and long threads.
Step 5. When the piece is ready, tie another piece of twine at both ends of the branch.
Following the principles of this master class, but by replacing the branch with a hoop or adding shells with starfish, beads, feathers and other decor, you can create more fancy wind chime designs.
Sea floating mug
Marine themes have found application in this type of creativity. Surely many people have shells at home that they brought from vacation. Using shells, beads, crystals, you can create a creative cup with seafood...
…. flying shell, replete with chic black pearls.
Broken shells, painted ceramic shards - you can safely use all this to decorate your designer mug. Create your own sea harmony.
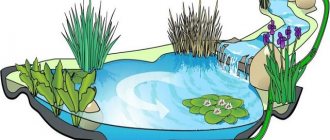
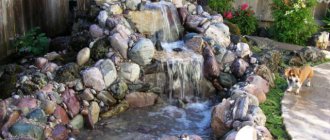
Homemade waterfall for a garden or cottage
Waterfalls in garden plots are a real decoration! Creating an artificial waterfall with your own hands at your dacha is not at all difficult.
You need to know some installation nuances, purchase the appropriate materials and follow consistency in work.
There are several types of decorative waterfall.
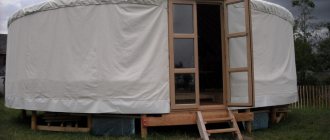
- Fixed (stationary) – represents a sculpture. These can be found in parks and squares, but many install them in their garden plots.
- Submersible - they are installed in reservoirs.
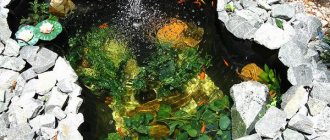
Installing equipment
This is the final stage in the construction of an artificial waterfall. The compressor is attached to the bottom of the tank, a device is installed on the surface to collect the top water and filter it, all other equipment is placed in a shelter built nearby.
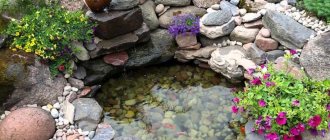
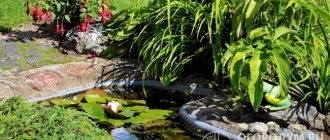
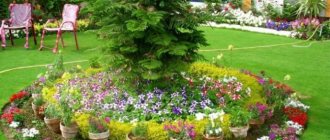
Decorate the waterfall to your taste, you can plant plants that love moisture nearby, and lay out the bottom with beautiful gravel.
This design will perfectly humidify the air in the summer!
Making a water spout
Ready-made designs are sometimes purchased as a vessel for pouring water, but a bowl can easily be made on your own using improvised means. A plastic container in which a longitudinal hole is made is suitable for this. They bend it outward, and the water will flow down it.
In order for water to flow there, a small hole is made at the bottom and a hose is inserted.
Additional Information! The hole should be made slightly smaller than the diameter of the hose itself!
Basis for the cascade
The base must meet several requirements:
- be moisture resistant;
- wear-resistant;
- be resistant to temperature changes.
Typically, concrete blocks are chosen as the base, which are then decorated.
These blocks are used to form a cascade of the required height; they can be left unattached to each other.
The first stage is positioned in such a way that it partially covers the place where the communications are located.
Subsequent steps are always smaller than the previous ones.
The lowest step is decorated with a border, which is subsequently decorated.
Where water outflow is planned, the walls are made smaller in height.
Interior ideas. DIY home waterfall. Part 1. Real waterfall (with water)
Hello, dear users of the World of Talents! In this article I present to you the MK of a certain author with water. It requires a pump. If you want to make a waterfall with your own hands, but don’t want to bother with a pump, then you can make a waterfall with imitation water using this microscope
I don’t know the real source, the source is the site on which I saw MK
It's time for the heating season, which means air that has been dried out by heating. Moreover, excessively dry air not only causes discomfort when breathing, but also causes an increase in the number of colds. The dry mucous membrane of the nasopharynx becomes more susceptible to all kinds of infections and viruses. That is why during the heating season you should think about air humidification. Well, we will humidify the air beautifully.
To make a tabletop waterfall-fountain craft, we first of all need a mini pump for (water circulation in the fountain) lifting water from the lower reservoir to the upper reservoir. It is best to use a pump water pump, which you can simply put in the lower reservoir (pond) and pump water up. Unfortunately, we do not have such pumps for sale, therefore, in this master class, we use a water pump from household appliances, or rather from an electric samovar (photo below).
We make the reservoir of the lower reservoir from a plastic oil bottle (5 l). Cut off the lower part with a height of 5-8 cm.
A round cake tray with a diameter of 29-30 cm is used as a base. You can use any shallow plastic container.
Connection of the pump to the lower reservoir. Using a hot soldering iron, make a hole in the bottom reservoir. The hole should be 0.5 mm smaller than the diameter of the pump tube. This is necessary to ensure that the connection to the pump is tight, which will avoid leakage. If you cannot tightly connect the pump to the reservoir, you can proceed as follows: put a piece of soft hose on the pump tube and thread it into the prepared hole, which will seal the connection (see photo below).
Next, glue the reservoir and pump to the base. We put a soft hose on the supply tube and use industrial cardboard to create a box to hide the pump.
At this step you can check the operation of our fountain. Also check if there is a leak somewhere.
The above steps are only necessary if you do not have a pump pump.
Relief production. To make the relief we will use construction foam. Cover the entire base with foam to a height of 5-6cm. Wait for the first layer to harden. This will take approximately 3-4 hours and start building up the slide (base of the waterfall) (see photo below). We gradually increase the base of the waterfall by 15-17cm.
After the foam has completely hardened (after 10-12 hours), we begin creating a waterfall. We cover the bed of the waterfall with pebbles and place a small lake on top. After completing the formation of the waterfall, we coat the bed well and, especially carefully, the seams between the pebbles with waterproof glue and liquid nails (see photo above).
After the glue has dried, we check the operation of our tabletop fountain - waterfall. It will not be possible to get a beautiful drop of water right away, therefore, using a gun (hot glue), we form 3-4 nests in which streams of water will form and fall down, see photo above.
Next, we proceed to decorating the waterfall and painting our tabletop fountain. Why will we prepare a special paint?
Pour PVA construction adhesive diluted 1:1 with water into a container, add color and sand. Stir and add sand until it reaches a creamy consistency. Let's prepare several shades of green and paint our craft, applying each layer after the previous one has dried.
The result of painting a decorative fountain is shown in the photo above.
Let's start making the base (pallet) for our tabletop waterfall - fountain craft.
From thick sheet cardboard we cut out a circle with a diameter of 30 cm, and another circle with an internal diameter of 30 cm and an external diameter of 32 cm, strips 5 and 1.5 centimeters wide. Glue all the parts as shown in the photos above.
Next, we cover the pallet with wrapping paper and paint it with spray paint, see photo above.
We install our waterfall on the base and proceed to the final stage. Let's take a decorative tree.
We glue the tree into a previously prepared place and complete the work, covering all the flaws and minor defects.
So the original craft is ready. Looking at it, you would never think that you can create such beauty with your own hands and use available materials for this. This indoor fountain will please everyone. What's not an idea for a great gift?!
It would seem that when we offered you to make a fountain - a waterfall for your home, we were thinking about humidifying the air in the room, but in the end we not only solved this problem, but also brought a touch of originality and sophistication to your home.
Good luck to you in all your creative endeavors!
Perhaps you will also