A child’s knowledge of the world around him occurs throughout childhood and is carried out in a playful format. On your own local area of a city or country house, and even on a summer cottage, it is recommended to organize a small play area for children, where certain play structures will be placed.
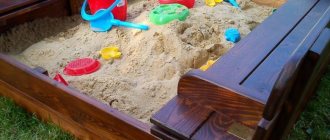
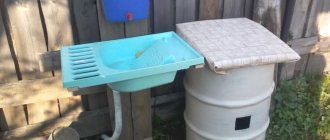
Recommended designs are shown in the photo of sandboxes for children that have already been built on local areas.
Such structures do not require significant financial investments or complex preparatory and basic work, but not a single craftsman can do without mandatory and thorough preparation.
Sandbox: a must-have element of the playground
A do-it-yourself sandbox must correspond to the general concept of the landscape design of the site, and it is difficult to imagine any playground without it.
This design allows children to get acquainted with the world around them and practice their own skills in a playful way, which is very exciting for kids of different ages.
The youngest children enjoy building castles and houses, making Easter cakes, using simple play accessories and wet sand.
For older children, there is also something to do in the sandbox. Here you can organize a racing track for cars or build a beautiful castle for a doll princess, training fine motor skills and developing imagination.Types of sandboxes for children with a roof
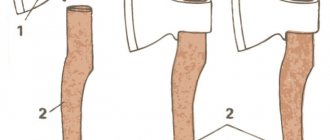
The simplest roof over a children's sandbox is a mushroom. But this is not the best option. It does not protect well from the sun and rain, especially slanting ones. It’s a good idea to make a roof with your own hands in the form of a wigwam, hut, or rectangular gable roof, which will reliably protect you from bad weather.
Sandbox with wooden roof
The most affordable and easiest to assemble option for a sandbox with a roof is a wooden house or gazebo. There can be several ideas for such designs:
- with a square or rectangular base;
- with a multi-pitched roof;
- with a retractable sand tray;
- with seating.
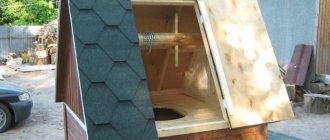
The most comfortable sandboxes are those with a roof that changes its position depending on the child’s location. It’s more difficult to make a movable canopy with your own hands, but you can try.
For a wooden roof, timber or edged boards are suitable. The main thing is that the material must be of high quality so as not to harm children's health. Before installation, the roof is treated with special compounds so that the wood does not deteriorate quickly. Only after this can it be assembled and painted with non-toxic paints.
Sandbox with metal roof
Metal is durable and resistant to wind and snow loads, so you can use it to make a reliable roof for a sandbox with your own hands. When installing it, a metal profile is used, and for covering – corrugated sheeting. The height of the support posts is at least 180 cm. The inside of the roof is covered with boards or sanded wood.
Sandbox with plastic roof
Plastic is low maintenance and easy to install, which is an advantage. However, such a roof for a children's sandbox can easily be damaged by strong winds or hail. And in winter you will have to remove snow and ice crust from it.
They assemble the roof with their own hands according to the metal principle. You can use ordinary inexpensive plastic or colored plastic, which shades the playing area well. If funds allow, then it is worth purchasing polycarbonate sheets. They are more practical and look better. The roof made from polycarbonate with your own hands is solid and does not leak.
Important! A metal profile is used for installing polycarbonate.
What requirements must the finished structure meet?
A standard children's sandbox is a specific container filled with finely graded sand that has been cleared of unwanted impurities.
Such structures are subject to certain requirements that ensure the convenience and comfort of using buildings for children:
- sufficient size for games and creative ideas;
- occupying limited space and a certain height of the sides;
- ensuring increased safety of operation in game mode.
Sandboxes are made from wear-resistant and environmentally friendly materials, which increases the safety of their operation.
It is recommended that home craftsmen provide for the presence in the design of future children's entertainment of certain protective elements and decorative decoration of the structure.
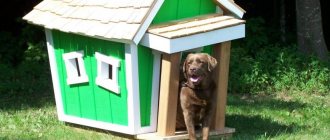
When and how to prune roses in autumn for winter: tips and step-by-step instructionsA decorative cart is a beautiful option for landscape decoration, see options and ideas on how to make a cart with your own hands (photos and videos)
- A beautiful decorative mill is a way to decorate your site in an original way without much effort, see how to make a mill with your own hands!
How to choose the right one
A little effort and a little patience - and a spectacular, colorful playground is ready. All that remains is to fill it with sand. This issue should be approached with all responsibility. After all, the baby’s safety depends on this:
- Firstly, it must be absolutely dry, and the multiplicity modulus of sand grains must be 1-2 mm. It is better not to use finer sand, as if it gets into the baby's eyes, it can cause irritation.
- Secondly, when buying it, you need to make sure that it is sifted, does not have foreign impurities, dust, and has good flowability.
You can buy it in almost every construction hypermarket. The best option is river sand. It is more common and affordable. However, if you buy it in a store, you need to check its safety certificate.
Additional elements of sandbox arrangement
Certain structural elements will help to maximally adapt the sandbox to its comfortable use for a long time.
These include sides and awnings equipped as seats or supporting protective structures, a cover that protects from contamination, and even a separately installed toy box.How to choose sand for a children's sandbox with a roof
The filler must be environmentally friendly so as not to harm children's health. It is better to buy it from companies specializing in the supply of raw materials; the construction type is not suitable for a children's play area. The purchased material has already been properly processed and does not contain insect larvae.
If the sandbox is small, then you can prepare the sand yourself. To do this, it is sifted to separate all debris and small stones, and then dried in the sun. Do not cover wet material, as it will take a long time to dry out, and children playing will quickly get sick.
For children's sandboxes, you cannot use sand that was collected near wetlands and industrial enterprises, at the bottom of dirty rivers, near landfills or near agricultural fields. It must be remembered that sand absorbs moisture, and rainwater can carry pesticides, industrial waste and other harmful compounds.
The ideal option for a children's sandbox is yellow or white filler. Fine-grained sand holds its shape well, does not collect dust and does not remain on clothes.
Comment! Red and gray sand are not the best options for children's play.
Seat bumpers
When determining the future size of the sandbox, do not forget about the correct calculation of the height of the sides, for which you can use wood or stone.
It is better to equip the seats from lumber, which has increased strength and aesthetic appeal; it is recommended to remove all roughness and sharp corners in advance and carefully process them.
What material to build from?
To make the box, it is recommended to use ordinary pine wood: boards, timber, slats. If you are installing a sandbox in a themed design, you can use waterproof plywood or OSB. Any wood is welcome, as it is the safest for children.
In addition to lumber, you can use more expensive decking boards or laminated facing materials. In addition to the sandbox frame, you will need to select a material for waterproofing the base, otherwise the sand will always be damp. For fungus or a canopy, the best solution would be flexible bitumen shingles or fabric awning protection.
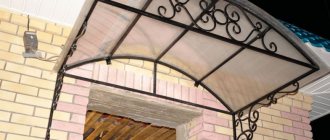
Awning and sun protection
The preliminary layout of the sandbox on the site suggests the possibility of building the structure on an area protected from sunlight.
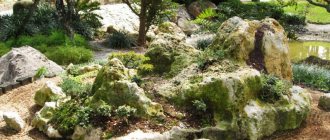
Creating a rock garden - features of application in landscape design. 145 photos of the most beautiful design elementsWe are building an artificial hill on a summer cottage - construction technology and features of application in landscape design (135 photos)
Fruit seedlings: how to choose a variety
If necessary, the future construction project can include the construction of a hanging or stationary awning, which will prevent the negative effects of direct sunlight.
Drawings of sandboxes with a roof
Before building a sandbox with a roof with your own hands, you need to prepare drawings and decide on the dimensions of the future structure. If there are a lot of children and there is enough space on the site, then it is better to immediately make a large box.
For one or two children, a sandbox measuring 1.5 x 1.5 m is enough. If the number of players is larger, then you need to add another 0.5 m to each side. The depth of the sand tray is often 45-50 cm. But it may depend on the age of the children. For the smallest ones, the sides are made no more than 30-35 cm.
When all the details are thought out, the measurements are put on the drawing. You can, of course, do without it, but in a situation where you need to accurately calculate the amount of materials, it is necessary.
Closing lid
A convenient and small sandbox with a lid will preserve the structure and cleanliness of the fill, and such sand will always be ready for play at any time of the year.
If there is not enough lumber for the cover, it is recommended to use covering materials, such as durable film or a tarpaulin cover, for the autumn and winter.Proper care of the sandbox is a guarantee of its durability
This element of children's fun, like any other toy, requires care and supervision. This will extend the service life of the playground and ensure the child’s safety while playing. To do this, just follow a few simple recommendations:
- Before or after play, check the sand for any kind of debris: branches, stones, debris from toys, etc.
- Change sand periodically. Usually this is done once or twice a year. It all depends on the frequency of use.
- Every year, paint the structure, especially if it is made of wood or metal.
- To protect the sandbox from encroachment by animals, as well as from the entry of various debris in the form of leaves, branches from trees, cover it with a lid or awning every time after playing.
By following these simple recommendations, the sandbox will delight your baby for many years and will ensure his safety while having fun.
Container for toys
During the gameplay, kids can use various toys and ready-made sets, which are completely covered with sand and become dirty.
It is better to store such items outside, for which special containers or boxes are used, which can be made from wood or old tires, boxes and other scrap materials.
Tips for parents
Sand games
At the age of 2-3 years, a child still does not know how to play independently. Therefore, at first you should show him how interesting it is to play with sand:
- Dip your hands into the sand together, rub it with your palms, squeeze it in your fist, sift it between your fingers. Share your feelings with your baby: “I feel the warmth of the sand and small, small grains that prickle pleasantly.”
- Leave footprints and handprints on the site with him. Use a stick to draw a funny image. Do the same with the prints of the bucket, mold, spatula.
- Draw a picture in the sand with a twig
- Hide a small pebble or toy in it, and then dig up the “treasure” together.
- Have a competition to see who can pour sand into the largest pile with their palms or a shovel.
- Use molds to build a sand castle. Organize a competition to see who can come up with a bigger and better building.
- Water the sand with water from a bottle. Ask your child which sand, dry or wet, is better to make Easter cakes from. Mix it with pebbles, shells, and earth. Watch together what happens in this case
- Feed the dolls pies made from sand or “porridge” poured into a saucepan
Don't forget that a child needs freedom when playing. Try to help him only when necessary. Control the work less - let him create on his own. Don’t give your child “extraordinary tasks.” As soon as you feel that he is bored, immediately switch him to a new game.
Be sure to invite your child’s peers to visit. Let him learn to communicate with them, share toys and work in a team.
You can clearly see the process of assembling a sandbox made of wood in the following video:
Stages of constructing a convenient and reliable sandbox
The project on how to make a sandbox is quite simple, but when building a durable and reliable structure, you should take into account the recommendations of experts:
- Do-it-yourself mailbox - a detailed description of how and what to make a beautiful and convenient mailbox for letters (80 photos and videos)
Flowerbed made from bottles - a master class in making original flowerbeds. 120 photos of decorating a flower bed using plastic
- Garden furniture - tips on selection, use and care. Rules for placement and nuances of choosing material (105 photos)
- planning the site and allocating space for an interesting playground;
- drawing up a diagram of the future structure with additional elements;
- marking the territory and carrying out earthworks, laying thermal insulation;
- arrangement of the frame for the future sandbox, design of the sides and decor;
- installing awning supports, preparing the toy box and installing the lid.
Before directly filling the container with sand, you should treat all materials with disinfectants and begin painting them.
Making a sandbox
Build the sandbox frame. It's not difficult at all... just assemble a rectangular frame 180 x 210 cm from the sawn fragments and fasten the boards with nails or screws.
Make the bottom of the sandbox.
Note: The bottom is not a necessary element of the sandbox, but without it your structure may become loose and deformed over time. In addition, weeds may begin to grow inside the box. On the other hand, the bottom quickly becomes unusable under the influence of atmospheric moisture, since the floor often gets wet in the rain and there is practically no chance of drying it completely. After weighing all the pros and cons, we decided in favor of installing the bottom of the sandbox.
To create the bottom, we used clapboard - wooden boards that interlock with each other. They are more expensive than regular ones, but they are much more convenient to work with.
The frame and bottom are ready, you can start creating the benches! They not only serve for sitting and relaxing, but also give additional strength to the frame.
Take scraps of boards and cut out fragments, marking them directly on the spot (in the corners of the frame). Be sure to sand rough edges and surfaces.
You can drill a few holes in the bottom to allow rainwater to drain out. How necessary this is is a controversial issue. But we think that this will still be useful: at least some of the water that gets into the sand will be absorbed into the ground.
Well, you did a good job. As a result, you should have a design similar to the one you see in the photo.
Note: we took this photo in the garage, where we brought our not yet finished sandbox, saving it from the rain. We planned to seal the wood surfaces with a layer of sealant, but later, after some thought, we decided that this was not necessary. Paint itself is the best way to protect wooden garden buildings.
One final touch... Attach short pieces of PVC pipe at the corners, into which you can later insert a beach umbrella for protection from the scorching sun. It was my wife's idea and I think it's brilliant. We drilled a hole in the bottom of the sandbox to accommodate the pipe. She stood tightly in the corner between the bench and the side of the sandbox. If your beach umbrella is larger than ours, you will need a larger diameter pipe.
DIY photo sandbox
Did you like the article? Share

0
To make a sandbox sailboat, you will need:
Board 5 cm thick:
- 30×245 cm - 2 pcs. - for sides;
- 15×125 cm - 2 pcs. - for deck seat;
- 15×115 cm – 4 pcs. — wide body parts;
- 10×115 cm - 2 pcs. — narrow body parts;
- 10×180 cm - 2 pcs. - for the mast.
And besides:
- rail 125 cm long;
- a circular saw;
- measuring tape;
- carpenter's square;
- drill with drills;
- bolts with nuts;
- wood screws;
- screws with eye-loop - 4 pcs.;
- a piece of fabric 1.20 m wide, 2.75 m long;
- synthetic cord;
- sewing machine (wouldn't hurt);
- wood glue;
- antiseptic primer and wood varnish;
- brush or roller, solvent, rags.
Let's take 2 boards that we cut for the sides of the sandbox boat (part 30x245 cm) and cut the ends at an angle of 45 degrees - we get the sides of our boat.
We connect the parts of the side with the deck (part 15x125 cm) using wood glue and self-tapping screws - the boat now has seats.
Let's turn the structure around. Using glue and then screws, attach two wide parts of the body (part 15×115 cm) and one narrow part (part 10×115 cm) to the sides.
Using a measuring tape, measure the center along the length of each side, press the mast (piece 10x180 cm) perpendicular to the side, drill and secure with glue and bolts.
Drill wide holes in the tops of the masts and insert a round rail (125 cm long rail) into them, after having lubricated the joints with glue.
Now we polish everything thoroughly.