Of all the types of open hearths, the barbecue is probably the most popular. It can even be made from scrap materials - the main thing is that they are heat-resistant. In most cases, the grill is made of metal. Usually it is portable, and sometimes even collapsible.
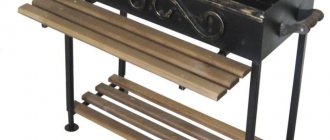
Collapsible grill Gratar Dimensions: - width 36 cm - height 15 cm - length 60 cm - weight 14 kg Steel thickness - ends - 3 mm - sides - 2 mm
Owners of houses and summer cottages can build a stationary kebab oven using brick or natural stone. But in any case, the design must meet a few simple rules.
Origin of barbecue
Many people are sure that barbecue originated in the USA, but this is not entirely true. Since ancient times, people have used a variety of devices for cooking meat over fire.
There are several versions about the origin of barbecue. An African tribe from the island of Haiti used an identical method of frying meat products, it was called “Barbacoas” and was first written about in 1553 in a book by the Spanish historian Cieza.
There is also a theory that the term barbecue comes from the French “barbe a gueue,” which means “from beard to tail.” The meaning of the expression is that the citizens of this country used to fry meat whole carcasses. In America, during the heyday of slavery, a dish of pig ribs, prepared in a similar way to barbecue, was popular among African-Americans.
Design selection
Creating a barbecue is divided into several step-by-step actions. If you follow them exactly, then:
- the design will be strong and durable
- individuality - the barbecue grill will be one of a kind
- You can easily use this barbecue in winter
- the likelihood of error will be minimized
The first step is choosing a design . The stove should be simple and functional. At the same time, an appearance and some platform should be provided to assist in cooking the meat. This could be a small tabletop or a designated area for storing spoons, forks, and skewers. You can also allocate space for storing firewood for cooking.
Example of workspace organization
Since the grill is an individual item, the dimensions and design are also individual.
Barbecue can be of two types:
1. Open – the working surface is open. At the bottom there is a through niche for firewood. A table top can also be placed for convenience.
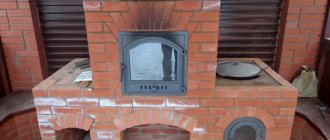
2. Closed – this is a multifunctional design. Basically, this grill is placed near the wall. The niches are all closed, there is a roof and an arch, as well as:
- Countertop for preparing food and utensils
- Place for heating the kettle or heating the first dish
- Dishes storage area
- Firewood storage area
- Place under the sink
Worth considering! This grill requires more material, as well as painstaking work associated with the stove maker.
Varieties of barbecue
There are many different types of barbecues available these days. They are divided into portable and stationary, and can also differ significantly in terms of cost. When choosing a barbecue, they take into account not only the available amount of money, but the size of the free territory. It also takes into account the type of unit, which fuel (coal, gas, electricity) will be easier for you to use.
At the base of any barbecue there is a roasting pan with a grate where meat products are cooked. The simplest types of barbecue have only this detail. The more improved ones have many frying pans, ovens, shelves, lids, etc. List of main types:
- Disposable equipment is a small tray made of thin tin. It is filled with coals and covered with a simple grate. To cook, you just need to place the barbecue on a uniform surface. Cook it once and forget it, because all the coals burn out and the pan burns out.
- A portable barbecue is a design that quickly folds up and is transported in a special suitcase. This equipment is a standard fryer with a grate. This modification is perfect for a short trip to nature.
- The barbecue cauldron is extremely popular in the United States. Its highlight is the dome-shaped lid.
- The barbecue trolley is a complex design with a fixed or folding tabletop.
- Stationary barbecues are made of brick or stone. There is a work surface and a table for guests. Most often, such equipment has a roof or is created in the form of a gazebo.
- The gas design is ideal for cafes. It combines the functionality of a grill and barbecue. Sometimes such models are built into garden structures.
- Electric barbecues are intended for home use. They are compact and can be mounted on a regular table.
General operating principle of the design
The device of a kebab maker can be considered simple. Externally, the grill is a product made of metal or other heat-resistant material, small in width. It is used to ignite wood and smolder coals. The walls of the roasting pan are used for laying out skewers intended for threading meat products and vegetables.
The design of the fryer provides for the presence of holes made for the penetration of air flows, which are necessary to maintain combustion. Using a kebab maker makes it possible to minimize the amount of wood burned, since the incoming heat is stored in the structure.
Most often, a variety of accessories are included with the barbecue installation:
- Set of rods.
- Poker.
- Scoop.
- Metal brush.
Skewers for barbecue have the appropriate length and width, which allows them to be conveniently placed in special fit clamps. This eliminates the possibility of unauthorized scrolling of rods with strung meat products. A poker is used to distribute burning pieces of wood and heat. The scoop is used to clean the device from accumulated ash. A metal brush is also included in the kit. It is needed to clean the surface from soot.
Preparing for self-construction
If you have your own cottage with a small plot of land, it’s time to think about a barbecue for your summer cottage. Creating a barbecue is not the easiest thing, but if you decide to make it yourself, it’s worth going over the main points.
Selecting a location
Choosing a location is an important procedure; first of all, you need to think about fire safety. It is easier to select a corner in the garden and replant plants from there than to put out a fire carried by the wind to trees and houses.
It’s also worth talking to your neighbors about the barbecue in advance if you are planning to install equipment next to it. And of course, a convenient path to the picnic area would be a good solution. Additional requirements for the installation location:
- You must have full access to the site with equipment and a water source.
- It is necessary to place the barbecue near the cottage or house to make it more convenient to perform various actions. Bring water or take the keys.
- A safe distance must be maintained, keeping away from trees and the neighboring area.
- You should not place the structure next to a garage, greenhouse, bathhouse or other buildings.
- When choosing a free place near trees, you need to take into account the height of the pipe and the direction of the wind so that sparks do not harm them.
- There should be no children's attractions, fuel containers, reed fences, or hay near the equipment.
Important! You cannot use kerosene, gasoline or alcohol when cooking on a stove, and it is forbidden to soak it in lighter fluid in advance; it is only used to water the firewood before cooking.
Furnace type and size, drawing selection
Main types of homemade barbecues:
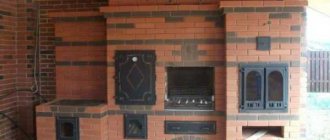
- A standard brick stove is considered the best option for a craftsman, but not a construction pro. It is not difficult to assemble such a structure; in the end, the stove itself should be in the shape of the letter P.
- Equipment with a roof and chimney is much more difficult to make, but kebabs cooked in it will please everyone. Among the important advantages of this model is the ability to cook even in rainy weather.
- Brick barbecue complex. Most often, it is bought already assembled in a special store and placed in a free place. Such a stove and its installation have many advantages: it does not require pouring the foundation and performing facing manipulations. Installation does not take much time.
- Brick grill and gazebo. Owners of large plots often want to make a recreation area and a gazebo in the backyard, because it is very convenient.
- Combination of barbecue and grill. This will help you cook a huge number of dishes at once.
- Separate oven smokehouse. This design has 3 floors, the last of which is considered a smokehouse.
Making a barbecue using welding
This assembly method does not differ much from the non-welding option. The fundamental difference is that all parts are connected to each other by welding. And there is no need to make various bends, form grooves and mounting holes as for collapsible ones.
Welding is often used for more substantial barbecues in the country and camp sites. For convenience, they are sometimes equipped with special places for firewood, a roof and other useful and pleasant little things.
We will also consider a special case of manufacturing - a barbecue made from a gas cylinder.
The advantage of such a cylinder is:
- ease of design;
- cheapness;
- sufficient wall thickness;
- functionality;
- mobility.
Flaws:
Decorative plaster- Artificial turf - what are the advantages?
- What is a sludge pump and why is it needed?
- you need to use only coals for cooking;
- Despite its mobility, it is still impossible to transfer it into one.
Barbecue drawings and diagrams
An individual drawing for a brick barbecue can be made using a ready-made version as a basis. In this case, it is necessary to consider the dimensions and elements of the structure. Also, it is important to calculate the height of the chimneys, the number of additional. fireboxes and other elements, think over their design features.
In addition to the fireboxes, it is worth equipping a place for coal or firewood, protecting the stove from precipitation, considering the design of a smoke elimination system and options for grates and spits. The project of a brick barbecue with a stove can be completed independently, using samples from the network as a basis. If you don’t want to bother too much, try making a structure from a barrel or cylinder.
Foundation
To create a brick barbecue that should serve you for a long time, you will need not only high-quality material, but also the creation of a solid foundation.
To begin with, you should dig a hole for the foundation according to the size of the barbecue. Its depth should be about 55cm.
Marking the designated area for the foundation.
- A mixture of sandstone and gravel is poured into the dug hole. This pillow is made against subsidence of the grill. Pillow height about 20cm
- Next, the fittings are installed. For greater strength, the reinforcing stakes are connected to each other by welding or knitting wire. The height of the reinforcement frame is 20cm
- Using wide wooden boards along the edges of the foundation, formwork is created
- A solution of cement, crushed stone and sand with the addition of water is poured into the finished box.
- After filling the formwork with mortar, the surface is leveled and left for a day or two until completely hardened. It all depends on the weather conditions, if the weather is damp and cloudy, the foundation can be ready after seven days
Ready-made formwork for the foundation
Required tools and materials
To build a barbecue with your own hands, you need to prepare:
- Fireproof type brick.
- Two or three bags of concrete powder.
- Remains of iron and wire.
- Several boards.
- Ruberoid.
- Metal tubes.
- Ordinary brick materials.
- Rubber hose.
- Stainless steel sink and faucet.
The amount of material depends on the stove design itself: the type of masonry and size. To build a barbecue with your own hands, prepare the following equipment:
- Building level.
- A big shovel.
- Thick thread.
- Wedges.
- Basin or bucket.
- Master OK.
Pouring the foundation, laying the furnace with your own hands
To form a good foundation, you will have to follow step-by-step instructions:
- First you will need to choose a suitable location where the furnace will be built.
- Using pegs and regular twine, mark the selected area.
- Take a shovel and dig a hole 25 centimeters deep.
- Place the formwork.
- Prepare the mixture using a sand to cement ratio of 3 to 1.
- Pour the solution into the hole.
Remember that the base must be reinforced. To do this use:
- reinforcing mesh;
- reinforcing bars.
If you prefer the mesh, it will need to be laid 2 times. Moreover, the primary layer is placed when the third part of the pit has already been filled with the mixture. Then the base will need to be filled again by ⅓, making another layer, after which the hole will be completely filled with the mixture. The rods are laid in the center of the base of the pit, then they will need to be filled with mortar. After pouring, the foundation must be given time to completely settle.
How to lay stove bricks correctly?
Outdoor brick ovens are heavy and are assembled on a solid foundation. This could be a strip foundation, a reinforced concrete slab or screw piles connected by a grillage.
There are the following rules for the manufacture of brick structures:
- A layer of waterproofing is laid on top of the concrete. Ruberoid or dense polyethylene is used.
- The lower part (woodshed) is made of stove bricks. The shape of this part is arbitrary. The optimal solution is a woodshed with a height of 12 rows.
- The roasting pan is made of fireclay bricks that are resistant to high temperatures.
- To ensure that stone stoves remain strong and airtight, a solution of clay and sand is used to connect the stones.
To control the verticality of the walls, it is recommended to use a plumb line or bubble level.
Let's move on to the masonry
To quickly make a brick barbecue, you need to do a little fitting. Of course, arranging a brick structure is not a process that needs to be done in an accelerated manner, and therefore fitting will be required, which is carried out according to a sequential scheme:
- The bricks are laid dry on the foundation part.
- The results of the fitting are studied and recorded.
- Such manipulations help in the work process, to operate whole blocks and brick halves.
- If you already have a grate or tray, their parameters must be taken into account when laying.
- After laying out the material, you need to outline the masonry line so that you can then work on it.
Before laying, the bricks are prepared. Not everyone knows that they can absorb water, which leads to weakening of strength. Therefore, a day before starting work, it is worth leaving them in containers with water overnight. You need to start creating a barbecue when the brick materials are dried on the outside, but contain moisture inside.
It's time to start building a barbecue grill for your dacha with your own hands. Prepare the material and solution, then start laying out the first row. Make sure that the space between the materials is completely filled with the mixture and that the brick products sit correctly. To press them into the mixture, use a rubber mallet.
Do it yourself
What can I say! Meat cooked in the wild with your own hands - what could be tastier? If you also have a grill of your own making, it will not go unnoticed.
Often, a store-bought roasting pan is not enough even for one barbecue season. There are also comfortable, reliable stainless steel barbecues on sale, but the cost of such products is very high.
Therefore, a homemade grill will be appreciated. Ideas for creating a barbecue with your own hands can be seen in the photo in this article.
If you have knowledge and experience in working with metal and a set of necessary tools, then making a portable barbecue will not be difficult. An ideal camping grill should have a number of qualities.
It should be:
- reliable;
- light;
- compact when assembled;
- have a simple assembly design.
First of all, you need to prepare a drawing of the future structure. You can also use ready-made drawings, but it is far from certain that the result will meet your expectations.
Therefore, it is better to make the drawing yourself, especially since it is not so difficult. Here you need to think through every detail and provide for everything.
In order for the barbecue to be easily and quickly assembled and disassembled, it must consist of a minimum number of parts (see photo).
On the other hand, all parts must be small so that when disassembled it can be easily transported.
Photo:
It’s better to immediately think about how it will be convenient to transport it. You can use an old suitcase or briefcase, a backpack, a sports bag, or even a small flat box for this purpose.
Based on the chosen form of carrying, you need to think about the dimensions of the grill.
Since, in addition to the grill itself, you will also have to carry skewers, grill grates, coals, marinated meat, dishes and utensils, the less space the brazier takes up when folded, the better.
The best option is when it can be placed in a box measuring 60*30*5 cm.
If the grill will only be transported in the trunk and not carried by hand, then the length of the package can be increased to a meter. It is not advisable to change the remaining values.
When assembled, the barbecue box must measure no less than 60*30 and 15 m in height. You can make a little more, but less is not worth it. At least six skewers must be placed on such a grill at the same time.
What metal is best to make a grill from?
From any that will meet the stated requirements:
- the metal must be light;
- durable;
- resistant to rust and corrosion;
- have a high melting point;
- non-toxic.
Stainless steel barbecues are in greatest demand, since the characteristics of this metal meet all necessary standards. The collapsible grill itself can be made from sheets of metal 2-3 mm thick.
If the sheet of metal for its manufacture is thinner, then there is a high probability of its deformation, and if it is made thicker, the product will turn out to be too heavy.
Video:
Since the bottom of the grill suffers the most from contact with fire, it makes sense to make it from five-millimeter stainless steel.
In addition to stainless steel, sheet iron and alloys of refractory metals are also suitable for making barbecues. The main thing is that the characteristics of the metal sheet meet the above qualities.
Construction of the basement
After building the first row, you will have something to focus on. Remember that the masonry must be done in a checkerboard arrangement. This means that all rows must be shifted half a brick to the side. When performing work, you will have to periodically check the plane of the structure. To do this, work with a level and plumb line. The masonry on corner joints is reinforced with metal wire.
To ensure good reliability of the main part of the barbecue oven with your own hands, you need to prepare suitable fastenings. For example, good fit:
- metal corners;
- reinforcement rods.
Also, don’t forget about the side gaps of the barbecue bricks that will not be filled with the mixture. They are used in the form of a trench.
Barrel model
If you move away from stereotypes and the fact that a barbecue is a strictly rectangular structure, then you will understand that such a thing can be created from almost any suitable metal object, for example, a barrel that is collecting dust in the corner of the barn.
Original barbecue from a barrel
Only those containers where fuels and lubricants were stored cannot be used for barbecues. If the thickness of the metal of the chosen barrel is not too thin, then the structure will have a long life. The barrel will act as a brazier. In addition to this you will need:
– drill;
- metal corner;
- welding machine;
– Bulgarian.
Barrel barbecue project
1. Having made the markings, cut out the top part of the barrel, maintaining the integrity of the ends. Do not rush to throw away “production waste”. The removed piece will be used to make a lid.
Cutting the top of the barrel
2. The metal corner will act as legs supporting the structure. They need to be cut into 4 identical parts and the parts welded to the end of the fryer.
3. Measure the length of the barrel and prepare two more corners of the appropriate size. This will serve as a support for the skewers. You will need to make cuts at the corners at intervals of 4-6 cm. We weld the prepared parts to the horizontal cuts of the sides of the barrel from the inside.
Barbecue from a barrel on legs with a lid
4. Now let’s start improving the barbecue made of this metal, and we’ll do this with our own hands. We will attach the lid to the base with hinges. Two handles should appear on its curved side. This will make it more comfortable to use. The lid will become both a decorative element and a functional part of the design, protecting the grill and the kebab being cooked on it from the rain.
Handle on the lid of a barbecue made from a barrel
Collapsible model
The grill can be made completely collapsible. In this case, you will not have to work with a welding machine. Here you need to act according to a different scheme.
Scheme of a collapsible barbecue
The parts are cut with seam allowance, that is, plus 3-4 cm on each side.
Next, you need to make bends on all sides of the resulting components according to the size of the allowances. This is necessary for corner joining and securing the bottom.
We will assemble the structure using bolts. We prepare the holes for them with a drill.
Folding model
Work on a folding metal barbecue will be carried out according to the standard scheme: drawing, cutting, assembly - only the parts will need to be attached to movable furniture hangers. To prevent the walls from folding arbitrarily, special hooks are welded to their upper part.
Drawing of a folding barbecue
Advantages compared to a standard barbecue
- During construction, available materials are used, so you significantly save your budget while protecting the environment.
- A simple barbecue can be assembled anywhere by a person even with zero level of preparedness, but with imagination and dexterity.
- There is no need to carry additional weight. This is true if you are planning a picnic without a car.
- A roasting pan made with your own hands is always of optimal, suitable dimensions, so the meat will not burn, but will become juicy and aromatic.