Do-it-yourself retaining wall on a site with a slope made of blocks, monolithic, soil. Why do you need it and how can you save money? In the course of arranging relief, owners are faced with the need to strengthen and level its entire area or individual zones. The second way is considered more accessible and correct - retaining walls installed in the right places make the landscape of the site unique and the layout convenient. Modern construction technologies make it possible to use any structural materials for these purposes - from polymers to concrete; all stages of construction can be carried out on their own if desired.
What is a retaining wall?
This design is a seemingly ordinary wall made of durable material, which is assigned the functions of support for unstable soils.
If the site has uneven terrain, includes hills and a large number of slopes, then it is recommended to install supports in the most problematic areas, which will avoid collapse and sliding of the soil.
Don't ignore any uneven spots on your property. It is necessary to take appropriate measures as soon as possible to help protect the site itself and you from trouble. And a retaining wall that you can make yourself can help you with this. If you choose the material for this design wisely, then this wall can turn into a beautiful design element of your site, as a result, your dacha will acquire an original appearance.
When choosing a retaining wall design, you must consider its purpose . Therefore, before its manufacture, it is necessary to find out whether it will serve only a decorative role or whether it will have to solve the problem of strengthening the site. The process of creating a retaining wall itself includes three main stages:
- Making a foundation that will serve as support for the supporting wall;
- Construction of the wall. Here we mean the support itself, which on the inside will provide support to the ground, and on the outside will provide decorative properties to the site;
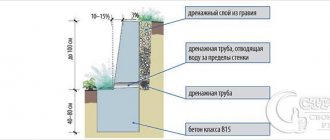
- Drainage and drainage system. These measures are necessary to prevent excess moisture. Moisture will certainly accumulate between the wall and the ground, so the owner will have to think about how to ensure its effective removal.
Price for work, if ordered
When calculating the price, the following indicators are taken into account:
- Terrain conditions (type of underlying soil, presence of groundwater, climate);
- Wall height;
- Number of linear meters;
- Presence of slope;
- Type of drainage, construction of water outflow in the form of canopies and trenches;
- The material from which the retaining wall is made;
- Type and volume of the foundation;
- The price is directly for the work (individual for each performer).
Kinds
Depending on their purpose, all retaining walls can be classified into two types: decorative and strengthening.
The first ones are installed in order to transform the site and add originality to it. As for the reinforcing walls, their main task is to strengthen irregularities , as well as prevent their destruction.
Fortunately, a retaining wall often combines the functions described above, so in addition to solving the problem of strengthening the soil, the owner has the opportunity to use this structure to perform zoning of the territory.
Another sign of the classification of retaining walls is the material used for their manufacture. In accordance with it, the following types of these structures can be distinguished:
- Wooden. These walls are of interest due to the minimal costs associated with their construction. To make them, you will need smooth logs.
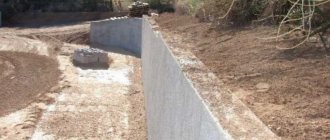
- Concrete. Among all other walls, these stand out for their maximum strength and long service life. However, the process of making concrete walls is too labor-intensive and time-consuming.
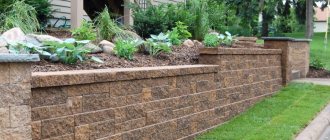
- Stone. This type of retaining wall may be suitable for owners who want to impress their guests. Moreover, this design can be made even more attractive if plants are planted between the stones. Then such a wall will turn into a real masterpiece.
- Brick. It is this type of wall that most summer residents most often choose. They are attracted to them by their high strength, reliability, and ability to transform the appearance of the site.
Where to start implementing ideas for decorating a summer cottage?
The best place to relax from everyday life in the city is a well-kept dacha, where every corner is pleasing to the eye. It’s difficult to start when garden design is still only in plans, and most residents of megacities have almost no experience. There is no point in repeating something if this decor has no practical application, and there is no way to do it without expense.
Comfortable relaxation involves quite practical decor of the site of a private house or summer cottage:
- convenient paths and alleys leading to all remote corners, so that after the rain the damp earth does not stick in clumps to shoes and bare feet;
- a gazebo providing shelter from the summer heat, where you can communicate with loved ones and enjoy fresh fruits and desserts;
- garden swings that will bring many pleasant moments to adults and children;
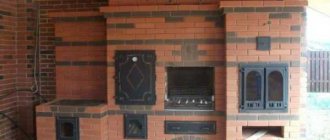
- an outdoor cooking area with a barbecue, grill or other fireplace;
- covered galleries and arches along the paths, entwined with flowers;
- flower beds and flower beds, hedges;
- equipped children's playground with a sandbox, mini-pool and funny figures;
- covered canopies decorated with forging;
- equipped relaxation area with benches on a green lawn with decorative islands made of stones and spectacular plants;
- a small fountain or artificial pond where it’s nice to soak your feet in the heat or watch fish and aquatic plants;
- emotional garden decor made of wood and metal, plastic bottles, tires, ropes, bricks, stones and other materials.
Most of the elements are easy to do yourself, spending a little effort, time and money. Much of what would become a noteworthy decor lies useless in different corners of the site. They start by collecting everything that can be useful in the work, including available materials, tools, nails, paints, etc.
Manufacturing instructions
The first thing the owner of a site who plans to install a retaining wall on it needs to do is perform calculations. The easiest way to do this is to create a design drawing in which the required amount of material should be displayed. It is also necessary to indicate on the drawing what type of drainage system will be constructed and where it will be located.
Types of drainage systems:
- Transverse. In the process of constructing the wall, between every 1-2 layers it is necessary to fix the tube at a certain angle, which will allow water to flow down it.
- Longitudinal. This option involves placing a tube with a cross-section of 15-20 cm along the entire length of the wall, and its end should extend out. For this drainage scheme, you can use either ceramic or corrugated pipe, but in any case it is necessary to wrap it in geotextile material.
When the drawing has been drawn up and the issue of material for constructing the wall has been resolved, we can move on to the next stage: here we will need to mark the territory using rope and pegs, which will determine the installation location of the retaining wall.
Let's start digging a trench . For softer soil and a higher wall, it is necessary to increase the depth of the trench. If the structure has a height of 1 m, then a depth of 40 cm will be sufficient.
Then we proceed to create a pillow, for which we first need to fill the bottom with crushed stone, and lay a layer of sand on it, after which everything is thoroughly compacted. The drainage system must be arranged so that the cushion is located at a slight angle to the slope.
Drainage
There are 3 types of drainage: longitudinal, transverse and combined (longitudinal-transverse):
- Longitudinal - a perforated tube with a diameter of 100-150 mm is placed along the base. It should be wrapped with geotextile. It will absorb moisture and ensure unimpeded flow of water.
- Transverse - holes with a diameter of up to 10 cm are made in the wall itself or tubes with a diameter of up to 5 cm are inserted at an angle to ensure unimpeded outflow of water. The recommended distance between holes is 1 meter.
Wooden retaining wall
To make this design, a log of any cross-section, including 20 cm, is suitable.
For laying wooden logs, you can choose one of the following options: vertical or horizontal.
Vertical installation
In the first case, the logs are positioned so that they are closely adjacent to each other. The advantage of this installation option is that there is no need to make a foundation. The minimum depth that must be maintained for installing logs should be 50 cm . It is best to install the logs to the maximum depth, as this will only increase the stability of the structure.
Horizontal installation
With the horizontal installation method, the logs are placed on top of each other. To do this, first dig a trench, the depth of which should be slightly greater than the thickness of the log. The ditch is filled with a layer of crushed stone, after which a log is laid and fixed with iron reinforcement. After this, the laying process is continued by adding new logs, which are fixed using self-tapping screws.
Before you begin installing logs, you need to treat them with machine oil , bitumen or another product that will help protect the wood from rotting.
Recent Entries
Chainsaw or electric saw - what to choose for the garden? 4 mistakes when growing tomatoes in pots that almost all housewives make Secrets of growing seedlings from the Japanese, who are very sensitive to the soil
The space between the wall and the ground must be filled with fragments of crushed bricks and coarse sand. It is recommended to turn the top layer of drainage into a base for decorative plantings.
Construction Features
Since there are many materials used to construct retaining walls, there are also several construction algorithms. You can take a closer look at an example of a structure using the technology for constructing the so-called dry wall.
Construction algorithm.
- To create a cushion at the base of the support, you need to dig a trench of sufficient depth (half the expected height) and a width that is twice the width of the object.
- Three-quarters of this trench is filled with the following composition: crushed stone, coarse sand, gravel, mineral mixture. This is large-fragment drainage. Such a pillow is created strictly in layers; after pouring, the layer is thoroughly moistened.
- The first stone or slab is installed below the soil level, he/she is sunk on this cushion.
- The space between the soil slope and the stone/slab must be filled with gravel, coarse sand, and mineral compounds. In short, you need to create a suitable buffer layer.
- The wall is being built slowly: stone by stone, with some displacement towards the slope. The free space inside is filled with gravel or drainage.
And a few more tips for different types of walls.
- For high-quality construction of a concrete structure, it is necessary not only to select and mix the composition correctly, but also to produce reinforcement and formwork. First comes the drainage, then the foundation, then the formwork and reinforcement for the frame are installed.
- If the wall is long, it is provided with thermal gaps and special drainage for drainage.
- Gabions are also installed on a bed of sand and crushed stone.
- Combined supports are built according to the rules of dry masonry; individual elements can be fastened with cement. This way you can fasten not the most stable stones with smaller parts.
Concrete retaining wall
The process of making this retaining wall begins with digging a trench, the length of which should correspond to the wall being built, including turns and corners, after which the bottom is filled with a layer of crushed stone or gravel. Next, you need to make a frame from reinforcement and install it in the trench. A combination of concrete and rods will provide a more reliable fastening, which will increase the strength of the structure.
Next you need to make the formwork. When installing supports made of boards along the length of the wall, they must be further strengthened. Unevenness can be avoided by taking appropriate measures to prevent the support boards from bending. This is done by knocking down iron tubes that will provide support for the formwork. They should be placed in increments of 1-1.5 m.
When the formwork is ready, they begin to pour concrete, making sure that it is distributed in even portions over the entire area. After waiting 4-5 days from the moment of pouring, the formwork is removed.
For a concrete retaining wall, it is recommended to install transverse drainage. To do this, even at the pouring stage, the pipe is laid across the formwork, through which moisture will be removed . At this point, the main part of the work on the manufacture of a concrete retaining wall has been completed. Now all that remains is to add moss, thereby giving the structure an antique effect.
Body
The body is the above-ground component of the support. Its main functions:
- Ensure stability - due to the mass of the structure itself and the earth;
- Decorative – should provide a pleasant visual perception;
It is also necessary to distinguish different types of body fastening: rigid structure (monolithic concrete blocks, brickwork) and elastic (materials that can withstand minor deformation without destruction).
Based on the design parameters, it is necessary to determine the need for tilt. If the wall height does not exceed 1.5 meters, then, as a rule, a slope is not required. If the specified value is exceeded, a slight slope will improve its visual perception.
Stone retaining wall
First, you need to mark the place for the future wall, after which we begin to dig a trench 40-50 cm deep. To make the formwork, you need to prepare the boards and lay them in the trench along the entire length on both sides.
To fill, use a mixture that requires the following materials:
- concrete;
- sand;
- gravel.
They must be taken in a ratio of 1:6:6 . For the solution to harden well, you need to wait 3-4 days.
Next, the frozen foundation must be covered with a layer of lime mixture. To prepare it you will need lime, sand and water, which are taken in a ratio of 1:4:300. Next, add the resulting mixture to the cement in a ratio of 1:7 and apply it to the foundation.
We begin to lay the stone. First, the stones must be prepared by removing dirt from their surface and also moistening it with water. The laying itself should be carried out according to the following scheme: two stones are laid side by side, and at the junction there should be the middle of the next stone.
larger stones on the edges . After laying the next stone, you need to rotate it in order to experimentally select the most stable position for it. Each level of masonry must be covered with a layer of lime mortar, the thickness of which should be no more than 1.5 cm.
In addition to what is described above, you can offer another option for laying stones. It differs from the first option in that there is no need to moisten the stones: before work, the stones are stacked on top of each other, and the gaps formed between them are filled with fertile soil, which will allow plants to be planted there in the future.
In the process of constructing a retaining wall made of stone, it is necessary to maintain a slight inclination in the direction of the slope.
When the construction of a stone retaining wall is completed, the space between it and the slope is filled with pebbles or crushed stone . You also need to remember about drainage: for the design in question, a longitudinal option is used, which is installed between the second and third rows.
How the design works
The retaining structure is installed in almost any place you need in your dacha, but it must consist of certain parts. This is the foundation that supports the entire structure, the body of the wall made of the material you have chosen, as well as a special drainage system that helps protect the main production material.
Brick retaining wall
As in the case of a stone wall, work begins with the construction of a foundation for which supports are used.
If you have to work on heavy soil, then concrete can be poured directly into the trench without the use of support boards. To create a reliable retaining wall, it is recommended to use frost-resistant and moisture-resistant bricks.
If the walls being built have a height of up to 60 cm, then masonry equal to half a brick will be sufficient. If the structure exceeds 1 m in height, then the thickness of the masonry is increased to one brick.
When laying the first or second row, it is necessary to provide a hole through which water will be removed. To do this, the area where bricks 4 and 5 are located does not need to be treated with cement mortar; subsequently, drainage pipes will be installed there.
During the laying process, the bricks are placed on top of each other; at the end of each row, cement mortar is applied, for which cement, sand and water are taken in a ratio of 1: 3: 3.
Foundation
Foundation parameters are based on the following factors:
- support dimensions;
- soil type;
- the depth of its freezing;
- presence of flowing groundwater. Based on the depth of the foundation, a distinction is made between shallow and deep (exceeds the width of the base by 1.5 or more times) foundation.
In practice, 2 types of foundations are used: strip and pile . The tape is a solid block that follows the line of the wall and is laid at a depth of at least 60 cm.
When calculating the depth of laying this type of foundation, the depth of soil freezing should be taken into account.
The pile type is more reliable and stable; it is used in cases where the retaining wall is laid on loose soil, or where groundwater flows underneath it at the site of its construction. Piles make it possible to deepen the foundation by several meters or more, giving the entire structure the necessary stability and reliability.
Decor of reservoirs
Artificial ponds, which are an integral part of a full-fledged garden, deserve special attention. Natural and artificial materials, mainly stones, are often used for decoration. They can mark the boundaries of the pond and also line the bottom. Stones or tiles are also needed to protect the pond from soil collapse. If there is an alpine slide in close proximity to a decorative pond, the overall picture will only benefit.
When designing a pond, designers recommend adhering to the general style of the garden plot. The pond should not look like a separate element, but should fit harmoniously into the landscape. If you install decorative fountains and waterfalls on the banks of the pond, they are unlikely to spoil the overall impression.
DIY floating flowerbed
A decorative element of a pond such as a floating flower bed looks very stylish and beautiful. You can build a green island of flowers with your own hands. It is enough to make a strong wooden base with moisture-resistant impregnation, on which a sealing mesh and soil are placed, and plant plants on this raft.
As a base, you can use other materials that adhere to water - polystyrene foam, lightweight plastic, etc. Often the foundation of a raft is made from ordinary plastic bottles fastened together. A floating flowerbed must consist of moisture-loving plants, otherwise the island will soon become unusable. Such plants include:
- ornamental grass;
- sedge;
- lilies;
- papyrus;
- some potted flowers.
A floating flower garden performs not only a decorative, but also a practical function, filtering and purifying water from organic waste. In addition, flowers in water will be inaccessible to locusts and other insects.
Briefly about the main thing
Retaining walls are needed in areas with tricky terrain; they help plan it and make it easy to use. They are used to strengthen slopes and form terraced areas, to create a multi-tiered landscape with a convenient breakdown into zones. They are also used as decorative elements, even in flat areas.
According to the method of use, designs of utilitarian, decorative and mixed types are distinguished. You can’t do without them if the height difference exceeds half a meter. The shape and size of the structure are calculated based on data on the composition of the soil and the depth of its freezing. The height of the wall is determined by the steepness of the slope (the difference in heights).
To build the visible part of the wall, stone, wood, brick, and less often gabions or metal are used. A supporting wall can turn into an interesting landscape element if you make it concrete and line it with a suitable material: tiles, mosaics, stone.