Pros of homemade barbecue
- As a rule, all unusual DIY barbecue photos imply, in addition to the material, the manifestation of the imagination of those who take on such an interesting job. This means that the end result is a device created in a single copy.
- Ready-made barbecues often have limited functionality, which cannot be said about those that were created independently.
- Such options are more budget-friendly, since often at the dacha there is material in the bins that is not used.
- A self-made structure is a designer decor that will decorate the entire area.
What do you need to prepare?
Material options for building a stationary fireplace are brick or stone. They are characterized by high heat resistance and ease of use. It is very convenient to lay out the parts not in contact with the flame from concrete blocks. Concrete casting is a good cladding for a barbecue built at the dacha, but the hearth firebox will have to be made of heat-resistant brick.
Having a good idea of what materials will be needed for construction, you can make a list of what you need:
- cement, sand and crushed stone - for the foundation and masonry mortar in parts remote from the fire;
- concrete blocks, if necessary;
- natural stone or brick;
- heat-resistant brick for firebox;
- a special mixture for heat-resistant masonry mortar, dry (the “Pechnik” brand is common, but another one is also possible);
- barbecue grill;
- asbestos sheet and steel or cast iron plate for the pallet (in some designs);
- accompanying fittings if the structure is complex (doors, chimneys, grates, etc.);
- finishing materials (cladding, countertops, etc.);
- shovel, trowel, containers for mortar and soaking bricks;
- measuring instruments.
At the chosen location, you need to make markings, indicating the place of the brazier, decorative walls and benches, if you want to build not just a fireplace, but a patio with a barbecue. For massive structures made of stone and blocks with your own hands, you will need to dig deep pits and make a foundation for the barbecue from a mixture of 1 part cement, 3 parts sand and 4 parts crushed stone. Further stages of construction can begin no earlier than in 7–10 days.
Ready-made BBQ projects
Firstly, it is worth realistically assessing your capabilities, that is, if the manufacture of such a structure is intended for the first time, it is irrational to choose the most complex projects. Even if these projects seem more suitable for the design of the site.
Secondly, projects should also be assessed from a cost perspective so that work does not stop halfway. It is especially important how to make a barbecue oven so that it is as functional as possible.
Choosing a place for a barbecue
If the main task has been completed and the design of the barbecue has been determined, then it is worth deciding on the place where it will be directly placed.
When choosing an area for the future preparation of delicious food for friends, do not forget that such a device requires special attention to safety. Therefore, it is not recommended to install structures of this type in close proximity to objects made of wood.
Also be careful with proximity to garden trees. Since a barbecue can not only ruin them, but such proximity can also easily cause a fire. Moreover, not only trees, but also any flowers can be damaged, so its location should be planned thoroughly so as not to redo it in the future.
Where to install the stove
The building itself, as a rule, occupies about two square meters of territory, but to ensure fire safety it is better to increase the parameter at least three times.
The structure must be located on a cleared area, at least 3 meters away from fire.
In order to protect against the influence of nature (rain, strong wind, etc.), they are usually built in a small structure or gazebo.
From a practicality point of view, it can be close to the kitchen, because it is more convenient to take two steps from the cooking area to the dining table than a hundred. Also position the roasting pan downwind to prevent anyone from breathing in smoke while cooking or eating.
BBQ material
Despite the fact that, in general, structures such as country barbecues are similar in their functions, the materials for their creation can be completely different.
The main components of the entire barbecue structure, or rather the foundations, must include materials such as construction sand, cement itself and suitable, usually small, crushed stone.
And then the material can be different; concrete blocks or also large-sized stones are often used. The stove is often laid out using special bricks.
Frying chamber roof
To form a canopy on the top of the oven, the roof extends 50 mm.
Forming the roof of the brazier. Looks complicated, but is easy to do
It is more difficult for a beginner to perform the arch of the fire chamber in the 18th row, but:
- you need to first make a cardboard pattern;
- cut it to the size of the brick;
- mark the next part on a specific brick with a marker;
- cut bricks according to marks;
- make a mandrel for the shape of the arch and secure it;
- lay brick;
- wait until the solution sets;
- disassemble the mandrel, the arch is ready.
Continuation of the frying chamber laying
The 19th row begins the transition to form the overlap of the oven, the order is controlled. Each brick at the joints of the vault is cut to size. In the 20th row the masonry is carried out in order, and the 21st row completely covers the vault.
Masonry canopy
Along the 22nd row, the outermost brick row is pulled out and a visor is created
It is necessary to pay attention to the peculiarities of bandaging the corners at the connection of the sidewalls with the rear wall
Covering the frying chamber
In the 23rd row the smoke hole becomes smaller and a chimney is formed. In the 24th row the frying chamber is closed, and in the 25th row its lid is created.
BBQ decor
Of course, the foundation for the oven is important, as it is the basis of the entire future barbecue. But in addition to the technical side of creating such a design, decorative elements are no less relevant.
Interesting doors or doors will turn your barbecue into a truly unique decoration for your summer cottage, so don’t neglect them. You can also buy them in the store or, for example, if you have the appropriate tools at hand, you can make them yourself, which will further increase its value.
How to care
The barbecue also needs care, so you need to stock up on the necessary “equipment” in advance: special brushes for cleaning. In winter, it is advisable to take portable barbecues indoors, while stationary ones will initially have to be placed under a canopy. If your barbecue grill is mounted on metal rods, these will also need to be removed for the winter to prevent them from rusting (this is why the rods need to be removable).
For more comfortable cooking, you can buy a thermal fork - a device for accurately determining the degree of readiness of meat (fish, poultry). By taking care of everything in advance, you will ensure that your barbecue area turns into a favorite vacation spot for the whole family.
BBQ Project
This is where to start creating this undoubtedly useful device. Barbecue drawings can be completely different, depending on the author’s idea. But you should understand that without them it is almost impossible to do quality work.
Since such a project implies precise parameters, on the basis of which it is necessary to create a barbecue. You can edit it during the manufacturing process, but this is only an adjustment, which is permissible if there is a certain base.
Multifunctionality
After the drawing of the roaster is made, you can begin to select additional parts. Basically this is a hob, a chimney, a separate table, a sink, etc. it all depends on your imagination, the main thing is to maintain proportions and take into account the strength of the brick (if the brick is not strong enough, or there is not enough of it, it will fail from the weight of the “buns”).
Barbecue made of stone
There are often a lot of unnecessary stones concentrated in a garden plot that can be put to use. Thus, you will get an extremely useful thing, on which you can make various goodies in the future, on the one hand, and, on the other, the area will be cleared of excess unnecessary cargo.
The stones are neatly and consistently stacked on top of each other, forming a kind of three walls, the height of which is adjusted depending on the presence of the main type of material. The main thing is that there are not very few of them; in this case, it is necessary to add another material, which, for example, is suitable for ordinary bricks.
It is also worth noting that this barbecue will require a grate. The easiest way is to purchase it in a specialized store, but if you have a welding machine, you can try and do it yourself.
This design, of course, is far from an ideal option, but it is quite fast in its production, which means that you can already enjoy delicious dishes that day.
Simple brick grill
This design is very simple and can be easily modified to suit any needs and desires. It consists of brick walls in which projections are arranged (the brick is placed on its edge). Heat-resistant sheets (metal, etc.), grates, and skewers are placed on these protrusions. Convenient, especially if there is some kind of roof over your head in case of precipitation, but it is built separately and at will.
Project and photo of the finished brick grill/barbecue
Any brick structure requires a foundation, or at least a prepared foundation. Not even this small brick grill. Since there are not many bricks - the wall is half a brick - a compacted area lined with some kind of hard covering is suitable for this structure.
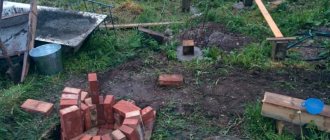
Preparing the base
Remove the fertile layer and, if necessary, deepen the pit. The depth should be about 20-25 cm. The dimensions of the foundation or platform are 50 cm larger than the dimensions of the stove in all directions. The bottom is leveled, crushed stone of the middle fraction is poured onto it. The thickness of the crushed stone layer is 15 cm. It is compacted well. It is advisable to use a vibrating plate, if not, a metal or wooden tamper.
Further steps depend on the selected base. If this is one of the coverings - paving stones, paving slabs and similar materials, then a layer of fine-grained sand is poured into which the covering is laid level.
If a slab foundation is chosen as the base, it is reinforced with a rod 10 mm in diameter. It is laid along and across the foundation in increments of 20 cm, and tied at the intersection. If you don’t know how to knit with special wire, you can tie it with plastic clamps. Reinforcement with a finished mesh of thick wire is allowed for this model. The formwork is placed around the edges and everything is filled with M250 concrete. Work can begin in a week if the average daily temperature was not lower than +20°C, and in two if it was +17°C.
Ordering (masonry drawings) and recommendations for masonry
For this brick grill, solid ceramic brick M200 is used. You can use a stove-type one, but it’s more expensive; you shouldn’t use fireclay: it’s not the right temperature and it doesn’t like moisture too much to feel normal in an open grill.
The masonry is laid using a clay-sand mixture, to which a little cement is added for greater strength. For beginners, it is better to take a ready-made mixture for stoves, but not heat-resistant, without fireclay. Knead according to the instructions, seam thickness - 3-5 mm, maintain strictly. Constantly monitor the verticality of the walls and the horizontality of the masonry. This is important for normal operation of the oven.
Arranging a brick barbecue (masonry drawings)
As you can see, everything is really very simple. Each odd row starts with a whole brick, the odd row starts with a half. In the 6th and 10th rows, the bricks are placed on a spoon - sideways, and turned across the main masonry. If you are making a barbecue - under the grate - in the same rows, the back wall is made of bricks, also placed on spoons, and to maintain the thickness of the masonry, they are placed in two rows, just like the rest - with bandaging - displacement of the seams. If you are going to use the grill for skewers, place a brick on the back wall, also on a spoon, making a ledge in this area as well. In front, a profile metal pipe of small cross-section, cut to size, is used as a support for the skewers. You can make recesses in it for skewers.
Starting from the 7th row, the laying is carried out only on half - right or left - as is convenient for you, but this layout is given under the frying chamber on the left - it is wider, and there is a table on the left. If it’s more convenient for you the other way around, do a mirror image of this order.
Brick is a hygroscopic material; in order to reduce the amount of moisture that it will “pull” from the base and extend its service life, waterproofing is needed under the first row. You can lay rolled material (such as roofing felt or waterproofing material) in two layers and apply hydrophobic impregnation around the perimeter. A layer of waterproofing between the first and second rows would not hurt either.
This is what one of the variations of a brick grill looks like without a table (if you don’t need one, just ignore this part)
After the brick grill is built, it is left to dry in warm weather for 1-2 days, in cooler weather - for 3-5. Then you can do a test run. Approximate “equipment” is shown in the photograph of the finished barbecue. This version has three rows of protrusions: the top one is for food, the middle one is for coals, and the bottom one is for collecting burnt coals and ash.
In order for a folded grill to serve more or less long, it is advisable to coat it with a composition that reduces hygroscopicity. For this case, KO-85 varnish is best suited. And it would also be nice to provide some kind of lid: close it in case of rain and for the winter.
Brick BBQ
For production, it is worth using a special brick, which is considered fireproof. It is more durable and specially made to withstand high temperatures, which means it is ideal for cooking food on it.
In addition, more visually interesting stoves are created with the help of bricks, which resemble real professional designs. For such barbecues you will also need a special durable grill.
In addition to the smokehouse itself, such stoves are complemented by other functional elements. Here they install a special stove, and often a real oven. That is, on such a barbecue you can simultaneously cook several dishes that will not leave anyone indifferent.
Therefore, it is worth assessing the material that is available and, based on this, proceeding directly to building a project to create the best and most interesting barbecue, which is sure to become a favorite meeting place.
Types of structures
The division here occurs according to 2 parameters:
- ease of installation;
- additional "buns".
One of the simplest installations will be a barbecue, laid out of brick in the shape of the letter U. The height can vary, usually 1.5 meters, where a grill grate and a charcoal tray are placed in the middle. The thickness of the side walls may vary; there are no standards.
A more complex stove would be a full-fledged complex, which would be a small tower with compartments. It already needs a stronger and more reliable foundation, stronger materials, and more money needs to be invested in it.