The topic of this article is “Do-it-yourself Alpine slide in a small area,” so we will first of all consider options when there is nowhere to turn around. These are standard summer cottages or small personal plots.
But if you are lucky and you are the owner of a more spacious plot of land, then this does not negate anything in the basic principles of constructing an alpine slide, but on the contrary, simplifies the process and gives more opportunities for imagination.
In this article we will look at all the main points of creating an alpine slide. Therefore, I hope that you will not need any additional information in order to build an alpine slide with your own hands on your site.
What is an alpine slide and how does it differ from a rock garden?
Before we begin to create an alpine slide, let's understand some terms and concepts so that in the future you won't get confused because of this.
So, what is an alpine slide and how does it differ from a rock garden or rock garden?
Or is it all the same thing, just called differently?
In fact, these are similar concepts, but we will try to determine their differences.
An alpine hill is a landscape composition of stones and plants characteristic of the mountain landscape of the alpine and subalpine zone. Since we are talking about a mountain landscape, such compositions are made in volume and can have a height of 0.5 to 1.5 meters. The basis of this composition is made up of large stones and the small terraces they form, on which low-growing flowers and shrubs are planted, as well as dwarf trees typical of mountainous areas. What exactly to plant will depend on the size of your alpine hill.
A rock garden is practically the same as an alpine slide. But at the same time, it can consist of either one slide of a large area with complex terrain, or of several compositions, that is, alpine slides. These slides can be of different shapes, different plants can be planted on them. The combination of several such compositions, decorated differently, but in the same style, of course, creates a more vivid impression of such a garden. But this is already possible in larger areas. If this is your case, then you can easily plan and implement a full-fledged rock garden on your site.
Rockery - translated from English, this is a “rock garden”. It is clear that such a composition should consist of stones randomly located between alpine or garden plants suitable for this purpose.
Unlike an alpine hill, a rock garden is located on a flat surface or a small hill that imitates a mountain slope.
The area occupied by a rock garden, of course, should be larger than that of an alpine hill. Otherwise, the intent of this element of landscape design will be unclear. A properly designed and implemented rock garden looks original and gives the site or garden some aristocracy. But this is a topic for another article.
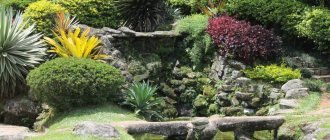
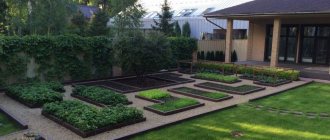
Setting up an area for reading or drinking tea
Behind a fragment of mountain nature there is a lawn for relaxation. For comfort, the two sides are framed with a green wall of deciduous shrubs, low-growing varieties of cypress and thuja, which reach 80-90 cm.
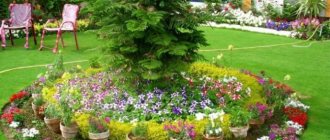
Option for decorating a stone slide with your own hands.
A platform with smooth contours, strewn with gravel or paved with the same material as the paths, is combined with the rock garden. The recreation area is equipped with rattan garden furniture. For the table, a slab (large slab) of rock is laid on a base of blocks.
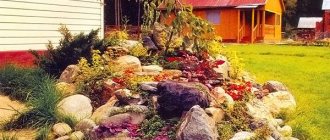
A picturesque composition, created using a combination of different types of stones.
Original tables and benches are made from gabions and boards. Such options create a feeling of harmony and integrity. For reading by the pond, you can place a tray on the stones. A stone outdoor fireplace will warm and decorate the area.
Choosing a place on the site for an alpine slide
Before we decide on the choice of location, let's answer the question: why do we need an alpine slide and why did we decide to build it?
It cannot be said that the alpine slide, as an element of landscape design, is currently something super new. But this in no way diminishes its attractiveness and ability to change the usual appearance of a garden plot beyond recognition. An alpine slide, made correctly and with soul, will become the highlight of your garden plot and a source of pride for you.
You ask, what follows from this?
I just want to bring you to the idea that for an alpine slide you need to try to find a decent, most suitable place. This means the following:
- It makes sense to choose a place where the slide will be clearly visible from different directions. Otherwise, your work will not be fully justified.
- It is advisable that the place be sufficiently illuminated and, to some extent, protected from the winds. This is especially important if you plan to make a “real” alpine slide. That is, plant plants characteristic of a mountain landscape on it. They require such conditions. If the limited area of the garden plot does not allow you to choose the optimal place for the hill, and it turns out to be shaded, then you will have to select other plants that grow well in partial shade.
- If you have a need to divide the site into zones, for example, to separate the front, that is, the front part of the site from the garden or vegetable garden, then an alpine hill will be a good solution.
- With the help of an alpine slide you can also solve practical problems. For example, if you have a place on your site that is good in location, but not suitable for growing flowers or vegetables due to poor soil composition or high groundwater, then it is quite suitable for building an alpine slide. Because in this case the soil will still be bulk.
- You should not place the slide next to objects that do not look very aesthetically pleasing, for example, a barn or a nondescript fence. It is unlikely that such a neighborhood will harmonize well with each other.
- The best options for the location of an alpine slide would be a front area, a relaxation area near a barbecue, barbecue, gazebo or pond.
- If your site has an area with naturally uneven terrain, then this will also be a good option for placing a slide, as it will fit more organically into the landscape design of the site.
I have given you so many recommendations for choosing a location for a slide that you may lose the desire to do it altogether!
In fact, I am not suggesting that you follow all these recommendations, and this is not possible in practice. It’s just that if you adhere to at least some of them, then the choice of place will be meaningful, and not spontaneous.
Layout of an alpine slide on a small area
Don't let such a serious name as planning scare you. There is nothing complicated about this, but it is advisable to do this, especially if we are talking about a small area where every meter of area is important. You can, of course, do everything “by eye,” but in this case it is more likely to make a less than optimal decision and then try to redo something.
And so, if you intend to build a small slide, then it will be enough to simply make a sketch on paper, indicating on it the location of large stones. There is no need to make the shape of the alpine slide correct and symmetrical. This will resemble not a fragment of a mountain alpine landscape, but a well-known ritual structure.
If you intend to build an alpine hill of substantial size, then in this case you need to take graph paper and draw a plan on a scale, for example, 1:25 and indicate on it not only the location of the stones, but also the main plantings. Especially if you plan to plant low-growing shrubs and trees.
It is clear that not everyone likes to engage in such planning. But this will give you the opportunity to test different options. After all, it’s much easier to fix on paper than in real life.
You can read in detail about the layout, and indeed about the basics of landscape design, in the article “Do-it-yourself landscape design for beginners.”
Preparing the soil for the construction of an alpine slide
We will assume that we have completed the preparatory work.
Now you can proceed directly to the construction of the alpine slide. In accordance with your plan or sketch, we mark the boundaries of the future slide. This can be done using a bayonet shovel or by hammering in pegs and pulling twine over them.
If there is turf at the location of the slide, then it must be removed to a depth of about 20 cm using the same bayonet shovel. There is no need to remove completely removed turf. Put it aside, we will need it later.
"Mountain Valley"
Another variety is the “mountain valley” rock garden. Its peculiarity is that, in fact, it is not even a slide; for the most part it is located horizontally on the surface. In this case, stones of different sizes can be randomly placed on the terrain, protruding a little more or less in some places so that the composition resembles a large valley with many mountains. This is also one of the easiest types of alpine slide to construct.
Preparing the base for an alpine slide
The next step will be preparing the base for the slide. In this case, with one action we will solve two problems simultaneously.
If the groundwater level in this place is high, this can lead to further shrinkage and destruction of the slide. This means that drainage needs to be installed at the base of the slide.
If you intend to build a slide of impressive size, then you need to make a foundation under it. Otherwise, it will lead to the consequences indicated above.
In both cases, you need to do the following:
- We remove the soil from the marked area to a depth of about 50 cm. If we previously removed the turf to a depth of 20 cm, then it remains to remove the soil another 30 cm.
- We lay small stones, pebbles, and broken bricks as the bottom layer.
- Pour a layer of sand about 10 cm thick on top to level the base with the ground level.
- We compact the resulting base of the slide and water it with water to shrink it.
- The next day, add sand if the base has subsided, and proceed to further work.
This work is necessary if the alpine slide is of considerable size and the stones are very heavy. If the hill is more modest, then it will be sufficient, instead of the removed turf, to fill the cushion with a layer of 10 cm of gravel and 10 cm of sand.
If you want to be especially careful when constructing the base of the slide, you can place a metal mesh between the gravel and a layer of sand to protect the roots of the plants from rodents.
DIY Alpine slide: basic work
Now you can finally begin creative, constructive work.
If before this only desire and physical strength were required, now you need to rely on the knowledge acquired on this topic and your own imagination.
Selection of stones for an alpine slide
If you have not prepared the stones for the future slide in advance, then you need to do this now. Here are some recommendations for selecting stones:
- It is desirable that the stones are not regular, rectangular or too round in shape. That is, they resembled real stones of a mountain landscape.
- If possible, the stones should be of the same breed, that is, the same composition and color. 2-3 different colors, but similar shades, are allowed. Preferred rocks are basalt, granite, and limestone.
- It is not advisable to use shell rock, tuff or dolomite, as they strongly absorb moisture from the soil and quickly collapse.
- Of course, you should not take too sharp stones.
Stones to choose for an alpine slide
Stones that should not be chosen for an alpine slide
I understand that it may not be so easy to find exactly the kind of stones recommended above. Therefore, you will have to use those that you can get. And I’m giving you recommendations so that you know what to give preference to if you suddenly have a choice.
Preparing the soil for an alpine hill
Now we need to prepare the ground for the slide. To do this, we take the soil removed when constructing the base of the hill, mix it with crushed turf, cleared of weeds and debris, and then add peat, humus and sand in the required proportions.
I say in the required proportions because I don’t know the composition of the soil that you removed from the base of the hill. If it is sandy, then adding sand may not be necessary. If this soil is clayey, then it is necessary to add. In general, the soil should be quite light and fertile.
Laying the first tier of an alpine slide
We will assume that you have stocked up on the required number of stones. Then we take fairly large ones and lay them out around the perimeter of the slide. The stones need to be buried approximately halfway into the soil. Of course, it is advisable to leave the most attractive side of the stone on the surface.
If the stone does not lie on the wide side, then the sides of the stone must be supported for stability with smaller stones.
The stones should not be laid close to each other. Otherwise, it will not look natural, and between the stones there should be soil on which some plants will be planted.
Having finished laying stones around the perimeter of the hill, we fill the first tier with prepared soil and compact it. This especially needs to be done in the center of the slide, where the second tier of stones will be located.
Laying the remaining tiers of the alpine slide
After the first tier of the slide is ready, we begin laying the stones of the next tier.
The stones should not be laid close to the first tier, but in such a way that small terraces are formed on each tier on which the plants will be located. The stones of the second tier need to be buried in the soil in the same way as we did on the first tier.
After laying the stones of the second tier, we fill all the free space with prepared soil and compact it in the central part.
Subsequent tiers of the alpine slide are performed in a similar way.
On its top you can place a large stone that seems most attractive to you.
By the way, the tiers of an alpine slide do not have to be clearly defined. On the contrary, the shape of the slide should be as close as possible to natural, that is, arbitrary, not symmetrical. The top can be shifted to one side. The number of tiers can also be arbitrary from two to five, depending on the size of the slide.
Now you need to take an unbiased look at what you have achieved, compare the result with the slide plan you previously made and, if necessary, make some changes.
The result of the work done: you built an alpine slide with your own hands on a small plot, which you still have to turn into a blooming corner of nature.
After the work is completed, you need to water the slide you built generously and leave it for several days for the soil to shrink. After this time, it will be possible to begin planting the plants, if this coincides with the optimal planting time.
It should be noted that there is another way to fill the tiers of the slide. In this case, the central part of the alpine hill is filled with a mixture of crushed stone and sand, and fertile soil is placed only on the terraces and between the stones. This strengthens the structure of the slide, makes it more durable and saves fertile soil.
In order to consolidate the information received, I suggest you watch a video in which a landscape designer builds a small alpine slide from start to finish. True, I’m not sure that the best place for the slide was chosen and the most optimal plants were selected, but it’s still useful to look at.
What is a rock garden
Alpine slides come in different styles and sizes, but have one main distinctive feature: they always combine mountain vegetation and stones. When constructing a rock garden, two approaches are used: a hill is created artificially on an initially flat area, or natural elevation differences in the area are used. For the first method, in addition to stones, you will need soil, crushed stone or construction waste, from which uneven landscapes are created. In any case, you can create an alpine slide yourself.
Types of rock gardens:
- Rocky hill. The stones are piled up in the form of a hill of arbitrary configuration, on top of which a piece of rock is installed, imitating a mountain peak;
- Terraced garden. Flat stones, mostly flagstone, form several tiers resembling wide steps;
- Czech rolling pin. Flat stones are laid “on edge”, forming a kind of relief of parallel ridges. The space between the rows is only half filled with sand and soil so that the stone ridges rise above the soil.
Making a Czech rolling pin - Supporting wall. Skilfully decorated to resemble a mountain landscape, a rock garden of this type serves to strengthen the slopes on the site.
You can create a slide using a minimum number of stones or no stones at all. Various types of clay pots with unpretentious vegetation are placed on several levels. The advantage of such a flower garden is its mobility (you can always change the composition by rearranging the flowerpots), as well as its ease of care (no need to fight weeds).
Selection of plants for an alpine hill
This question is not so simple and quite important, since several factors must be taken into account at the same time.
First of all, you need to decide whether you want to plant only those plants that actually grow in the mountainous areas of the alpine and subalpine zone or whether you are satisfied with any plants that are suitable for an alpine slide. The complexity or richness of the choice of plants will depend on this.
Pay attention to the proposal below and you will not have problems with choosing planting material.
In addition, you need to consider the lighting of your slide. This will determine whether you choose plants that love bright sunlight, or whether you will have to limit yourself to those that grow comfortably in partial shade.
If we assume that the illumination of your alpine hill is sufficient, then we can recommend the following plants for your choice:
- sedum;
- edelweiss;
- rock alyssum;
- periwinkle;
- young;
- tenacious;
- saxifrage;
- lavender;
- lumbago;
- Japanese spirea;
- aquilegia;
- alpine aster;
- viola horned;
- phlox subulate;
- thyme;
- heather;
- Adonis;
- iris;
- What about the price;
- juniper;
- dwarf barberry;
- mountain pine;
- Canadian spruce.
This video talks in great detail and professionally about choosing plants for an alpine hill. Be sure to watch it, and you will not have any questions about it.
Features of planting plants on an alpine hill
So we have come to the final and most creative process - planting plants on our alpine hill. There is nothing too complicated about this, but there are still some features that need to be taken into account.
You need to start planting flowers from top to bottom. In this case, it will be more convenient for you to work, and you will not damage already planted plants.
If you have a fairly large selection of planting material, then you need to consider which tier is more suitable for certain plants.
It is more advisable to place light-loving and drought-resistant flowers on the upper tier. These can be alyssum, edelweiss, creeping thyme, iberis.
Below may be plants that are less demanding of light, such as awl-shaped phlox, horned viola, lumbago, alpine aster and many others.
Since when watering an alpine hill, moisture flows to a greater extent to the lower tier, it is preferable to plant moisture-loving plants on it. It can be
saxifrage, young, various types of mosses.
Plants that grow well in partial shade should be planted on the northern part of the hill.
Even when planting plants, you should try to alternate flowers with different flowering periods so that your hill looks elegant for as long as possible.
Rules and care tips
To care for an alpine slide, you do not need special skills. Herbs, shrubs, and flowers develop well in the mulched soil mixture that was provided when preparing the stone flower garden. Plantings properly planted in tiers do not require frequent watering. The “population” of the rock garden is watered abundantly only after planting. The planting substrate for conifers from nurseries contains enough fertilizer for several years. On the Internet you need to look up how to properly water, prune, feed, and plant each plant.
Anyone can create a decorative composition on their site.
Caring for a landscape composition varies by season:
- After the spring melt, the cover is removed from the hill, fertilizing is applied, the gravel mulch is renewed, cracked stones are replaced, loose stones are strengthened, and cracks are filled.
- In the summer, the remains of peduncles and damaged leaves are removed, the shoots are cut off, and the plants are replanted in May or August. Instead of weeding, it is allowed to treat weeds with chemicals. The diluted product is injected into the growing point of the weed with a syringe or onto the leaves.
- In late autumn, the leaves are removed so that the rocky ecosystem does not freeze, and covered with spruce branches. On clay soil, diversions for melt water are made.
- In winter, if there is little snow, they add snow cover themselves.
Note! To build an alpine slide, it is necessary to lay a drainage foundation. It will prevent subsidence of the stone structure and stagnation of water.
To make an alpine hill at your dacha, you need to be prepared for long-term work on preparing the site, planting seedlings, seedlings, and creating conditions for the survival of the populated ecosystem.
Various types of cacti are used in the design of the horizontal rock garden.
Even with independent arrangement of the composition, a lot of money is spent on dwarf trees and stone blocks. To save money on your dacha or country house area, you can create an imitation of a mountain landscape from scrap materials. Stones are chosen along the perimeter of the cultivated fields, seeds of fragrant herbs are collected in the forest meadows, blueberry and lingonberry bushes are brought from the forest.
Landscaping of a summer cottage: (read more)
Periwinkle, ferns, tansy, forget-me-nots, lungwort, crocuses, and snowdrops quickly take root in the new location. Painstaking work and imagination will help you create a unique composition. The main thing is not to overdo it with the decor; the rock garden is not decorated with artificial materials.
Alpine slides: photos of the best options
Now let's summarize everything we've read and look at the most interesting examples of alpine slides. Perhaps you will decide to implement something from what you see on your site.
"Forest Ravine"
An extremely atypical type of alpine slide is the “forest ravine”. Such a rock garden is not located on a hill, like most, but, on the contrary, in a recess. Here, more attention is paid to simulating a forest space, so large stones are used, abundantly covered with moss and decorated with many plants. It is also possible to arrange a small pond near the slide, as shown in the photo below. This element will add mysterious expressiveness to your garden plot.