Your baby is growing up, and it’s time to think about a cozy children’s corner in the garden. What is your favorite pastime at this age? Of course, outdoor games. One of the main attributes of a children's playground is a sandbox, where children can play with sand from morning to evening. Installing such a structure in the yard is as easy as shelling pears, since they are sold in specialized stores ready-made. However, their price often does not please caring parents. The best solution in this situation would be a sandbox with a lid, made by yourself. This does not require special skills, and you can use any available means as material.
Children's sandbox with lid
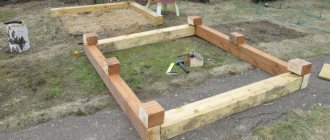
It’s not difficult to make a convenient and functional sandbox with a lid and built-in seats with your own hands. Buy boards and bars and sand them. You can start assembling. The corner bars should be long so that they can be dug into the ground; use the rest to strengthen the corners of the box. You will also need wicket hinges and paint.
When the structure is assembled, you can start painting; soak the “tails” that will be in the ground with a moisture-resistant liquid, or regular machine oil. Then begin assembling the movable sandbox lid by adding two more boards and attaching the wicket hinges. The sandbox lid will also serve as a bench. See step-by-step photos for all the details, a drawing is not included, use the dimensions at your own discretion.
Photo source https://ivan-kruglov.livejournal.com/86227.html Project author Ivan Kruglov
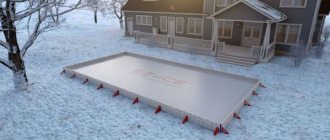
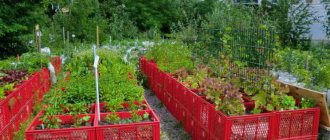
There are many such options for sandboxes, here is another one, only simplified, in this case the box does not need to be dug into the ground. It’s also convenient; the structure can be moved if necessary.
Photo source www.icreativeideas.com/diy-sandbox-for-kids/
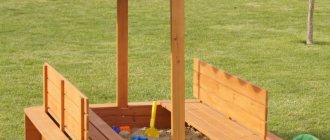
This is how it looks in the diagrams, of course not an exact copy, but to make it clear.
Photo source www.ana-white.com/2011/10/plans/sand-box-built-seats
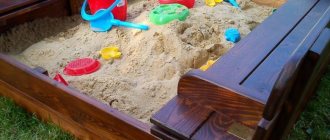
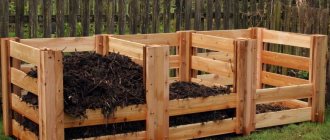
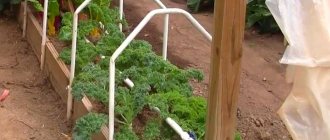
Another children's sandbox with a lid that will protect the sand well from animal excrement and other unwanted things, and at the same time allow water to pass freely, preventing the sand from drying out too much
This is very important, since dried sand, if it gets into a child’s lungs, can pose a certain threat to health. In this design, the bottom is open, so with free flow of water from above and dampness from the ground, the sand will always have the desired consistency
As in previous versions, the lid also serves as benches
When assembling, pay attention to the author’s interesting idea: to strengthen the back of the bench, which the child usually rests on when getting up from the sandbox, make wooden rotating latches that will rigidly hold the back in an upright position
Photo source srbu.ru/blagoustrojstvo-territorii/259-detskaya-pesochnitsa-s-kryshkoj-svoimi-rukami.html
Materials
Sandboxes with a lid can be made from a variety of materials. But they are mainly made from the following bases.
Tree. This environmentally friendly and safe material is quite easy to handle. It should be thoroughly sanded so that no unevenness or other defects remain on the surface. It is also necessary to round corners and edges to avoid further injury. When creating, it is better to coat the wood with special compounds that prevent the formation of fungus. The product can be made from wooden boards (terrace varieties can be used). If necessary, they can be easily coated with construction paint. To secure parts, use wood screws and furniture hinges.
Also, some children's sandboxes are made using metal sheets (in this case, the material is treated with anti-corrosion compounds), stones, and bricks. But such materials are used much less frequently than plastic and wood, since if not handled correctly, children can be injured in such structures. Sometimes structures are made from old large tires, which are completely painted and decorated. They are absolutely safe for the child, he cannot get hurt, the walls are relatively soft and comfortable.
But still, this option cannot be called suitable for placement on a summer cottage, because the installation of protective shutters will be quite complicated. In addition, large tires are too heavy and, if necessary, it will be problematic to move them to another place and disassemble them.
Stages of work
Let's look at the process of creating a simple square or rectangular sandbox with a lid.
Site preparation: Clear the area of unnecessary debris; Using a tape measure, fence off the perimeter, drive in pegs and connect them with rope. Check the marking accuracy again. This can be done easily by comparing the diagonals: they should be equal.
Installing the base: Remove the top layer of soil (approximately 30 cm). Place and compact a layer (5 cm) of sand or crushed stone. It ensures water drainage and protects sand from the ground. Otherwise, they will mix, and insects and other inhabitants will appear in the sandbox.
Reinforce drainage with geotextiles. It allows water to pass through, but polyethylene does not, so when using film, make holes in it.
Installing the sides: Treat the blanks (45 cm long bars and 3 cm thick boards): sand, coat with antiseptic and prime. Place the bars in the corners to a depth of 20 cm. Attach the sides to them. Install horizontal pads. These can be boards of any width, also pre-processed.
Sides for a sandbox made from bottles
Empty plastic bottles are used as sides to build a children's sandbox with their own hands. If they are different colors, they can be combined, for example, brown and white.
The essence of the work is to fill transparent containers with sand, dark ones with soil, alternating in a checkerboard pattern. The main thing is that they have the same displacement, then it is easier to tie them with wire or synthetic twine.
A groove is dug along the intended perimeter (circle) so that the bottles turned upside down go more than half into the ground. All that remains is to secure this side well with earth on both sides and tamp it down with a layer of crushed stone on the bottom.
Fill in clean sand - the place for an exciting children's activity is ready. Several homemade figures made from plastic bottles will complement the playground.
Step-by-step construction of a sandbox with a lid
The future construction depends only on your ideas, capabilities and preferences.
Option 1
To figure out how to make a sandbox with a bench lid with your own hands, you will need a diagram, drawings and step-by-step instructions with photos.
You also need to prepare:
- lumber;
- loops;
- nails.
Step-by-step production:
- All boards are subjected to initial processing with a jointer.
- Using a router, we round the edges and clean the material with sandpaper.
- We paint the blanks.
- We knock down a couple of boards using a block and nails.
- We turn the boards from step 4 over to the other side, place 2 more boards on the bars and connect them with loops with self-tapping screws.
- We mount another third, with the fastening elements located at the bottom.
When constructing the lid, it is necessary to make a gap between the boards of 5 mm.
- We make the second half of the product in the same way.
- We assemble the box from timber or boards and paint it.
- Attach the lid to the base.
Option 2
To build another sandbox, you will need the same list of materials as for the previous structure. A jigsaw, a grinder and a screwdriver will suffice as tools.
We advise you to study - Which building blocks are better
We produce in the following sequence:
- We cut the boards to size and process them using a grinder with an emery wheel.
- For the box we use a pair of boards on each side. We connect them with bars, as in the photo. The protruding part will serve as a support.
- We fix bars at the corners to increase the strength of the structure.
- We paint all wooden elements.
- We fix 2 boards to the base with screws. We lay a couple more boards and install hinges to them.
- We place the next two boards on the box and fasten them to the previous ones using bars.
- We choose the length of the wooden elements so that when the lid is lifted, they serve as support for the backrest.
- To prevent the benches from sagging, we attach a part in the center of the first two boards, as in the photo.
- We perform the second part of the lid in the same way.
- To protect the corners from moisture, we cover them with a wooden element.
- We prepare a place for the sandbox, install the structure and fill it with sand.
With roll-up lid
You can build a simpler sandbox design without benches, in which the lid is rolled up. The tools and materials used are the same as in the previous versions, but instead of canopies, dense rubber is used.
Step-by-step instruction:
- We cut the boards to the required length, process them and cover them with protective agents.
- We prepare strips of thick rubber the same length as the boards for the lid.
- We assemble the shield using rubber to connect the boards.
It is better to use small nails to attach rubber strips.
Roof for sandbox
An addition to the sandbox with a bench-lid, made by hand according to step-by-step instructions with drawings, diagrams and photos, will be a roof, and we’ll look at how to make it in more detail.
The material will also be wood, and OSB will be suitable as a roofing covering.
The build process is as follows:
- We fasten vertical elements made of timber 50x80 mm and 150 cm high to the side walls of the box with self-tapping screws.
- We level the racks using a level and connect them with a horizontal block.
- Assembling the base for the roof.
- We cut the rafters 1 m long, lay them and secure them to the prepared frame.
The roof base must be securely connected with self-tapping screws without any gaps.
- We cut out sheets from thick plywood or OSB and fasten them to the frame.
- We paint the roof in the desired color. If desired, the design can be decorated with different designs using stencils.
Sandbox with lid: advantages
Why did the idea of building a sandbox with a lid arise? Firstly, to protect the play area from pets. Because cats and dogs love to relieve themselves in the sand. However, the lid will reliably protect the sandbox from turning it into a cat litter box.
Secondly, during rain, less moisture will get into the sand through the cracks in the lid. This will be enough to maintain the sand at the “consistency” needed for building castles and making Easter cakes.
Third. Sand protected from drying out will not turn into dust. If sand particles get into children's lungs, quite serious consequences for the child's health can occur.
And finally, one more pleasant aspect. The sandbox lid can be transformed into two comfortable benches with backs. And parents will be able to comfortably watch the little one’s fuss.
Types of sandboxes
The simplest sandbox is the open wooden structure familiar to everyone from childhood. It is a box made of boards and filled with sand. Almost any man can make it, capable of sawing off boards of equal length and driving in several nails or screwing in screws. It is more difficult to make a collapsible sandbox - it is assembled from cuts of the same height and width, like a construction set. More complex preliminary calculations will be needed here. If you make do with improvised means, you can build a sandbox from wood cuts dug into the ground. Or simply lay thin logs, fastening them together like a log house.
Photos of varieties
Today you can increasingly find a sandbox with a lid. This may be a removable lid, which will need to be removed and then put on each time, or a hinged one. It will protect the sandbox from rain, falling leaves and unwanted visits from nearby cats and dogs who want to turn the sandbox into a toilet. And it’s much more convenient to leave the sandbox closed for the winter - you won’t have to clean it out of debris in the spring. An interesting option is a sandbox with a lid that transforms into a bench or table. It is not only functional, but also convenient. A child can sit on it while playing, rather than on the sand, and closing it is much easier than a solid one.
To cover the sandbox, you can use a polyethylene roof or umbrella. But this is protection only from the sun and rain, but not from garbage and animals.
Nowadays there are various types of plastic sandboxes on sale. But they, compared to wooden ones, have some disadvantages. Plastic is quite slippery after rain; it can be used of fairly low quality - fragile, with a specific odor.
The sandbox can be made of brick or stone. Despite the fact that such a sandbox will look interesting, when playing, a child can get seriously injured by hitting the side.
A sandbox made of wood is still preferable, since it uses environmentally friendly material, it is the least traumatic - every father will carefully treat all surfaces, and it is convenient. When working with wood, you can develop and implement your own project - a sandbox-ship, car, carriage, etc., and modernize it over time.
Sandboxes made of various materials (photo)
How to make a canopy
The easiest way to protect your child from the sun's rays is to install a beach umbrella next to the playground. By the way, you can provide a hole for it in the corner of the box. Another option, if there is enough space, is to place the umbrella in the center of the base.
A little more complicated - the tent type. To do this, a crossbar is installed in the center and a windproof fabric such as tarpaulin or nylon is thrown over it. It can be stretched along the edges using pegs in the ground or loops on the curbs.
A roof in the form of an awning is the most complex type of shade canopy. It is installed on two or four support legs.
Instagram @dpolinadel
Instagram @dream_house_from_julia
Tools and manufacturing process
For construction you will need the following tools and materials:
- Lumber (boards, bars, beams, eurolining).
- Door hinges (if you plan to make a sandbox with a lid).
- Fasteners (nails, screws, self-tapping screws).
- Hammer, screwdriver, grinder, jigsaw.
- Tape measure or centimeter.
Fence the area where construction is planned. Arm yourself with a bayonet shovel and remove the top layer of soil. Divide the square where the sandbox is located with two diagonal lines, and at the place where they intersect in the center of the structure, make a small hole. This will be a place for water to accumulate after rains. The hole should be filled with small stones: crushed stone, pebbles, expanded clay. Make a funnel around the perimeter of the entire sandbox with a slight slope towards the center. This is easy to do with a patting motion with a shovel.
Construction of the frame
As a rule, the frame dimensions are 2.5 meters by 1.5, but you can choose any one. It all depends on your desires and the area of the plot.
We advise you to study - Decorating a wooden house inside
We take the timber and cut it to the required size. Don't forget to sand the boards so that the child doesn't get hurt in the future. Take a screwdriver and fasten the structure to form a box. Then they begin to make the sides. They will serve as a bench and table for sand cakes.
Next, take the boards. They should also be processed in advance so that there are no uneven spots left. Screw them to the box. The easiest way to do this is with self-tapping screws.
Sandbox cover
At first glance, the place for games is ready. Now the question arises: do you need a lid for your sandbox? Much speaks in favor of this design:
- Firstly, it is protection from natural precipitation.
- Secondly, from dirt and insects.
- Thirdly, many animals are not averse to relieving themselves in sand. And these are unsanitary conditions for children to play.
To build the lid, measure the required number of boards to size. Go over them with a sander. Attach a couple of boards to the bench with self-tapping screws, then fasten two more boards together and connect these two structures using door hinges. On the other side of the sandbox, repeat a similar procedure. If the lid needs to be made even longer, attach a couple more boards on each side using the same hinges, but fasten them on the other side. You should now have an accordion.
Secure the handles to lift the lid up. Now the folding lid for the children's sandbox is ready.
Treat the product with a wood antiseptic and let it dry. On top you can cover the sandbox with paints or draw different designs. You can do this together with your child.
If you give free rein to your imagination, you can come up with a high roof that will protect from the sun and rain. The easiest way to do this is to screw four bars to the base, and make a sheet of boards, plywood or other material on top.
If you approach manufacturing creatively, it is possible to build an entire ship: a mast made of a block should be fixed in the center of the sandbox, and an old sheet will serve as sails. There are plenty of options to diversify daily games. Feel free to involve your child in this matter.
Sandbox with lid: design features
When starting construction, think through the main details in advance, starting with size. The sandbox should be deep and roomy enough so that a one-and-a-half-year-old baby can climb into it without any problems, but so that even a five-year-old child doesn’t feel cramped there. For this purpose, dimensions of 1.5 m x 1.5 m are suitable: such a sandbox will not take up much space and can comfortably accommodate 3-4 children.
Calculate the height of the structure so that the sand layer is at least 15 cm. Do not forget to leave space on top for sitting. With a board width of 12 cm, you can build a sandbox using two boards, that is, 24 cm high. This is quite enough for the child to not only sculpt Easter cakes on his “construction site”, but also build a sand castle.
But does the sandbox need a lid? For those who love order and care about the health of children, the answer is obvious.
The cover protects the sand:
- from being scattered throughout the territory;
- from excessive getting wet during rain;
- from debris, branches, rotten fruits;
- from the encroachments of dogs and cats, arrange a toilet there.
The lid will protect the sand from contamination and become a convenient bench
The simplest cover is a shield made from boards, which is used to cover the sandbox after the game. It is the easiest to make, but such a cover is very heavy and bulky, it takes up additional space on the site during the day, and it is quite difficult to move it from place to place. Therefore, we suggest choosing a transforming lid: its construction will take more time, but the result will be justified. Build a lid that, when opened, turns into a table and/or a comfortable bench with a back: not only will the child like them, but they will also entice adults to join him.
Photo gallery of options
You don't have to stick to the traditional square shape
Use of car tires
It is necessary to protect the child from the sun's rays: a bright, large umbrella will help. The lid will help protect the sand from debris and moisture.
The bright cover transforms into comfortable seats, thereby adding a place to relax
An easier-to-use, but more difficult to manufacture option with a solid lid
Can also serve as a separate game element
Such a sandbox allows the child not only to play with the sand, but also to walk along the sides and warm up a little
Standard sandbox - easy to make
To protect children from the sun, you can make a canopy
Also protects sand from contamination
An original boat will delight your child
Another version of the sandbox in the form of a ship
Choosing materials for making a children's sandbox with a lid with your own hands
To make a sandbox, it is best to use those types of wood that are least susceptible to moisture. These can be quartered or tongue-and-groove boards, bars treated with an antiseptic. For long-term use, choose coniferous wood. Alder and aspen will last less. It is not recommended to use chipboard, plywood and other building materials obtained by pressing sawdust. It is best to pre-treat parts that will be in the ground with bitumen mastic.
To prevent sand from sinking into the soil along with precipitation, and to prevent weeds from growing in the sandbox, make a bottom in the sandbox. Please note that it is better to fill a sandbox with a height of 25 cm with 15 cm of sand and for a size of 2x2 m you will need about 1 m3 of sand. River sand is best suited, but you can use construction quartz sand, having previously sifted it to remove large fractions. Sea sand is salty, so it is better to avoid it.
Escaping from the sun
In the photo of the sandbox for children you can see wooden mushroom canopies from the sun. They are decorative and functional - under the hat you can create a small table for storing toys.
The leg is installed in the soil to a depth of 0.7-1 m, after which it is filled with concrete. At the dacha, you can get by with a less labor-intensive and more mobile option - a folding umbrella.
Sandbox with lid: stages of construction
Before starting construction work, it is worth making a schematic plan drawing. Believe me, if you work with drawings, things will go much faster and better. Well, if you don’t have problems with memory and imagination, you can sketch it out in your head.
We begin construction by cutting the boards to the length you need. When the material is ready, start assembling. When assembling, it is necessary to drill guide holes for the screws to avoid splitting the boards.
First of all, make the base of the sandbox. For this, boards one hundred and thirty centimeters long and 3×7.5 centimeter blocks are used, fastening them at the corners of the “box”. Check the corners of the future sandbox. They should be equal to 90 degrees. Once you are sure it is correct, screw on the second tier of boards. As a result, you will get a base whose sides will be equal to 130 by 135 cm.
After the box is ready, you need to use a material that prevents the growth of weeds (you can use Spunbond). When stretching Spunbond, avoid excessive tension. The material must be spread over all areas of the structure, securing it with a construction stapler.
Making a lid-bench
After this, we begin assembling the cover. For these works you will need 12 prepared boards. The boards for the lid must be well planed so that there are no burrs. Because they can injure or prick the delicate skin of children. When making the cover, position the boards so that the smooth surface is “facing” the sand. Fasten two boards together using timber. And then connect three pairs using canopies to form an “accordion”. Repeat. You will get two lids, each consisting of six boards.
We advise you to study - Metal roofing technology
Attach each end board to the manufactured box. When fastening, do not be too zealous and do not overtighten the screws, otherwise the board may crack. Using sandpaper (an angle grinder is recommended), thoroughly polish the underside of the boards
Pay special attention to this issue, because the boards will serve as a seat
The seat back is secured with metal hinges. For secure fastening, it is recommended to use three or four loops, distributing them evenly.
To firmly fix the seat back in a vertical position, you need to build wooden latches. Simple boards, which are latches, should rotate 360 degrees and hold the back in an upright position.
Lids
The second attribute necessary for sandboxes is lids. Not only do leaves fall into the sand and all sorts of garbage gets into the sand, but animals also love to be there...being there. You can prevent attacks on the purity of the sand by using a lid. In the simplest version, it is a shield made of boards or cut out of plywood, to which handles are attached.
Cover made of boards
To avoid having to remove and install the panels every time, you can attach hinges, and to prevent the doors from hanging, weld handles on which they can rest. When the lid is folded back, you get two small play areas. Children can sit on them or build their own sand castles. Therefore, it is more convenient to make such covers from plywood: there are no cracks and they are lighter in weight.
Hinged lid
There is an even more interesting design - away. This type of cover is definitely made from plywood. Nail the top bar so that there is a gap left. A sheet of plywood is inserted into it. And so that the opposite end does not dangle, legs are nailed - small pieces of timber.
Interesting sandbox lid design
The same principle is implemented differently in the version in the photo below. It is already for those who are good at carpentry.
The cover rides on guides
Step-by-step instructions for making a children's sandbox with a folding bench
When making a bench, it is recommended to strictly adhere to the step-by-step instructions:
- Once you have decided on the location, you need to mark the area. To make the calculations more accurate, it is recommended to install pegs around the perimeter and stretch a cord between them. Using a tape measure and a square, you can make the corners even.
- Now you need to remove the top layer of soil with a shovel. It is advisable to make the depth a little more than 25 cm. This step will eliminate the rotting of plants and the appearance of various living creatures in the sandbox, and will also ensure the reliability and stability of the structure.
- Next, you need to level the bottom and fill it with gravel and sand in a 10 cm layer. Then the surface of the pit is compacted and leveled. Due to this, water will not accumulate under the sandbox.
- After preparing the bottom of the pit, you need to lay the base of the structure. Polyethylene is suitable for this. It needs to be laid at the bottom of the hole, after making several holes in it with a nail. This is necessary so that moisture does not linger in the sand for a long time, but goes into the ground.
- At this stage you need to make a frame for the sandbox. To do this, sides are constructed from two boards. For fastening it is customary to use self-tapping screws, bolts or metal plates. The connecting parts are bars - they fasten the sides on the inside of the sandbox.
- Before installing the sandbox in the soil, you need to dig 9 holes around the entire perimeter of the prepared hole, into which the supports will then go.
- Then the boards are secured with self-tapping screws to the upper edge of the side, serving as the basis for the lid.
- You need to attach door hinges to the boards you just installed at a distance of 35 cm from the edge.
- Now you need to secure two more boards. The hinges are installed on the opposite side.
- Then you should install boards that will act as a backrest. The corresponding wooden parts are secured with self-tapping screws.
- Now you need to fix the stops to the base of the seat.
- In order for the back of the benches to have a stop, you need to install the bars and secure them with self-tapping screws.
- At the end, it is necessary to install the structure in specially prepared holes in the ground and secure it well.
Useful tips
Almost every parent has the opportunity to build a sandbox on their garden plot for their beloved child. However, in order for the structure to last a long time and not pose a danger to the child, it is worth following several recommendations during its manufacture and installation:
- The sandbox should be within sight of parents so that they can check what their child is doing at any time.
- In order to reduce the likelihood of infection through sand, it is recommended to choose an installation location away from trees.
- The dimensions of the structure must be chosen such that it can ultimately accommodate more than three children.
- The structure should be installed on an elevated area, since with this location it will not collect sedimentary moisture.
- You need to install the sandbox so that one part of it is in the sun and the other in the shade. This will allow the sand to warm up evenly without burning the child.
- It is better to choose river sand because it is cleaner and contains a minimum amount of impurities.
- To prevent stray animals from trying to “take a fancy” to the sandbox, you can treat the outer perimeter with a special agent that repels cats and dogs.
- Before you start construction, you must check that all the boards are sanded.
- For manufacturing, use only high-quality materials.
- When choosing a location for installation, it is recommended to immediately check whether there are thorny bushes, allergens or other plants nearby that could harm the child.
- Ensure that the perimeter of the structure is free of electrical wiring, various hoses and pipes.
- It is advisable to make a lawn around the sandbox, seeded with trampling-resistant grass.
- It is recommended to locate the structure on the south side - this way the sand will warm up faster.
The main thing is that playing in the sand is safe
Step-by-step construction of a sandbox with a lid
Option 1
- lumber;
- loops;
- nails.
- All boards are subjected to initial processing with a jointer.
- Using a router, we round the edges and clean the material with sandpaper.
- We paint the blanks.
- We knock down a couple of boards using a block and nails.
- We turn the boards from step 4 over to the other side, place 2 more boards on the bars and connect them with loops with self-tapping screws.
- We mount another third, with the fastening elements located at the bottom.
- We make the second half of the product in the same way.
- We assemble the box from timber or boards and paint it.
- Attach the lid to the base.
Option 2
- We cut the boards to size and process them using a grinder with an emery wheel.
- For the box we use a pair of boards on each side. We connect them with bars as in the photo. The protruding part will serve as a support.
- We fix bars at the corners to increase the strength of the structure.
- We paint all wooden elements.
- We fix 2 boards to the base with screws. We lay a couple more boards and install hinges to them.
- We place the next two boards on the box and fasten them to the previous ones using bars.
- We choose the length of the wooden elements so that when the lid is lifted, they serve as support for the backrest.
- To prevent the benches from sagging, we attach the part in the center of the first two boards as in the photo.
- We perform the second part of the lid in the same way.
- To protect the corners from moisture, we cover them with a wooden element.
- We prepare a place for the sandbox, install the structure and fill it with sand.
With roll-up lid
- We cut the boards to the required length, process them and cover them with protective agents.
- We prepare strips of thick rubber the same length as the boards for the lid.
- We assemble the shield using rubber to connect the boards.
Roof for sandbox
- We fasten vertical elements made of timber 50*80 mm and 150 cm high to the side walls of the box with self-tapping screws.
- We level the racks using a level and connect them with a horizontal block.
- Assembling the base for the roof.
- We cut the rafters 1 m long, lay them and secure them to the prepared frame.
- We cut out sheets from thick plywood or OSB and fasten them to the frame.
- We paint the roof in the desired color. If desired, the design can be decorated with different designs using stencils.
Preparing parts for the frame
Having chosen a form for the sandbox, we proceed directly to work:
- On a wooden sheet or plywood sheet, mark the boundaries of each part using a construction pencil for this purpose.
- Use a jigsaw to cut out the workpieces, carefully polish the edges and sharp cuts. While playing, the child should not damage the thin skin from random nicks and knots.
- Next, you should pre-treat with special compounds (antiseptic, antipyretic, moisture-resistant and antifungal solution), and allow the products to dry.
To fasten parts together, it is better to use safer methods: metal corners along the outer surface of the frame, dowels along the internal contour. For safety reasons, it is not advisable to use pointed screws, screws and nails.
The frame is installed on the lower frame, secured with dowels. Rotary fittings for the future lid are placed along the contour of the sides. The locations of the fittings must be shown on a previously prepared drawing.