Arranging a recreation area is one of the best decisions of the owners.
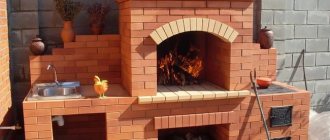
The construction of a garden stove makes it possible to cook a variety of dishes over an open fire and enjoy freshly prepared meat and fish in the company of friends in the fresh air. Despite the variety of types of garden stoves, the main thing that unites them is a roaster. The project can consist only of a stove or be supplemented with a smokehouse, a device for hanging a cauldron and a number of other elements useful for the owners.
You can come up with a barbecue area project and bring it to life yourself or contact a specialized company. Specialists, taking into account all the wishes of the owner, will implement the installation of a turnkey brick barbecue oven.
Safety requirements
One of the main conditions for the preparatory stage of equipping a barbecue area with an oven is the choice of location. This should be done before creating the project. After all, the location of the structure should not only be convenient, but also equipped taking into account construction standards and fire safety rules. The ideal material used for laying a barbecue oven is refractory brick. It is resistant to prolonged exposure to high temperatures.
Important! When choosing a site for the construction of a summer stove, you need to pay attention to where the power lines are located and what is the height of the nearby trees. According to the approved fire safety regulations, the space above the chimney must be open.
During operation, the furnace walls become very hot. It is important to position it so that there are no buildings or wooden structures behind it. All buildings and trees should be located at a distance of five meters from the future structure. It is prohibited to store flammable substances or flammable materials near the barbecue stove.
Experts recommend equipping the rest area near the barbecue using tiles and bricks. If the owners prefer wooden finishing, before starting work the material must be treated with a special solution that will protect it from moisture.
One of the important aspects of the normal operation of the stove is a properly designed chimney and hood in the structure.
Convenience of cooking is ensured by the correctly selected height of the stove top and work surfaces. The absence of sharp corners will help avoid injury.
Preparing tools
To lay brick you will need special tools:
- pick;
- mallet;
- jointing;
- plumb and level;
- corners and trowels.
For work you may also need:
- shovel and bayonet shovel;
- boards for the frame under the foundation;
- film for waterproofing;
- nails and fittings;
- pliers;
- thick wire.
If the cooking grate does not have standard dimensions, then you will have to order it from a specialist or build it yourself using a welding machine.
Accommodation options
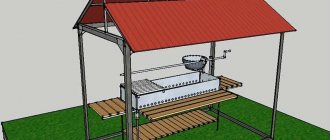
It is most convenient to arrange a place for the stove in the garden. A canopy will provide additional comfort. It will protect the barbecue seating area from gusty winds and precipitation and will allow you to prepare your favorite dishes at any time of the year, regardless of weather conditions.
An area that is located near the walls of a residential building is also suitable for a barbecue with a canopy. But the distance from the structure to the residential building must be at least 5 m.
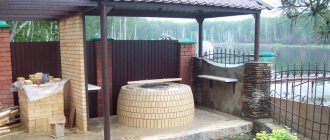
You can also place a barbecue oven in a summer annex or gazebo. The main thing for this is to choose a suitable location and building materials that comply with fire safety instructions.
Briefly about the main thing
Brick and iron stoves for baths bring even more benefits if they are carried out after appropriate calculations and drawing up a diagram.
Bath stoves can have different volumes, which depend on the size of the steam room and the type of bath.
Metal stoves are good for their mobility, simplicity and ease of manufacture, while brick stoves are good for their aesthetic appeal, softness of steam and safety.
Each of the sauna stove options has its own negative aspects: brick products are heavy, emit infrared radiation and require additional fire safety measures, while brick products require cleaning and heat up unevenly.
A metal sauna stove is made from thick sheets, but for brick stoves you need to purchase a certain amount of refractory bricks.
A device for heating water and steam for bathing procedures can be combined and include several different materials in its design.
Typically, a sauna stove design includes a firebox, a heater, a place for ash and a heating tank with water.
Thin metal used for a sauna stove may burn out after several uses, and non-combustible brick in the firebox may burst or crack.
Doors are one of the most important elements of a sauna stove, therefore they must be selected with special attention or made independently.
Since there are a lot of designs for sauna stoves, each master designs his own unique version for his home or cottage.
To choose a suitable stove for a bath, consider the manufacturing features of each of them.
Ratings 0
The main differences between a barbecue and a grill
Anyone who has cooked food on a grill at least once in their life knows that heat comes only from below. Infrared radiation from smoldering coal does not reach the top layer, so vegetables and meat constantly have to be turned over.
In a barbecue oven, the cooking process is much simpler and does not require constant human intervention. Uniform roasting is ensured by the fact that the grate is installed 20-25 cm below the height of the side walls of the fryer. This short distance ensures the creation of a warm air-smoke cushion over the dish, giving the finished food a subtle smoky smell.
Dishes cooked in the oven turn out much juicier and more tender than those fried on the grill. In addition, there are no restrictions when choosing meat: the softest part is suitable for the grill, and you can purchase any meat for cooking in the oven. Shish kebab, even from the oldest beef, turns into the most tender and juicy dish in the oven.
Another distinguishing feature of a stove from a barbecue is the presence of a tray for coal. The pallet is made without holes. This provides better traction. Charcoal in a stove does not burn, but smolders. The cooking process occurs evenly due to the heat reflected from the oven walls. The dish is heated simultaneously from all sides and reaches readiness gradually.
The differences between a barbecue and an oven affect the taste of the food. Once people try shish kebab cooked in a barbecue oven, they immediately feel the difference, and they want to become the owner of a garden oven.
Among the wide variety of stone stove structures, everyone can choose a design suitable for their personal plot.
Create a drawing with dimensions
Before you begin construction work, be sure to develop a construction plan. In the project, take into account the size of the gazebo, the place for the fireplace and its area, as well as materials for manufacturing. The initial stage of creation is the preparation of a competent drawing, which will take into account all safety requirements.
Did you know? The beginning of the 1952 heating season in Great Britain was accompanied by smog, consisting of coal combustion products, hanging over the cities. After the deaths of citizens, the government banned the use of coal heating, thereby sharply increasing the demand for waste-free electric fireplaces.
So, when creating a project, observe the following parameters:
- When calculating the area, take into account the dimensions of the heating device. The ideal depth of a brick grill is 750–100 cm, width - 120 cm.
- For convenience, it is advisable to provide a work table 60–80 cm wide on the side of the stove, and plan to install a sink of the same width next to it. On the other side, make room for storing firewood, while maintaining a similar distance (for proportionality).
- You need to leave a free space in front of the grill (about 1–1.2 m) so that it is not crowded during the cooking process and the heat does not disturb vacationers. Thus, allocate 8–12 m² of space for leisure, and at least 240 × 175 cm for a barbecue.
- To save space, you can install a stove in the corner of the gazebo.
1 - spark arrester, 2 - small pipe, 3 - large pipe, 4 - side upper left brick wall of the firebox, 5 - right brick wall of the firebox, 6 - lower left brick wall of the firebox, 7 - lower right wall of the firebox, 8 - rear brick wall , 9- main leg from the end (left), 10- main leg from the end (right), 11- rear lower painted wall, 12- brick shelf, 13- decorative panel, 14- main panel, 15- main tabletop, 16- right tabletop, 17 - left tabletop with sink, 18 - left additional stone leg, 19 - right additional stone leg
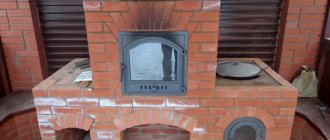
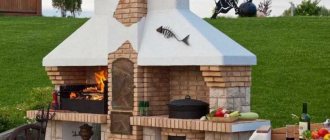
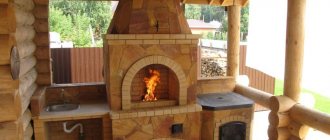
Advantages of a brick barbecue oven
The universal material will make it possible to prepare many different and equally tasty dishes. Barbecue ovens equipped with a special canopy are convenient to use and are independent of the season. Rain, snow, hot midday sun will no longer cause inconvenience.
Brick barbecue ovens will fit perfectly into any interior and will be a wonderful addition to the recreation area.
Important! The fryer occupies a significant area and is designed for preparing a large number of dishes. The design features of the oven will allow the heat to be distributed evenly, which guarantees proper roasting.
One of the main advantages of the stove is a large range of fuel, the choice of which will depend solely on the design.
There is only one significant drawback - massiveness. We should not forget about fire safety; the location of the stone structure should not only be convenient.
The design includes 2 or more fireboxes, which increases the number of functions and makes the stone stove the most convenient for use. If you have a cauldron, hob and smokehouse, you can cook several dishes at the same time.
Each oven design requires a roasting pan and a grate. A tray without holes ensures even cooking of food. The grate should be lowered approximately 20-25 cm below the edge of the walls.
It will be possible to serve freshly cooked meat with smoke if the oven has high and long walls.
Positive and negative qualities of metal sauna stoves
There cannot be a steam room without a stove, because it is it that heats the room and maintains the desired temperature. Nowadays you can find a wide range of different options. But it’s best to make the oven yourself.
The advantages of a metal device include:
- actions are carried out quickly, and at the same time not very expensive, this can be done autonomously with basic knowledge and experience;
- a significant part of the models are compact, so they are suitable for small saunas;
- rapid heating of the steam room to the required temperature, even in winter;
- the mechanism can last a long time, it all depends on the welding condition and the thickness of the metal;
- economical fuel consumption;
- easy to use, even a person who does not have the proper skills can handle it.
An iron stove has negative qualities, these are:
- low heat capacity, it is not enough to heat the rest room;
- excessively rapid cooling, so you need to heat it regularly;
- the walls heat up and nearby objects can catch fire.
It is not easy to determine which stove is best for a bath; there are a lot of design qualities.
BBQ oven design
The creation of a construction project and drawing is approached with responsibility. You need to think through every little detail, every element, including materials, total cost, location on the site and size of the structure. If you wish, you can seek help from special services that provide the necessary class=”aligncenter” width=”1200″ height=”1025″[/img]
When drawing up a project, it is important to take into account not only your own desires, but also safety criteria. There should be no trees, bushes, fences or any other flammable objects near the stove. It is necessary to consider at what distance from the house the stove will be located. Often they make an additional canopy to protect from external factors, or build a gazebo inside.
Project development should combine individual and general requirements. A detailed study of the issue will help you understand it and prevent any possible mistakes during construction.
Making a BBQ stove project is not as difficult as it might seem. You can use additional sources and choose the appropriate option.
You can find various drawings on the Internet and later use them for construction.
The barbecue complex is perfect for creating several dishes in a short time. It will allow you to cook a large number of different delicacies at the same time. Such complexes are divided into 2 types: corner and frontal, depending on the desired appearance and location.
You can decorate the sitting area with additional furniture: small cabinets, countertops, a sink or a smokehouse.
Creating a large-scale barbecue project on your own will be quite difficult; you will need the help of specialists. Almost anyone can make the most ordinary brick oven, even without experience in construction.
The desired drawing will help you create ready-made options. You need to choose the most suitable option, add a little if you want, and set your own dimensions. After the work has been done, begin construction.
Important! It is imperative to accurately calculate the height of the chimneys, the number of fireboxes and other necessary elements, paying special attention to their location relative to the main structure.
A place for fuel, protection from precipitation, a smoke elimination system, grates and spits should also be equipped to improve the quality of food and the ease of use of the oven.
Making a furnace firebox for a bathhouse from metal
The installation of the firebox must be carried out in accordance with all standards. The foundation for the firebox is a very important element. The reliability of the base determines the duration of its use, which can range from several months to decades. The firebox itself does not look quite aesthetically pleasing, so it is decorated with fireplace tiles. There are a lot of variations on how to make a firebox for a bath.
For the frame you will need a sheet of steel with a thickness of at least two millimeters; you can also use a chylous barrel, but with additional fastening. The sheet is divided into several sections for the firebox, tank and heater.
The remainder will be needed to make the ash pan and door. Corners or plates will be welded along the length where the grate will rest. It is best to purchase it in a store.
Making a heater
This type of stove is called a heater because it consists of individual stones. When fuel burns, the stones heat up, and the water that ends up on them forms steam. First of all, you need to choose the design and dimensions of the mechanism for heating the water. For the heater, the rods are attached by welding. Since it is heavy, the rods or square must be at least 10 millimeters.
A door is cut into the heater to transfer water to the stones. In this case, the heater door must face into the steam room, and the firebox must be placed opposite the entrance. The stones are distributed into the heater with some clearance, not closely. It is a good idea to use stones with small crystals of small size. It can be diabase or just chlorite.
Stones containing mica are prohibited; it promotes the release of carbon monoxide, and this is harmful to life. You need to attach a metal chimney cover above the heater, and then install a water tank.
Creating a tank for heating water
The most practical method of heating water in a bathhouse is to use heat from the stove. There are several ways to install a tank for a sauna stove, the main thing is the location of the tank, it can be: internal, mounted or remote.
To design the tank, three versions of the material are used: cast iron, stainless steel containers or stainless steel. To make an iron barrel, you need to carry out a number of actions.
First you need to cut the desired piece of pipe. The cutting areas must be carefully processed. Then you need to start installing the bottom and top lid of the container. The next stage is soldering all the cut parts. Afterwards you need to install a tap and pipes, as well as a heat exchanger for the sauna stove. Then the installation of the module is carried out.
Assembling a sauna stove with your own hands from metal
They prefer to build the stove supply for the bath separately. This is due to the fact that it is possible to create exactly the model of the stove that you wanted. Then, to make a metal sauna stove with your own hands, you will need blueprint reading skills, construction tools and materials. First you need to draw up a project and determine the dimensions of the device.
There are 2 design options for homemade stoves, these are the horizontal and vertical versions. To make a stove you will need:
- a rod ten millimeters thick;
- sheet steel, 8 mm thick;
- iron pipe;
- latches;
- water tap;
- two meters of pipe.
We take a large piece of pipe and cut out an opening in it for the blower. In the middle of the pipe, on the side of the opening, we weld fastenings for the grate. Then we equip the firebox, for this we weld fastenings for the heater rods. On the back side of the heater we cut a hole through which steam will flow. We fill it with stones suitable for this type of unit.
We cut a hole in the roof for the stove for the chimney pipe and install it. And don’t forget to cover the sauna stove with useful material to create a classic stove. It’s not difficult to build the device; just follow the instructions.
Necessary equipment for work
Installing a sauna stove is an important matter, the correct operation of which depends on the correct organization of the installation. Initially, you should choose a place to place it. It is also necessary to adhere to fire safety rules.
According to standards, the distance between the stove and a flammable wall must be at least 25 centimeters. First you need to determine what kind of stove you decide to install. The next stage is drawing up a plan and counting the necessary material.
To assemble a homemade stove, you will need tools: a grinder, metal scissors, a welding machine, a variety of measuring and marking kits. You will also need material. The step-by-step manufacturing process can be seen in the video presented in this article.
Making a heater stove for a bath from a metal pipe
A do-it-yourself sauna stove made from a pipe is the easiest and most economical option for furnishing a room. A similar design will work well in every room. Thanks to the sealed housing, the stove made from 530 pipe will not emit carbon monoxide when active, so it is completely safe. A pipe bath can be made in two types: a horizontal and a vertical model.
This type of furnace significantly reduces the number of welding steps. In order to obtain an improved stove, only high-quality tubes are used, without corrosion. The workpiece should be cut into two parts, a longer section is needed for making a firebox and heater, and the remaining piece is suitable for constructing a tank. First you need to start making a pod.
A hole is cut at the bottom of the pipe, and a strong round-shaped plate is welded above it. Then we make a firebox and a door for it. We hang the door on a loop or hooks. A piece of pipe is welded above the firebox, which will be used as a heater.
Material for a metal stove in a bathhouse
Making stoves is an interesting and labor-intensive procedure. There are many types of metal stove models. The main task is to create a structure that is strong enough to prevent deformation and high thermal conductivity. For the manufacture of the mechanism, different materials are used: cast iron, steel and heat-resistant steel. The most common manufacture is steel.
This matter tolerates temperatures up to 400 degrees. The thickness of steel starts from 4 millimeters, but the disadvantage of the material is that it quickly burns out. The next material used is heat-resistant steel.
The minimum metal thickness is 3 millimeters. The stoves are made from the safest material, efficient and easy to install. Another material for forming metal sauna stoves is cast iron. It is not inferior in strength to steel, but at the same time its heat capacity and fragility are comparable to ceramics.
Installing a stove in a bathhouse
Precisely installing a stove in a bathhouse with your own hands is a responsible procedure, since the comfort and safety of its operation will depend on this.
In order for the steam room to warm up effectively, you need to select the location of the stove structure. By following all the rules and regulations for the placement of the heating medium, you will not have to worry about altering the bath unit for many years.
First of all, you need to calculate the dimensions of the device for the size of the high-temperature room, because the roof and interior decoration can burn, smolder, or melt; to prevent this, you need to choose the correct placement of the stove. You should also take care of installing a hood for a sauna stove, and do it yourself. It should be placed 50 centimeters from the wooden covering.
If it is protected by a metal screen, the distance can be reduced. The partitions opposite the firebox may not be insulated. The gap from the ceiling to the top cover should be 1.5 meters.
There must be unhindered access to the elements of the furnace structure in case of an emergency. You also need to plan in detail the ventilation system in the steam room, and think about the release of combustion products. When installing a brick kiln, you need to create a solid foundation, and place light metal structures on a non-combustible floor base.
Option for a barbecue oven for a summer residence
Summer residents prefer simple stove designs. It is not necessary to have special skills or experience in laying stoves, the main thing is desire. There are quite a lot of photos of self-made brick barbecues on the Internet. After studying the material, you can choose the appropriate option for yourself and make a project based on it. There are also ready-made prefabricated models of stoves that can be taken as the basis for a future design.
Before starting work, you need to stock up on materials. The list of main building materials includes:
- refractory and facing bricks;
- metal fittings;
- boards (for formwork);
- stove parts made of cast iron;
- clay and concrete.
Additional details include a countertop and sink.
Selection of bricks and finishing materials
An important role in the operation of the future structure is played by the choice of materials for construction. For a stove with a smokehouse you will need 2 types of bricks. The laying of the inner chamber is carried out with fireproof (fireclay), everything else is made of facing bricks (solid).
Brick selection criteria:
- Smooth surface and sharp corners. The seamless appearance indicates high quality material.
- Density. The most durable brick is marked M-500, but a less dense brick can be used for laying the stove: M-250, M-200 or M-150. You can check the density yourself if, when you tap with a hammer, you hear a metallic sound, a brick with a high density.
Important! A dull sound when hitting a brick with a hammer indicates the presence of voids and defects. A stove made of such bricks is not durable in use.
- Quality. The surface should be smooth; chips and cracks indicate low quality. When you hit a refractory brick with a hammer or other tool, it should not crumble, but simply break into several pieces.
- Marking. Fireclay bricks are marked – ША-8 or ШБ-8. It is produced in standard sizes: 230x113x65 mm and 230x123x65 mm.
- Color. The material must be evenly colored. The most common colors of fire bricks are straw with brown flecks and red-orange.
For laying a barbecue oven for home use, a brick marked M-150 or 125, standard size (250x120x65 mm), is suitable.
Important! During the laying process, smaller bricks or halves may be needed. A grinding machine will help give the material the desired size.
For finishing work, you can use decorative tiles that imitate brick or decorative plaster. The texture of the facing material can be smooth (from a distance it resembles tiles), with slight roughness or sparkling inclusions.
The color of the material is most often selected in accordance with the color of the fence, the roof of the house and garden paths.
Grouting in contrasting colors makes the stove look impressive. Darker shades visually make the structure heavier, while lighter shades add lightness.
It is preferable to take dark red clay. Before starting work, it is recommended to soak it for 24 hours, then knead it thoroughly.
The mixture is prepared on the basis of clay and sand, mixing the ingredients in a 1:2 ratio. The sand should be sifted in advance. For additional strength, glue is added to the mixture; it is produced specifically for stove masonry (no more than 3% of the total volume of the mixture).
Brazier made of refractory bricks with a metal edging - frame
This option will require basic welding skills. The structure is made of refractory fireclay bricks and placed in a metal frame. It is installed on a stand welded from a profile pipe.
Manufacturing procedure:
- Lay out the bottom. It will take 7.5 bricks.
- Lay out the walls. The brick is placed on its side. You will need 7 bricks.
- We make two frames from a 45x45 mm corner - for the bottom and for the top of the barbecue: we cut the corner; weld at an angle of 45 degrees; We weld reinforcement across the frame for the bottom so that the brick does not fall out; clean and paint.
- We lay a brick bottom and walls on the frame with lintels, coating it with heat-resistant mastic or clay. Let the structure dry for a day.
- Install the top frame. We connect it by welding to the lower frame with 4 jumpers made of reinforcement.
- We weld the stand from a corner and pipes with a diameter of 50 mm.
Foundation
Creating a barbecue area must begin with pouring the foundation. Particular attention is paid to this stage, because the service life of the structure will depend on it. The foundation should not sag or crack.
First you need to dig a pit with a depth of 30 cm. The length and width of the base must exceed the planned size of the stove by at least 50 cm.
The bottom should first be compacted and then filled with crushed stone. Pour a layer of concrete on top and strengthen the reinforcement.
Metal rods are driven vertically and horizontally, holding them together as they intersect. This is necessary to strengthen the structure.
Fill the pit to the top with concrete and leave for 3-4 days. After the time has passed, cover with a metal sheet and place a brick under each of the 4 corners so that the surfaces cannot touch.
To protect the foundation from moisture, a roofing felt sheet is laid on top.
We recommend studying: making a strip foundation for a house with your own hands - our advice for beginners
Construction technology
You can build a brick barbecue (production should begin in the warm season) with your own hands. It is important to pay attention to each stage of the work and take into account all the nuances. If something is not going according to plan, then you need to refine these points to perfection before moving on to the next ones.
Experienced stove makers argue that it is better to spend more time on preparation and rework than to redo a failed project. A detailed description of each stage of construction can be considered later in the article.
Foundation
How to properly lay the foundation for a barbecue oven:
- In the cleared area, dig a hole 30 cm deep. The width should be 20 cm larger than the dimensions of the stove.
- Cover the bottom of the trench with sand, the thickness of the cushion is 5 cm. Fill with water.
- Lay a cushion of fine crushed stone in a layer of about 10 cm.
- Build formwork from boards. It should rise 7 cm above the ground.
- Lay the reinforcing mesh and insert the rods.
- Fill the foundation with cement. Smooth the surface and dry for about 3 days.
When the foundation is dry, it needs to be covered with waterproofing film. You can use roofing felt.
Armature
To lay the foundation you will need a metal lattice and several rods. This is necessary so that the finished structure stands firmly and the lower rows of masonry can withstand heavy loads.
The grating should be laid correctly in 3 layers, at a distance of 5-10 cm from each other. Rods are used to support the structure from the corners. Rods with a diameter of 10-12 mm are suitable for furnaces.
Masonry mortar
The solution can be prepared in 2 ways.
Limestone mixture:
- Mix 3 buckets of cement with 1 bucket of slaked lime.
- Add 1 bucket of sand.
- Add water if required. Mix the ingredients until smooth.
How to prepare a solution with clay:
- Fill red clay with water for 5 days.
- Mix it with sand, cement and water in equal proportions.
- Stir until smooth.
You need to mix the ingredients gradually. Sometimes, some materials need a little more or, conversely, less. It is important to monitor the viscosity of the solution.
Base
The base is the base of the future furnace. To fold it correctly, you will need to do a “fitting”. That is, you need to lay out the base without mortar. See where additional blocks are needed. Some of them may need to be cut. It should be taken into account that between the bricks there will be a layer of mortar of about 0.5 cm.
How to lay the base:
- The initial row is laid out from half bricks.
- Using a level, check whether the verticals and horizontals of the rows are even.
- When the masonry reaches the level of the brazier, the installation of metal corners will be required.
- In the next rows, the brick must be laid on edge.
When the support for the bottom of the furnace is ready, the brick is replaced with refractory brick and the fire pit is smoothed out.
brazier
Rules for making a brazier:
- Before starting masonry, provide a compartment for collecting coal and cleaning the stove from it.
- Place a metal tray or insert a blower door.
- Usually 14 brick rows are enough for a brazier. The firebox level will be 90 cm from the base, which is considered acceptable and convenient to use.
The top of the roasting pan is covered with a concrete base and 2 brick rows.
Walls and smoke collector
It is believed that the cooking area should be at medium height. It's more convenient to cook this way. Therefore, the walls are laid out of clay bricks in 3-4 rows. To build a chimney, you will need to lay the brick by moving it inward. It is important that the pipe tapers towards the top, then there will be good traction.
Decorative finishing
In order for the stove to fit harmoniously into the overall style of the recreation area, its appearance must be beautifully decorated.
There are several finishing methods:
- plaster and whitewash;
- tile cladding;
- decoration with tiles;
- addition of metal cases;
- brick jointing.
The last option is considered universal. The barbecue will look beautiful and have a brick color. The remaining options allow you to change the color and appearance of the stove in accordance with the uniform style of the site.
In construction stores you can choose the shade of the finishing material. Designers advise choosing colors that will harmonize with the fence, paths, roofs of buildings or decorative objects.
You can also choose the texture of the plaster or tile. The rough surface does not reflect light, as a result of which it is recommended for purchase for use in shaded areas. The color of such tiles remains saturated and will not be visually distorted.
The color of the grout also plays a role in the design of the cladding. Dark seams are more noticeable. They create an accent on the brickwork, and make the color of the brick a shade darker. The light grout blends in with the main tone of the stove and is invisible from afar. Usually, the seams of large-sized structures are made light in color to make them visually lighter.
Construction of a regular barbecue oven
The laying scheme is carefully thought out in advance. The wall is laid in half a brick using concrete mortar.
The height of the walls directly depends on the shape of the openings.
The rectangular opening must be closed with a metal profile, which acts as a basis for further bricklaying. An arched one can be made using a wooden frame. After the work has been done, the structure should be left for a while, allowing the solution to harden.
If there is a sink in the design plan, you need to install a pipe through which the water hoses will pass.
Important! The tabletop must be at least 1 m.
Don’t forget about the 3 most important recommendations from stove makers:
- the quality of the masonry depends on the seams; any unevenness must be eliminated;
- the upper edge of the opening and the table must be separated by at least 2 rows of bricks;
- Brick must be laid in the center of the arched opening.
After the construction of the lower tier, a screed is performed.
Wood formwork is installed. After filling it with the solution, the screed is left for 4 days.
After time has passed, the countertops can be installed.
Firebox for barbecue oven
A firebox with partitions is the next tier of the structure. The firebox is laid in 2 rows.
For a standard rectangular firebox, you will need to lay out walls of 9 rows, and for an arched opening, 7 rows will be enough.
Before starting to reduce the rows for the chimney, be sure to lay 2 additional rows of bricks. After which they begin to form the chimney, successively reducing the length of the brick rows by ¼ brick. The rows of the front and rear walls are reduced by ½ brick. This is how 7 rows are laid out.
The time has come to arrange the main element of the stove - the chimney. The pipe should not be too high; experts recommend a height of 12-14 rows.
You should not start finishing work right away. It is required to allow the structure to stand for at least 3 days.
The presence of desire, attentiveness and hard work make it possible to build a barbecue oven at your dacha yourself.
Orders
Building a barbecue oven with your own hands is a rather labor-intensive process. Order is needed to perform high-quality masonry. The procedure is as follows:
- Laying the starting tier. The usual cement composition is used, the laying is half a brick. Dimensions of the first tier: opening minimum 5 cm and tier height – 70 cm.
- Next, the metal sheet is laid. The length of the stove is laid out in 2 masonry lines. A ledge of 1/3 brick is constructed. Next is facing this area with finishing bricks.
- The next stage is the creation of the combustion chamber. It is constructed according to the parameters of the drawing. A recess of 3 bricks is created. The required width is 5-6 bricks.
- The next stage is laying openings, arches and walls 9-10 bricks high. The height is calculated from the earth's surface. When laying out the walls, it is necessary to lay metal rods on the 6th and 7th lines. Their protrusion is built to 7 cm. Next, a grate and a tray are placed on them. The height of the grate can be adjusted if the rods are laid up to the 10th line.
- This design involves the installation of 2 grilles. The lower one will serve for fuel and ignition. The top one is for storing food.
- To make a chimney you will need fire-resistant bricks and a clay mixture. The method of laying 1 brick on top of each other is used. A damper must be inserted into the chimney. A certain bend should be built on its back wall to adjust the traction. The chimney is constructed from 13-16 lines. The longer it is, the better the traction.
- To finish the stove, use either natural stone or facing brick, at the discretion of the owner.
- The tabletop is also made in several ways: from marble slabs, from moisture-resistant wood, or simply poured with concrete. The choice will depend on the preferences and financial capabilities of the owner.
- The last step is to open the seams until the composition hardens.
Important!
Operation until drying is complete is prohibited. Otherwise the seams will crack.
Stove design with cauldron
The presence of additional elements expands the functionality and makes the oven even more convenient to use. The cauldron allows you to cook delicious first courses in the oven, and at the same time as the second ones. There are quite a few design options for a barbecue oven with a cauldron. It won’t be difficult to choose a ready-made and suitable one, or you can come up with your own project.
How to make a sauna stove with your own hands - details from the master
The design of the stove is primitive, but has a number of significant conditions.
The difference between an ordinary heating stove and a sauna is that the second one contains additional elements, such as a heater and a water tank. Many craftsmen opt for making a bathhouse stove with their own hands, without buying it in a store. The construction process is not simple and requires a lot of time.
First you need to familiarize yourself with the main components of sauna stoves, and these are:
- material;
- energy carrier used;
- firebox location;
- heater heating system.
Monolithic foundation
The stove with cauldron is placed on a reliable and solid foundation. The foundation must be several times wider than the oven itself. About 30 cm is usually added to the front, and 10-15 cm to the sides and back.
The depth of the pit should not be less than 50 cm. The bottom is compacted, covered with a 10 cm layer of sand, followed by crushed stone of the same thickness. A metal mesh is laid on top.
The formwork is made from boards. Fill the foundation with a solution containing a plasticizer, which eliminates the possibility of cracks. While the concrete hardens, you can pour water on it and put a film on top.
The concrete will dry within 3 weeks. Afterwards, you can begin building the furnace.
Laying a stove with a cauldron
A masonry plan must be drawn up before construction. The developed scheme will reduce to a minimum the number of possible errors. To create the stove, exclusively cast iron doors, grates and views are used. There should be no ledges inside.
The width of horizontal joints between bricks should not differ significantly.
The central part is laid first, after which the compartment for the cauldron is completed.
In the barbecue part, the wall is made of 2 bricks.
At the base there is a firebox. The front wall should include the main door and for cleaning.
On the inside, the walls are made of heat-resistant material; a grate is installed in the lower compartment.
Important! The walls must be made in the form of a semicircle. Rings made of metal are attached to the top of the cauldron chamber.
The oven must be left for 14 days. After 2 weeks, you can plaster it or use facing bricks.
Video description
One of the options for assembling a bathhouse using the example of a layout is shown in this video:
- When making a stove, they always remember that the stove is being made for loved ones, relatives, and friends, so they always check the safety of using the selected building materials.
- The quality of steaming in a built sauna depends, among other things, on the regularity and thoroughness of cleaning the stove.
- If an already unnecessary gas cylinder is used for a sauna stove, the doors are carefully cut out from it, then additional money is avoided on these structural elements.
- Homemade sauna stoves can have a vertical or horizontal firebox.
- When purchasing doors for the firebox and ash pans, compare their size in advance with the dimensions of the future stove (they also think about it in advance and purchase fasteners in the required quantity).
- If the stove is made without a heating water tank, you just need to equip the chimney with a steel heat exchanger and run pipes to the water used for showering, then the thermal energy generated in the firebox is used more fully.
Drawings of a metal stove for a bath Source oboiman.ru
- The air flow, when passing through a stove made of a thick pipe, a metal barrel or an unused cylinder, flows around it, thus improving heat transfer.
- A very hot metal stove is additionally separated from the rest of the space by brick walls, then the level of fire safety is acceptable.
Temporary brick barbecue
Without the use of a solution, a temporary furnace can be built in a short period of time. The absence of a chimney and small gaps in the masonry will allow food to warm up well. To create this type of barbecue oven you need to follow a simple algorithm:
- Find a flat, hard surface on the ground. Cut off grass, bushes, flowers that interfere with construction, and cut down trees. The site must be leveled and compacted.
- Lay roofing felt in several tiers. Lay out the first brick layer with small gaps between adjacent bricks.
- Lay out the next layer in a dressing with the previous one, observing the dimensions of the seams.
- In the future, lay out the rows in the same way. The minimum number of brick layers is 10.
- Place the steel sheet on the brick row. It will be used as a fuel pan. Lay it with bricks on both sides and the back.
- Insert grille. Increase the height of the walls by a few more bricks.
It will only take a few hours to build the oven. This simple, unpretentious option is suitable for any master, even a beginner.
Operating rules for a barbecue oven
The stove will last a long time if you follow simple rules during operation:
- The damper must always be open.
- For kindling, it is best to use firewood from deciduous trees.
- Make sure that there is sufficient air access to the firebox. This will ensure complete combustion of the fuel material and prevent soot from settling on the walls of the furnace.
- Prepare food in special containers using tools and equipment specialized for barbecue ovens.
Features and important nuances of constructing a stove for a bath
In order to properly make a homemade stove for a wood-burning sauna with a water tank or build a brick one, you need to know in advance some rules that should be followed when working on this useful device:
- They think in advance about exactly what plan the stove will be made in order to prepare all the necessary tools and materials in sufficient quantity.
- To produce a metal furnace, you can also use an unnecessary iron barrel, which eliminates the common problem of unsoldering the seams of the product.
- After completing the welding work (if any), be sure to check each seam made for integrity.
- A container for laying stones can be provided for both metal and brick sauna stoves.
- When selecting bricks, clay, sand or metal sheets for making a bathhouse, you should always give preference to high-quality materials. In some cases, the material is improved independently: for example, sand is sifted to include large fractions, and other components are cleared of debris.
Basic mistakes and rules when building a barbecue oven
Often, errors are associated not with negligence, but with ignorance of the rules for constructing a brick kiln. Let's look at the main mistakes and recommendations of professional stove makers.
- Ceramic bricks cannot be laid “dry”. Soak in advance (usually 2-3 minutes before laying) on both sides. When performing these manipulations, the masonry will become stronger and the solution will set well. Also, moisture will not be lost to impregnate the surface. Fire bricks are not soaked, but only rinsed.
- Errors include the absence of a thermal gap in the frame under the firebox door when constructing a barbecue. The gap must be at least half a centimeter around the entire perimeter. This is often forgotten. Subsequently, the gap is filled with an asbestos cord. If this was forgotten during construction, the stove will not be reliable.
- Before laying, each level is laid out like a Lego set, without using mortar. This makes it possible to precisely cut the brick in those places where it is necessary and adjust them.
- The masonry joint should be in a mortar of sand and clay 5 mm. If it is larger, cracks will begin to form.
- Regular and fire-resistant walls are not bandaged. When gaps form, pieces of basalt cardboard are inserted into them.
- Each tier is checked with a bubble level. The vertical line is checked with a plumb line.
- When the solution comes out, it is removed with a trowel. The surfaces inside are wiped with a rag.
- If you have little experience, you should not chop bricks with a pickaxe. In this case, use a grinder and a circle on concrete.
We recommend studying: how to assemble a tent with your own hands - even a person without experience can handle it
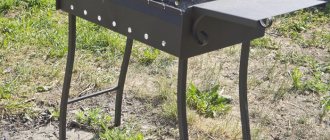
Brick grill without mortar
This option is suitable for those times when you need to quickly make a small and convenient barbecue roaster from leftover building materials, that is, for free. The brick grill shown in the drawing, measuring 160 x 100 cm, equipped with a table top and open niches, you can easily build in your dacha with your own hands. One important condition: you need a flat platform made of concrete or other material.
Note. We did not indicate the height of the building intentionally. It is better to adjust it to your height so that you can prepare food comfortably.
For the construction of the supporting part, any stone of the correct shape is suitable - cinder block, hollow silicate brick, shell rock, and so on. The masonry of the hearth and sides of the roasting pan must withstand high temperatures, so here you will have to use fireclay or ceramic bricks (preferably solid ones). To cover the supporting part, supply steel corners with a shelf width of 4 cm and a sheet of flat slate. Perform the work according to the step-by-step instructions:
- Draw the contours of the barbecue on the site with chalk and lay out the first row along the lines. Form the corners from solid stone and half, the walls from whole bricks installed in 12 cm increments, as shown in the diagram.
- Maintaining a vertical line, build the remaining rows of the lower part, laying stones in a checkerboard pattern with bandaging.
- On the 8th or 9th row (depending on your height), install iron corners on the supports, and cover the entire opening with slate on top.
- On top of the slate sheet, form a tray from a continuous row of refractory bricks, and then fold the sides of the grill.
Layout diagram of the first row
Advice. If you use blocks of other sizes for the supporting part, then fit them into the drawn outline experimentally. The main thing is to ensure the stability of the structure and correctly build an open firebox. Details of the process can be found by watching the following video tutorial:
Please note that masonry mortar is not used here; the structure stands due to its own rigidity. But if you wish, nothing prevents you from preparing a cement-sand mixture and performing full-fledged masonry. A fire pit for burning wood does not have to be made of flat slate and fireclay stone; it is enough to provide supports and place a sheet of thick iron on them, as shown in the photo.