Review author: Terrari School of Design
What could be more pleasant than relaxing in the country, in silence and away from bustling cities? Probably only delicious food prepared in the summer kitchen.
What are the options for summer kitchens? What equipment to choose, what finish? We will answer these and other questions in this article.
Types of summer kitchens
Summer kitchens can be divided into 2 types: closed and open.
Closed
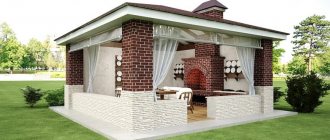
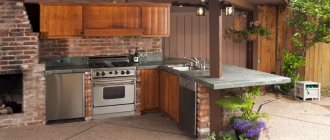
This is a small house dedicated to the kitchen and dining room, where you can gather in rainy weather and cold weather. You can combine the kitchen with a small veranda to dine directly in the fresh air.
The main disadvantage is that in hot weather it is quite stuffy to cook inside, especially if you fry, steam, or bake something. But this problem can be solved by ventilation or air conditioning.
Closed kitchens include:
- Verandas;
- Grill houses, where there is a grill in the center, and around there is a table and seating;
- Combined: kitchen inside and tables outside.
Electricity and gas supply
To supply electricity to the summer kitchen in the house, it is better to provide a separate panel with automatic switches so that the system can be completely and easily de-energized. It is better to take machines with a GFCI circuit breaker.
Also purchase waterproof sockets with grounding and a rubberized curtain. Pay attention to the markings. The last number indicates the degree of moisture protection. For example, products with the number “3” are able to operate smoothly even in the rain. The number “5” means that the socket can withstand even a stream of water without shorting.
Select a separate RCD for the summer kitchen
Installation of gas stoves, even outside the home, is permitted only with the permission of the operating organization, taking into account existing conditions. As a rule, too many problems do not arise when arranging them in open areas.
Gas supply will cost $500-600. Please note that any installation of gas equipment is carried out only by specialists from gas companies.
If there is no gas supply, gas cylinders can be used. They are stored at a distance of 5 m from buildings and basements in special locked cabinets or outbuildings with the inscription “Caution, gas.” Such cabinets must have blinds for ventilation.
Summer gas will need to be used up before frost sets in. Winter gas is not afraid of negative temperatures.
When supplying any type of devices, you will need to lay seamless pipes with welded bends. They are connected to the stove or grill using flexible bellows tubes and gas valves. Such a room must be equipped with a hood.
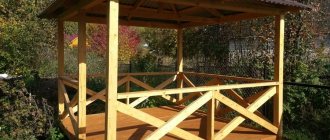
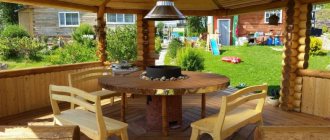
Open
Usually they have 1-2 walls or none at all, but more often it is just a frame with a roof that protects from the sun. However, some prefer to give up even the roof, which suggests that the design of a summer kitchen is an individual matter, depending on imagination and needs.
The most common types of open kitchens:
- Terrace
- Patio
- Alcove
If you have decided on the desired option, then let's figure out how to make a summer kitchen yourself, what materials to use, and share some useful tips.
Place for construction
The first priority before choosing a project is to determine the location of the planned facility. Whether it will stand alone or be attached to the house, whether it is planned to connect them with a common canopy or terrace - these nuances are of significant importance when designing. When choosing the optimal location, you should take into account the proximity to your home.
We are talking about saving money when connecting communications. It is also important that it should be located as far as possible from sources with odors that irritate the sense of smell, for example, a toilet, a dog enclosure, a compost heap, sheds for birds or animals.
In this case, be sure to take into account the more frequent direction of the winds. And even before you start digging the foundation, at least mentally imagine whether the constructed structure will fit into the general landscape of the entire territory, which will serve as its general background.
Selection of materials
Most often, closed kitchens are made of brick, concrete, wood, and corrugated sheeting or metal tiles are used for the roof. A building made of concrete and brick will last longer than wood, but is not always authentic compared to the rest of the dacha. It is important that the kitchen is in the same design code as everything else.
On the Internet you can find ready-made frame kitchens for a country house, but this is a rather controversial option. Their service life is not long, it is hot in summer, cold in winter, and due to the design features, when walking on the floor, all the dishes on the shelves rattle.
It’s cold in winter in both brick and concrete kitchens, so there’s no need for insulation.
Economical option
To build an economical version of a summer kitchen, scrap materials are often used. For example, to reduce costs they use old window frames and railway containers. It is probably more profitable to find a ready-made house that does not require modification.
An economical building is usually an open structure. There are several ways for construction:
- Creating an island that combines a stove, sink, work surfaces and places them on a single base with a country house. To protect against dampness, you can use stone, plastic, stainless steel and good design. For prepared meals, a tent is installed nearby;
- Summer kitchen located under the same roof with a veranda, terrace or gazebo;
- The use of stakes and other supports, braided with country pack greens and covered with straw;
- A building near a fence, complemented by an awning or a pitched roof;
- The use of adobe is a composition of clay, sand, straw and other available materials. Cob structures require a hot, dry area.
Foundation
Whichever of the two options you choose, in 90% of cases a foundation will be required for both. Here's a quick guide:
- Mark the area and dig holes around the perimeter about a meter deep and 30-35 cm wide;
- Pour a mixture of sand and crushed stone about 25 cm high onto the bottom and compact it;
- Install the formwork and pour concrete. The hardening time is 25-28 days.
Construction Features
Almost any building structure consists of the same elements. These are the foundation, walls, roof, windows and doors. The summer kitchen is no exception.
Foundation
The foundation is the basis of the structure, so its type depends on the size of the building, number of storeys, wall material, as well as on the characteristics of the soil at the construction site. The following types of foundation can be used to build a summer kitchen:
- foundation slab;
- columnar;
- tape
The foundation slab is a solid concrete monolith. Its area corresponds to the area of the structure. It does not need to be buried below the freezing level. The foundation slab is ideal for the most unstable soils. For such a foundation, soil is selected according to the size of the summer kitchen to a depth of 50 cm. Wooden formwork is installed around the perimeter. A sand cushion of up to 30 cm is poured into the excavation, followed by a layer of fine gravel and then a layer of concrete with reinforced mesh laid.
The walls of the structure are erected directly on the slab, so such a foundation is considered very reliable, since the load is evenly distributed over the entire area.
A columnar or pile foundation is perfect for a not too heavy structure made of wood, plasterboard or polycarbonate. It is not recommended to install structures with brick walls on a columnar foundation, since soil deformation is possible, which can lead to the destruction of the walls. High quality baked brick is used as the material for the posts. Usually the size of the columns is 40 X 40 cm. They can be solid or hollow. In the second case, concrete solution is poured inside the structure. The distance between the posts depends on the size of the building and is usually 100-200 cm.
A shallow (65-75 cm) foundation is used on dense sandy soils that are little susceptible to displacement. Deep foundation columns can go into the ground to a depth of 200 cm. Such a foundation is used in regions with deep soil freezing, as well as on weak and unstable soils.
A strip foundation is considered to be quite simple to manufacture and reliable for any type of soil, which is why it is most often used in the construction of structures on a summer cottage, including summer kitchens. Before starting work, it is necessary to mark the area using twine and pegs. Summer kitchens rarely consist of several rooms, so the trench under the strip foundation represents the perimeter of the structure in the shape of a rectangle. The depth of the trench depends on the reliability of the soil and is usually 100-120 cm.
A sand cushion with a layer of fine crushed stone is poured onto the bottom of the trench. In the non-buried version, before pouring the foundation, a reinforcement frame is mounted in the trench. Step-by-step instructions for laying a strip foundation can be found here.
If the summer kitchen is built from wood or other lightweight materials, you can use filling the trench with crushed stone or broken bricks, followed by filling with concrete mortar.
Walls
The following materials can be used as materials for the walls of a summer kitchen:
- brick;
- beam;
- log;
- aerated concrete blocks.
Typically, summer kitchens are not built with brick walls under the roof. One of the common options is brick walls laid to a height of up to one and a half meters, and above that there are light wooden structures. They can be made in the form of window openings and glazed. Glass is often replaced with colored polycarbonate.
The walls are made of profiled timber and are quite simple. It is not necessary to assemble solid walls from it. You can mount a frame from laminated veneer lumber, insulate it, perform steam and waterproofing, and cover it with clapboard. Log structures are beautiful and reliable, but require some experience. Both the lower parts of walls and entire walls can be assembled from aerated concrete blocks.
Low walls can be made of decorative stone, and the upper part can be made of wooden panels with glazing. Walls made of brick, decorative stone and aerated concrete blocks will cost more than wooden structures. Aerated concrete blocks have an unattractive appearance, so they will have to be decorated, which increases construction costs. Frame and cabinet walls made of wood will be the most budget-friendly.
Connecting communications
The summer kitchen is connected to water supply, sewerage and electricity. Plumbing communications are carried out using metal-plastic and polypropylene pipes, which are laid in shallow trenches on a sand bed. All communications are connected to similar systems in the residential building. The electrical connection can be made by overhead cable, which is not very attractive, or in a metal or plastic corrugated sleeve in a shallow trench. In the summer kitchen you should make an electrical panel where automatic machines and RCDs are installed.
It is prohibited to connect electrical appliances “directly” in the summer kitchen. All metal housings of stationary kitchen appliances should be grounded.
Insulation and vapor barrier
Insulation and vapor barrier are carried out only if the summer kitchen is a separate closed house, intended to be used not only in the summer, but throughout the year. Thermal insulation of walls can be made with the following materials:
- mineral wool;
- expanded polystyrene;
- isolette
For vapor barrier, a special film with a foil coating is used. These are “Izospan”, “Yutafol”, “Izovek” and others.
Interior and exterior
The interior and exterior decoration of a summer kitchen is no less important than the decoration of a residential building. The exterior of the kitchen or its appearance must correspond to the architectural style of the house and be in harmony with it in terms of decoration. The interior of the kitchen offers many options, but comfort and ease of use are put first. The kitchen is not a museum, so beauty is very important, but it is secondary. Everything that is located in the kitchen must correspond to the overall artistic design. A single style of furniture, lamps and even dishes is preferable. For example, you can choose Mediterranean, colonial or Chinese style in the interior.
Walls
When building brick walls, it is recommended to make masonry the width of a whole brick, as this will allow for better heat retention in winter. But if the gazebo is not planned for winter gatherings, then you can leave the width of half a brick.
It is much faster to assemble a house from wood. The best option is a frame made of timber; it is better to fasten it with self-tapping screws. Make the exterior from boards, and for interior decoration use plasterboard or plastic.
Interesting solutions
If you use a wooden beam, treat it with a special anti-rotting compound that repels moisture. Otherwise, you will have high humidity in the room, and the boards themselves will deform under the influence of water and form cracks.
If it is necessary to insulate the walls, if you want to use the building even in winter, you should additionally make a layer of mineral wool, apply a mesh for plaster on it and prime and plaster everything.
Another interesting interior solution is to make it look like a Danish house. That is, the wooden floors should remain on the surface, and the space between them can be filled with plasterboard.
Roof
In numerous photos of a summer kitchen in a country house, you can see that most often the roof is made of bitumen tiles or metal tiles. These are truly the most popular materials, which we also recommend for their durability and reliability.
In addition, you can use:
- Slate
- Seam roofing
- Corrugated sheet
- Composite tiles
Water pipes. Drain system
When drawing up a summer kitchen project, think separately about the communications lines. After all, most of them are laid at the excavation stage.
The simplest plumbing in the country
Full plumbing in a summer kitchen will not be cheap. For its installation and thermal insulation (and in cold climates this will have to be done, otherwise the pipes will simply freeze in winter) you will need about $300-500.
It is much easier to equip an electric pump to drain water for the winter or make a water supply system at an angle - then to drain it, it will be enough to open the valve. You can do it even easier by connecting a regular garden hose to the sink in the summer.
You will also need to think about the drainage system. Pipes for these purposes are laid at the stage of foundation construction. To prevent fluid stagnation, they are installed at a slight slope.
In this case, no insulation will be required - the water will flow freely from the pipes and will not freeze in them. If it is not possible to tap into the central sewer system, a septic tank will also be needed to drain wastewater. It is erected at a distance of 5 m from the building.
Interior decoration
Here you can give free rein to your imagination or take a look at ready-made summer kitchen projects. But here are some recommendations on how to make everything as comfortable as possible:
- Even if the kitchen is made of brick, there is no reason not to finish the interior with wood;
- Install enough light to make cooking convenient;
- In the kitchen area, place the refrigerator, oven and sink as close to each other as possible;
- Wicker furniture, wood and everything else made from natural materials will be an excellent choice;
- Add flowers, decorative elements, etc.
When building an outdoor kitchen, in most cases you also need to make a foundation, which can then be covered with wood, slab or stone.
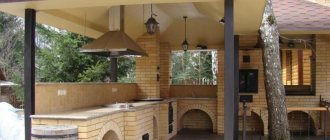
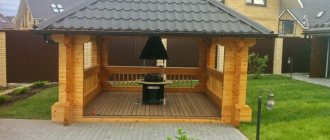
The most popular and simple designs of open kitchens are a light veranda and a gazebo. A cheap option is a gazebo with a columnar wooden foundation, a frame made of timber and a roof covered with corrugated sheets or polycarbonate. Place a grill, barbecue or oven on the edge.
The best option would be to combine materials: load-bearing pillars can be built from brick and continued with wood.
If you plan to hang cabinets and other furniture, then the double-walled option is perfect. In such a structure, the front and side walls form a corner, and the other corner is open. Such a kitchen can either be built separately or made into an extension to the house: in this case, you will already have 1 wall at your disposal, and it will become much easier to supply gas and electricity.
Disadvantages of Merging
- Smell. Aromas lingering throughout the house are perhaps the most important problem for those who decide to combine the dining room with the kitchen. It is necessary in advance, even at the stage of planning a kitchen in an ordinary rural private house, to purchase a powerful hood.
- Functionality. It's no secret that a house filled with children resembles a small island of chaos, where any room sooner or later turns into a playroom. Proper zoning of space will help solve this problem. And, of course, personal control over how household members use the original premises.
- Heating and air conditioning system. It can be solved quite easily: you need to install a sufficient number of heating radiators, plus several air conditioners, in order to feel maximum comfort in your own kitchen-dining room.
A high-quality modern hood can easily cope with unpleasant odors in the kitchen
Equipment selection
If you are building an enclosed kitchen, then this option is no fundamentally different from the kitchen in your home. But still: grill, barbecue or oven for a summer kitchen? Here, again, it all depends on your desires and culinary preferences.
But using a regular stove for a summer kitchen is impractical. We come to nature for smoky meat, which can be cooked in the oven or on the grill.
The most important rule to remember is to first plan the setup of your outdoor kitchen where the oven or grill will be located. It is important that they are located at least two meters from the table so that fumes and ashes do not fly and it is not hot:
- You can build a grill house and place it in the center... a grill! There is also a pipe that removes smoke.
- If you like not only to sit on the stove, but also to cook, then place the stove either against the wall in the middle or in the corner.
- If you have a portable grill/barbecue, then it doesn’t matter where you place it, but it’s better to think about the place in advance so that it is convenient.
Don't forget about the cooking table, sink, cabinets for dishes and other kitchen utensils. Placing a large refrigerator on a summer gazebo is not the best idea, but a small one disguised as a cabinet will look solid.
Bring light into the gazebo to make evening gatherings more comfortable. And for maximum comfort without mosquitoes, install an anti-mosquito lamp.
These are just basic rules and tips, but ultimately it’s up to you to decide what your outdoor kitchen will look like. Fantasize, try different options, and then you will get a place that you won’t want to leave!
Lighting
A single chandelier in an open area is unlikely to cope with the task - after all, in the absence of walls, the light will be scattered. Therefore, provide several types of lighting. Be sure to place spotlights or LED strips near the work area.
You can hang one large chandelier above the dining table. This lighting can be supplemented with halogen lamps or lanterns hung on nearby trees.
Lighting must be thoughtful
With the help of light, you will be able to easily divide the space into separate zones. For example, after you've set the table, hide the work tables by turning off the lights and leaving only lighting on the dining tables and areas near the structure.
Don't forget that for street lighting you will need lamps and luminaires with a high degree of protection from dust and water (their IP should be in the range of 54-65). The first number is the degree of protection against electric shock. The second is to protect the housing from moisture penetration. Products marked with the numbers “65” will be needed if the lamps will be located outside the canopy area.
Photo of a summer kitchen in the country
BBQ oven
Barbecue stoves installed directly in the open air, under a canopy or in a summer kitchen are becoming increasingly popular. This is explained by the great advantages of such equipment:
- Everyone loves food cooked over fire;
- it is healthier than foods cooked on a conventional stove;
- the process of cooking using a barbecue is quite exciting;
- You can use old cut trees for fire in a barbecue oven, which eliminates the need to remove them from the site;
- By regularly using natural fire stoves, you can save on gas or electricity for a conventional stove.
Barbecue is primarily a method of cooking that uses a grate placed over a fire. Barbecue equipment can be different - from a portable metal structure to an industrial stationary unit.
Video description
Options for gazebos with barbecues:
Often, stoves in summer kitchens are intended for installing a barbecue. A barbecue differs from a barbecue in that it is used to cook meat and vegetables on a skewer. In this sense, the barbecue is more versatile, since you can put food of almost any consistency and any size on the grill.
There are multifunctional devices that combine elements such as an oven, oven, barbecue, tandoor, cauldron. On top of this entire structure there can be ordinary burners, powered by gas, electricity, or, like a village stove, powered by coal.