On any site, outbuildings or sheds are installed where gardening tools and equipment for working with the soil can be stored. To ensure that the design of the barn does not deviate from the general design style of the area, it is built according to a design similar to the architecture of a residential building or landscape design ideas.
The following details are important: correct distribution of objects on the site, material of construction of the building, dimensions of the building, ergonomics, usefulness of the internal space. The need to further transfer the utility block to another location requires the correct selection of building materials and construction technologies.
More than just a garden shed: decorative solutions
It so happened historically that most summer residents do not have a separate garden shed: they have a large common one, and they make do with it. But this is not always convenient: everyone in the household actively contributes to filling it, and for some reason the only suitable place for a new thing turns out to be right at the doorstep. Naturally, over time, an insurmountable blockage forms at the entrance.
A garden shed may well become a decoration for a dacha. Don’t forget one more feature: many of us are simply unable to immediately send an item that has gone out of use to a landfill, be it an old coat or a lame coffee table - what if it’s good for something? No, let it lie there for a while, but not in the house! It is clear where old things are sent for foster care. As a result, it is not always possible to get a rake out of the shed without bringing down a pile of things on yourself.
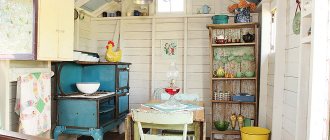
A garden shed is a completely different matter. Personal, where only our belongings are stored: pitchforks and rakes, hoes and scoops, soil and pots, pegs and twine, markers and a gardening journal. And if your imagination helpfully drew a picture something like this (as in the photo below), don’t worry: a barn doesn’t have to be shabby, dusty or unsightly.
Old garden shed
A garden shed can be so cozy and charming that you'll want to spend as much time as possible around it, without having to worry about decorating it.
Perfection in miniature
A small garden shed can be spacious and functional: the folding table makes it convenient to replant flowers or plant seedlings.
Garden shed cabinet
There is a place for shovels and watering cans, and the shelves will conveniently accommodate gloves, pruning shears and other useful items.
You don’t even have to buy the material: you can use the doors and window frames left after renovation to create a nice shed.
Mini barn made from old doors
The main thing is that everything you need for gardening work is in one place and is easily accessible.
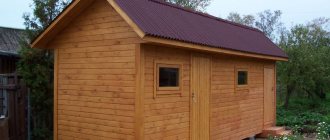
Bathhouse cladding with imitation timber
Imitation timber is a type of lining that is used for cladding facades. Board dimensions: thickness – 1 cm, width – from 10 to 16 cm.
A distinctive characteristic of the material is the presence of a central groove to relieve stress in the wood, which helps extend the service life of the finish.
Imitation wood is made from various species, but coniferous wood is considered the best.
The main advantages of the finishing material include:
- environmental safety;
- affordable and quick installation;
- resistance to aggressive substances and damage;
- aesthetics;
- variety of standard sizes - width, length and thickness;
- high thermal insulation characteristics;
- long service life.
But even such a practical material is not without significant drawbacks:
- the need for periodic treatment with antiseptics and fire retardants;
- susceptibility to fire and rot;
- the possibility of deformation due to insufficient drying or the use of low-quality raw materials for manufacturing.
The log house of the bathhouse is sheathed horizontally with the tenon facing outwards. This type of fastening is resistant to deformation and moisture penetration. The material is mounted on a flat surface using wooden or metal sheathing. Before painting, the imitation wood is carefully sanded with fine-grain sandpaper.
Two in one
You can double the benefits of your garden shed by adding a mini-greenhouse for growing seedlings.
Garden shed with greenhouse
Or build a small canopy under which a woodpile or garden wheelbarrow can be conveniently placed.
Garden shed with canopy
Or arrange a cozy place to relax, where you can wait out the light rain and drink some tea.
Garden shed with seating area
And my friend has a canopy attached to her garden house, under which there is a small sandbox and a swing. It’s very convenient: the work is progressing and the children are under supervision.
Obtaining various types of information on the topic of building sheds on the site
People who are far from the construction industry cannot independently design a building and determine the best place to put it.
It is better to learn what rules to follow in this case from the recommendations of specialists. Here again it is convenient to mention construction sites.
If printed information or video material is too tedious, you can turn to searching for images of site plans with the layout of main and additional facilities.
There are many such plans made in color on the Internet. You can easily find a layout similar to yours and see how to arrange the barn.
You can also find a photo of the barn online to get an idea of what the building might look like.
Fabulous beauty
Surely many would not refuse to store gardening equipment in a hut, as if straight from the pages of a fairy tale book.
A fabulous solution for decorating a garden shed
Or in such a wonderful house. True, there is a high probability that the children would quickly reclaim it for their own needs, leaving the hoes and rakes without a roof over their heads =)
A garden shed is a house from a fairy tale. We would have to urgently build a new shed for the equipment. But this is not a problem: there is no shortage of ideas, here are a few more interesting ones.
Masking the shortcomings of the garden exterior: the basics of beautifying a dacha area
A beautifully decorated local area of a country house is the pride of any owner. But not everyone can boast that they are satisfied with everything about the exterior of the site. After all, there will always be unsightly buildings and elements that would be useful to remove, hide or disguise. But turning disadvantages into advantages, transforming unattractive buildings into examples of exquisite landscape design is a task that anyone can solve. The main thing is to show imagination and apply skills to realize the idea.
The charm of color
Here the accent of the building is the color scheme. The snow-white structure looks very beautiful, but is perhaps only suitable for purists. I wouldn’t risk painting my garden shed white (even ordinary rain will turn it into a mess, not to mention the not always clean hands that will have to open the door), but it would be a pleasure to admire it. Snow-white garden shed: beautiful, but impractical
The gray color of the garden shed is a classic. Various shades of green and white look good. In my opinion, the design option for the garden shed in the photo below is an excellent solution: a lot of natural wood texture and just a little soft pastel. A minimum of paint and effort - and the garden shed becomes an element of landscape design
Agree, if the window frames and door were not painted, the building would look ordinary, but a minimum of paint gave it a stylish look.
We design low-rise outbuildings
When designing utility buildings that are present on each site, one should be guided by the principle: “if a defect cannot be hidden, do not hide it.”
Even unattractive compost heaps and bins can be turned into a spectacular piece of art. To give your compost heap a more attractive appearance, just plant pumpkins, zucchini or cucumbers next to it. Under the large spreading leaves, an unsightly but much-needed pit for composting plant residues will be successfully hidden.
The material on creating a high bed in the African style will also be useful: https://diz-cafe.com/dekor/zamochnaya-skvazhina.html
By planting cucumbers in a compost bin, you can successfully accomplish two tasks at once: to cover an unattractive place in the garden and provide yourself with a rich harvest of fresh vegetables.
You can turn concrete wells and boreholes into attractive decorative elements by decorating the walls of the structures. A mosaic made of colored glass and bright broken tiles, shimmering colorfully in the sunlight, will create an atmosphere of celebration and beauty on the site.
The same flowers will help you decorate technical wells and fertilizer barrels. An excellent solution for building a mobile flower bed is an old stepladder. Containers with flowers, displayed in several tiers on the steps of the stairs, will cover the object and create a picturesque cascade. In the event that it is necessary to open access to a well or hatch, the stepladder can be easily rearranged without much hassle.
Tall “green” beauties of mallow, tree peonies, hibiscus, sunflowers and Jerusalem artichokes can act as a decorative backdrop for an old rainwater barrel.
A work table is a necessary thing on the site. In addition to its direct purpose, it serves as an open “storage room” for storing leftover building materials, cans, improvised tools, pegs...
You can learn more about where else to store tools from the material: https://diz-cafe.com/tech/kak-xranit-instrumenty.html
You can give your old desktop a whole new look by simply painting it a bright and colorful shade.
What are we building from?
The priority, of course, is wood in all types and forms. Wooden garden shed
Often the wood is not even coated with paint, leaving it in its natural state. But I still wouldn’t give up protective impregnations. An interesting solution for a wooden garden shed By the way, one of our readers found a very original solution for finishing the shed with bark - it looks very impressive!
Brick sheds are suitable for those who want to acquire a solid structure. Good brick construction
It is not at all necessary to copy the proposed ideas: rework and change them at your discretion, supplement them with details that are pleasant to you. After all, this is your garden shed, and only you can decide how to make it a decoration for your summer cottage.
What materials are suitable for interior cladding?
PVC boards for exterior cladding of buildings
Since sharp tools are often stored indoors, the interior lining of the shed must be resistant to scratching and occasional cutting impacts. Sometimes the building is equipped as a workshop, where various household work is carried out, aerosols and liquids that are susceptible to ignition are stored. In this case, fire resistance will be a useful quality of the barn interior finishing material. Resistance to moisture and mold fungi is also important.
To sheathe the ceiling in a barn, first organize a frame made of metal profiles or slats. A good option would be stainless steel profiles. It is better to make the lathing using hangers - this will allow for thorough insulation, which is important for unheated rooms. As for plasterboard products, suitable blocks are GKLVO class, which are less susceptible to deterioration from moisture than other options. It should be borne in mind that they are quite heavy. In order not to make the building too heavy, you can compensate for the weight of the sheets with lightweight aluminum sheathing.
You can use PVC panels, available in a wide range of colors and patterns. Products can be monolithic or have voids in their structure. The latter are better suited for a shed.
The length of the plasterboard blocks is selected depending on the dimensions of the building. For most commercially available products, it varies from 1.5 to 3 m. The laid blocks are puttied along the seams using a fiberglass mesh. The top of the wall can be plastered for leveling.
Both the ceiling and walls can be sheathed with oriented slabs. This material is made from wood shavings held together with wax compounds and artificial resins. Mount the products on a wooden sheathing. The walls can be finished with thick slabs, and for the ceiling choose options of 8-10 mm.
Sheathing the shed with boards is also acceptable, but in this case the building materials must be carefully treated with fire-retardant and anti-rot compounds. Standard “inch” boards are often used. The lining, although it has a beautiful appearance, is not very suitable for a shed due to the insufficient thickness of most options. Profiled boards have good performance properties, but they are rarely purchased for utility units due to their high price. Sheathing with boards can be done end-to-end or overlapping. In the second case, the material costs will be slightly higher.
At least once, wooden cladding must be treated with an antiseptic compound.
What's inside?
A window, even a small one, will create the feeling of a living room, and not a warehouse for shovels and rakes. Can you imagine how pleasant it will be to sit by the window, writing down the date of planting seedlings or calculating the deadline for the next feeding of tomatoes? A garden shed with a window will be more comfortable
For the arrangement, improvised materials will do: several boards and drawers will provide us with a work desk. Desk made of boards and drawers
You can continue to sort through successful design options for garden sheds ad infinitum) Perhaps it’s time to return to reality.
Unfortunately, I don’t have a garden shed: hoes and shovels huddle together with all the ensuing consequences that I mentioned at the beginning of the article. I in no way consider myself a fan of perfect order, but I would still like to find things where I left them. Therefore, a garden shed is not only a dream for me, but also an urgent need.
There is no point in building anything on the current site - constant flooding calls into question further residence on it. But on my new plot of land I will definitely have a garden shed! Therefore, now I am in the process of actively searching for beautiful (but not at the expense of practicality) ideas for its design.
Friends, share photos of your garden sheds or interesting ideas you saw on the Internet - everything will come in handy! Most often, masterpieces are collective images: from the world one by one, and not just a garden shed is ready, but a worthy decoration for a dacha =)
Source
How to cover the walls at the dacha: interior decoration is inexpensive and beautiful
A cozy atmosphere in a country house is the key to a comfortable pastime away from the noisy city. In creating favorable conditions for recreation, an important role is played by the interior decoration of the walls of a country house, which can be done in various ways.
At the same time, not all owners can afford to buy expensive materials in order to tidy up their dacha, which prompts them to look for more budget-friendly solutions.
Next we will look at some of the possible options for inexpensive finishing.
Wall design options
The construction market is replete with various offers, forcing the modern consumer to rack his brains over the choice of finishing material.
Some opt for the simplest and most affordable methods, which are suitable both for finishing an old country house and new houses, which will be discussed below.
Painting
To implement this finishing option, you can use various types of paints (see photo), among which the most common are water-based and acrylic materials.
The advantages of this finishing method:
- painting is a very simple procedure that does not require special skills and tools;
- the painted surface can be easily repainted in a different color if necessary;
- an endless selection of colors and shades;
- ease of cleaning and disinfection.
Now about the disadvantages:
- Before painting, the walls require careful preparation, since if there is a rough surface, the paint will lie in an uneven layer, which will lead to the formation of peeling over time;
- the painted surface needs systematic wet cleaning;
Drywall
Installing drywall will not only allow you to perfectly align the walls in the room, but also lay thermal insulation material between the sheets and the main wall, if necessary.
Advantages of using drywall:
- quick and easy installation;
- the ability to construct structures of any complexity;
- drywall makes it easy to disguise wiring and various communications;
- Possibility of finishing with various finishing coatings.
Flaws:
- the usable area of the room decreases;
- low resistance to mechanical stress;
- the need for additional puttying of seams and joints after installation, as well as puttying of the material over the entire area;
- Drywall is susceptible to high humidity, which negatively affects the service life of the material.
You may be interested in information on how to level a wall with plasterboard. Read this article.
Textile
This finishing method was often used in the old days, but now it has received a rebirth. Both natural textiles and artificial materials are used to cover walls.
The fabric is attached in various ways: pasted like regular wallpaper, stretched onto pre-constructed wooden frames, which are then installed on the wall, and fixed to the wooden wall with a stapler.
Advantages of the method:
- there is no need to level the walls (except for those cases when fabric is glued instead of wallpaper);
- resistance to various mechanical damage - textiles simply stretch under load without being subject to ruptures or cracks;
- the room acquires a special chic thanks to the texture of the material;
- fabrics for wall decoration are made in a wide range, so there are many options to choose from, as well as the possibility of combining the material with curtains and bed linen.
Flaws:
- the fabric absorbs a large amount of dust, so the material must be vacuumed regularly;
- textiles quickly lose their appearance, get dirty and rubbed easily.
A traditional option that provides the modern consumer with a wider range of options than in the old days.
Today you can purchase not only paper wallpaper, but also vinyl, duplex, non-woven, textile and other types of materials.
Advantages of wallpapering:
- walls require less thorough preparation, unlike painting, which requires repairing even the smallest cracks and irregularities;
- large selection of different types of material;
- the ability to independently carry out finishing work with minimal skills.
Flaws:
- the need to replace wallpaper (except liquid wallpaper) after 5-7 years, as they quickly lose their appearance;
- susceptibility to mechanical damage;
- difficulties in removing dirt, even when it comes to washable wallpaper.
Wall panels
Wall panels are products intended for decorative finishing of walls. They can be made from various materials (chipboard, fibreboard, PVC, wood) and in different shapes - in the form of slabs, sheets and slats.
They are mounted like drywall on a frame, which in this case can be either steel or wood.
Advantages of panels:
- relatively simple installation;
- the possibility of equipping the wall with sound insulation, which is laid behind the panels;
- there is no need to level the walls before installation;
- the ability to dismantle the panels for use in another location.
The disadvantage of this finishing method is that it reduces the size of the room, since the lathing on which the panels are installed takes up a lot of space.
How to choose the right material?
When choosing a material, you must take into account what the walls to be finished are made of.
For finishing the brick walls of a country house, the most suitable material is wet plaster, given the fact that in winter the room will not be heated. Therefore, other materials (such as drywall or wallpaper) can quickly become unusable on a cold brick wall.
To finish walls made of aerated concrete, it is best to use both plaster and finishing with frame materials (plasterboard, lining). You just have to take into account that, due to its characteristics, gypsum plaster is best suited for aerated concrete. If the building is located in an area with a harsh climate, then a layer of thermal insulation will need to be laid under the drywall.
A distinctive property of foam concrete is gyroscopicity (the ability to absorb moisture), so for the interior decoration of walls made of foam blocks it is better to use a vapor-proof material.
Experts recommend using a combined finishing method - applying several layers of primer to the wall, then finishing it with gypsum plaster. The finished surface can be painted with oil paint.
Do you know how long it takes for primer to dry? Detailed information in this article.
It is best to finish a frame house from the inside using OSB boards - one of the best options. The plate increases the rigidity of the frame and improves the moisture-proof and thermal insulation properties of the structure. Both wallpaper and paint can be used as a finishing touch.
Walls made of laminated veneer lumber. Despite the fact that walls made of timber, as well as log houses and log houses themselves have a completely aesthetic appearance, some still resort to additional finishing. This is often due to the desire to insulate the building.
Here the same drywall or wall panels come to the rescue, allowing you to hide the thermal insulation material under the decorative cladding.
Walls made of rounded logs in a wooden structure. In this case, for lovers of natural wood, the method of covering wooden walls with transparent varnish is suitable.
For those who are not impressed by this option, there are other methods of finishing the walls of a wooden house, among which the most common are:
- cladding with PVC panels or slabs;
- siding finishing;
- installation of wooden lining or block house.
However, it is worth noting that the last two options can hardly be called budget.
Decorating the inside of the house with wood with your own hands
One of the original finishing options that allows you to give the walls the appearance of natural wood is the use of special wood wallpaper, which is made from various types of wood.
In terms of installation method, they are practically no different from ordinary wallpaper, requiring only the use of a special adhesive. But not everyone can afford such pleasure.
A more popular way to decorate a house with wood is to install a block house; this option will cost you little and has an aesthetic appearance.
Before installing it, it is necessary to keep the material indoors for 2 days. During this time, you can prepare the wall - if it is not level, you should level it with plaster. After this, a wooden frame is constructed from the bars to install the block house.
The installation of the block house is carried out from floor to ceiling; during the process, the material is attached to the frame with self-tapping screws, screwing them into the base of the tenon, which is equipped with each individual element of the product. The boards of the block house are connected to each other using the tenon-to-groove principle.
Upon completion of installation work, the surface can be coated with clear varnish or varnish with stain.
Do-it-yourself outbuildings for a dacha - 43 photos of interesting ideas
In country house design, even outbuildings can be not just a shed, but a real work of art. I bring to your attention interesting ideas for utility sheds, houses for equipment and workshops. All these structures can be made for your dacha with your own hands and decorated to your liking.
Utility units may also have no windows to prevent easy theft of tools if your site is located in a not very quiet place.
The wall of the shed can be decorated with painted plastic plates, screwed with self-tapping screws. The northern wall of my dacha is decorated this way; I painted them myself.
Your workshop may also have a small porch where you can sit and take a break from country affairs and worries.
The classic design of a cute utility unit, decorated with hanging flowers, as well as tub and tray compositions.
The octagonal guest house can be used both as a workshop and as a utility unit.
A utility block combined with a garage. Even a shed can have a beautiful front garden with flower beds.
A stylish guest house made of foam blocks can also serve as your workshop.
Here is another beautiful idea for a utility block from a passionate summer resident. The doors, as I like, are glazed to the floor.
A wonderful idea for a utility room combined with a guest house.
The idea of imitating windows with trays of flowers will liven up the plain walls of a barn.
A pleasant composition of a shed and a pergola with a resting place.
A classic barn in a country house or private yard.
Still, it’s nice that there are people who create beautiful landscape design solutions from ordinary, familiar buildings.
It would seem like a barn, but here is a porch, here are flowers - and it’s a completely different feeling! Some kind of joy...
If you paint the shed in light shades, the area will immediately become more cheerful.
Old instruments can be hung on the walls, decorated in a rural country style.
A neat guest house, covered with shingles.
A beautiful idea for a shed at the dacha - a flower bed and trays of flowers, a path made of stone slabs leading to the building.
A tall barn with a pitched roof and windows for light in the ceiling.
An original utility unit for storing equipment in the country.
The idea of a workshop on a summer cottage - I can imagine that an artist creates his masterpieces here!
Natural roof in Scandinavian style - in Norway you can find turf on old houses. Well, here the designer’s idea was to plant a flowering lawn.
Some ideas are so good that they can even become the basis of a small country house, rather than a utility block.
The photo shows a completely workable option for a summer house on a plot of 6 acres.
A wenge-colored barn is a stylish color solution!
Stone utility block on an English estate - the structure is more than one century old, and there are many more centuries to come!
A simple idea for a shed for storing equipment in a summer cottage.
A beautiful frame shed covered with plywood.
A squat utility block is a design idea for your dacha.
An original solution is to imitate shutters on a window.
You can make such outbuildings with your own hands in a week, thereby giving you a place where you can store your tools. But don't turn the room into a storage room!
The idea of designing an approach to outbuildings at the dacha.
I recommend making a lamp at the entrance to the barn so that even in the dark you can easily approach the building.
It would also be nice to provide a canopy over the door so that in the rain you can open the door without standing under falling drops of water.
An unusual solution for the entrance group made it possible to create an additional door.
A solid barn built in Western style.
The idea of a utility block is a square-shaped workshop.
The idea of a utility room with an asymmetrical roof.
A utility unit with a beautiful front door on massive hinges.
Unusual utility block with walls made of wood cuts. I have already come across a similar solution several times, I wonder how labor-intensive and reliable it is?
With this, let me say goodbye to you today, see you tomorrow! Follow the updates, share ideas with your friends, get inspired and create unique beauty in your area!
Did you like the article? Subscribe to the channel to stay up to date with the most interesting materials
Source
Do-it-yourself siding installation
Before starting work, you need to calculate how much siding you need to purchase to cover the building. This is easy to do if you know the dimensions of the walls and the linear parameters of one panel. It is better to purchase cladding with some reserve.
If you plan to build a barn using frame technology, you should remember that siding belongs to the category of finishing materials. They cannot form the planes of the walls themselves. The frame is pre-sheathed with OSB boards at least a centimeter thick. Finishing panels can already be attached to them.
The old casing, if it is in unsatisfactory condition, must be removed. The panels must be mounted on a flat surface. Nails, protruding wire pieces and other similar elements are removed. The cracks are sealed with sealant. If the previous cladding is fairly smooth, you can install the sheathing profiles directly on it. If you are sheathing a shed with smooth wooden walls, you can do without sheathing at all, attaching the panels directly to the walls. If the building is built from block materials, a metal profile is used for the frame under the cladding. To align its elements in a vertical plane, first mount 2 elements on the sides of the walls, and then stretch a thread between them.
Special screws with washers or aluminum nails with a head width of at least 2.5 cm are suitable as fastening elements. Tools you will need are a hammer, pliers, a screwdriver, a hammer drill, and a hacksaw for cutting material. You also need tools for marking and checking levelness: a building level, a plumb line, a square and a tape measure. Gloves and goggles are needed to protect your hands and face.
First, sheathing is attached to the walls of the barn. Depending on the material of the walls, it can be made of timber or metal profiles. If vertical installation of panels is planned, the sheathing elements, on the contrary, are mounted in a horizontal direction. In this case, the distance between them should be about 0.4 m. If they want to lay the siding horizontally, the timber or profile, on the contrary, is laid vertically. The step value does not change.
The element to which the panels are attached is called the starting profile (or bar). Before its installation, marks are made on the wall, which will be used to control the evenness of the products. For covering the space near door and window openings, J-straps are included in the package. To hide the ends of the panels in the corner parts of the building, external corners are used.
Sometimes sheathing begins with the space near windows and doors. The advantage of this option is the protection of these areas from corrosion processes and moisture ingress.
In no case should you press the profiles tightly against the wall, screwing the screws (or nailing them) to the end. Otherwise, the siding may fail, since it tends to expand when the temperature rises. It is necessary to leave a gap of approximately 0.5 cm so that the products can move.
The panels are mounted overlapping from left to right or from bottom to top. Depends on which direction of installation is chosen - vertical or horizontal. A gap of 3-5 mm is left between them in case the volume changes during frosts in winter or hot summers. When a unit of siding cannot cover the entire length or height of a wall, a fragment of another panel can be added to it. This is done using special joining profiles.
How to turn outbuildings into site decoration
Reading time: 4 minutes No time?
A dacha is a place not only for relaxation, but also for work, so there are a lot of outbuildings here, and there are utilitarian objects that can hardly be called decoration of the site: a barn, an outdoor toilet, watering tanks. And these objects spoil all your improvement efforts. There are ways to disguise these buildings so that they not only do not spoil the view, but even become the highlight of your hacienda. And you can do this yourself and practically for free.
“Playing with” the unevenness of the terrain
The appearance of the site is often spoiled by all sorts of uneven terrain: depressions and mounds. Since leveling the surface is a very expensive and time-consuming process, decorative techniques help to visually “smooth out” unevenness.
It’s easy to “play out” a hole or depression on the site by arranging a small decorative pond.
The placement of improvised bridges and decks, based on support posts, helps to visually smooth out uneven terrain.
Even a high multi-level flowerbed, the area of which is slightly larger than the size of the depression, will help to “cover” the unevenness.
How to hide a shed and all its shortcomings
A utility block or barn is usually an unremarkable structure, cobbled together from leftover building materials. There is no beauty in it, so it is best to disguise the nondescript house with greenery. There are several options for this. You can attach hanging flower pots to the wall and plant flowering annuals in them. Even plastic bottles can be used as flowerpots.
Cork
- 100% environmentally friendly;
- excellent sound insulation;
- magnificent relief;
- solid and expensive look.
This is the case when the obvious visual advantages of a cork correlate with its technical characteristics and the numbers on the price tag. This option is certainly suitable for a respectably furnished wooden house, in which a lot of money has been invested. If you plan to cover the walls inexpensively, then you can use a little trick - use cork to decorate individual wall fragments. In this case, the costs will not be so high - and nothing will interfere with the pleasure of contemplating the spectacular wall cladding in the house. It is better to glue cork to a wall in a wooden house using special contact glue. It grips the sheet perfectly even with low consumption. Of course, before this it is necessary to prepare the surface of the wall itself:
- remove irregularities;
- clean from dust and debris;
- remove any remaining old material.
It is best to thoroughly level the walls before doing this, but if you don’t really want to do this with plaster, then gypsum board sheets will be an excellent and, most importantly, inexpensive alternative.
How to decorate barrels for irrigation
One barrel is usually not enough for watering, and a string of these containers can hardly be considered a decoration.
PHOTO: tvoya-banya.ru What can be done in this situation? First of all, you can paint and decorate the barrels with a pattern or ornament using a stencil
You can wrap iron barrels with vines or thick rope, and secure wooden slats in a circle.
To make the barrels less visible, they can be buried in the ground and plants can be planted around the edges.
PHOTO: flo.discus-club.ru You will get mini-ponds from which you can take water for irrigation
And if you illuminate these objects with solar-powered flashlights, you won’t worry that someone will “dive” into your mini-pond in the dark.
Household block: design options and construction features
Experienced developers know well that it is better to learn from the mistakes of others, so as not to make mistakes in their construction. To do this, it is best to study the experience of portal users who have already built sheds and cabins. Therefore, in this part of the article we have collected illustrative examples of practical utility units.
It all started when I conceived the idea of building a utility complex - combining a barn, a terrace and a bathhouse under one roof. Construction began with a model. I bought slats at the store and, together with my son, built a model of a multi-shed in the winter.
Note that the barn was built using one of the most common technologies used for the construction of such objects - frame. Screw piles were used as the foundation.
Source
Fence as a canvas for creativity
If you feel the talent of an artist, then the fence can become your canvas.
PHOTO: na-dache.pro It is most convenient to paint with acrylic paint, adding the color desired for the shade
In addition to drawings, the same hanging flower pots, trellises and hedges can be used to decorate the fence.
PHOTO: farpost.ru You can decorate an ordinary mesh fence with the help of bright covers
PHOTO: irecommend.ru A solid concrete or brick fence will become unique if you make a three-dimensional applique on it
Mask the drainage ditch
Depressions for drainage are rarely pleasing to the eye, but dry streams can decorate the area. To make the ditch look aesthetically pleasing, line it with natural or artificial stone and plant flowers along the banks. A winding “path” with boulders and pebbles looks best.
Along the banks of a dry stream you can plant miniature varieties of conifers, dwarf willows, rhododendrons and typical coastal herbaceous perennials.
Masking the septic tank
A sewer hatch certainly cannot be called attractive, even if it is a modern plastic product that looks very neat.
PHOTO: maksiplast.com You can disguise it in just two steps: attach a piece of artificial plastic turf to it. In this form, the hatch will no longer be noticeable
PHOTO: Pinterest You can also leave a decorative element on the manhole cover - something like a well or a garden sculpture
PHOTO: Pinterest A great idea is to disguise the hatch under a false stone. It's hollow on the inside, but looks like a boulder on the outside.
Outdoor toilet and its limitless possibilities
It’s unlikely that anything can be done here, skeptics will say - and they will be wrong. What options have online creative authors come up with? The toilet can definitely become an art object. You can decorate it with the help of original painting, landscaping and the use of overhead decorative elements.
PHOTO: YouTube Look, who would even think that this is a toilet?
Stages of work
There are only three stages that make up the step-by-step instructions for installing siding:
- preparatory work, including cleaning the balcony and purchasing materials;
- installation of sheathing made of wooden beams;
- installation of panels on the frame.
Preparation for installation
Before you begin installing vinyl panels, you need to prepare the necessary materials and tools:
- the panels themselves with a small margin for trimming and additional elements;
- wooden blocks with a section of 5x5 or 6x6 cm, from which the sheathing is made;
- fasteners (clamps, screws, corners);
- insulation materials, which include mineral and basalt wool, extruded polystyrene and fiberglass.
In preparation for installation, the balcony is cleared of things. If there is glazing, the old cladding, slabs and frames are removed. The fencing bars are cleaned and primed - if necessary, rusty railings are removed and new ones are installed.
Installation of sheathing
The process of manufacturing the frame on which the siding will be attached is as follows:
- Wooden elements are treated with an antiseptic that protects them from woodworms and mold.
- Vertical posts are being installed at the corners of the site. The bars are secured to metal using brackets, and to concrete - with anchor bolts.
- Horizontal frame elements are installed parallel to the slab and the upper border and connected with corners to vertical bars and brackets - to the fence.
After completing the main part of the frame, the remaining vertical bars are installed. The distance between the jumpers is about 500 mm. Polyurethane foam is used to fill the gap between the lower horizontal beam and the base slab.
Panel installation
For a correctly assembled sheathing, installation does not take much time, even in the absence of sufficient experience. The most difficult part of the process is holding the panels on the longest side. Therefore, it is recommended that two people install siding.
The installation process consists of the following stages:
- Using self-tapping screws, the starting strip is attached to the bottom trim (it is recommended to use a magnetic attachment for a screwdriver, which makes it easy to hold the fastener suspended).
- A profile is set on which the internal and external corners will be attached. Self-tapping screws are used to attach it to the harness and the starting bar.
- The front elements are cut in such a way as to leave a small gap (about 5 mm) for their placement between the corner profiles. This distance allows you to compensate for thermal expansion when the skin is heated in the warm season.
- The first panel rises above the sheathing with the edges carefully inserted into the corner profiles and is carefully secured into the lock of the starting strip. The siding is screwed to the frame using 19-25 mm galvanized self-tapping screws, between the heads of which and the surface of the element there should be a space of 1-2 mm to compensate for temperature changes.
- In the same way, the remaining siding panels are fixed and fixed to the sheathing, with the exception of the very top panels. The sides of the balcony are covered, which is simpler due to the shorter length of the panels. For a neat finish and connection to the wall, install a j-profile at the junction of the wall and the balcony.
- After installing the panels, except for the top ones, the finishing profile is installed.
- We measure the remaining height of the unsheathed part of the balcony walls (the height from the beginning of the lock of the installed siding sheet to the top edge of the finishing part) and cut off the required size of the siding panel. Then, using a nail or core, we punch holes from the inside of this sheet in the upper part, which will go into the finishing part. This way you will make lugs that will hold the panel in the lock of the final part and prevent it from falling out during temperature changes. This top panel is installed and you will hear a distinctive click.
The last stage of work is attaching the finishing profile to the frame beam. These actions are considered the completion of the external cladding process, followed by the installation of glazing and insulation. To enhance the decorative characteristics of the balcony, it is finished with basement siding from the inside.
Video: Exterior decoration of balconies and loggias
A compost heap to behold
And finally, the trivial compost heap - can anything be done with it? It is possible if you arrange it in a “basket” of intertwined branches.
PHOTO: vok.org.rs This compost looks very nice, and you will no longer worry about its unsightly appearance.
How a compost box should be designed is in this video:
Source
Lining
- wide selection of shades and textures;
- sound insulation and thermal insulation;
- environmental Safety;
- pleasant appearance;
- basic installation.
It seems that we started with a finishing material that does not need additional recommendations. And indeed: in any building materials store you can find several dozen texture variations. As they say, pick it up - I don’t want it. However, it would not be amiss to recall some criteria by which the choice will definitely be correct:
pay attention to the wooden lining - it is this that brings tangible notes of unique home comfort into the atmosphere and exudes a characteristic pleasant aroma;
the specification of the material should be marked “for interior decoration” - an important point, since some types of wooden lining are intended exclusively for facade work;
find out the type of wood used before purchasing - such information is always relevant, since different types of wood behave differently in conditions of high humidity, focus on lining options made of linden, alder, oak if you are planning decoration in a bathroom, bathhouse or kitchen;
The so-called eurolining is also on sale - this finishing material has improved characteristics, is well ventilated and is practically not subject to swelling even in conditions of constant high humidity, it is more expensive, but it has an impressive appearance and an impressive long service life.
Installing lining is one of the most common options for inexpensive, but successful sheathing of walls in a wooden house. In addition, it is not particularly complicated:
- a frame is assembled from metal profiles or wooden slats;
- sheets of lining are attached to it with clamps or, in the old fashioned way, with nails.
And in this article you can familiarize yourself with step-by-step instructions for installing lining.
https://youtube.com/watch?v=cQIXzEroi_k
Decor for a barn: stylish tandem
On any summer cottage there are old sheds, woodsheds, outbuildings and other buildings, which are impractical to demolish or rebuild for practical reasons. So that they don’t spoil the overall picture, let’s turn them into garden design objects! Original decor will help divert attention from shortcomings, and you will no longer have to repaint the building. For example, a wall can be decorated with an original panel in the form of a false window. And so that such a bright spot does not look too lonely, decorate the door that leads inside the barn in the appropriate style and technique. Such a successful tandem will completely transform an old building, and most importantly, it will not take much time and will bring a lot of pleasure!
Overhead windows can be painted in a variety of colors, and pots with unpretentious annuals can be used as decoration.
We improve old trees and stumps
Old tree stumps, which are very difficult to uproot due to the branching of deep roots, are likely to be found on any site.
“Play up” the left cuts, turning them into interesting accents of the garden, you can make garden stools or stands for outdoor flowerpots out of them
Old, inconspicuous trees, which no longer delight with lush flowering or have completely dried out, can act as a beautiful support for climbing vegetable crops: cucumbers, decorative pumpkins, climbing beans. Tree vines: grapes, actinidia, clematis are capable of completely covering dried tree branches.
Hanging flower pots, which you can purchase at a gardening store or make yourself, will help add brightness and uniqueness to the tree.
To make a flowerpot in each pot, drill 3 holes at a distance of 2-3 cm from the top side, placing them around the circumference at a distance of 120 degrees from each other. We stretch 3 identical pieces of aluminum wire or thick fishing line through the holes and secure them with knots so that they hold the container. We collect the free ends of the wire together and fix it on a tree branch. We line the bottom of the containers with expanded clay. We fill the containers with soil mixture and plant flowers: nasturtium, lobelia, pelargonium.
Outbuildings, transformed with the help of imagination and skill into original art objects, will become a worthy decoration of the site and the pride of the owners.