The main element that turns a room into a bathhouse or steam room is the stove. A person who decides to build a bathhouse on his property is faced with the question: how to choose a stove for a bathhouse? The modern market offers a huge assortment: many models and manufacturers, different price categories and materials of manufacture, wood-burning, gas or electric.
You can also spend more time and make the stove yourself. To make the right choice, you need to understand the classification and requirements that apply to such units.
Advantages and disadvantages of a sauna stove
Sauna stoves are varied. They are made independently or purchased ready-made models in stores. Brick is used as the main material for the construction. This decision is due to a number of advantages.
The advantages of brick kilns include:
- Long-term heat retention;
- High quality steam;
- Great power;
- Fire safety;
- Creating a pleasant microclimate;
- Environmentally friendly.
The peculiarities of the material and original appearance allow you to create a pleasant antique atmosphere in the bathhouse.
Despite their advantages, brick stoves have a number of disadvantages:
- Heavy weight;
- Foundation requirement;
- High manufacturing cost;
- Demanding qualifications of specialists;
- Long fire.
To make a high-quality stove, you must have experience in laying bricks. If the masonry turns out to be uneven, the quality of the room’s heating decreases.
Frequently asked questions
The process of building a furnace is quite complex, raising a lot of questions. Some of them appear for all users. To save time, you need to answer them in advance.
How accurate are the ordering diagrams from the network, are there any errors in them?
Errors are possible in any case, regardless of the source. In order to be on the safe side, you can try to look for ready-made diagrams on specialized forums where there are experienced specialists. They will give accurate diagrams and help with useful advice if something seems unclear.
Is it possible to use screw piles with a channel frame as a base?
Screw piles are a completely acceptable foundation option, especially on heaving or unstable soils. You just need to correctly calculate the load-bearing capacity and immerse them to the required depth. At the same time, the grillage must be made strong enough and a concrete slab must be laid on top of it.
How to choose the oven size?
The size of the stove firebox correlates with the size of the heated room in the range from 1:50 to 1:70. Take into account the size of the steam room and washing compartment. Since the bath heating mode is quite harsh, it is recommended to select a lower value (1:50).
Is it possible to use facing bricks?
To build the furnace, ordinary ordinary brick is used. If you need to finish the stove, you can use clinker tiles - they imitate brickwork as realistically as possible and have a suitable size - only 2-2.5 cm thick.
What to prefer, a brick pipe or a modern sandwich?
The sandwich is lighter. If the stove is small, it is better to choose it and thereby reduce the load on the main structure. However, for large massive ovens you can build brick pipes and save on buying a sandwich.
Features of modern sauna stoves
When creating a furnace, you must carefully consider the choice of design and development of drawings. The design features of the product will directly depend on the heating option.
The main options are:
- In black - with no chimney;
- In gray - with a chimney, but there is a need to wait for the wood to burn out;
- On white - there are no signs of soot in the room, the stove has a chimney;
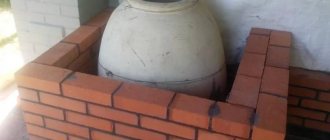
- With a stove is the most successful option; it is based on a tank, a stove and sauna stones.
When building a modern stove, special attention should be paid to the choice of a water tank, firebox stones and additional elements. Brick, as the main building material, allows you to retain heat for a long time and maintain the desired temperature in the steam room.
Tank selection
The water tank is selected before construction work begins. Its volume directly depends on the number of people simultaneously in the steam room. The more traffic the room has, the larger the tank should be. In the classic calculation, 1 liter per person is taken.
Experts recommend giving preference to open tanks. Such containers are easier to maintain and fill with water. During periods of prolonged inactivity, it is recommended to empty the water from the tank.
Firebox stones
Stones play an important role in the steam room. Their choice should be approached carefully. Ordinary cobblestones are not suitable for a bathhouse. They have microcracks and additional inclusions, which have a negative effect on the material during sudden temperature changes and can explode.
Stove makers recommend using jadeite, soapstone, or river tracing paper as stones. In case of financial difficulties, the use of basalt or vulcanite is allowed.
Brick selection
For masonry, most builders use ordinary solid red brick.
- It is distinguished by good behavior under temperature changes and a long service life.
- Red brick performed best in the construction of the main structure.
- However, in the firebox, under the influence of temperature and moisture, it quickly collapses.
Fireclay material is used to lay the firebox.
Additional items
Additional elements in the design of a sauna stove are metal inserts: doors, grates, grates and other systems. They are purchased ready-made; it is recommended to buy a full set. It contains everything necessary for the construction of the structure.
- When purchasing metal products, take into account the dimensions.
- It is important that they comply with the parameters specified in the bathhouse design.
- If there are no such items on sale, then they buy those that are as close in value as possible. Dimensions are adjusted using bricks.
Choosing a water tank
To make the tank, you can use stainless steel or heavy-duty cast iron. We would advise you to give preference to the first option, since cast iron is more expensive and the water takes longer to heat up.
Note!
Insulate the foundation with your own hands - a step-by-step description of the use of the best materials and technologies (90 photos)
- Do-it-yourself pergola on a summer cottage: step-by-step instructions with photos and descriptions
- Laying laminate flooring with your own hands: a detailed description of how to lay laminate flooring. Laminate calculation, step-by-step description and installation secrets (105 photos and videos)
Stainless steel is superior in price in this regard, and the water also heats up quickly. The only drawback is the service life; a cast iron tank in this case will last much longer.
Construction technology
Construction of a furnace is not a quick process. The work takes on average at least 1 month. The period directly depends on the qualifications of the specialist and the speed of installation. Most of the time is spent preparing the foundation and hardening it.
The main stages of work are:
- Preparation and pouring of the foundation;
- Preparation of tools and solution;
- Construction of the masonry of the main part of the furnace;
- Construction of a chimney;
- Finishing work.
All stages are carried out sequentially, observing the time limits for hardening of the solution.
Varieties
The heating device is the most important device that should be in the steam room. Without it, a bathhouse or sauna will become an ordinary room that does not provide any benefit. Without such a unit, you won’t be able to take a steam bath, much less relax. Today, different manufacturers offer a huge range of fireplace stoves, so choosing the right device can sometimes be quite difficult.
Depending on the material used, fireplace stoves are divided into brick heaters and metal ones.
According to the classification they are called:
- Heater with open or closed fireplace.
- Cold and hot.
- Long burning or direct heating stoves.
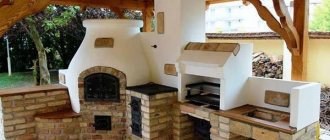
There are two-in-one options when the oven turns into a barbecue. This combined unit is especially good for those who like to take a steam bath and eat delicious food.
If you don’t have the opportunity to spend time near a real fireplace-stove, you can buy an electric infrared fireplace. Its advantage is that the transfer of a large heat flow occurs in a relatively short period of time.
Pouring the foundation
The foundation is the basis of the entire building. There are increased demands placed on him. The foundation must be strong and reliable, capable of supporting the heavy weight of the building.
The construction of the foundation is carried out according to the scheme.
- Dimensions are applied to the base. Pegs are driven into the corners, and a thread is pulled over the stakes for ease of orientation. The size of the markings corresponds to the dimensions of the oven.
- Prepare the pit. Depth – 60-70 centimeters, the lower part is additionally expanded by 10 centimeters to the sides. The shape of the pit should be trapezoidal.
- A layer of sand 5-10 centimeters thick is poured onto the bottom. Broken brick or crushed stone is poured on top. Sand is also sprinkled on top. The thickness of the puff pastry is approximately 25-30 centimeters.
- Waterproofing is laid on top of the compacted brick with sand. Traditionally, roofing felt is used.
- Formwork is installed around the perimeter of the pit. A reinforcing mesh is installed in the pit itself.
- The formwork is poured with concrete. In this case, 10-15 centimeters are left to the top. They are necessary for leveling the surface and laying the base layer of bricks.
The foundation is allowed to settle and set. This period takes from 5 to 7 days, after which the formwork is removed. The voids are filled with gravel. Roofing felt is laid on top of the foundation. It is recommended to do waterproofing in two layers for reliable protection against groundwater leakage.
Operating principle
Such stoves operate according to the following scheme: wood and fuel are placed in the firebox and lit, generating heat. Since hot air is much lighter than cold air, it rises through the heater and heats the stones. They get very hot and maintain the desired temperature in the room for a certain time.
When working with some devices, you have to frequently add firewood, since it burns quickly and the comfortable temperature does not last long. Wood is usually lit from below.
Preparation of the solution
It is not recommended to use cement mortar for masonry. It is not heat-resistant and does not tolerate temperature changes well. Experts recommend starting a mixture based on clay and sand.
There are no exact proportions for the composition. Focus on consistency.
- Clay is used red or fireclay. No large inclusions.
- The material is filled with water and left for 24 hours. After this, knead until soft. The clay should stick slightly to your hands.
- After this, sand is introduced, previously sifted through a sieve.
- The composition is mixed until homogeneous.
The readiness of the solution is determined by dipping a stick into it and shaking it. If the remaining layer exceeds 3 millimeters, then sand is introduced. If less than 2 – clay. The optimal layer is 2 millimeters.
We make a long-burning stove with our own hands
The first step is to decide what the stove body will be made of. It is advisable to choose thick metal so that it does not burn out longer. Most often, such a potbelly stove is made from a gas cylinder with a volume of 50 liters. You can use a large-diameter thick-walled pipe or a 200-liter steel barrel, but its walls are thinner.
You will also need
:
- steel pipes;
- metal profile;
- tool for cutting metal (grinder, gas cutter, etc.);
- welding machine with electrodes;
- Sheet steel.
Let's take a closer look at how to make a potbelly stove with your own hands. It is first recommended to sketch out a design diagram and determine the dimensions of the elements.
Frame
. When making a body from a gas cylinder, it is necessary to carefully cut off the upper part (cut line 1 cm below the weld). If desired, the body can be extended by welding the cut-off part of another cylinder. The top part with the lid is also cut off from the barrel. And if a pipe is chosen for the body, a round or square bottom made of thick sheet metal should be welded to it.
Housing options
Lid. In the cut off top of the gas cylinder or in the lid of the barrel, a hole should be cut in the center, corresponding in size to the pipe from which the piston will be made
The lid is scalded with a steel strip - it is important that it fits tightly onto the body. For a pipe body, the lid will have to be specially made from sheet metal. Chimney pipe
On the side of the stove, a couple of centimeters below the lid, a hole is cut and the chimney pipe is welded
Chimney pipe. On the side of the stove, a couple of centimeters below the lid, a hole is cut and the chimney pipe is welded
It is important that the removable chimney elbow fits tightly, without gap
Chimney. The lower, horizontal section of the chimney should be longer than the diameter of the stove. The chimney pipe can be made broken to increase the surface area that transfers heat to the room
It is important that there are no angles less than 45°. A pipe with a diameter of 10-15 cm is suitable for installing a chimney.
Piston
. The length of the air duct must exceed the height of the housing by 100-150 mm. It is necessary to weld a steel circle with a hole in the center to its lower part and equip it with five to six blades on the lower side (arranged in a circle, with rays from the center).
The blades can be
:
- pieces of steel angle;
- U-shaped sections;
- wave-curved strips of metal (welded edgewise).
In the middle, a small steel circle with a hole in the center is welded onto the blade. If the platform with the blades is made of steel less than 6 mm thick, it will deform over time due to overheating. To prevent this from happening, stiffening ribs are welded on top - a triangle made up of angle segments. Attach a steel plate to the upper section of the pipe with a bolt to adjust the combustion intensity.
Assembly
. Install a top-burning stove, check the tightness of the chimney connection. Insert the piston into the stove, put on and close the lid. Make sure that the cap fits tightly and that the gap between the piston and the hole in the cap is minimal.
Commissioning
. Homemade long-burning potbelly stoves can be placed on an earthen or concrete floor. If the floor in the room is wooden, lay out a brick platform using stove mortar and cover it with a steel sheet. Instead of brick, you can lay a sheet of refractory material and also cover it with sheet metal. It is advisable to line the walls next to a self-made stove with bricks, which will accumulate heat and transfer it to the room.
Firewood is placed into the installed stove, filling the firebox approximately 2/3 or a little more. Place paper on top and set it on fire. After making sure that the firewood is occupied, you can install the piston and put on the lid. The next addition of firewood is possible only after all the fuel has burned out and the stove has cooled down.
Conclusion
“Bubafonya” is not the most effective long-lasting homemade stove. Craftsmen are developing various versions of a wood-burning “rocket” stove, but its manufacture requires precise calculations, hand-made drawings and good skills in working with various tools.
“Bubafonya” can also be modernized, for example, by installing a device that simplifies the unloading of ash.
Video on the topic
:
Brickwork
Brick laying is carried out according to a pre-developed plan. During work, it is important to maintain the sequence of rows and the evenness of their construction. The first row should be perfect.
The general scheme for discharging a brick sauna stove with your own hands consists of a number of steps.
- The first row sets the general direction of the walls. Must be perfectly smooth. A plumb line is made from it to check the vertical.
- The next step is to make the ash pan. Its tasks include collecting waste generated during the combustion process.
- The third and fourth rows are responsible for attaching the blower. A metal strip is used to secure it. The blower is responsible for regulating the combustion process. Open position – intense flame, closed – small flame.
- After the fifth row, steel corners for the grate are laid.
- Starting from the 6th row, a firebox is installed. Fireclay bricks are used for it. The height of the firebox is 25 centimeters, the width is just over 30. A grate is placed on top of the firebox.
- In the last rows, the firebox area expands. Refractory bricks are used for external masonry. Openings are created for secondary air supply. They are made of bricks cut with teeth.
- The laying continues with the outer brick. Doors for the firebox and a partition for the chimney are installed.
- A water tank is installed.
- At the height of the 15th row, the firebox is covered with a slab of refractory material, and stones are laid on it.
- The laying of the compartment under the stones begins. Its size depends on the number and size of stones.
- The chimney is laid out last. Fireclay bricks are used for it. The chimney gradually narrows upward. Exited through a wall or roof. The passage points through the bathhouse partitions are lined with thermal insulation. The last to be installed is a chimney protected from rain and dirt.
During operation, the solution is applied to the previous row. The brick is laid with the smooth side facing the chimney. The vertical and horizontal lines are checked after each row. The remaining solution from the side surface is cleaned every 3-4 rows. After laying out, the oven is left to dry.
Requirements for construction work
Construction rules (SNiP and SP) require stoves weighing more than 700 kg to build their own foundation. It is necessary to build it separately from the base of the bathhouse, therefore, it is most convenient to build the stove in parallel with the construction of the room itself.
Creating a foundation is the very first stage of furnace construction, which determines the success of further work. Various design options can be used here, from screw piles to a full-fledged poured concrete slab (the most preferred type of foundation).
The stove itself is built from two types of bricks. A special material is used for the firebox - fireproof (fireclay) brick.
You cannot use an ordinary ordinary block - from strong heating it will lose strength and begin to crumble.
An important point is that a rigid connection between the combustion chamber and the outer walls of the furnace cannot be made - thermal expansion of the inner part can cause destruction of the outer walls.
In addition, bricklaying is done using clay, and not using ordinary cement-sand mortar. This is an important point, since clay and fireclay bricks are sintered into a monolith from exposure to high temperatures.
This allows you to maintain the tightness of the firebox even when the external seams begin to crumble - this is an inevitable process that requires constant attention.
If such defects are detected, the defective seam is opened and re-filled with a clay composition.
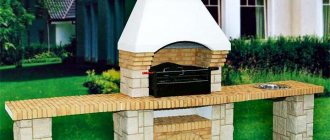
Finishing
Finishing for brick stoves is not mandatory. Finishing allows you to hide minor imperfections in the masonry and give the stove a complete, stylish look. The most common design option is tile.
There are 3 types of ceramic tiles for finishing the stove in the bathhouse.
- Terracotta. High strength tiles with a porous base. Has excellent adhesion to the surface.
- Majolica. It is distinguished by the presence of a top layer of glaze. It has excellent performance characteristics and an attractive appearance.
- Clinker room. It is made from a mixture of clays with the addition of fireclay powder and pigments. The material is fireproof. Has high strength. It is most suitable for ovens.
You can line the stove in the bathhouse with brick or decorative stone. The design made of porcelain stoneware, marble, granite, and coils looks good.
A brick sauna stove is not only functional, but also a beautiful structure that can create the amazing atmosphere of an old bathhouse. Compliance with installation technology and proper selection of equipment will allow you to create a reliable and functional product that will last a long time.
Design or how to design
The question of how to decorate a fireplace stove in a dressing room or decorate heating equipment for a rest room worries many self-taught craftsmen who decide to lay the fireplace stove on their own. This point is also relevant for homeowners who use stove heating. Finishing the hearth with ordinary plaster does not have any aesthetic value, and after a short period of operation it simply requires updating.
The following types of finishes exist:
- Peasant (clay, lime and whitewash are used). A long time ago, stoves were coated with a similar mixture and then whitened. The dried walls were decorated with various designs, mostly flowers. These days this method is almost never used anywhere.
- Decorative brick. Heat-resistant material retains heat for a long time.
- Heat-resistant ceramics (terracotta, majolica, clinker, porcelain stoneware).
- Tiles. The most common method of lining heating elements. It differs from ordinary tiles in its box-shaped structure, which serves as a fastening for the tile to the surface.
Photo of a brick sauna stove
Necessary tool
To lay a stove, you will need the following set of tools:
- small trowel;
- hammer-pick;
- square 60×40 cm;
- plumb line;
- steel level 60–90 cm;
- grinder with cutting disc for stone;
- protective glasses.