Provide an open terrace at the project stage, rejoice at how beautiful and original it is. For a couple of years you will suffer from the inability to use it one hundred percent due to rain, wind and snow. Glaze the terrace. It takes a long time to get rid of the thought that such a beautiful room is empty most of the year - but you can receive guests there, have dinner, drink coffee and generally do something functional. Insulate the terrace.
Familiar algorithm, right? We have collected several terraces from FORUMHOUSE, which were open in a previous life and offer you to look at their before and after photos.
What is a veranda
This is a closed or open terrace, which is located along the facade of a residential building. This room was built into the house initially or added later. As a rule, it is not heated. It can have glazed windows and doors (veranda) or do without them (terrace). The design of the veranda should match the overall appearance of the house and be in the same style. For example, you can build a brick veranda for a wooden house, but it will be ugly. It is better to make it also from wood. The roof for the veranda is usually made of a pitched roof, using the same roofing material as for the roof of the house.
One of the defining aspects of the overall appearance of the terrace is the location and shape of windows and doors. The shape and designs of the frames of window and door openings will help you make your extension original and beautiful.
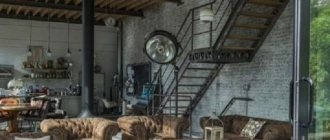
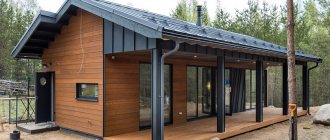
Photo: room options made of various materials
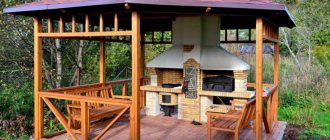
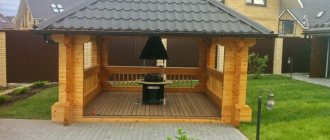
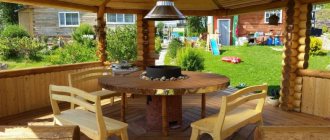
Cozy veranda
A simple open veranda under construction
Spacious bright veranda Open terrace
Veranda with equipped rest room
View of the veranda from the street
Converting a summer terrace into a dining terrace with transparent walls. Third stage of evolution
Our forum member with the nickname crystalik has a 6x6 meter bath house at his dacha near Novosibirsk, but the third part of this room is an open terrace.
This distribution of space seemed non-functional to him, and he decided to expand it into a larger space, which would include a kitchen, a dining room and a solid fuel boiler. The following project was born:
The terrace stands on 5 thick-walled stilts. The frame from the side of the house was attached to the protruding heads of the piles on which it stands. From the side of the house, the frame was placed on the heads of the piles on which the house stands, and in two places I additionally screwed in the beam fasteners.
The craftsman covered the closed part of the terrace (where the boiler is planned) with OSB sheets. I installed large windows “warm, not country.”
To avoid condensation on the windows with such a glazing area, low radiators are planned along the perimeter.
To avoid large heat losses, the owner of the house insulated the ceiling well.
And the floor.
Crystalik
We arrived at two o'clock in the afternoon. It was -24 on the veranda after a cold night. They turned on a two-kilowatt convector. The next morning at 11 o’clock it was +12 there, and -10 outside. We warmed up to +22 with a fan heater in an hour, drank tea and relaxed in the warmth.
Recommendations for design and construction of a house
Modern verandas are no longer cluttered with work clothes and household supplies. Now these are full-fledged premises and extensions of a residential building, the arrangement of which is approached with the utmost seriousness and responsibility.
Design is the most important stage in the construction of any structure, including a veranda. At this stage, you need to create a sketch, which will show the general view of the structure by hand, and a detailed project drawing, indicating all measurements and necessary materials for construction. The more detailed the project, the easier it will be to build later. After all, you will know in advance how long, for example, a board you need for a particular element, as well as how many such boards you need. The project will help you calculate the amount of material and the approximate cost of constructing a veranda.
There are many projects for constructing an open veranda
If you do not have drawing skills, then you can look up the project in open sources or order an individual one from specialists.
- Decide on the purposes for which the veranda will be built and what time of year you will use it. If you are going to actively spend time there during the cold season, then it should be glazed and insulated. If only in the summer, then you can build a terrace.
- The next stage is determining the location and size of the building. The size is selected for each individual. For example, for a family of 5 people, a veranda of 12 m2 will be enough. Usually it is located along one of the walls of the main building and is hidden from the eyes of strangers. There should be an entrance to the common house from the veranda. The ideal location of the veranda is a place away from the eyes of neighbors and the view from it should be as conducive to relaxation as possible: to the garden, flower beds, children's playground. But not for outbuildings and a vegetable garden.
- Always consider the view of the veranda from the street. It should not only be comfortable and cozy from the inside, but also look attractive and harmonious from the outside.
- It is not only necessary to legalize the extension, but it is done without fail! To do this, you need to make a design and bring it to the architecture department at your place of residence. Specialists from this department will study your project, if necessary, changes will be made to it and you will be issued a building permit. This will take about 2-3 months, so it is better to submit documents for review in advance, before the construction season begins.
- For greater harmony and aesthetics, experts recommend choosing the same material from which the main building is made.
- The foundation of the house and the veranda must be at the same height. If the veranda is being built to an already finished house, then a columnar foundation is made. Floor insulation occurs during the construction stage.
- The veranda and the house should become one whole and fit tightly to each other so that precipitation does not seep into the extension.
- The veranda, by definition, is a very bright room, which means it should have as many windows as possible. It can even be made completely panoramic. To use such a building in cold weather, you can make windows from thermally insulated double-glazed windows.
Glazed small veranda
- Some heat the veranda if necessary using a conventional heater. And there are those who put a fireplace there.
- Blinds or curtains will be a salvation from the sun's rays in the heat.
Inserting windows into the veranda
The owner's requirements for the building determine what kind of glazing will be used for the project. With plastic windows, the simplest opening is sufficient.
Glazing is also allowed in the case of a regular veranda. How much the owner will spend in a given case depends on the glass itself.
And the complexity of the work is determined by what parameters the veranda itself has.
How to make a foundation correctly
To build a veranda, it is enough to erect a columnar or strip base, the depth of which will be equal to the depth of the base of the house. Experts do not recommend connecting the main foundation to the base of the extension due to differences in weight. They will not shrink equally and this can lead to deformations of the extension. Leave a gap of 30-40mm between these two bases.
The choice of the right type of foundation depends on what material the extension will be made of and the characteristics of the soil. For example, for the construction of heavy brick extensions, it is better to make a strip foundation, but for lightweight wooden structures, a columnar foundation is sufficient.
Tape base: step-by-step construction instructions
The dimensions of the foundation for the extension should be the same as the dimensions of the foundation of the house.
- Dig a trench along the entire perimeter of the future walls of the veranda.
Pit for a strip base
- Level the bottom and walls of the pit, compact the bottom.
- Install wooden or panel formwork.
- The next stage is a sand-crushed stone cushion. Each of the materials is poured in a layer of 100 mm. Everything is compacted well.
- Lay a reinforcement network, the rods of which are 10–12 mm, and the cells are 100x100 mm.
- Pour in a concrete mixture, which is made from 3 parts sand and 4 parts crushed stone and water.
- Level the concrete and leave until completely dry. This takes about one month.
Cement poured into formwork
In order for the foundation to be strong, it needs to be “watered” at first. Especially on hot days. Moisten it with water and cover with plastic wrap. So, it won't crack.
Columnar base
For light timber or polycarbonate verandas, the construction of a columnar foundation is ideal. The recommended depth of holes for pillars is 800–1100 mm. For a small veranda (3x4 meters), it will be enough to install supporting structures only in the corners. But for greater reliability, it is better to play it safe and make intermediate posts. The distance between the supports should ideally be 80–100 centimeters.
The parameters of the pillars must be carefully calculated
- Dig holes for support structures. Using a drill will make the task much easier.
- Make a sand and crushed stone cushion for the pillars. Sand in a layer of 150–200 mm, and crushed stone 100 mm. Compact each layer well.
- Make wooden formwork and lay reinforcement mesh.
- Pour concrete to the full depth of the hole and let it harden.
- After hardening, coat the concrete structures with bitumen.
- Remove the formwork and cover all cracks with sand.
- The ground part of the foundation is made of bricks. The height of their construction should be equal to the height of the base of the house.
Review of materials used for internal insulation
Nowadays the construction market offers a wide variety of materials for thermal insulation of premises. They differ in performance characteristics and cost. So, let's figure out how to insulate the veranda from the inside?
- Polystyrene foam is the most popular type of insulation in many areas of construction. It is characterized by low weight, good rigidity, stable performance characteristics even with long-term use, ease of installation and the possibility of installation, both with and without a frame. The disadvantages of polystyrene foam include its high fire hazard and attractiveness to rodents. This is a significant disadvantage for insulating a veranda in a private house.
When using polystyrene foam, there is no need to construct another waterproofing layer.
Scheme for insulating veranda walls with polystyrene foam
1 Polyurethane foam 2 Styrofoam 3 Lining 4 Frame stand 5 OSB boards 6 Upper planking block 7 Block house - Penofol is recommended by many experts. This is a modern and high-quality thermal insulation material; it can be used in conjunction with other types of insulation or without them. Penofol is ideal for insulating all buildings in a country house. It has a low degree of vapor permeability. The material is environmentally friendly. You can install it yourself without any problems.
Floor insulation with penofol - Another popular insulation material is mineral wool. It can also be used to insulate any buildings in the private sector. It is possible to use mineral wool for rooms intended for winter use. To install a thermal insulation layer made of mineral wool, you will need to equip the frame. Such material will lose its density four to five years after installation, and this will inevitably lead to a loss of thermal insulation properties.
- Basalt wool is an analogue of mineral wool. It also gradually loses its thermal insulation properties. It differs from mineral wool in being safer from an environmental point of view.
- Expanded polystyrene combines all the advantages of foam insulation. It has good strength and is easy to work with. Even a beginner in this matter can install a thermal insulation layer with polystyrene foam. However, this material is characterized by high sound transmittance.
Expanded polystyrene belongs to the category of non-combustible materials.
- Glass wool is superior in strength and elasticity to all the materials listed above. It can be purchased in roll form. Working with it is quite simple, but it is necessary to use means to protect your hands, eyes and face, as well as the respiratory system. Therefore, along with glass wool, you will need to purchase safety glasses and a respirator. Glass wool has little strength, so it can sag greatly over time. This material is absolutely fireproof.
Subfloor
It is better to start installing the subfloor immediately after building the foundation, having previously waterproofed the base with roofing felt in 2 layers.
The floor can be made of wood or concrete. The first option is better suited for a frame wooden veranda, the second for a massive brick one.
How to build a wooden one
Subfloor installation
- Secure the bottom trim to the base with anchors. The strapping elements are connected to each other using galvanized nails.
- Attach wooden floor joists to the trim beams at a distance of 500 mm from each other.
- Fill the space between them with expanded clay.
- Using an uncut board or plywood about 5 cm thick, construct a deck that is attached to the floor joists using galvanized nails or self-tapping screws.
We create a concrete
- Fill the base with sand, the layer of which should be 100 mm.
- Then comes a layer of expanded clay.
- Lay a reinforcing network, the rods of which are 6–8 mm, and the cells are 250x250 mm.
- Pour the concrete mixture.
- The thickness of the floor screed should be 3–5 cm.
It is important that the concrete surface is perfectly flat. Use a spirit level to check this as you work.
Creating a wireframe
The frame part is placed on the finished foundation part. This is a fairly simple and quick process. You will need bars measuring 150x150 millimeters in cross-section (bottom trim), 100x100 millimeters for the supporting railing and post parts. Cover the foundation part with roofing felt. Beams (150x150) are placed on it. A structure of six meters or more will require splicing of strapping parts. The middle of the beam is marked with cuts. This is the end of the transverse part. The resulting recess will serve to insert the protruding part of another part. Using a tool (manual or mechanical), the beams are sawed along the marks. You can use both a saw and a hacksaw. The recess is connected to the protruding part in different ways: longitudinally or at a certain angle. A couple of nails will strengthen the fixation.
Reinforcing pieces should be used to prevent the frame part from moving. They are inserted on top of each pillar (ribbon). Length – 20-25 centimeters.
Note!
- How to attach a veranda to your house with your own hands - step-by-step instructions from A to Z + photos of new designs
Do-it-yourself columnar foundation for a gazebo: detailed instructions from A to Z + photo
DIY economy class garden gazebo - instructions on how to build quickly and cheaply. Photos, diagrams, drawings, layout and design
Where the rods emerge, holes are made before laying the strapping. The beams are then laid on top of the pins. They bend along the entire perimeter. The floor binding is complete. The perimeter is lined with transverse beams with meter-long notches. Additional fastening is carried out. Nails of the correct size are used.
The roof rests on beams. Determining the dimension is done like this. It is necessary to maintain the roof angle with the roof height. Two meters or more from the floor level. An electric planer will help bring the racks into a neat appearance. After such processing it is much easier to carry out processing. The posts are secured to the frame using special self-tapping screws. They must have steel corners. The end part of the bar at the top is attached to the harness. This frame part increases the durability of the veranda made of wood with your own hands. Bars of 10x10 centimeters are used. First the work is carried out on the ground. Then installation is carried out on the rack end parts. Fixed. Vertical elements must be perpendicular. A level or plumb line will help with this.
How to attach brick or foam blocks
Beautiful brick veranda
This is already a capital building. If the work is done according to the rules, then such a building will be comfortable at any time of the year. In the summer heat it will be cool there, and in the winter cold it will be warm. The brick veranda is distinguished by its durability, fire safety and ease of maintenance.
But it also has a drawback. Namely, heaviness. Therefore, its construction requires a strong foundation.
When the foundation and subfloor are ready, laying can begin. There is a type of spoon masonry, in which the total thickness of the walls is 12 cm; bonded masonry, with 25 cm walls and chain masonry, with 38 cm walls.
- Attach a mooring cord to the opposite ends of the base. Corner bricks are being installed along it.
- Once the corner bricks are exposed, fill the space between them using a masonry method that suits you.
The bricks are fastened together using standard cement mortar. Check the evenness of the masonry with a building level. Carry out work to the height you require, not forgetting to leave openings for windows and doors. Option for laying a brick veranda - To build a pitched roof, you need to make a wall 1 row lower, which will fall on the lower part of the roof slope.
- After you have laid out the last row, you need to install the armored belt. Place formwork on top of the walls, the height of which is 7 cm, place anchor bolts in the corners, lay reinforcement and pour concrete.
- After the concrete has hardened, attach the strapping to the bolts using wooden beams with a cross-section of 100 * 100 mm. And then the order of the rafters is the same as in a wooden roof.
If the veranda is intended to be used all year round, then you can make 2 rows of masonry and put waterproofing and thermal insulation materials between them.
You can leave single masonry. Then insulation and waterproofing are laid between the brickwork and the internal wall cladding material.
External finishing work remains at the discretion of the owner: it can be facing bricks, it is allowed to sheathe the building with polycarbonate.
Calculation of the number of bricks for the terrace (table)
| Masonry size | Length | Width | Height | Number of bricks excluding the thickness of the mortar joint, pcs. | Number of bricks taking into account the thickness of the mortar joint 10 mm, pcs. |
| 1 m3 single brickwork | 250 | 120 | 65 | 512 | 394 |
| 1 m3 of thickened brickwork | 250 | 120 | 88 | 378 | 372 |
| 1 m2 of masonry in half a brick (masonry thickness 12 cm) | 250 | 120 | 65 | 61 | 51 |
| 1 m2 of masonry in half a brick (masonry thickness 12 cm) | 250 | 120 | 88 | 45 | 39 |
| 1 m2 of masonry in 1 brick (masonry thickness 25 cm) | 250 | 120 | 65 | 128 | 102 |
| 1 m2 of masonry with one and a half bricks (masonry thickness 38 cm) | 250 | 120 | 65 | 189 | 153 |
| 1 m2 of masonry with one and a half bricks (masonry thickness 38 cm) | 250 | 120 | 88 | 140 | 117 |
| 1 m2 of masonry with 2 bricks (masonry thickness 51 cm) | 250 | 120 | 65 | 256 | 204 |
| 1 m2 of masonry with 2 bricks (masonry thickness 51 cm) | 250 | 120 | 88 | 190 | 156 |
| 1 m2 of masonry with 2.5 bricks (masonry thickness 64 cm) | 250 | 250 | 65 | 317 | 255 |
| 1 m2 of masonry with 2.5 bricks (masonry thickness 64 cm) | 250 | 250 | 88 | 235 | 195 |
Open-closed terrace. First stage of evolution
It happens that family members cannot agree on one decision, and then a compromise has to be sought. A member of our portal with the nickname Pavel Again lived in an old house with an old veranda, the lower part of which was covered with boards, and the upper part consisted of frames with many pieces of glass of different shapes.
When they started modernizing the terrace, some family members insisted on an open version, while others dreamed of a closed one. We agreed on removable windows. Here is the technology used:
Pavel Again
We screw threaded rods into the wall and hang sheets of transparent plexiglass on them from the floor to the roof (this is about 2.5 meters).
This is how this terrace lives: in autumn and winter it is closed.
And in the summer it is open.
Useful link for those who want to repeat something similar: A little practice on working with light-transmitting materials .
Roof: ceiling trim and other structural elements
To finish work on the roof, you need to build a sheathing, lay down layers of insulation and cover the surface with the finishing roofing material.
The sheathing can be made continuous for rolled materials or sparse for sheet roofing. The first is made from OSB boards. They need to be attached to the rafters, leaving a gap of 10 mm. The sparse sheathing is done at a pitch recommended by the manufacturers of the selected roof. Usually it is about 300–350 mm. The sheathing is attached to the rafter part with galvanized nails or self-tapping screws.
Veranda roof
Place mineral wool in the cells between the beams of the sheathing part. This will be thermal insulation. Lay a waterproofing material on top, which is attached to the sheathing using staples from a construction stapler.
For a continuous version of the sheathing, the heat-insulating material is laid inside the veranda, fixing it with the help of transverse slats added to the sheathing.
The last stage is laying the roofing material. Ideally the same as the roof of a house.
Roof arrangement
In this case, several main steps are assumed:
- Creating a sheathing.
- Installation of layers with insulating characteristics.
- Finish type roofing material is laid.
The lathing is made solid or sparse. OSB boards complement the solid one. The fastening step of the sparse variety depends on what recommendations the manufacturer gives.
The lathing in different elements is filled with mineral wool. This creates additional thermal insulation.
The roof covering should also match that used for the main house.
Final work
Mount the finished floor joists to the wooden subfloor, between which it is necessary to lay thermal insulation. Finished floor boards are laid on top, which can be painted or varnished.
Insulate the veranda floor taking into account the climatic conditions of the region
Concrete floors can be finished in the same way as wood floors. Or you can send it at your discretion, for example, lay linoleum or tiles.
The last stage of construction is the installation of windows, doors and landscaping of the veranda. The better it is equipped at the dacha, the more pleasant it will be to live there in the summer.
There is no need to install additional electrical wiring to the veranda. Here you can use an extension cord that is pulled from the house, and lighting fixtures are connected to it.
Frame extension of a veranda to a wooden house
The very definition of a veranda shows that the basis of the entire structure is a supporting frame made of edged timber. In addition to the main frame, other parts of the frame building are also made from timber - these are the lower frame and corner posts.
Standard racks and lintels are made from ordinary boards.
With the help of boards, future door and window openings on the veranda are also designated.
In this case, the thickness of the racks is equal to the thickness of the thermal insulation, and the width of the step between the wooden racks is determined based on the width of the insulating layer.
For example, if a private house is located in the northern region, then the thickness of the insulation layer should be at least 15 cm. Based on this, we can conclude that the width of the lumber will be 150 mm x 100 mm or 150 mm. The step size is maintained within 60 cm, because the width of the insulation board will be exactly 60 cm.
After assembling and installing the frame structure, an insulating layer is laid. Before this procedure, waterproofing and vapor barrier must be carried out. After completion of the insulation work, rough cladding of the entire structure is carried out using DSP sheets.
The most common material for rough cladding of a veranda is an OSB panel. This panel has greater resistance to moisture and mechanical stress than other materials. All OSB panels have fairly high strength indicators. Below we will look at what other materials are used as cladding for frame houses and extensions.
Video: diagram for constructing a corner veranda with your own hands
Almost anyone can handle the work of building a veranda. This is a wonderful place to relax, which is simply necessary for a summer cottage. Do not doubt the need for this extension. You will definitely enjoy spending your evenings in the cozy space of the veranda. Good luck!
- Author: Olga Morozova
Hello. My name is Olga. I am 27 years old. A journalist by training. Rate this article:
- 5
- 4
- 3
- 2
- 1
(18 votes, average: 3.7 out of 5)
Share with your friends!
Preparing for construction, choosing material
After determining the construction site of the veranda, it must be prepared. The construction site begins along the selected wall, so before starting all work you need to:
- If there is a canopy over the main entrance, remove it.
- Dismantle the porch.
- Clear the entire area under the veranda of debris and bushes.
- Prepare a place for storing building materials. It will be much easier to build a summer extension when the materials for it are selected in advance.
What tools and materials will we need?
When making a wooden extension with your own hands, you will need the following tools:
- Having construction skills you need: a hacksaw, an ax.
- Power tools: sledgehammer, hammer.
- Marking: tape measure, plumb line, level, marking cord, corner.
- For the foundation: shovel
If a metal frame is being made, a welding unit and a grinder with a disk for cutting metal are additionally prepared. This type of frame is considered the most economical for building an extension.
A brick veranda or a wooden one would look better
Important! Make sure the materials of the extension and the main house match
A wooden summer extension requires the following material:
- Lumber: beams, logs, boards, slats.
- Elements of wooden fasteners.
- Mixtures that perform protective functions for wood.
- Construction material: crushed stone, concrete.
- You will need drying oil and roofing felt.
- Choosing the material for the roof of the veranda.
- Window and door systems.
In the design of an additional room for summer recreation, using metal corners, a metal profile is used instead of wooden materials. compositions for metal processing.
For a better view, you can make an extension (walls and roof) from polycarbonate, the panorama will be complete and clear. The positive properties of this material include the ability to retain heat well; it can be used for walls and roofs.
Advice! Materials that will be used in construction and that require pre-treatment must undergo this process first before construction.
Types of fabrics for gazebos
There are two main types of fabric for gazebos and verandas, which are used depending on the tasks assigned to them and the time of year:
- Decorative fabric used for decoration, protection from the sun and insects.
- Fabric for protection against rain and wind.
Now let's take a closer look at both of these types.
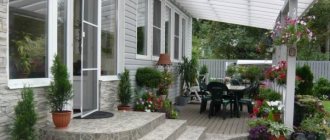
Light fabric curtains on the veranda
Fabric curtains
Curtains for gazebos and verandas made of fabric look very beautiful and give the area a special coziness. However, they can only be used if the object is used in the summer.
Especially popular lately is acrylic water-repellent fabric, which will certainly delight you during the summer rain. In addition, it protects well from the sun and is easy to care for, as it does not absorb dust. Contaminated fabric can simply be washed with soapy water, after which it will look like new again.
Popular articles Growing and using Kyushu hydrangea
Special attention should be paid to blackout fabric, which will create an atmosphere of privacy in the recreation area, since it does not allow sunlight to pass through. However, by choosing such material, you give up the opportunity to enjoy the surrounding nature.
If you use transparent fabric curtains for gazebos and verandas, they will not only protect from the sun, but will also create a romantic atmosphere, as if you are somewhere on the sea coast. For example, linen curtains are a good option.
Bamboo curtain
Those who want to implement a more unusual solution should pay attention to bamboo curtains. Externally, they are not much different from “Roman blinds”, but they are lighter and more practical and can fit into any interior, including gazebos.
PVC safety curtains
Often there is a need for the curtains in the gazebo to perform not only a decorative function, but also protect from wind and rain. For these purposes, waterproof PVC fabric for gazebos is used, on the basis of which curtains are made. Sometimes the gazebos themselves are covered with this fabric.
Protective transparent curtains
This decor option will allow you to feel comfortable, even while in the gazebo during the cold season. In addition, with the help of plastic curtains you can realize the most unimaginable creative ideas regarding interior design.
Despite the fact that products made from polyvinyl chloride are dense and durable, over time they can lose their presentable appearance as a result of frequent opening and closing.
To solve this problem, manufacturers began to produce roller blinds that will satisfy the most demanding owners of gazebos and verandas. They are a waterproof, dense fabric that is rolled into a compact roll using an electric drive or manually.
Outdoor curtains
PVC curtains are available in a wide variety of colors in the market. There are also transparent options that allow you to leave openings to let in daylight and observe the surrounding nature.
Thanks to these curtains, you can extend your rest in the gazebo during the cold season with the help of heating devices, since the curtains retain heat well. Caring for this material is not difficult, since it is easy to clean with ordinary detergent or soap solution.
At one time it was believed that the environmental characteristics of this material were very questionable. However, modern manufacturing methods make it possible to produce products that are absolutely safe for human health.
Blackout curtains
The only drawback of the product is that it is too tight. If the curtains are kept closed for a long time, then there will be a lack of air inside the room. Therefore, it is necessary to ventilate the gazebo from time to time, especially on hot days. To do this, simply lift the curtains.
Roller curtains
But the product has a lot of advantages, among which the main ones can be identified:
- Strength and wear resistance;
- Resistance to sudden changes in temperature;
- Resistant to sunlight;
- The service life, if the instructions for use are followed, can reach 14 years;
- The material is not difficult to care for;
- During storage, the material is not afraid of creases;
- Affordable product price;
- The ability to choose curtains of any shape, size, color and with various sets of accessories.
Popular articles How to build a 4 by 4 wooden summerhouse with your own hands?
Accessories for curtains and awnings
Pits for a columnar foundation
Dig holes in the ground using the marks you have already made with string lines. The holes must be dug to a depth of 80 cm. The sides of the holes must be straight and clean on top.
Note!
DIY metal bench: instructions with step-by-step guide (100 photo ideas)
Blinds for gazebos: wooden, metal, bamboo. Instructions for installing blinds yourself
- Adding a terrace to your house with your own hands: step-by-step instructions on how to easily and quickly add a veranda or terrace (100 design photos)
Installation of foundation columns
Have someone help insert the foundation posts into the holes you dug in the ground. Raise the posts so that the threaded rod fits through the hole in the beam and into the post. Place the washer and nut on the post and tighten with a wrench to hang the post securely. Make sure the beam is still level after you attach the post underneath it.
Mix concrete in a wheelbarrow. Then lay it in the hole around the posts to the required height. Install the remaining supports. Now repeat the previous steps to connect, install and secure other supports and a post foundation for each hole dug.
You will need to leave the concrete around the stumps to harden overnight. Then use a hammer to remove all the support posts on the supports. Fill all holes with soil. You can then tidy up your work area and you are ready to install the beams.
An outdoor deck is an ideal place for entertaining, so it is important that you install it safely and securely. This must be kept in mind when exploring options for adding a veranda to the house.
Floor and walls for your veranda
The floor and walls are also the most important components for your veranda.
If you are going to make your terrace frequently visited or even want to separate a separate room for it, then it is advisable to insulate the floor in your terrace.
For insulation, it is worth cutting out special cells and placing the insulation there tightly.
Construction of walls
Independent construction of wooden houses is simplified if profiled timber is used.
It has grooves that connect easily. Before starting the construction of walls, it is necessary to check the horizontalness of the foundation. It is necessary that the hydraulic level shows zero, since when installing the first crown, the construction geometry must be observed.
The foundation plane must be perfectly flat and straight. In addition, when laying, the corners of the first crown are aligned vertically. They should be exactly 90 degrees. If the geometry of construction is broken from the very beginning, the walls will not be smooth, and there will be skew at the level of window and door openings.
Installation of a wooden house with your own hands at the stage of wall construction is carried out as follows:
1. A layer of roofing felt is applied to the foundation without first applying mastic.
2. If it is necessary to level the surface of the foundation, when its skew is more than one centimeter, wooden wedges are placed at a distance of 30 cm from one another.
3. A “zero” board is installed on top along the entire perimeter of the foundation.
4. The space between it and the foundation is filled with polyurethane foam.
5. The first crown can be laid at a distance of 25 cm from the edge of the foundation. It is also allowed to install crowns behind the edge of the foundation at a distance of no more than 5 cm.
6. At the corners, the first crown is attached to anchors.
7. The bowls of the first and subsequent crowns are tightened for compaction by assembling them onto a pin.
8. The bowls of the first crown are tightened using a reinforced washer measuring 60x80 mm.
9. Further reinforcement of the screed using a reinforced washer is carried out every 5 - 6 crowns.
10. Screeding around the perimeter of the crowns is done using metal or wooden dowels.
11. The crowns are connected to each other thanks to grooves. A new one is placed on the lower beam. It is inserted into the grooves by hitting the overhead board with a sledgehammer from above.
In addition to anchor fastening, end fastening is also used - the ends of the crowns are joined at the ends. In this case, if one of them cracks, it can be easily removed and replaced whole.
What are there
Depending on the method of construction, a veranda attached to a house can be closed - with glazing - or open. Open ones are used mainly in the warm season, closed ones can serve as a place to relax all year round. A veranda attached to a house can be of two types at once: part can be glazed (closed), part can be open.
Popular Articles Three Ways to Improve Your Pond
You can relax on the covered veranda all year round. It also reduces heat loss through this wall
There are also walk-through doors - this is when in order to get into the house you pass through it. Such extensions are located on the front side of the house, sometimes on the yard side if there are two exits from the house. Entrance to impassable buildings is only from the house. It is impossible to get outside from such a veranda.
An extension can cover one, two or more sides of the house. If it covers two adjacent parts of the house, it is called a corner. Some of them occupy only part of the wall.
The forms are different. More often it is a rectangle, less often - a hexagon, a semicircle, or other non-standard shapes (these are more difficult to build). In short, these are all types of verandas attached to the house, but without taking into account the materials.
The perimeter extension gives the house an extravagant look
What materials are they made from?
Most often, wooden verandas are made in our area. It is easier to work with wood, and it is not as expensive as in other countries. In areas where wood is very expensive, structural elements are made of metal, and the cladding is selected to suit your taste. It can be glass (double-glazed windows), polycarbonate.
The walls of the veranda are built from brick, shell rock, rubble stone, and building blocks. Just like a house, they are then finished or not, depending on the design of the main building. They can simply make a fence, as in the photo above.
Veranda made of a metal frame and special window blocks
If wood is expensive, or you are reluctant to work with it on a regular basis, the veranda frame is assembled from metal. For this purpose, a profile pipe, corners or channels are most often used - it depends on the material and size of the extension. It is easier to attach double-glazed windows to metal; instead of glazing, you can use polycarbonate. This material can be of different colors and varying degrees of transparency. Despite its apparent fragility, there is a fairly strong material that is used for the construction of greenhouses. And if so, then in the veranda, if it is closed, it will keep the heat well.
Polycarbonate veranda attached to a brick house. The entire frame is assembled from a profile pipe
Required Tools
To build a veranda in a country house you will need:
- Screwdriver
- Concrete mixer
- Timber grinding machine
- Cord
- Building level
- Marking pencil
- Hammer
- Ladder
- Roulette
- Ruler
- Electric planer and jigsaw
- Shovel
- Bucket with water
Brick structure, stages of construction
Install auxiliary wooden wedges in the corners of the building and pull a cord between them - a mooring. This is necessary in order to lay the brick evenly.
Laying should begin from the corners. After the first row is completed, the second follows and beyond. To connect the stones together, ordinary cement mortar is used.
- Lawn laying
A garage at the dacha is not a warehouse, but a modern and comfortable space!
Diesel generator for home: which one to choose?
In places where openings for doors and windows are planned, installation is not carried out. If the roof has a slope, then the wall closest to the house will be one row higher than the opposite one.
The armored belt is set up as follows: a wooden formwork (about 70 cm in height) is fixed along the top of the walls, anchor bolts are placed at the corners and it is filled with concrete.
After the concrete has hardened, wooden beams with a cross section of 10x10 cm are attached to the anchor bolts.