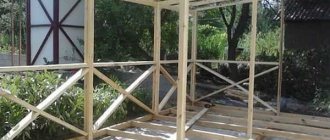
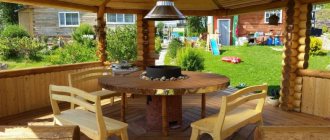
A year after building the house, I wanted to attach a canopy to its front wall. So that it is functional, but at the same time very simple in design. What was required from the canopy? The most important thing is that thanks to it I wanted to get an additional place for summer relaxation, protected from sunlight and rain. For outdoor gatherings, so you can have lunch in the courtyard and relax on a sun lounger. According to the project, the canopy was supposed to be a kind of replacement for an open gazebo, but with a simpler design. So that during construction a minimum of material resources and physical effort is spent.
Within 2 weeks the plan was implemented. Based on the acquired practical skills and knowledge, I would like to bring to your attention a report on the construction of the simplest classic canopy attached to a house.
- 2 Step #1 – installation of metal poles
- 3 Step #2 – make the roof
- 4 Step #3 – pouring the foundation for the mini-wall
- 5 Step #4 – installing covers on posts and trellises
- 6 Step #5 – building a retaining wall
Construction materials
Artificial and natural stone, brick, and concrete blocks are widely used as the basis for an attached canopy to a house. In addition, in budget options for canopies in front of the house, various pipes are often used - metal (round or square) or asbestos.
Canopy in front of the house, photo of brick supports
The materials used for the frame are more varied:
Metal – has great strength and ductility, suitable for most styles from modernism to high-tech
An important feature is the possibility of modular assembly of ready-made structures, while the tolerances on the dimensions of parts and the placement of technological holes are minimal, which makes it easy to do it yourself. The main disadvantages are the laboriousness of self-processing and the need to periodically update the anti-corrosion coating
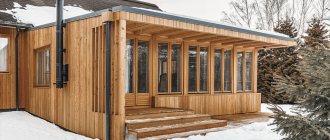
Wooden beams - wood frames are perfectly combined with both traditional roofing materials and modern high-tech ones. The tree itself suits most classical styles and architectural designs of the building, but such structures look most harmonious in houses made of logs or rounded logs.
Despite the apparent primitiveness and conservatism of wood, you can build quite interesting and beautiful extensions to the house. In addition, it is quite easy to process, so if you have the appropriate tools and basic knowledge, you can build a wooden canopy for your house with your own hands. The main disadvantage of this material is the inability to create thin, elegant structures and susceptibility to rotting, fungal and insect attack, which requires systematic treatment with antiseptics and fire retardants.
The original rafter system of the canopy attached to the house, photo of the structure with a barbecue
Anodized aluminum profiles are one of the most modern building materials that provide a sufficient level of strength with maximum lightness of construction. The main disadvantage of an aluminum canopy is its exorbitant price. It should be noted that most options for canopies adjacent to the house are made using a combination of materials.
Aluminum frames of polycarbonate canopies attached to the house, photo design supported by tension rods
Important! Despite the manufacturer's guarantees (especially Chinese ones), it is necessary to check the strength of the connections and the integrity of the cast structures of the purchased set. In addition, you need to take into account the snow load of the area where the canopy is installed.
Roofing materials
The most popular roof coverings at the moment are polymer materials, in particular monolithic and cellular polycarbonate. In second place in terms of use are metal tiles and metal profiles. In third place are flexible tiles (roofing felt) and slate. However, it should be noted that when choosing a material for covering, you need to be guided by the rule that the same covering for the house is the same for the canopies.
A canopy attached to a house, made of corrugated sheets, photo - the roofing material of the extension is similar to the roof of the house
Main characteristics of slate
Despite the emergence of new roofing materials, the popularity of traditional asbestos-cement slate remains quite high. This is explained by the affordable cost of the material, the ability to install the roofing with your own hands, without the use of specialized tools. Classic slate is suitable for simple single-pitched and double-pitched roofs; it can be used to cover a hipped or hipped roof.
Slate is highly resistant to static loads, resistant to aggressive environments, and is easy to process. The disadvantages include the rather large weight of the material - when installing it yourself, you need to attract one or two assistants to lift the slate sheets onto the roof without the risk of damaging them.
When considering the question of how to cover a roof with slate, it should be noted that this material is best used for laying on roofs with simple geometry. It is best if the roof has a slope of up to 20° or more than 35°, since in this case the likelihood of snow accumulation in winter is reduced.
The technology for laying covering on a pitched roof involves the installation of slate sheets that comply with GOST 30340-95. It could be slate
:
- six-wave (sheet thickness 5/6/7 mm, width 1125 mm);
- seven-wave (sheet thickness 5 – 8 mm, width 980 mm);
- eight-wave (sheet thickness 5 – 8 mm, width 1130 mm).
The length of any type of slate sheet is 1750 mm
.
When choosing slate, you need to pay attention to its markings, which indicate the height and pitch of the wave. The arrangement of sheets of material on the roof should be developed taking into account these parameters. The wider the wave pitch, the larger the area of material spent on vertical overlap. Selecting slate and the method of laying it is based on the size and configuration of the roof slopes.
When determining how to cover a roof with slate, you need to take into account the drainage system. If the gutter for collecting precipitation is supposed to be located under the roof overhang, it is enough to lay the outermost row with an overhang of 200-250 mm relative to the wall of the building. If water from the roof will drain directly onto the ground, the overhang should be at least 400 mm.
Slate rafter system
Before you install the roofing yourself, you should make sure that the rafter system is suitable for laying slate. This material is classified as heavy, so the roof frame design must be designed for high loads, which include
:
- total weight of the roofing pie;
- atmospheric loads;
- the weight of people installing, maintaining or repairing the roof.
If the roof is designed for metal tiles, ondulin or other lightweight materials, it may be necessary to reduce the installation pitch of the rafter legs or use struts to increase the rigidity of the wooden trusses. Particular attention should be paid to the roof frame if slate is intended to be used to cover an old soft roof
.
The minimum cross-section of rafters for a slate roof is 50×180 mm, the sheathing is made of 60×60 mm bars or unedged boards 15-25 mm thick. The pitch of the board sheathing should be 200 - 1000 mm. When using sheathing made of bars, it should be taken into account that each sheet must be supported by at least three horizontal jumpers. A 60×120 m beam or a 60×150 mm board is mounted in the ridge part.
To properly lay slate, the sheathing must be made of dry lumber that does not have deformations.
If you plan to install a chimney or exhaust pipe on the roof, you need to make a special sheathing for the structures before laying the roofing. The arrangement of the drainage system should be completed before laying the roofing. On the bottom row of the sheathing it is necessary to fill a strip of metal about 300 mm wide and 2-3 mm thick, which will prevent the destruction of the lower edge of the roof under load. The metal strip should be waterproofed on both sides, and holes should be made for roofing fasteners.
Design and functionality
The canopy in front of the house should delicately fit into the overall architectural ensemble, emphasize the advantages of the exterior and hide its shortcomings, harmoniously combine with the landscape design of the site, be convenient, practical in use, and fully meet the needs of the owners.
Functional Features
Sheds attached to the house, see photo examples in the gallery, can be attached for various household needs, from the main functions we will highlight the most common:
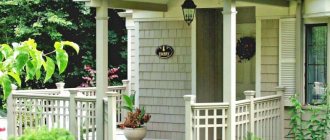
- Extensions above the entrance group serve as protection for the porch and entrance door from precipitation.
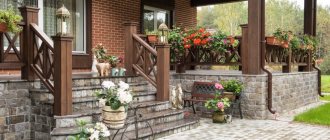
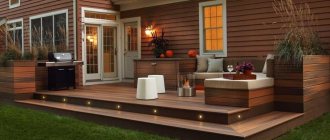
- Terraces and verandas are a place for outdoor recreation.
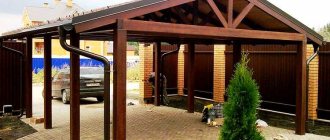
- Covered galleries, often made of metal and polycarbonate, provide a comfortable entrance to the house and at the same time provide parking for a car.
Large sheds attached to the house, photo of a practical, arched design
- Awnings over windows, usually awnings, protect from the bright sun.
- Outbuildings for storing firewood and other household utensils are built on the back side of the house; sometimes, with due imagination, these are original, exclusive structures that decorate the facade of the building.
Sheds attached to a house made of corrugated sheets, photo of outbuildings for firewood
Types of canopies for the house
Canopies near the house are divided according to the method of support to the main building:
- Cantilever - small canopies on mensols or embedded elements.
- Suspended - roofs on metal cables.
- Supporting – on vertical posts around the entire perimeter;
- Support-beam - the edge located closer to the house rests on a beam tied to the wall, which helps distribute the load over the entire surface of the supporting structure, and the opposite - on the pillars.
Design Features
Canopies for private homes and public buildings are usually:
- Open – roof that protects from precipitation: entrance lobby, terrace, parking lot, outbuildings.
- Semi-closed - a blind parapet is provided at the bottom 900-1200 mm, and the openings are closed with thick curtains, soft glass, lattice, climbing plants, grapes: terraces, gazebos.
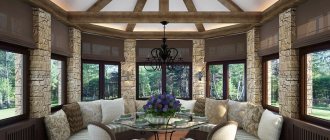
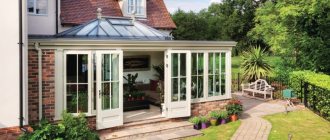
- Covered - glazed buildings of various types, usually verandas, attached corridors, greenhouses.
Good to know: To preserve heat, it is better to glaze the canopy with plastic or wooden windows with double or triple glazing, with a tilt and turn opening mechanism. If the room is for a warm period, then the ideal option is sliding aluminum systems; they open easily and do not obstruct the view; if necessary, the transoms can be removed or moved to one side. Lightweight gallery canopies can be sheathed with polycarbonate.
Sheds attached to a house made of polycarbonate, photo of the original design, echoing the shape of the steps
Roof
Buildings adjacent to the house may have different rafter systems. The easiest way is to make a pitched roof, at an angle of 15-25o, it protects from precipitation, but does not protect from gusts of wind and dust. A gable roof is more practical, although it looks more cumbersome. Often it is arranged if the main building has a roof of the same shape.
A polycarbonate canopy attached to the house, photo of an open terrace for relaxation
Recently, arched structures have become popular, usually a polycarbonate canopy attached to a house on a metal frame. The buildings have gained popularity due to their low price, ease of installation and a certain elegance due to the materials. They do not clutter up the architectural ensemble and are practical, reliable protection from atmospheric surprises.
Determination of canopy characteristics and design development
Structures erected to protect vehicles must meet a number of technical and technological requirements:
- sufficient dimensions of the canopy for free placement of the car;
- reliable protection against moisture getting on the car, especially during precipitation with side winds;
- protection from direct sunlight at different times of the day;
- unhindered entry and exit;
- ensuring free access to the machine from all sides;
- fit harmoniously into the design of the territory of a summer cottage or country house;
- simplicity of design;
- low costs for the purchase of building materials and installation work.
Before you start building a carport, you must first select the main material for the supporting structure. In general, the structure consists of a roof mounted on supports. To make pillars you can use:
How to build a canopy with your own hands
Having become familiar with the main types of canopies and roofing materials, you can begin designing your own structure. At the initial stage, you will need a sketch with calculations of all the necessary materials. You can draw it by hand, in a special program, or find it on the Internet. Next, you need to make your own drawing indicating the exact dimensions of the canopy. In accordance with the purpose of the canopy, its height, length and width are calculated. If you are planning a carport, you should take into account its overall dimensions. If the canopy is calculated for two cars, then these parameters must be increased. The barbecue shed must be built taking into account safety rules; the materials used in construction must not ignite.
A do-it-yourself canopy, a canopy attached to a building, and a self-contained canopy differ in the amount of building materials used. For example, for a carport that stands separately, you will need 4-6 racks (for two cars the number will be greater). For an attached shed, you only need to reinforce two supports.
Do-it-yourself preparatory work should also be carried out thoroughly and taking into account various aspects. Removing turf, leveling the area - all this also needs to be done before construction begins.
The first stage of construction itself will be laying the foundation. The foundation can be permanent, that is, you need to dig a trench, lay reinforcement and pour concrete to the surface level. After the concrete has hardened, support posts are attached to it. But if you do not have the opportunity or desire to make such a foundation, you can take a simpler path. This does not mean that the structure will lose stability; for a structure such as a canopy, lighter methods are quite suitable.
The foundation for the racks can be made as follows. In dug up racks, 50 cm deep, racks are placed on a cushion of crushed stone and filled with concrete. You can strengthen the supports with your own hands using dry crushed stone.
After installing the support pillars, you can begin concreting the floor. In general, the floor can be anything: concrete, paving slabs or asphalt.
To concrete the floor, you will need to make formwork, fill it with sand and gravel mixture and fill it with cement mortar. Complete drying will take about a week. Next, you can begin attaching the strapping.
The sheathing is attached to the horizontal trim for subsequent installation of the roof
. The roofing material can be attached directly to the sheathing, but you can pre-install waterproofing.
The final stage will be priming and painting the finished structure.
Beautiful carports
And finally, we have prepared for you some photos of original and interesting car canopies. For example, this canopy is very elegant and does not clutter up the space.
This one just looks original.
The smooth lines of this canopy harmonize nicely with the surrounding garden.
And finally: why not turn the roof of your carport into a solar power station?
A DIY carport is one of the easiest things to build and undoubtedly one of the most necessary! After all, you invest effort and money into your car and expect it to serve you for many years. We hope that these photos will give you inspiration and confidence in your abilities.
DIY construction
To make a canopy yourself, you need to think through everything carefully. This applies not only to the type of structure, but also to all stages of construction. First you need to decide where the canopy will be located and how much space it will take up. If you plan to build a simple carport of a simple shape, then you can do without a drawing, just a simple sketch. But the calculation of materials in accordance with the load that falls on the structure will have to be done, otherwise the reliability of the canopy will be in doubt. Therefore, it is better to contact a specialist with this question, who will calculate everything, and you will only have to assemble the canopy for the yard with your own hands.
To understand in more detail how to do everything correctly, we will consider all stages of construction in order. As an example, let's take the construction of a polycarbonate carport in the yard, a sketch of which is presented below.
Procurement of materials
To build an arched canopy for a car measuring 6.36 x 3.65 m, it is necessary to prepare the following materials:
- square profile pipe, size 80x80 mm, length 3.5 m - 4 pieces;
- profile pipe for longitudinal stiffeners, size 50x50 mm, length 6.36 m - 2 pieces;
- profile pipe for attaching a frame made of arcs, size 40x40 mm, length 6.36 m - 1 piece;
- metal arcs with a square cross-section, arc length 3.65 m - 7 pieces;
- polycarbonate sheets 2.1x12 m thick 10 mm - 1 sheet;
- bolts with thermal washers for fastening the roof;
- concrete mixture and crushed stone;
- primer and paint for metal and street work;
- reinforcing mesh measuring 6.5 x 4 m;
- joint profile – 7.3 m;
- end profile – 20.1 m.
Also collect all the tools for construction in advance, among them should be: level, drill, tape measure, marker, grinder, container for mixing concrete, shovel, welding machine.
Laying the foundation
Before pouring the foundation on the supports, it is necessary to prepare the area for the canopy, clearing it of debris. We also recommend removing the top layer of soft soil by 15 cm and leveling the area. Next, we will designate the perimeter of the site 6.5 x 4 m, which will be filled with concrete. Inside this area, you need to designate a second rectangular area measuring 4.33 x 3.15 m, at the corners of which supports will be installed.
Installation of supports will be carried out by concreting into the ground. To do this you need to do the following work:
- we dig 2 holes at a distance of 4.33 m and 2 holes at a distance of 3.15 m to a depth of 1 m;
- pour a layer of crushed stone at the bottom of the hole;
- pour a layer of concrete;
- we install a corrugated pipe in the concrete and secure it with spacers, aligning it strictly vertically;
- pour concrete and wait for it to harden and gain strength.
After installing the supports, you can concrete the site. To do this, an area of 4x6.5 m needs to be blocked off with a board, which will form formwork. Then we fill the ground with sand and crushed stone, pour about 5 cm of concrete on top. Without waiting for the concrete to dry, lay the reinforced mesh and pour the concrete again onto a layer of 5 cm. We wait for everything to harden.
Construction of the frame
After laying the foundation, we move on to assembling the frame of the carport. At this stage you will have to work with welding. It is not easy for an untrained person to do such work, so it is better to invite a specialist.
- First, stiffeners are welded, connecting the frame supports along the length; for this, a 50x50 corrugated pipe is used. You need to place it on the racks so that there are ends about 1 m long at the edges.
- Next, the arcs are welded to the stiffener; the distance between them will be 106 mm, excluding the thickness of the arc.
- Then a 40x40 corrugated pipe is welded along the tops on the inside of the arches for rigidity.
- After assembling the frame, you need to cover it and the supports with a corrosion primer and then paint.
Roof decking
Now the final, but no less important step is to make polycarbonate flooring. First, the polycarbonate sheet is cut into 3 parts 3.65 m long. It will be bolted to the metal arches through the drilled holes. Thermal washer on the bolts is necessary to prevent moisture from entering the material and causing it to crack. The fastening must not be overtightened, but it should not be weak either.
You need to join polycarbonate sheets using a special profile. In this case, the joint should pass along the metal arc of the canopy frame. It is necessary to attach an end profile along the edge of the polycarbonate, which will also prevent moisture from entering the material. If everything is done correctly, then such a canopy will last for more than a dozen years.
At this point, the construction of a carport in the yard can be considered complete. Rejoice in the work you have done with your own hands. Good luck!
Preliminary calculation of a canopy from a profile pipe, instructions for the manufacture of trusses
A canopy made from a profile pipe is a very common design that can be found in almost every yard. From profile pipes you can make either a small canopy over the porch or a large roof for a car park - and in any case the structure will be quite strong, beautiful and easy to install. This article will discuss the calculation of a canopy made from a profile pipe and its installation.
Calculation and drawing of the canopy
Proper calculation and creation of a good drawing imply compliance with a number of standards and requirements for structures made of profile pipes. However, small lean-to canopies do not need to be calculated so precisely - a small canopy made of a profile pipe does not weigh much, so this kind of structure does not pose any danger. Large canopies for parking lots or swimming pools must be calculated to avoid problems.
A drawing of a canopy made from corrugated pipe always begins with a sketch - a simple sketch that indicates the type of structure, its main features and approximate dimensions. To accurately determine the dimensions of the future canopy, it is worth taking measurements in the area where the structure will be located. If the canopy is attached to the house, it is also necessary to measure the wall in order to know exactly the dimensions of the profile pipe for the canopy.
You can consider the calculation methodology using the example of a structure located on a 9x7 m site located in front of a house with dimensions of 9x6 m:
- The length of the canopy may well be equal to the length of the wall (9 m), and the overhang of the structure is one meter shorter than the width of the site - i.e. 6 m;
- The lower edge may well have a height of 2.4 m, and the high edge should be raised to 3.5-3.6 m;
- The angle of inclination of the slope is determined depending on the difference in the heights of the lower and upper edges (in this example it turns out to be about 12-13 degrees);
- To calculate the loads on a structure, you need to find maps showing the level of precipitation in a given region and build on them;
- When the size of the structure and the expected loads have been calculated, all that remains is to draw up a detailed drawing, select materials and begin assembling the canopy.
Drawings of profile pipe trusses for a canopy must be displayed separately with all details. It is also worth remembering that the minimum slope of the canopy is 6 degrees, and the optimal value is 8 degrees. A slope that is too small will not allow the snow to slide off on its own.
Having finished with the drawings, the appropriate material and its quantity are selected. The calculation must be carried out accurately, and before purchasing it is worth adding about 5% of the tolerance - during work very often small losses occur, and defects are not uncommon. Using similar calculations, you can make a garage frame from a profile pipe, which is quite in demand.
Creating a canopy from a profile pipe
The design of the canopy is not particularly complex. If you already have a drawing of the canopy and the materials necessary for its assembly, then you can proceed directly to arranging the structure.
The manufacture of a canopy from a profile pipe is carried out according to the following algorithm:
- First, the area for the canopy is marked and prepared. You need to select a place for the foundation holes and dig them, and then fill the bottom of all the holes with crushed stone. Mortgage elements are installed in the pits, after which the foundation is filled with cement mortar.
- Square-shaped steel parts are welded to the lower parts of the canopy posts, the size of which coincides with the dimensions of the embedded parts, as well as the diameter of the holes for the bolts. When the solution hardens, the pillars for the canopy from the profile pipe are screwed to the embedded parts.
- The next step is to assemble the frame. At this stage, the profile pipe is marked and cut into the necessary pieces, and only after this can the production of trusses from the profile pipe for the canopy be carried out. First, the side trusses are attached using bolts, then the front lintels, and lastly, if necessary, the diagonal grilles are installed. The assembled frame is installed on racks and fixed in the chosen way.
Before installing the roof, the canopy must be painted or coated with an anti-corrosion compound to prevent possible destruction of the material - during assembly the base coating is damaged, and as a result the metal parts lose their resistance to corrosion. In addition, you need to understand that external processing does not protect the structure from destruction from the inside, so the edges of the pipes must be closed with plugs.
Types of fastenings for canopy elements and their sizes
To assemble canopy elements from profile pipes, different methods can be used:
- One of the most common methods of fixing corrugated pipe canopies is a bolted connection. The quality of such a connection is quite high, but it does not differ in complexity. To work, you will need a drill with a metal drill, as well as bolts or screws, the diameter of which depends on the cross-section of the pipe.
- Another method by which canopy elements are attached is a welded connection. Welding work requires certain skills, and the equipment will be more expensive than for a bolted connection. However, the result is worth it - welding ensures high strength of the structure without weakening it.
- To fix small canopies made of pipes with a diameter of up to 25 mm, you can use the crab system, which consists of special clamps of different shapes (for more details: “What are the types of crab systems for profile pipes, rules for making connections”). Most often, when installing canopies, T-shaped and X-shaped clamps are used, providing the connection of three or four pipes, respectively. To tighten the clamps, bolts with corresponding nuts are required, which often have to be purchased separately. The main disadvantage of crab systems is the ability to assemble the structure only at a 90-degree angle.
Selection of profile pipes for the manufacture of trusses
When selecting pipes for arranging a large canopy from a profile pipe, it is necessary to study the following standards:
- SNiP 01.07-85, which describes the relationship between the degree of loads and the weight of the constituent elements of the structure;
- SNiP P-23-81, which describes the methodology for working with steel parts.
One 2.2-meter rack made of profile pipe weighs about 150 kg, and the load on it is about 1.1 tons. Considering the degree of load, you will have to select durable pipes - a standard round profile pipe with 3 mm walls and a diameter of 43 mm will not work here. The minimum dimensions of a round pipe should be 50 mm (diameter) and 4 mm (wall thickness). If the material used is a pipe with a diameter of 45 mm and a wall thickness of 4 mm. Using this material, you can make a gate from a profile pipe with your own hands, which will be quite reliable and durable.
When choosing trusses, it is worth choosing a design of two parallel contours with a diagonal lattice. For a truss with a height of 40 cm, you can use a square profile pipe with a diameter of 35 mm and a wall thickness of 4 mm (about
What materials are used in the construction of canopies?
We will look at the most common and not too expensive materials for creating a canopy.
A metal canopy is so called because metal or steel profiles are used in construction. All frame elements are assembled from them: racks, strapping and lathing for the future canopy. At the design stage, you yourself determine what section of pipe to choose for the racks and piping. Remember that the racks are more massive, the trim and sheathing should be thinner. Profile pipes are often used in construction and it may happen that you still have some unsold pipes that can be put into use. In this case, your construction will be reduced to minimal costs: the purchase of roofing materials, paint and fastenings.
Wooden sheds can be made not only from a wooden frame, but lumber can also be used as a roof. Wooden canopies are considered to be one of the best. First of all, they are environmentally friendly, wood is a natural material, which means that the content of chemical components is excluded. Wooden structures look amazing in a country ensemble. If you own a house made of timber, then you simply need to supplement it with wooden buildings. You can purchase wooden beams at any sawmill or from sales representatives. If you have the opportunity to make a canopy with your own hands from leftovers, then this will be an additional plus.
Brick sheds. The frame of the building is created from a metal profile and is faced with bricks and, in rare cases, decorative stone. This gives the building a more impressive look, but will require you to have skills in working with brick or stone. This may not always be possible for a novice builder. Sheds made of brick or decorative stone go well with brick buildings and fences in the yard made of similar materials.
Roofing material has been discussed many times and can be discussed endlessly. Their diversity will not leave indifferent a person who puts his soul into construction.
Slate roofs never become outdated. This material is easily attached to any frame; it can be found easily and at no cost. Probably, many people have experienced such situations: while replacing the roof of a house, you discovered that the wear of the material is small and it can be used somewhere else. A shed is one way to put slate to good use.
Wooden roof. As mentioned above, a wooden canopy can be completed with such a roof. The only drawback will be the impossibility of using such a canopy as gazebos with barbecues. The flame height is not adjustable; flying sparks can also cause a fire.
Cellular polycarbonate. It is used in most cases and it has its reasons. You can make a canopy roof with your own hands of any configuration and without much effort.
Metal tiles and corrugated sheets. Modern and beautiful materials for constructing roofs of houses, cottages, sheds.
Outdoor canopy using slate and chrysotile cement pipes
Chrysotile cement slate is practical to use for the construction of outdoor sheds.
This roofing material has a number of advantages, the main ones being durability and strength. Slate sheets practically do not heat up in the sun, unlike any metal, and provide deep shade, which is not possible with transparent greenhouse coverings (for example, polycarbonate). For canopies, country gazebos and similar structures, it is recommended to choose corrugated chrysotile cement sheets (slate) or “Roman profile” (a type of slate) - with them, water will not linger on the roof, and the distribution of snow loads on the structure in winter will be more uniform.
Materials for building a canopy
To build a canopy you will need:
1. a construction project, which indicates the type of roof - single or double slope, with a recommended angle of more than 6 ° so that precipitation does not linger on the roof;
2. tubular products - metal or chrysotile cement;
3. bitumen mastic for waterproofing;
4. wooden beams made of coniferous wood: for roof rafters - with a section of 50 x 120 cm, for sheathing - 60 mm x 60 mm or 20 x 120 mm, under the roof ridge - 70x90 m or 60x100 mm;
5. cement grade no lower than 300, from which concrete is made and mixed with gravel;
6. roofing material, preferably slate (its quantity must be calculated depending on the size of the future canopy, taking into account the useful area of the sheet and not forgetting about the overhang - at least 20 cm along the edge of the slope, and 10 cm on the sides);
7. ridge parts of the roof (for a gable roof);
8. drain and downspout.
A few words about canopy supports. Usually metal pipes are chosen for this. However, all metal products are subject to corrosion! And the price for them is quite high.
A more affordable alternative to metal is chrysotile cement pipes. They consist of mineral fiber (chrysotile) and cement, so they do not oxidize. The walls of such pipes are strong enough to support a slate roof. Even without special care, the supports will last at least 30 years, and if they are completely filled with concrete - at least 50 years. Another plus is the lower price compared to its metal counterpart.
Preparatory work
1. Dig holes 1300–1500 mm deep with a diameter 100 mm larger than the pipe or timber. The distance between the supports is 1200–1500 cm. It is believed that two pillars installed at a distance of 3 m should withstand a weight of 250 kg.
2. The supporting elements are waterproofed with bitumen in the lower part to a height equal to the depth of the holes.
3. Install the supports, check the vertical level or plumb, and secure them with heavy stones.
4. The supports are concreted with a cement-gravel mixture.
5. The drying time for concrete is 2–3 days.
If chrysotile cement pipes are used, they are filled to a certain height with a concrete mixture. It is especially important to fill supports on soft soils. This technique allows you to expand the area of pressure on the ground, and the structural element will not sag as much as a hollow pipe.
If desired, the support pipes can be painted in any color. After the concrete has dried, you can begin constructing the canopy roof.
Installation of rafters and sheathing
First we install the canopy roof plate and rafters. The distance between the rafters is 1200–1140 mm.
Next we proceed to the sheathing. The beams are laid perpendicular to the rafters so as to ensure a distance between the battens of 500–750 mm. Along the edge of the sheathing, you can make a cornice flooring - a continuous sheathing of softwood beams with a cross-section of 60x120 (150) mm.
Laying slate
A leveling structure made of nails and rope (level) is installed on the sheathing in order to correctly position the sheets. Keep in mind that slate sheets are laid according to a two-span pattern: each sheet should rest on three sheathing bars.
The slate is laid from right to left from bottom to top, starting from the bottom of the canopy, from the eaves to the ridge. An overlap of 15–30 cm is left at the bottom of the slope: the smaller the angle of inclination of the roof, the larger the overhang.
Tight abutment of sheets is ensured in two ways:
1. shifting the sheets to a wave in each next row;
2. by cutting off adjacent corners when aligning the longitudinal edges in all sheets laid above.
The sheets are fastened to wooden structures using galvanized screws or nails. Holes for fasteners are made in advance with a diameter 2–3 mm larger than the cross-sectional size of the nail or screw leg.
The sheets are laid with an overlap of 15 cm. The first screw is tightened, retreating half of the overlap from the edge (7.5 cm). If the roof is gable, install a ridge piece on top, laying it from right to left.
Upon completion of the roofing work, a drain is installed on the roof of the canopy, which will protect the space under the canopy from precipitation at any time of the year.
Project preparation and selection of materials
First of all, you need to decide where the canopy will be located and what function it will perform. For example, a canopy in front of the entrance to a private house, depending on the size and configuration, can
:
- protect the porch from precipitation;
- play the role of a terrace located along the wall of the house;
- protect the path from the gate from precipitation.
A canopy-terrace attached to a house does not have to be located along the same wall as the main entrance to the house. Typically, such structures are built on the south side so that you can spend more time in comfortable conditions.
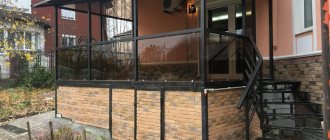
Extension in the form of a terrace on supports made of metal profiles
Vertical supports
. For their manufacture, timber or logs, metal and forged racks can be used. This depends on the chosen design of the structure, its size and planned loads. Supports on the ground can also be pillars made of brick or stone, or concrete columns lined with any suitable material.
Supports on the wall
. The principle of attaching the edge of the roof to the wall depends on the design and characteristics of the attached canopy. Horizontal supports are used (a beam or a piece of metal profile is attached to the wall) and brackets.
Rafter system
. The material of manufacture may not be the same as that from which the supports are made. Wood or metal profile pipes are predominantly used, which make it possible to construct roofs with curved surfaces.
Roofing material
. The same one can be used as on the roof of the house. For a canopy over the entrance to a house or a roof protecting the path leading to it, transparent polycarbonate is suitable - such a design will not clutter up the space. It is better to equip a canopy-terrace with an opaque roof or a matte polycarbonate roof, so that the place to relax is comfortable in the heat.
One of the points that you should pay attention to at the design stage is the angle of the roof. An extension with a flat roof, capable of withstanding increased loads, can be used as a two-level terrace - a convenient ladder is installed to climb to its roof
Two-level usable terrace
A flat roof should be sloped away from the house to prevent moisture from accumulating at the junction of the wall and the attached structure. If you plan to make a usable roof, the slope of the slope should be 3-5°. For a regular pitched roof the figure is 10-15°.
Arched structures and roofs of complex shapes are calculated individually, and the preparation of the project should be entrusted to professionals. Errors in calculations can lead to the fact that the canopy cannot withstand the loads and collapses.
Wood canopy
There is an easier option to build a canopy over the porch for the house yourself - a canopy. A simple small structure that can be simply assembled on the floor and then nailed over the porch. The shape of the visor can be different, it is described in the project:
Installing a simple wooden canopy over the porch
- Arched.
- Single-pitch.
- Curly.
- Gable.
But if you are not a master in this matter, then it is better to make a single-pitch canopy. Dimensions are calculated according to the drawing, which must be drawn up in advance. The width of the canopy should be half a meter larger than the porch. The length of the slope is 80 cm. For consoles it is better to use 7.5x7.5 cm timber, for sheathing - use thinner material, for example, 5 cm. The angle of inclination will be 30 degrees. All parts must be painted or treated with water-repellent impregnation.
The attached structure consists of 3 bars:
- vertical - needs to be fixed to the wall - this will be the basis for fastening the strut with the crossbar;
- fasten the support beam to the crossbar, the sheathing will be mounted on it;
- build a strut to support the roof.
Variant of the design of a wooden canopy
The beam support, located behind the canopy, is attached to the risers. The rafters and supports are connected to each other by slats, forming a triangle. Attached using self-tapping screws. This canopy can be covered with any roofing material.
To minimize noise from precipitation, you need to put roofing felt or insulation under the roofing sheet.
Anchors can be used to secure the structure to the wall of the building. The fasteners must be long so that they fit two-thirds into the wall - otherwise the canopy may move away from the wall. The video shows the step-by-step process of making a wooden canopy over the front door.
Canopy building material
Polyvinyl chloride PVC awning
Plan of a carport with a pitched roof.
To equip the canopy, a material such as a polyvinyl chloride PVC awning (awning fabric) is used. This vinyl sheet, reinforced with durable materials, has a glossy or matte varnish. The material is wear-resistant and completely waterproof: used for making bathtubs for small pools in the country. This type of roofing can be easily installed on the roof rafters by securing eyelets around the perimeter and passing a strong cord through them. This type of fastening can be easily done to the protruding parts of a gable (ridge) roof. As an option, a canopy covered with awning fabric can also be made with a mosquito net.
Metal tiles
In appearance, a roof made of metal tiles is similar to a roof made of ceramic tiles. It is also made similar in color to ceramic tiles. Steel sheets are galvanized and coated with polymer paints, which significantly increases their service life. If necessary, the sheets should be shortened and cut using metal scissors or a fine-toothed saw (hacksaw). The dimensions of the sheets are 80-800 cm in length. Metal tiles are made from sheets of standard width. Therefore, depending on the manufacturer, its width ranges from 1.16 to 1.18 m. The useful width must be determined taking into account the overlap (6-8 cm). If the sheet length is not enough, then the overlap along the length is 10-13 cm.
Warning: no matter what you build, under no circumstances should metal tiles be cut with abrasive wheels using an angle grinder (grinder). This method of cutting will lead to melting of the edges of the sheet, removal of the polymer coating and quickly covering them with rust.
The slope of the roof covered with metal tiles must be at least 14°. This value is easy to calculate if the difference in heights H between the supports located in the direction of inclination of the roof slope and the distance between them L is known. If the condition is met
A/L ≥ 0.25 (1)
then the angle of inclination will be greater than 14°.
Polycarbonate
Recently, metal tiles have begun to be replaced with a more practical material for canopies - polycarbonate. It is translucent (up to 90%), environmentally friendly and durable material. It will withstand hail impacts and snow loads. Provides good protection from ultraviolet rays of the sun. It is fire-resistant and non-toxic material, resistant to chemical attack.
Monolithic and profiled polycarbonate has a thickness of 2-12 mm, it is convenient to install. Sheet dimensions 3660×660 mm. Colored versions of this material are suitable for covering canopies, but colorless polycarbonate is also available. The slope of a flat polycarbonate roof must also be at least 14°. Warranty service life up to 10 years. There are many options for polycarbonate shelters with improved design.
Shed roof for house extension
For bathhouses, sheds and garages, a pitched roof is often chosen. This type of roof is the most convenient for such buildings. Thanks to its design, a pitched roof has a number of advantages. It’s worth getting to know them before you start arranging it.
When creating a roof over an extension, a connection is made between the rafter system and the wall of the building. It is set up separately from the house. The lower ends of the rafters rest against the facade wall. The upper ones are fixed on the wall of the building.
In this case, it is important to connect the wall of the main structure and the roof rafter system of the adjacent extension. If the connection is too rigid, the roof of the extension may become deformed during shrinkage
This situation cannot be allowed to happen.
It is better to lay the beams on a timber frame located next to the wall of the building. The gap formed between the timber and the wall surface is sealed with a special sealant. This will prevent the occurrence of drafts.
To make the extension look attractive against the background of the house, it should be covered with the same roofing material. If you decide to build a free-standing shed, the technology for constructing the roof will be slightly different. This is due to the lack of connection between the roof of the building and the wall of the main building.
Sometimes barns are built from timber. In such situations, the upper part of the frame is the mauerlat. Otherwise, such a roof is no different from the roofs of other buildings. When creating a roof for a garage, it is done in a similar way. If there are brick walls of the garage, the beams are mounted in pre-made niches.
They are performed in advance within the walls. Before installation, wooden elements should be wrapped in waterproofing material. The rafters should be 60-70 cm apart from each other. The front part of the garage is a high wall. The slope from it goes down to the rear of the building. The gate should be located precisely in the façade wall.
Taking into account these rules for creating a pitched roof, you can create a reliable and durable coating. This roofing option is quite successful and practical. Its design is quite simple and also functional. Such a roof will be durable and warm due to the small area for air masses to enter. If designed correctly, it can last for quite a long time.
How to decorate a canopy
A canopy is a simple architectural form consisting of a frame and a roof. And the entire design is essentially based on the search for original solutions for decorating the structure. We have already mentioned carving, forging, and decorative lattice. Another popular way to decorate a building is to use unusual materials in the design: a thatched roof, shingles, parapet or wicker walls, clay decorations. Depending on the choice of material for decoration, different directions of ethnic style will be traced.
Unusual and beautiful decorative canopies are made from original materials
Climbing plants, beautiful bushes, and vines are well suited for decorating canopies near private houses and in summer cottages. To make the building more closed, you can plant trees with a dense crown along the perimeter.
Plants will decorate the building and create a day
Beautiful curtains will not only decorate the building, but also make it more comfortable. For this purpose, a colored awning, openwork tulle, fabric with patterns, impregnated with water-repellent agents are suitable.
Curtains are beautiful and functional; the design solution is relevant for all types of structures
Lanterns, LED lighting, garden sculpture, flower beds around - all this will help to arrange a canopy, combine it into a single design with the natural landscape and decorate your site.
Options for canopies that protect cars from sun and rain
In summer cottages, three types of awnings are most often found:
Types of roof configurations and their advantages
The shape of the roof is determined by the roofing material and its placement in relation to the structure. The most common roofing forms for making a canopy:
- A pitched sloping roof is a simple way to arrange parking for cars on a summer cottage. It is economical, does not require special skills or professionalism during construction, is quickly erected, and is resistant to strong winds.
- A gable roof (hip) is more rigid and has high windproof characteristics.
- The arched shape has increased rigidity and is very durable. When creating an arched canopy, the slope angle must be made no higher than 10 degrees. When installing arched systems, there is no need to install a gutter.
Why tree
Wood is an environmentally friendly, affordable material, reliable and safe for humans, which is the main factor why this material has been in demand for many years; it is distinguished by its warmth, naturalness, and color. These factors allow this material to add uniqueness and beauty to landscape design.
Of course, wood does not have high strength coefficients, unlike stone and iron structures. Wooden structures are subject to rot and attacks from insects and mice. But this can be avoided if you properly treat the wood with stain and fixing solutions. The varnish also has its own profound effect, and the varnished wood itself looks gorgeous.
Wooden canopy design option
When it comes to wooden sheds, some people think that they are simple, nondescript structures. But everything will depend on the imagination, the desire of the average person to correctly draw up a project. You can decorate the designs with filigree carvings, balusters and beautiful carved elements. At the same time, take into account the image of the garden where the canopy will be located, next to the house or separately.
Important! The entire structure should look proportional and interesting. This is the only way a canopy attached to a wooden house will please you
Roof
Slate can be of several types:
- Fiber cement is very reliable and durable. Can withstand heavy loads, but is rarely used during construction;
- Asbestos-cement is a very popular type. Sheets of such slate can be flat or wavy.
- Corrugated sheeting is a very strong and durable material with good ultraviolet resistance.
- The metal profile can be hollow, with a cross-section of different shapes. Used for rafters and posts.
Lumber:
- board;
- beam;
- plywood.
Plywood is used for lining under the roof.
The awning is also rarely used. It is a seasonal roof option.
Rafter system
The supports should be connected to each other for structural rigidity. If the canopy near the house rests on a wall, the outer vertical supports and the hanging beam are connected by purlins, and the support pillars are connected by a load-bearing beam.
If the structure next to the house does not rest on the wall, load-bearing beams are laid on both sides, and the outer supports located opposite each other are connected by jumpers made of boards.
Fastening the load-bearing beam to the supports is done in one of the following ways:
:
- The beam is placed on top and fixed with long-length self-tapping screws (vertically and at an angle) or metal plates.
- If the supporting beam is made of a rectangular beam placed on a narrow edge, a groove can be cut into the pillars for it (the width of the pillar must exceed the thickness of the beam by at least 10 cm).
- Thick boards are fastened on both sides of the column with the edge up - in terms of load-bearing capacity, such a structure is not inferior to a beam made of timber, and at the same time it will be cheaper.
At the next stage, the sheathing is installed. Beams or boards (flat) under an opaque roof can be placed on top of the supporting beams or secured end-to-end using metal fastening holders.
Installation of sheathing
But a wooden canopy for the house looks more impressive and stylish if the support for the polycarbonate matte roof is thick boards fixed edge up
. Curly cuts can be made on the edges of the boards that form the roof overhang.
If a canopy for a house is built with your own hands from metal structures, the elements of the rafter system are secured by welding or using bolts.
Roof
Installation of roofing decking is carried out using technology corresponding to the selected type of covering. If a decision is made to build an opaque canopy, a layer of waterproofing material is placed on the sheathing (if this is provided for in the installation instructions for the roofing material), a sealed joint is made between the wall and the canopy, and only then the roofing material is laid.
Flexible tile covering
Polycarbonate is attached using special profiles so that the joints of the sheets fit onto the sheathing. It is recommended to fill the gap between the outer profile and the wall with sealant for external use.
When designing a canopy, you need to think about where the water from the roof will flow? If the entrance to the canopy is located from the bottom of the slope, you cannot do without installing a drain to drain away precipitation.
Construction of a canopy will help improve your yard, make it more beautiful and comfortable.
Canopy over the porch
When starting to build a wooden canopy over the porch, carefully calculate everything and make a drawing. It is necessary not only to decide on the length of the beams, but also to calculate the angle of inclination. This is necessary so that during the construction process there is no large distortion.
There are no standard sizes for this structure; you need to calculate it individually based on the size of the porch. The height of the structure should be comfortable for residents.
The tallest person should stand quietly on the porch without touching the roof. The tilt angle cannot exceed 35 degrees. Advice. If you don’t know how to make calculations, then lay out the material on the ground with which you plan to cover it, the resulting rectangle needs to be measured - this will be the size of the canopy over the porch.
Design and decoration of a wooden canopy over the porch
Tools and materials
To build a canopy over the porch with your own hands, you need the following material:
- beam 150x150 mm, for the rafter system and supports;
- a wooden block 7.5x7.5 cm for sheathing and a board 2.5 cm;
- roofing material;
- anchors, screws, staples to create a structure;
- shovel;
- nails with self-tapping screws;
- screwdriver, hacksaw;
- tape measure, paint;
- plumb line
Before starting work, prepare the site for construction, mark where the supports will be located. The ends of the beams that will be in the ground should be treated with liquid waterproofing material to prevent rotting.
Detailed description of canopy construction
Mounting the beam on the wall:
- draw a line along the level in the place where the beam will be located;
Attaching the canopy to the wall - attach the timber with anchors to the wall at the marking point, having previously cut grooves in it for the rafter system;
- if the porch is more than two meters wide, then it is advisable to mount vertical supports along the edges.
Installation of vertical supports:
- dig the supports prepared in advance to a depth of 50 cm;
- fill the holes with concrete;
- As soon as the concrete hardens, you need to cut the beam to the desired height and attach a second beam for support.
Advice. You need to try to make the roof so that the snow does not cake on it; to do this, for every 1 meter of roof length we make supports 10 centimeters below the support beam attached to the wall. Lathing:
- attach the rafters to the supports;
- the pitch between the rafter beams is 80 cm, so that the snow does not bend the roof in winter;
- fasten the rafters into a groove or onto brackets;
An example of installing canopy rafters in grooves - lay the sheathing perpendicular to the rafter beams;
- the boards must be laid so that the sheet of roofing material rests on them at the edges and in the middle.
Roof installation:
- as soon as the sheathing is ready, it needs to be treated against mold and rot;
- installation of roofing material begins from the free edge;
- secure with nails or screws;
- ready to decorate the canopy.
Preparing materials and tools
Let's look at the stages of building a metal canopy with our own hands using the example of a gable structure with a polycarbonate roof, measuring 6x3m. Its device is one of the simplest.
To make such a canopy, you will need the following materials and parts:
- professional pipe measuring 80x80 mm with a section thickness of 3 mm and a length of 3.5 m - 6 pieces;
- corrugated pipes for a purlin measuring 50x25 mm with a section thickness of 2 mm and a length of 6 m - 7 pieces and 2 pieces measuring 50x40 mm and a length of 6 m;
- ready-made gable trusses with an angle of inclination of 20 and a length of 3.5 m - 5 pieces;
- sheets of cellular polycarbonate measuring 2.1x6 m - 4 pieces.
- hardware for fastening polycarbonate;
- straight joint profile - 10 pieces of 2 m each and 3 corner pieces of 2 m each;
- end polycarbonate profile – 21 m;
- crushed stone and concrete mixture.
You can’t do without a tool, such as a hole drill, a screwdriver, a welding machine, a drill, a measuring tool, a construction level, a marker, an angle grinder with a special attachment for cutting polycarbonate sheets.
Calculation
The canopy is subject to loads from wind and snow, so strength calculations are required. Let us briefly describe its main provisions.
Carport-garage
Snow load
Specific snow load per 1 sq. m of coverage, calculated by the formula:
S = k * Sg,
Where
- K - the coefficient of transition from the snow load on the ground to the load on the coating, varies for different conditions ranging from 3% to 20%;
- Sg is the standard specific snow load in a given region, varying from 0.8 to 5.6 kg/sq.m. m (information for all regions of the Russian Federation is given in SNiP “Building Climatology”).
BBQ gazebo
Wind loads
The specific wind load is calculated using the formula:
W = W0 * k * C,
Where
- W0 is the standard specific wind pressure, for different regions it ranges from 17 to 85 kg/sq.m. m;
- k is a coefficient taking into account the distribution of wind force over height;
- C is the aerodynamic coefficient, which takes into account the dependence of the nature of the wind influence on the structure of the object.
The value of the coefficient k depends on the terrain and for different conditions is 0.4 – 2.75.
Finished design
The coefficient C for the canopy is assumed to be -2.
Parameters of the proposed design
Based on the calculation results, the parameters of the proposed typical canopy, subject to construction in the middle zone of the country, will be as follows:
- number of racks with section dimensions 9x9 cm: 8 pcs.;
- distance between posts: 2.5 m.
The distance between the rafters with a section size of 15x5 cm is 60 cm.
Support pillars
If you are installing a structure made of wood or metal profiles with your own hands and installing pillars in the ground, the work technology is as follows
:
- holes for supports are being prepared;
- a layer of sand and crushed stone (about 20 cm) is laid and compacted at the bottom;
- a small amount of concrete mixture is poured and a support is installed;
- After leveling the support vertically using a level, concrete is poured into the hole to the top (it will take about 7 days for the concrete to gain strength).
Both metal and wood should be pre-treated so that the material is not damaged by moisture
. Bitumen mastic is suitable for these purposes.
Laying a pole from a metal profile.
The supports can also be mounted on a ready-made site.
:
- A mounting plate is welded to the profile pipe, the metal is primed with an anti-corrosion compound and painted. Through holes in the plate, the support is attached to the concrete or tile surface using anchors.
- Wooden supports can be attached to a finished flooring made of deck boards using special metal bearings with a thick leg, which are screwed into the wooden covering.
Before installing the rafter system, it is necessary to check the height of all supports - it must correspond to the design parameters in order to maintain the correct angle of the roof and avoid distortions.
How to cover a roof with slate?
If you are going to install a slate covering with your own hands for the first time, you should know that this material allows you to attach no more than two layers at one point. Thus, the installation scheme should be well thought out at the roof design stage
.
The sheets must be mounted with a horizontal overlap in one or two waves. A single wave overlap is most often used if it is necessary to cover a fairly steep slope with a small snow load. An overlap of two waves is required for flat slopes; this design is much more reliable, but the total cost of the coating with such installation increases, especially with a large wave pitch. Vertically, the top sheet must overlap the bottom sheet by at least 200 mm
.
The installation technology requires starting installation from one of the lower corners of the slope and continuing along the eaves overhang. The slate should be laid taking into account the wind rose: the overlap should be located on the leeward side. It is recommended to lay the first row of sheets along a pre-tensioned rope so that the overhang is neat and even. To avoid combining more than two layers of slate at one point, various installation options are used. The most popular methods are staggered installation (with offset) and without offset.
The staggered installation is popular due to its simplicity. In this case, the new row is laid with an offset relative to the bottom one. Thanks to this, it is possible to avoid the overlap of waves and no more than two sheets of slate are joined at any point. When installing with offset, it is necessary to trim the outer sheets and trim the top edge of the last row on the roof slope.
Staggered laying is ideal for installing eight-wave slate - just offset in four waves and use halves of cut sheets to start each odd row. The offset lines in this installation option are arranged aesthetically, in a checkerboard pattern.
If you lay slate without displacement, you can save roofing material, but this is a more labor-intensive option, which should be taken into account when starting installation yourself. In this case, it is necessary to trim the corners to the width of the wave and 120-140 mm in height. To lay the covering elements from left to right, the lower corner of each sheet of the top row is trimmed from the side covering the previous slate sheet of the horizontal row.
The question of how to cover a roof with slate is directly related to the choice of fasteners and the method of their installation. Slate nails, self-tapping screws and self-tapping screws are characterized by an enlarged head and are installed using a special rubber gasket, which ensures the tightness of the fastening point. The fasteners should not be driven in or screwed in all the way
.
To avoid damage to slate sheets during installation, it is recommended to mark and drill holes in them for fasteners in advance. The holes should have a diameter 2-3 mm larger than the diameter of the nail or screw.
The slate is attached to the roof only at the crest of the wave. The first attachment point is located in the lower part in the second (overlapping) wave with a distance of 120-150 mm from the edge. The second attachment point is diagonally from the first, and the attachment at the top in the second wave is carried out after laying the overlapping slate roofing sheet.
Examples of drawings and standard projects
Let's consider only those project options for which you can build a wooden canopy with your own hands.
The easiest way to build a single-pitched canopy over the entrance to the house is on sloped supports. Any sheet material is suitable for the roof.
Scheme of how to make a canopy over a wooden porch
The installation is simpler and clearer for lean-to buildings; they can be attached to the house on a transverse beam or organized as a separate building on poles.
A typical project that will help you build a wooden canopy for your house with your own hands; the dimensions can be changed depending on individual conditions
Important: to avoid sagging of the transverse beams, the optimal distance between the vertical supports is 2 m; for large sizes it is recommended to make supporting slopes.
A gable wooden canopy can be attached to the house; the trusses should be parallel to the facade
Gable, conical, hip roofs for sheds require a competent approach to the construction of the rafter system. Usually these are free-standing buildings adapted for a gazebo or summer house. The frame and top trim are made of timber 100*100, 150*150 mm, and the truss is made of boards 150*40 mm; for comfort, you can build a parapet, sew up the sides with trellises, transparent sheet material, plant climbing plants and grapes.
Drawing of a self-contained canopy with a pyramidal, hipped roof
It is better to entrust the design of more complex buildings to professionals.
Lumber
You can build a good and inexpensive canopy at your dacha with your own hands using lumber, such as boards and timber.
When designing a canopy roof, it is necessary to carry out additional waterproofing measures and place the covering at a certain angle, which will ensure its self-cleaning.
The advantages of corrugated sheets include:
- a light weight;
- durability and high strength;
- non-susceptibility to mechanical influence of precipitation;
- long warranty period;
- wide color range;
- the color of the material is not susceptible to fading in the sun;
- with proper installation, it prevents even the most intense precipitation from entering the structure;
- ease of installation, which even a non-professional builder can do;
- the lowest cost among all options for roofing coverings.
Among the disadvantages of corrugated sheeting are the low ability to absorb sound and the low level of resistance to mechanical damage, as a result of which it can become corroded.
Metal tiles are one of the types of roofing in the form of steel, aluminum or copper sheets coated with a polymer protective layer.
The advantages of metal tiles are:
- light weight;
- strength;
- environmental friendliness;
- ease of installation and repair;
- large selection of colors;
- low cost of hired labor during installation;
- Possibility of installation at low temperatures.
The disadvantages of metal tiles include a low level of sound insulation, the need for special tools during installation, and the likelihood of corrosion of damaged areas of the coating.
It is necessary to build a lean-to canopy with your own hands, focusing on the strength, durability, functionality of the material and its cost.
Installation of rafters
The construction of a pitched roof has some subtleties, so it is worth considering the workflow of its creation in detail:
- Installation of cross rafters. These elements must be fixed on the Mauerlat. The entire rafter system rests on this foundation.
- The sheathing is attached to the rafters. It is made from 50x50 mm slats. Thanks to the lathing, the rigidity of the entire structure increases, and the roofing material is mounted on it. The sheathing is laid at right angles.
- The waterproofing material is attached to the sheathing using a construction stapler. Fixation is carried out without tension. The overlap should be from bottom to top.
- Then a thermal insulation layer is applied. Basalt mats can be used for this.
- At the end of the work, the roofing material is installed. Its choice depends on the characteristics of the roof.
Knowing these steps will help you understand how to carry out installation correctly and quickly.
In addition, it is important to know some of the features of creating single-pitch structures. This will make the roof as strong and durable as possible.
Which building style should you choose?
Choosing the most suitable style of gazebo can be difficult. When selecting a project, the following are taken into account:
- Purpose of the building.
- Allotted budget.
- Registration of other buildings on the site.
The material for the gazebo is selected taking into account how long it can last. Brick, concrete and natural stone last much longer, but wood is cheaper and, if properly processed, retains its basic properties over a long period.
Shapes of gazebos for summer cottages
The most important criterion for choosing a project is the shape of the structure. It could be as follows:
- The most common is the square or rectangular option, as they are easy to construct.
- A polygonal shape is chosen if the structure will have a large area.
- The most difficult project to implement involves the creation of a structure of a round or semicircular shape.
Dimensions
The dimensions of the canopies depend on their purpose and the area allocated for construction. For example, in order to cover garbage cans, a well or a sandbox, you will need a small structure. And canopies that hide three cars or a large owner’s yard will have a completely different scale. Carports are built according to standard parameters - a square version for two cars - 6x6 m, rectangular buildings - 4x6, 6x8 or 6 by 7 square meters. m.
To calculate the minimum parking for a car, add 1-1.5 m to its size - the less space, the more difficult it is to park. In addition, the space for open car doors and the possibility of a comfortable landing are taken into account. Regarding height, the canopy should not be lower than 2.5 m; The larger the building, the higher it is.