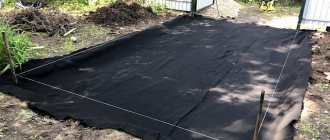
When starting to develop their newly acquired plot, many happy owners are faced with the problem of difficult access to it. The reason for this is the sewage or drainage ditches that run along the road or even along the entire perimeter of the village. The most affordable thing that you can easily do with your own hands and that is the first thing that comes to mind for inexperienced summer residents is to drive a bulldozer or arm yourself with shovels, fill the ditch well, level it, compact it and pave it with asphalt.
Construction of the entrance to the site through a ditch
Many people do this. Great, no problems until there is a period of heavy rain or snow melting. The fact is that the sewage ditch is left for a reason, but with the purpose of directing groundwater or wastewater bypassing the site. Otherwise, flooding threatens the buildings, cellar, and basement of the house.
Making a correct entry into a site is more difficult than simply burying a ditch, but it is more reliable.
This work does not pose any great difficulties, the main thing is to take into account some nuances.
Which pipe to use for crossing a ditch?
First, let's decide which pipe to use for the free flow of water in the ditch of our crossing. There are three main materials:
- plastic,
- metal,
- reinforced concrete.
Let's look at each in more detail and several other options for a summer house or country house, for example, a device for crossing a ditch without a pipe using reinforced concrete slabs or using asbestos-cement pipes, which are not often used, but for some reason you just have them stored.
Important
Before purchasing a pipe, find out its characteristics, namely what load it can take, by consulting with the seller.
Option for crossing a ditch with a pipe and filling with crushed stone
Using plastic pipes to cross a ditch
The main advantage over other types of pipes is ease of installation and light weight. No special equipment is required for installation, since the pipes are light enough to be installed with your own hands.
Modern plastic pipes are strong enough to withstand the weight of passing cars, resistant to temperature changes from -60 to +95 degrees. The material is not subject to corrosion and such pipes are not expensive.
The only negative is the depth of placement. Such a pipe should be laid at least 30-40 cm deep; it will not be possible to ride on it directly with vehicles.
Corrugated plastic pipes for ditch crossing
Reinforced concrete pipes
Such a pipe can be used for moving and not buried, but this is again not advisable. It is advisable to bury any pipe, but if there is no other way out, and the depth of the ditch is not great and the pipe will stick out a little from the surface, then reinforced concrete is the ideal option.
I recommend: How to decorate a house with siding yourself
Such pipes can only be laid using special equipment. It will not be possible to lay such a pipe in a ditch with your own hands, due to its large weight. Reinforced concrete doesn’t need any special introduction, but still. Reinforced concrete is a material consisting of concrete and steel. This is steel reinforcement covered with a layer of concrete, or, in other words, it is concrete in which steel reinforcement is embedded, giving the concrete bending strength. Probably everyone understands its strength and long service life. You can also buy reinforced concrete pipes used.
Reinforced concrete pipe for crossing a ditch
Metal pipes
Metal pipes for creating drainage and crossing a ditch are not as popular as the previous ones, since they are susceptible to corrosion and the service life of such pipes can be 30-40 years, in contrast to almost eternal plastic and reinforced concrete.
For the most part, the problem of corrosion of metal pipes can be solved by painting them with anti-corrosion compounds and selecting thicker pipes, which will significantly increase the cost of the crossing design. Paint the pipes or treat them with special treatment. Anti-corrosion compounds are a must if you want to extend their service life by 10-15 years.
You can install metal pipes with your own hands; all you need to do is involve 1-2 neighbors. Such a pipe can be bought used, just like reinforced concrete.
Metal pipes
Regulatory Requirements
Such structures must comply with a number of regulatory requirements:
- Safety.
If the entrance is made of soil or sand fill, then it is compacted with a vibrating plate. In addition, the surface must provide frictional friction for the car's wheels when driving in rain or icy conditions. - Bandwidth
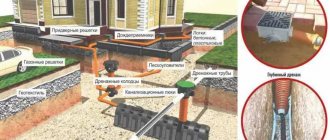
. The surface area should be 1.5 times the dimensions of the car. - Functionality
. A pipe must be laid along the bottom of the drainage ditch so that wastewater can easily cross the entrance below.
SNiP requirements:
- The edges of the entrance must coincide in height with the edge of the trench.
- Under the fill or concrete monolith there must be a metal or solid wooden support frame on which the flow pipe is installed. The frame is buried in the soil so that its edge is level with the bottom of the trench.
- The edges of the pipe should extend below the entrance by 20-30 centimeters and be a natural continuation of the riverbed.
Important!
The same requirements apply to the concrete monolith with the obligatory observance of waiting for the concrete to harden.
Other crossing options
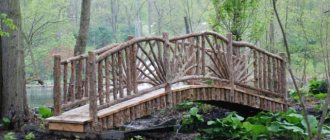
You can cross a ditch without a pipe. You can use concrete slabs for this. You can also use well rings if you have a fairly wide and deep ditch, similar to a large ditch.
Concrete slab bridge over a ditch without a pipe
Concrete slabs are laid along the edges of the ditch with a mandatory overlap of at least half a meter over the edges of the ditch. The base under the slab should be carefully prepared and compacted so that the slab does not settle. The joints are sealed with cement-sand mortar of a grade not lower than M300. Along the edges of the crossing (and this is, rather, a small bridge), where the slabs are laid on the base, the top, fertile layer of soil is removed, compacted with sand and crushed stone.
It is important not to make a mistake when choosing concrete slabs and not to make the bridge fragile. When choosing, consult with sellers and calculate the expected load on your bridge.
Crossing (bridge) made of concrete slabs over a ditch
Alternative solutions
If it is impossible to change the level of height difference by trimming the landscape, then you can resort to an alternative. To do this, you need to drive along a curved path. In this case, the distance from the road to the fence increases. This will lead to a reduction in driving speed, which will increase safety when driving.
Important!
A curved path should have bends, not sharp corners. It is best to use one large rounding with a flat area near the road and portal in the fence.
It is advisable to carry out these activities during the period of laying the house and working on the local area. When the fence has already been erected, work on organizing access roads will become much more complicated. Often they require the dismantling of adjacent sections of the fence or the development of a new project with the transfer of structures.
Do-it-yourself device for crossing a ditch
We've figured out the types of pipes, now let's see how to make the move. In its simplest form and to a shallow depth, moving is carried out by installing a pipe in a ditch as flush as possible with the road (well, that is, preferably not higher, lower is possible). For this, the required diameter is selected. Reinforced concrete and metal pipes are suitable for this. After installation, backfilling with crushed stone, sand, broken brick or concrete and layer-by-layer compaction are performed. This closes the remaining space between the pipe and the road.
I recommend: Features of using cement mortar when laying in hot weather
It is best when the pipe is buried a certain distance, but this is not always possible, especially if your ditch is not deep. It is often better to choose a pipe with a smaller diameter and still make a bedding on top of it. The main thing is that at the very peak of drainage, the pipe is filled with water no more than halfway.
The pipe should not be filled more than halfway during drainage.
It should be taken into account that the pipe and bedding will settle over time and under the influence of vehicles if they are laid on surface layers of soil and additional bedding will be necessary. It’s easier to prevent this and select a fertile soil layer and arrange a cushion of sand and/or crushed stone or even broken concrete or brick (broken or whole). Let's look at more complex options for crossing a ditch.
Construction of the base and backfill for the pipe
At the bottom of our ditch we need to make either a backfill of crushed stone, but crushed stone is not the best option. Brick or some kind of concrete slabs will work much better. The wider the slabs, the better. If the pipe settles, it can be sprinkled with crushed stone on top to level it with the road. It’s better to do it as it should, a good backfill (base) with a tamper and not wait for the pipe to settle.
The option with crushed stone and sand occurs when the top layer of fertile soil is removed and crushed stone is placed in this pit. Such a hole should be about 20-30 cm deep, no less. It is good to lay the already mentioned slabs or bricks at the bottom of the pit, and fill it with crushed stone on top, then shrinkage will be minimal.
Ditch crossing option
Metal pipe with channels
An option for crossing a ditch is a metal pipe with channels welded to it. The pipe is laid with the channels down, the channels extend beyond the pipe in diameter by 15-20 cm. Thus, the channels distribute the load on the base and the pipe will sag less.
Metal pipe with channels welded underneath
Logs (boards) on a pipe or wooden flooring
Having arranged the base and laid the pipe, you can lay logs at least 10-15 cm thick on it, fastening them with metal staples along the edges. This option is quite strong, but not very durable (10-15 years). The logs can then be replaced, or instead they can be replaced with a backfill of crushed stone or something else, for example broken concrete (for example, the first layer is broken, with beautiful crushed stone on top, in half, to save money). You can also lay a plank covering over the embankment.
I recommend: Question: Is it possible to build a garage on a foundation made of compacted sand?
You can make such a crossing without a pipe by using thick logs across the ditch. Such a move will be more of a temporary measure, but it has its advantages in that it is cheap; if there is a forest, it is practically free.
Moving over a ditch made of logs is the most economical move
Asbestos-cement pipes for crossing a ditch
Asbestos-cement pipes can also be used to construct a crossing over a ditch, but the laying depth must be good, 30-40 cm at a minimum. Such a pipe should be well compacted on top in layers, with crushed stone, clay and sand, brick or concrete scrap. The sand should be spilled with water and compacted. You can lay several pipes parallel to each other, this will increase the channel capacity. Often small-diameter asbestos-cement pipes lie idle in the countryside.
Asbestos-cement pipes can also be used to cross a ditch
Driving over a tire ditch
The drainage system in the ditch can be made from tires. This method is a good way to recycle old tires and is simple to use, but has many disadvantages:
- Water often stagnates in tires and often flows through a ditch. It accumulates, “blooms,” rots, and breeds mosquitoes and other living creatures.
- The crossing made of tires is not created for heavy-duty vehicles; the car can barely pass, the tires sag.
- Large outer radius of tires - you will have to dig a deeper ditch.
As a temporary measure, it’s fine, but as a capital structure, you need to understand the disadvantages.
Driving over a tire ditch is not a good idea.
Stages of arrangement
The dissimilar location of the plots, the terrain, and the type of soil determine the different design of the entrance to the territory through the ditch, but still some general features must be taken into account when performing this work with your own hands. What do you need to decide before you start?
Diagram with dimensions for installing an entrance to the site through a ditch
- Look around the area. Typically, trenches for water drainage are dug in swampy places where groundwater is close to ground level. It is useful to consider the construction of similar structures in neighboring areas, if any. You may need to consult a more experienced specialist;
- Decide on the width of the entrance. This is a very important point. The fact is that even if you don’t have a personal car, a strong and fairly wide driveway to the gate is a must. It must withstand not only the cars of friends and relatives, but also heavy construction equipment that will work on the site and transport materials through the ditch. The width must be calculated taking into account the possibility of unhindered access to the site from the main road by a truck with a trailer.
Laying a drainage pipe at the bottom of a ditch
The recommended width of the embankment is equal to the standard width of the gate and is four meters, but for long vehicles this width will not be enough to easily move off the main road; - Determine the type of drainage pipe through which the water will flow. If the choice of the diameter and material of the pipe is an individual matter and depends on the budget and capabilities, then there is a certain rule regarding its length: the pipe must be wider than the entrance itself in order to exclude the possibility of clogging with soil, that is, if the width of the embankment is four meters, then the pipes should be six meters ;
- Prepare the necessary tools and materials, draw up an action plan, weigh your options and get to work;
- Laying the pipe and constructing the entrance embankment;
- Registration of the entrance in the style of general design (optional).
Device for crossing a ditch with retaining walls
To install concrete sides along the edges of the crossing, first lay out a base for concreting, making a backfill of sand and crushed stone with layer-by-layer compaction. In general, this event is combined with the installation of bedding under the pipe. Next, → formwork is arranged (what it is and how to make formwork is described in detail at the link) with the required dimensions and height.
The formwork must be strong and firmly fixed. Then → concrete is poured into it (you can read about preparing concrete with your own hands at the link), the concrete dries for about a week, after which you can remove the formwork and carry out further work (you can remove the formwork after 3-4 days if you are in a hurry).
Installation of formwork for retaining walls of a crossing over a ditch
Recommendations from experts
An effective material for creating an entrance is concrete. This area requires scrupulous attention. It is necessary to take into account certain requirements and rules:
- It is impossible to start building a site without performing a thorough and accurate planning on the ground surface;
- If necessary, compact the top layer thoroughly;
- The most suitable material for laying drainage under the site is a mixture of gravel and sand (a kind of cushion);
- Formwork is poured onto the prepared base, and it is necessary to use various reinforcement components;
- Use only high-quality concrete in your work;
- Lay building materials using the vibration and smoothing method;
- The final stage is complete and punctual care of the hardening concrete mortar.
If the entrance area is made flat and carefully polished, it will be very beautiful and comfortable at the same time. An addition to the livability is sufficient lighting of this area.
This process is quite labor-intensive and requires certain skills and knowledge. Therefore, the best solution would be to turn to professionals who will help arrange the entrance area wonderfully, reliably and safely.
If the owner of the estate decides to register the entrance to the site with his own hands, it is worth getting acquainted with the various options for such devices.
Bedding device above the pipe
To construct the crossing itself over the pipe, or the road itself, you can use a variety of materials. Starting from clay to crushed stone. This could be a broken brick or broken concrete, or sand. The main thing when arranging such a move is to compact everything well and roll it out layer by layer.
There are many materials that can be used in a compartment. For example, first compact the joints of the pipe and the ditch with clay, then pour sand, compact it with pouring, fill it with broken concrete or brick, or crushed stone, compact it and on top → make a road, either dirt, concrete or lay asphalt (how to make a road is described in the link). You just need to wait until everything settles (a year), this way you will avoid the fact that your future road will crack and settle along with the foundation. You don’t have to wait until you’re really sure, when you’ve consulted with the designers, done the calculations and are sure that you did everything right, that you made a good foundation that won’t sag.
That's all, I hope this information helped you and you will share it with your friends who also want to move across the ditch!
Leave your tips and comments below. Subscribe to our newsletter. Good luck to you and good luck to your family!
Properties of the pavement for entering the site
During construction, active movement of heavy equipment loaded with equally heavy building materials (concrete, cement, brick, sand, etc.) is expected through the entrance gate. For this reason, the surface of the area in front of the gate is subjected to fairly intense loads every day. In order to maximize the service life of the coating, a very responsible approach to the selection of building materials is important.
Requirements for high-quality coating:
- waterproof;
- high vibration resistance;
- resistance to temperature fluctuations;
- resistance to intense loads.
Taking into account the above requirements, the entrance coating can be monolithic (reinforced concrete slab) or bulk (crushed stone, gravel, slag, sand).
How to save an embankment from erosion
To protect the embankment from erosion, its sides and longitudinal slopes are reinforced with various materials:
- For the construction of the sides, natural stone, white sand-lime brick or reinforced concrete slabs are used. Brick or stone walls are placed on both sides of the ditch. In this case, the ends of the pipe are left free. If it is necessary to strengthen the sides with concrete, then first install formwork with supports. A reinforcement cage is installed between the walls of the formwork, then the structure is filled with concrete. A week later, after the concrete mixture has set, the formwork can be removed from the top.
- Along the ditch, the slopes are reinforced with crushed stone and poured with cement mortar, carefully compacting each layer.
What material to choose a collector from?
Traditionally, thick-walled metal pipes were used. The industry also produces a lot of reinforced concrete collectors: round sections, U-shaped or square. There are also small sizes.
However, all these structures are heavy and require heavy construction equipment for transportation and installation. At the same time, modern technologies have made it possible to launch the production of collectors made of other materials, lightweight, but no less suitable for constructing an entrance to the site.
These include two-layer corrugated non-pressure plastic pipes made of polymer materials of various diameters from 100 mm to 1 meter. The standard length is 6 meters, but many sellers sell the required length. The weight of 1 m/p with a diameter of 500 mm is about 10-14 kg, the cost for 2022 is from 3,000 rubles. The ring stiffness class (SN) plays a significant role in the cost of the product.
Such pipes can withstand significant loads, including heavy vehicles, if the installation technology is followed. The service life is stated to be from 50 to 100 years. This is the best choice today.
A good alternative option is a pipe, also polymer, but smooth - HDPE. The weight of 1 m/p with a diameter of 500 mm ranges from 20 to 45 kg, with a wall thickness of 12 to 30 mm. Pressure pipes are intended for water and gas pipelines. The approximate price for them is from 2500 rubles with a 12 mm wall to 6000 rubles with a 30 mm wall. The thickness of the wall will also determine the weight of the car that it can withstand if the crossing surface is unpaved.
Entry on a slope
You can enter the site even on a slope. When the construction of a garage is planned and the terrain is relief, such a drive is similar to a ramp. In this case, the angle can be no more than 23%. The angle decreases in front of the car parking area, turning into a completely flat surface.
- Geogrid - main types, description of application, properties and placement tips (video + 115 photos)
- Instructions on how to level a site: basic methods and step-by-step recommendations from experts on site leveling (140 photos)
- Do-it-yourself well - 145 photos of decorative ideas and design options for wells
Ways to build a parking lot
Parking using crushed stone
This method is low-budget. This kind of car parking at the dacha has excellent water throughput, and, in addition, it does not crack. A negative aspect of such a parking lot can be considered an uneven surface, which will make it very difficult to clear snow from it in winter. The thickness of the base layer should be 0.2 meters. For the main surface layer, a mixture of sand and gravel is used.
Parking using paving bricks
For this type of parking, a mixture of sand and gravel is used; it is installed with a slight recess under the paving bricks. This material creates a smooth surface, without the formation of dust and cracking of the canvas in winter.
Paving bricks can pass water well, so it does not stay on the surface for too long.
Some builders recommend laying paving bricks on cement. But after a certain time, the cement will begin to crack, which will lead to poor water infiltration. The traditional technology for laying paving bricks is on sand or its mixture with gravel.
To prevent the destruction of the parking lot over time, its main (bearing) layer is created in the pit. You need to pour about 0.1 meter of sand into it and compact it well.
compacting sand for a parking lot at the dacha
When calculating the depth of the pit, the thickness of all its layers is taken into account. The sand and gravel mixture requires careful compaction. A layer of geotextile is laid on top of it, as well as in the middle.
It is important that in the autumn-spring period the supporting layer is under no circumstances exposed to moisture. If this does happen, and the parking lot itself is located in a low area, then you should take care of the drainage system and good drainage in advance
Concrete parking lot
A concrete parking lot is one of the most durable and long-lasting options. When arranging it, the most varied cladding can be used. The base of such a parking lot is very strong, which allows the use of stone - natural or artificial - for cladding. This coating is laid using a special tile adhesive, which has good resistance to frost.
Concrete parking lot project
To prevent rain or floods from creating problems in the parking lot, when pouring the concrete mixture, you need to provide slight slopes for water drainage. And in order to avoid compression of concrete during temperature fluctuations, expansion joints must be made on its surface every five meters.