Today there are many options for heating a dacha: centralized gas, boilers, electric heaters.
Stove for a summer residence
But if it is not possible to implement all this due to the area’s remoteness from civilization, a do-it-yourself brick stove for a summer cottage will be an excellent solution.
Reliable and durable - it will gather around itself more than one generation of household members, providing the house with warmth and filling it with comfort.
The services of a good stove maker are not a cheap pleasure. Therefore, if you decide to implement a brick stove project at your dacha, it will be useful for you to read this article, in which we will tell you about the operating principle, features and layout of the stove structure.
A brick stove can become not only a functional device, but also the main highlight of the interior if it is used correctly. Today there are many ways to beautifully veneer and decorate a stone stove.
Types of furnace designs
No matter how much time has passed since the appearance of the first stove designs and no matter how far home heating technologies have come, the stone stove still does not lose its relevance. Compared to other types of heating (electricity, gas), it is more economical. At the same time, thick stone walls allow you to retain heat for another day after the firewood burns out.
According to their purpose, furnaces are divided into the following types:
- heating;
- cooking;
- multifunctional;
- combined.
- The heating design is perhaps the simplest and most common. As the name implies, the function of such a stove is aimed only at heating.
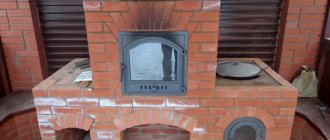
Oven with hob
Basically, such a stove is chosen for dachas where there is electricity and a stove is used for cooking. Or home owners want to create a special country coziness with the help of a fireplace stove. The design of such a furnace consists of:
- combustion chamber, which is purchased ready-made or lined with fireclay bricks;
- an ash pit where ashes are collected;
- chimney.
This type of design also includes a fireplace with an open or closed firebox. It is used not only for decorative purposes, but also allows you to effectively heat a room of 15-20 square meters. meters.
Depending on the selected material, wall thickness, masonry scheme, heating stoves may have different heat output.
The most popular type of stove is the one-brick design. This allows the walls to be heated up to 600C. The famous Dutch ovens are laid out according to this pattern.
In terms of dimensions, the heating stove can be wide and flat, or it can have an elongated rectangular shape. It all depends on the area of the room, the style of the interior and the personal preferences of the owners.
For cladding such a stove, tiles, decorative plaster, and decorative stone are usually used.
Brick heating stoves in the form of a three-sided prism look very stylish and original, but a beginner cannot implement this option, since it requires a lot of experience. The greatest difficulty is in cutting bricks and the requirements for maintaining an angle strictly at 600.
Round stoves, which are laid out according to the design of the famous Russian furnace engineer V.E. Grum-Grizhimailo, also look beautiful and unusual. The furnace operates on the principle of free movement of gases. To ensure tightness, the outside of the structure is covered with sheet metal. Such a stove can heat a large country mansion and will become a real decoration for any home.
- Cooking stove. It is advisable to choose this option for a dacha where the owners visit only in the summer. In this case, heating the house is not needed, and if you equip the structure with an additional water tank, it will serve not only for cooking, but will also create comfortable living conditions.
Cooking ovenOften this option is installed in country cottages where gas and electric heating are provided, but in order to save resources, owners sometimes use a brick oven.
The design of the stove consists of a brick body, inside of which there is a combustion chamber, an ash pan, and a chimney. There is a metal plate on top (an oven can be built in).
- A heating and cooking stove is already a multifunctional design.
This is a more difficult project to implement, as it consists of:
- combustion chamber;
- chimney;
- ash pan;
- hob;
- oven.
The stove looks massive and is usually chosen for dachas where there is no other heating option.
In our country, heating and cooking stoves are the most popular, allowing you to heat the house and prepare a delicious dinner for the whole family.
It can be additionally equipped with a drying chamber, where you can make preparations for the summer: mushrooms, berries, fruits. In cold and damp weather, you can quickly and safely dry clothes and shoes in this chamber.
Oven with drying chamber
By the way, ovens with drying chambers were first invented in the countries of Northern Scandinavia, where hunters and fishermen needed to dry clothes and boots in one night.
Many schemes of heating and cooking stoves have additional devices in the form of a comfortable bench, drying for firewood, an oven, and a water-heating tank.
Technology issues
Base
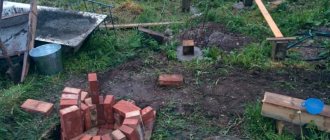
Under the foundation of the outdoor stove, they dig a pit on the bayonet of a shovel (30 cm). First, an anti-heaving sand cushion with a thickness (thickness) of 15 cm is poured into the pit and compacted, and crushed stone backfill is placed over it to the ground level. The backfill is carefully leveled to the horizon. The extension of the sides of the pit beyond the contour of the furnace in plan is from 400 mm.
Further, if the foundation of the furnace is a ready-made concrete monolith, the foundation slab is simply placed on crushed stone. If the foundation is poured with your own hands, formwork with a height of 80-150 mm is made under it. Reinforcement is standard 2-level. Solution - from M250. It is impossible to lay the foundation of the furnace flush with the ground: it will soon become clogged with soil and its “chemistry” will ruin the lower rows of the masonry, which is equivalent to re-laying the entire furnace. To avoid tripping over the threshold of the foundation, a gently sloping blind area is made of curb stone or cement-sand mortar along its contour.
If the stove is built in a gazebo, on a veranda, or generally on a wooden floor of sufficient load-bearing capacity, the removal of the stove base must be done according to fire safety rules: from 600 mm on the side of the fire door and from 300 mm on the other sides. Asbestos cardboard with a thickness of 4 mm or basalt mineral cardboard with a thickness of 6 mm or more is placed on the floor, then a sheet of roofing iron. The iron flooring is moistened with a liquid clay solution, felt or basalt cardboard is placed on it and impregnated with the same solution. Laying the furnace structure begins when the clay impregnation is completely dry.
Brick
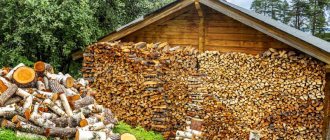
For an outdoor stove, you need exactly stove brick: dense, well-annealed. A rough stove or a 2-burner stove with a smoke tooth, in which the firebox does not get very hot, can be made of red working bricks, incl. hollow - the stove from it warms up faster and loses less heat in vain. Sand-lime brick is absolutely unsuitable for stoves, and fireclay masonry in outdoor stoves should be avoided: due to the high moisture absorption of fireclay bricks, it is susceptible to frost in the open air in winter.
Note: why would the authors of some publications and the rewriters who are crazy about stealing their material think that a stove can be made from gas blocks, the Almighty hardly knows. This is foamed cement mortar. Under the influence of high temperatures, cement gradually but quite quickly loses water of crystallization and disintegrates into dust.
Masonry mortar and masonry
Ordinary clay stove mortar is unsuitable for outdoor stoves: it will become limp during the period of inactivity during spring and autumn bad weather. Stoves with a relaxed thermal regime (rough, 2-burner with a smoke chamber) can be laid on a cement-sand mortar from M250 (Portland cement from M500: sand 1:3 - 1:3.5); in extreme cases, it won’t take long to completely shift them. Sometimes outdoor stoves at weekend dachas are placed on the same mortar with reinforcement of 6-7 mm thick seams with 3 mm thick steel mesh. However, with more or less regular use, a stove folded in this way will last no more than 5-7 years.
To build a truly durable outdoor stove, you will have to buy dry stove mortar for laying outdoor stoves and seal it according to the instructions. In general, this is a clay-cement-sand mortar, but the quality of the clay for it must be tested in the laboratory, and the dry mixture must be prepared on production equipment. If you don't mind taking the risk of laying down a rough or slab first, a trail of mortar for laying outdoor stoves is prepared at home. way:
- White or gray fatty clay is mixed with a large amount of water and left to “sour” for three days;
- The first two days the clay solution is periodically stirred, the third day it is allowed to settle;
- The suspension is drained, and the clay sediment is pressed through a sieve with a mesh size of 1.5 mm and dried in the shade;
- Dry clay is crushed to a fraction no larger than 1.5 mm and Portland cement grade M400 or higher is added in an amount of 10-15% of the volume of clay;
- Make a “sausage” test for the fat content of the clay-cement mixture, as when preparing stove mortar with your own hands;
- Add mountain sand of fraction 0.5-1.5 mm to the dry mixture to the desired fat content. Gully and rounded quartz river sand are not suitable. Only now the mixture is ready to work.
You need to prepare masonry mortar for the stove, from a purchased or home-made mixture, in small portions so that it can be worked out in 2-3 hours, because The clay-cement-sand mortar dries and separates in the bucket. For beginners, it is better to make a bucket of mortar at a time; it will be enough for 100-120 bricks. It is better to apply the mortar onto the brick with the palm of your hand in a layer of approx. 3 mm. The squeezed-out excess is immediately removed with a finger, and the seams from the outside are cut with a wooden stick to a depth of 4-5 mm for moisture insulation, see below.
Note: the thickness of the seam between fireclay and red stove bricks is 6 mm, because the moduli of their thermal expansion coefficients (TCE) are different.
Seam protection
Neither cladding with tiles, stone or face bricks, nor plastering with moisture-resistant plaster will completely protect the masonry joints of an outdoor stove from getting wet. A radical way to protect external joints from moisture has appeared only in our time: grouting the joints with glue for porcelain tiles. The seams are rubbed down after the masonry has completely dried (20 days at 15 degrees and 7 at 25). During the drying period, a temporary canopy is installed over the oven to avoid uneven heating by direct sunlight.
As for the internal seams, to protect them, all openings/openings in the stove structure are plugged with bags filled with dry grass, rags, etc. during winter downtime. So the temperature inside will be at least a degree higher than the outside one, which will prevent condensation. In the spring, before the first start after winter, the stove is quietly heated for an hour or two with paper, shavings, dry grass, until the smoke from the chimney brightens or becomes almost transparent. Now the furnace can be started at full speed.
Mortgages and accessories
Metal embedded parts can only be walled up in furnace brickwork; There should be no mortgages in fireclay. The thickness of the mortar layer between the metal and the stove brick is also 3 mm, so the seam with the embedded part will be 6 mm thick + the thickness of the embedded part. Because seams thicker than 13 mm are unacceptable, the maximum thickness of the embeds in the furnace is 5 mm, and the minimum, according to general building standards, is 4 mm. Wire embeds can be 3 mm thick.
Deformation gaps between the brickwork and fittings (doors, flaps, latches, gates) are required to be 6-12 mm wide. Most often, the gaps are 10 mm. Deformation gaps are filled with fluffed asbestos; As a rule, for this purpose, the fitting element is wrapped around the contour with an asbestos cord before installation. They put the fittings in place as soon as the masonry reaches the level of its bottom; It is unacceptable to push the part into the finished opening! Next, the laying is carried out by circling the fittings until they close at the top of it.
In the manuals for the construction of stoves they write that the fittings in the stove structure need to be secured only with wire, because... cast iron does not cook or cooks very poorly. This is true, which is why cast iron fittings are provided with eyes and/or grooves for 3-4 mm wire. Installation of cast iron elements of stove fittings is done as follows. order:
- As soon as the masonry is brought to the bottom of the part, grooves are selected in the bricks with a grinder for the wire whiskers. The width of the grooves is 6 mm. Laying the mustache in the masonry - from 1.5 bricks, better - 2.5-3.5 bricks. The ends of the wire should not fall on the vertical joints of the masonry!
- A wire is threaded into the lower eyes of the asbestos-wrapped fittings, the piece is put in place and the laying continues;
- In the last row of masonry before the part covering the part, grooves are selected for the upper wire whiskers, as in step 1;
- Insert the wire into the upper eyes of the part;
- Lay out the overlapping row and carry the masonry further.
At the same time, in outdoor stoves that are heated irregularly and not intensively, fittings made from ordinary structural steel are quite durable, incl. homemade. This saves a lot of money, because... cast iron fittings road. It is quite legal to attach steel stove fittings by welding to embedded parts made from a steel strip or angle.
Construction of a stove for a summer residence and its features
The main elements of any brick stove for a summer residence are:
- Foundation. For any stove it is necessary to build a separate foundation, not connected to the main foundation of the house.
The foundation is built separately
- Furnace body. Consists of a combustion chamber and a chimney. If the stove design requires additional elements, then it may include a hob, oven, and water heating tank.
- Combustion chamber. The dimensions of the firebox depend on the area of the room and the required power. If the stove is planned to be heated with wood, then the height of the firebox must be at least 40 cm. The thickness of the firebox must be at least 1/2 of a brick. The firebox can be made of fireclay (heat-resistant) bricks or purchased in ready-made cast iron.
- Ash pit (ash chamber). This element of the furnace is designed to collect products during fuel combustion. Oxygen is also taken in through the ash pan, which is necessary for the combustion process.
Ash pan
The ash pan is located below the combustion chamber and is always equipped with a metal door through which cleaning takes place. A grate is laid between the ash pan and the combustion chamber. Typically, the ash chamber is 3 bricks high.
- Chimney. The main element of the furnace through which combustion products are removed. The chimney can be made of brick or made of steel pipes. This does not affect functionality or efficiency in any way. The chimney is discharged from the stove either directly through the roof or through the wall to the street. When constructing a chimney, you must avoid multiple branches and horizontal sections, as this negatively affects draft and can reduce the efficiency of heating the room.
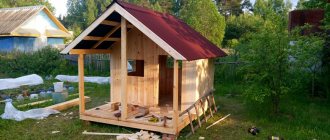
Project
Before starting construction, you need to decide what exactly needs to be built: if the house has a full-fledged kitchen, and it has a normal oven, then it will be more convenient for your housewives to bake pies and buns there. In this case, there may be no need for a Russian stove. If you are not supposed to smoke fish or poultry, then there is no need for a smokehouse.
At first we want everything, but approach the choice of project realistically : it is likely that, having tried it once, you will never use either a Russian stove or a smokehouse again. By the way, you can make a small oven under the cauldron next to the firebox to cook something in a cast iron pot or bake it. It will take up much less space, but will perform the same functions.
It’s worth looking at as many photos of ready-made garden stoves as possible on the Internet or interior magazines, assessing their dimensions and deciding whether you can afford a large complex or should limit yourself to a small one that combines a barbecue (barbecue), a stove with two or one burner (one of them under the cauldron) and a work table with a sink. Read the description of the selected DIY garden stove project.
The next step will be choosing a construction site . Usually they try to place the stove closer to the house, in this case you need to take into account where the smoke will go from it. There should also be no trees, wooden buildings, garages or rooms with flammable materials nearby.
After this, you need to do the ordering on the Internet or with the help of an experienced stove maker. These are drawings showing in detail how bricks should be laid in each row.
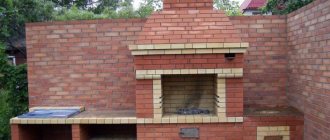
Several options for garden stoves
Which brick stove to choose for your dacha?
The choice of stove design determines the size and type of room. Large cottages will require a massive stove structure with thick walls, which will take a long time to heat up, but at the same time be able to maintain the temperature for a long time. Building such a stove is not an easy task. This will require some experience and knowledge.
But even a beginner can handle a small stove for heating a small dacha if you strictly follow the diagram and do not change the laying rules.
small ovens
The first place in the popularity of heating and cooking stoves is worthily taken by the Swede, which enjoys well-deserved love and respect among Russian stove makers.
This design is a compact, ergonomic shape with a small cooking surface and a three-channel chamber. It is ideal for a small cottage, the length ranges from 880 to 1250 mm.
For the location of such a stove, the place most often chosen is between the kitchen and the living room. Thus, the stove performs a double function: it serves for cooking and decorates the living room with a fireplace.
Today you can find hundreds of different layouts for laying a Swedish stove with a hob on the Internet, so it won’t be difficult to implement it for your dacha. Many stove makers have added additional options to the standard masonry scheme, so each design is called by the name of its creator: the Buslaev, Kuznetsov stove, etc. But the principle of operation in them is the same.
Traditionally, a Russian stove can be called a bulky, massive structure, which is decorated not only with a hob with an oven, but also with a spacious bench.
Stove with bench
This stove is not only a functional device for cooking, but also a place for relaxation. It allows you to warm up the room well, retaining heat for a long time, and has a beneficial effect on the human body, thanks to which the owners of such stoves are less susceptible to colds.
The building usually has two fireboxes (main and additional). Thanks to the special design of the oven, heating is carried out evenly, from bottom to top. Any solid fuel is suitable for kindling, and there are no particularly strict requirements for the materials for laying a Russian stove.
A special place among small heating and cooking stoves is occupied by the little V.A. Potapova, created by a famous engineer at the beginning of the 20th century. To lay it, you need only 211 bricks, and the dimensions of the stove are only 630 * 510 mm.
Moreover, this little thing contains a single-burner stove, a small oven for baking and a hood. This type of stove would be an excellent solution for a small garden house or one-room cottage.
In this article, we invite you to study the rules and main points of laying a small heating and cooking stove.
Cooking oven order
Conclusions and useful video on the topic
Video #1. A video to help independent stove makers, the material presents a visual arrangement of a heating stove:
Video #2. A detailed guide to the construction of a heating and cooking unit according to ready-made procedures, but with some changes from the contractor:
When choosing a design for your own construction of a stove for a summer residence, you need to take into account your own capabilities and skills. It is possible that someone will consider the options we have proposed to be too complex or simple. In any case, the information presented will help you get an idea of the stove structures in order to use it yourself or monitor the actions of hired stove workers.
If you had to build a brick stove for your dacha yourself, please share photos of your own designs. Perhaps you know some subtleties that we did not take into account in our article? Tell our readers about them - leave comments in the block below.
Chimney installation
The operation of the entire garden stove depends on a correctly installed chimney. The easiest way to make a chimney without errors is to use a modular system. Having collected a sufficient number of modules, you only need to assemble them like a construction set and cover the outside with bricks. It is important that the modules fit tightly together and are firmly connected with clamps or heat-resistant sealant.
There are several rules for installing a chimney:
- Installation must begin from the stove;
- The parts must fit tightly together without forming gaps or cracks;
- Good access must be provided to all parts of the chimney so that in case of blockage, the chimney can be cleaned;
- The joints of the modules should not be in the ceiling.
Criterias of choice
You need to select equipment for heating your home in such a way that it provides complete heating of the existing room, based on its area. A wood-burning stove, for example, is a fairly simple and economical device that quickly solves the problem of warming the inhabitants of a country house.
The following features are important when choosing:
- compactness and simplicity of design, especially if the house is small;
- safe operation in houses made of any material, tightness of the chimney, compliance with draft parameters;
- resistance to natural factors during periods when the stove is not in use;
- quick kindling, quick heating of the room, heat retention for a long period of time;
- the presence of a convenient door that allows you to use the device as a fireplace;
- arrangement of the hob;
- preferred fuel for heating – it is advisable to opt for more versatile models;
- mobility, ability to move if necessary;
- built-in units for connecting the hot water system in the house.
Materials
Considering that the oven will be located in the open air, the choice of materials should be approached very responsibly. It is best to use refractory fireclay brick, but if the complex is large, then it is possible to use solid red brick . When purchasing a brick, check its dimensions. It is important that it matches the dimensions of the brick in the project.
It has always been believed that for laying bricks it is better to use clay with the addition of sand. The amount of sand depends on the clay and here you need to look at the condition of the mixture. The clay must first be soaked in water for 2-3 days, then knead it well with your feet, adding a little sand. The solution is considered the most suitable if the bun made from it, falling from a height of 1 meter, does not crack or crumble, but simply flattens.
For the generation under 30, this is the same as the rocket fuel formula for my mother. Therefore, we leave the clay in a basin for the children to enjoy, and we ourselves buy in the store a special building mixture for outdoor stoves or just stoves, if there is a canopy over it.
Laying a garden stove with your own hands
We lay a layer of waterproofing on top of the foundation and install the first row, according to the order. We check each row with a level to ensure it is horizontal and all angles using a plumb line. The seams between the bricks must be filled with mortar. After this, he lays out row by row, strictly in accordance with the order.
When installing the doors and slabs, we carefully cover each of them with basalt wool or wrap it with asbestos-cement cord. This is necessary so that, when expanding from heat, the metal door does not burst apart the brickwork.
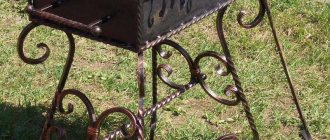
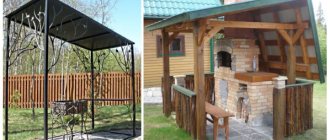
Why do we need barbecues on the street?
Among the main advantages of an outdoor wood stove and outdoor barbecues are:
- decoration of the local area, summer cottage;
- the possibility of cooking, preserving freshly picked vegetables and berries, drying fruit stocks and mushrooms;
- ease of use while relaxing outdoors with family and friends;
- preserving usable space inside the house.
Before starting construction work, it is important to learn how to make an outdoor barbecue with your own hands and solve technical issues, including the design and assembly of the structure. You need to draw up a design for an outdoor stove in advance; in particular, you will definitely need a diagram. It must contain certain information, for example, it must indicate the order of the outdoor stove. All this must be done in advance, before folding the stove.
Outdoor stoves and barbecues must be functional and practical, serve for many years, ensuring safe operation, while their construction must be as economical as possible. There are different variations of this design, for example, an outdoor stove for a cauldron or combined with a smokehouse.
Chimney pipe
The beginning of the chimney pipe was laid out dry. The smoke collector was constructed: the author picked out the outer halves of the bricks to make it a little wider, planted them on the mortar and from the top a couple of rows of bricks on the edge. A brick was cut into a smoke collector. Then it became clear that making the semicircular cutouts was in vain, it was necessary to catch up to the overlap of the smoke collector without cutouts, time was wasted. Cutouts were made in the ceiling for a diameter of 180 pipes. The pipe went: an old 180 mm disc was used as a guide.
The pipe is made of a quarter of a brick and there is simply no room to install a damper. Therefore, it was decided to lay a slab larger than the pipe. The result is protrusions of 8-10 centimeters. According to the design, protrusions must be made. We bought 10 kg (there is no smaller package) of heat-resistant cement called GC 40, they will be sawn.
Next, the oven was insulated, a mesh was laid on it, and one layer of mortar was placed on it.
Making a pipe from a used roofing sheet took one day. The distances to the roof locks seemed to specifically coincide with the 180 diameter I needed. All that remains is to saw off the sheet to length and bend it along the mandrel cut from the outlet.
Let's summarize the work done
So, after finishing the work, we can draw the following conclusions. An outdoor stove for a summer house or country house is easy to build with your own hands. At the same time, it is not necessary to have the skills of a professional stove maker or designer.
The main thing when constructing structures of this type is the correctly selected building material and desire, without which it is better not to even try to build a stove. To build a stove device with your own hands it will take from 4 days to a week. There is no need to rush into this matter and place the brick on a poorly set foundation.
Failure to comply with construction technologies can lead to rapid destruction of the furnace structure due to shrinkage. It is important to remember that cement must be added to the solution for a stove that is not covered with a roof, which will prevent the washing out of clay and sand under the influence of precipitation.
Outdoor stove options
What is long burning in heating stoves?
As is known, the intensity of the fuel combustion process depends on the amount of oxygen supplied. If there is enough fuel, the fuel burns intensely, releasing a large amount of heat, but the fuel burns quickly. With limited air supply, combustion can enter the smoldering stage, in which even flames are not always observed.
A solid fuel stove with a sealed door can be switched to smoldering mode
In principle, any furnace can be switched to a long-burning mode by manipulating the valves. Another thing is that not all of them are designed for this mode. Conventional stoves with closed valves can even be dangerous - in smoldering mode they can become a source of smoke or carbon monoxide. So it’s better to look for a fireplace stove for a summer house whose characteristics include the line “long burning” and the maximum burning time for one bookmark. This could be 6-18 hours.
How to determine whether a stove supports long burning or not
One of the characteristics by which you can distinguish a long-burning fireplace stove for a summer residence from a conventional heating stove is its sealed design. After all, you need to make sure that air flows in the right quantity. No more and no less. The second sign is the presence of several adjustable dampers.
Dampers and dampers must be airtight (the photo shows the ash pan door of the Nordika stove)
The tightness can only be checked during combustion, but the presence of dampers can be monitored visually and how tightly they block the access of air, you can also see how well they move. In some models, the air supply is adjusted through the ash drawer. In this case, you need to look at how well it “moves” and how tightly it blocks the air supply. Although the ash box cannot be airtight, it should not leave large holes either. You can also track the presence of a seal on the door, a gate on the pipe. All these are criteria by which you can determine whether a given fireplace stove supports long-term combustion.
With afterburning of gases
How else do long-burning stoves differ from conventional ones? The fact that they can be used to burn gases that are formed during the combustion of wood. In conventional furnaces, these gases escape into the chimney, since their ignition requires a special regime - high temperature and limited access of air. In long-burning furnaces, the fuel chamber can be divided into several parts. In one firewood burns, in the rest there are gases that were formed during the decomposition of fuel. Such furnaces are also called gas generators, since it is in the smoldering mode that the largest amount of gases is formed. What is characteristic is that most of them have a calorific value higher than that of the fuel during the decomposition of which they were formed. So when using conventional ovens, a significant portion of the heat is lost. That is why it is believed that a long-burning fireplace stove is more profitable for a summer house or home, since it requires less fuel.
The technical specifications should contain a line stating that this model supports a long-burning mode. There should also be a maximum time on one tab in long-burning mode
The downside is that a long-burning fireplace for a summer house or home costs a lot of money. The price tag for models that support long-term combustion starts from $400-450, if it is a Russian manufacturer and the body is made of structural steel. Domestic stainless steel costs twice as much, and cast iron costs twice as much. Imported fireplace stoves with a long-burning function, with the same characteristics, are approximately 70-100% more expensive.
The difference between a classic open fireplace and a fireplace stove
A classic open-type fireplace is only an additional source of heat that cannot heat a room in cold weather. It gives heat in small quantities, it spreads only during the combustion of the fuel, and immediately before the firebox. This type of heating device is good for a damp summer or autumn/spring day. In winter, it is not able to provide enough heat for the entire room, since its operation requires good draft, which “pulls out” most of the heat.
One of the simplest models: a long-burning fireplace stove for a summer house and home “Bavaria”. Manufacturer – EKOKAMIN (Russia)
The fireplace stove has different characteristics, a closed firebox.
Such a unit can heat the room independently (with correctly selected power). And a long-burning fireplace stove for the country house and home also does this economically, as it uses fuel energy to the maximum. Date: September 25, 2022