0
6349
23.12.2015
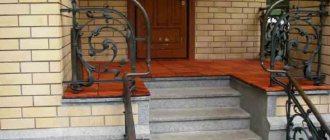
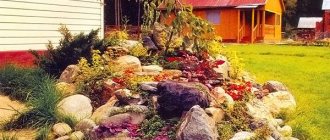
Today, paving stones have gained immense popularity, which is an ideal material for creating driveways to houses and garden paths. Gradually it replaced the black and ugly asphalt. With the help of paving stones, a wonderful pedestrian area can be created. To make it unique, you need to use tiles that have different shapes and colors. This will help create exclusive patterns and ornaments. In this article we will talk about how to lay paving stones correctly.
Paving stone area in front of the house
What is paving stone and what types does it come in?
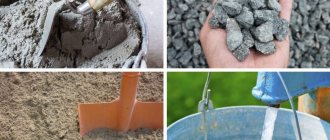
A parallelepiped made of stone is called a paving stone. The coating is strong, durable, laid out on the surface block by block, and is intended for beautifying the external space. It can be clinker, granite, concrete. The elements are different in shape, decor, color. There are many installation methods and technologies for performing work.
Laying granite paving stones is suitable for sidewalks and roads. Natural material is environmentally friendly and does not require constant maintenance. Concrete blocks are also popular; they are distinguished by high levels of stability, but it is worth considering the material’s susceptibility to acids. Clinker paving stones are durable, do not deteriorate from chemicals, and do not fade.
For a budget option, you can make paths using vibro-pressed cement-polymer paving stones. The material tolerates loads well and is moisture and frost resistant. The low price is due to the replacement of cement components with polymer ones.
There are several tips when choosing. In addition to the type and shape of the elements, it is worth paying attention to the technical characteristics of the compositions. Frost resistance is important, which takes into account the freezing-thawing cycle (for the climatic conditions of Russia this is 10 cycles). Water absorption capacity should be no more than 2%. There are 3 strength indicators for paving stones: compression, bending and abrasion. Average weight of material per 1 sq. m - 100 kg.
What are the advantages and disadvantages
The advantage of paving stones is strength, high performance characteristics, high load-bearing capacity, and resistance to temperature changes. The material is easy to install, so you can make the paving yourself. Paving stones are environmentally friendly, have high maintainability, and do not require high operating costs.
Paths made of paving stones do not retain water; the safety of people's movement is ensured by the rough texture of the elements. A geotextile separator, which is laid in the base, prevents soil subsidence and deformation of the sidewalk.
The disadvantage is the high cost of paving stones, which is why concrete-polymer block options are used in budget projects at the dacha. Paving stones are also difficult to process.
On some soils, with a high level of humidity, the base can be washed out, then the masonry sags and individual elements fall out.
Features of choosing paving stones
Nowadays the construction market offers a wide range of road surfaces. The owner of the site must, first of all, decide which area he is going to pave. The aesthetic and performance characteristics of the bars directly depend on this.
Parameters that determine the purpose of the material:
Thickness
- Bars up to 30 mm thick are suitable exclusively for pedestrian areas.
- Park areas and recreational areas with increased traffic are paved with elements from 50 to 60 mm.
- For the construction of access roads and parking for cars and trucks, stones over 80 mm are used.
Advice from the experts! When purchasing a batch of bars, knock the tiles together. A dull sound indicates that the production technology of the product has been violated (insufficient drying).
Also, the product must be accompanied by a quality certificate, which reflects such characteristics as:
- Frost resistance. The indicator indicates the number of freezing and thawing cycles that the bars can withstand. For example, in the middle zone, temperature changes vary from - 25 ° C to + 25 ° C, with a frequency of 5 to 7 times. This means that the service life of tiles with a frost resistance of 200 and with 5 cycles of temperature changes will be equal to 40 years.
- Strength. Strength indicators are assessed according to three criteria: bending (resistance to oblique loads, value from 60 kg/cm²), compression (impact of vertical loads with a value from 400 kg/cm²), abrasion (for paving stones this indicator should be less than or equal to 0.4 kg/cm2).
- Water absorption. The indicator is measured as a percentage. Moreover, the lower it is, the better. For example, if the value is 1.5%, then in this case the material will absorb water at the rate of 15 g per 1 kg of paving stone weight.
Form
Decorative wave paving stones
The configuration of the elements does not affect the strength of the paving stones. Therefore, the choice of decorative elements depends on the personal preferences of the owner of the site.
Landscape designers recommend selecting several coating options. The original composition will enliven the area.
The construction market offers decorative tiles in the shape of clover, wave, parquet or honeycomb.
You can lay the bars according to your own sketch, or contact the designers.
Marking paths and platforms
The technology for laying paving stones on sand involves marking the area. First, the paving area is calculated. At this stage, it is necessary to measure the width of the road so that the bars lie evenly and do not require modification. The thickness of the seams is also measured. For marking, pegs are installed in the corners of the future sidewalk. Beacon cords are needed to check the level of the road surface. Adjustment is also necessary for laying rainwater drains.
Types of paving slabs with their pros and cons
Modern manufacturers of building materials produce paving stones using various modern technologies. Depending on the characteristics of the technological process, sidewalk tiles are divided into 3 types:
- vibration-cast;
- vibropressed.
Vibrocast tiles are produced using plastic compounds . The “filling” of the building material is poured using equipment into special containers – “vibroforms”. Paving slabs of this type have an attractive appearance; they imitate natural wood or brick. Most often, this type of building material is used for individual construction. Vibro-cast tile elements are used for arranging personal plots of country houses and cottages. They are also laid out on paths located in parks and garden plots.
Vibropressed tiles are made in a different way. The pre-prepared concrete mixture is poured into a special mold. After this, it is subjected to pressure, which is created by special equipment - a brick press. Thanks to a special manufacturing technology, the building material has a strict shape with a rough surface. Vibropressed tiles are used to lay sidewalks, pavements, squares and roads in crowded and public places.
Read on topic: Construction of high-speed highways
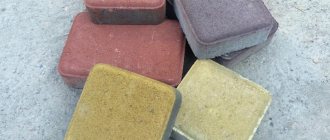
Modern consumers have access to a large number of product options in a variety of colors. Paving slabs also come in various shapes; the most popular are the following shaped paving elements:
- honeycomb;
- paving stones;
- scales;
- clover;
- wave;
- fleece;
- gzhelka;
- flower.
Depending on the material from which paving slabs are made, they are divided into several types. Relatively inexpensive building materials made of concrete and clay are popular among modern consumers. In the arrangement of suburban areas, clay paving slabs imitating roofing tiles are often used. To improve the technical characteristics of the building material, manufacturers can add a binder material, for example, granite chips, to the tiles.
The most wear-resistant are granite tiles , characterized by the excellent strength characteristics of natural stone. It easily tolerates sudden temperature changes, due to which it has a long service life. Concrete slabs become unusable after 3-4 years, asphalt pavement will begin to deform after 2 years, and granite tiles will last more than 25 years. Another plus of granite is that it does not require additional means of protection against damage. The disadvantage of natural building materials is their high cost.
Excavation
Laying paving stones yourself involves excavation work. To create a trench, soil is removed, since the top layer of earth is often unstable and will not be able to withstand massive elements and operational loads.
The volume of soil to be lifted depends on the project, but there are general rules. The paving stones should be located 4 cm below the area adjacent to the sidewalk. The total depth of the trench for the blocks and fastening mixture is from 20 cm. If the tiles are placed on a platform for transport, it is necessary to increase the depth of the trench by 10 cm. The bottom of the earthen structure is leveled and compacted with a manual tamper or a vibrating plate.
Step-by-step preparation of the base
Step #1.
It is necessary to break the contour of the area intended for installation and set up control beacons.
Step #2.
It is necessary to determine the flow of water and remove it from the path or blind area of the building onto lawns or into water wells. The slope can be transverse, longitudinal or longitudinal-transverse. Its calculation is carried out based on the type of material for installation:
- For clinker road bricks or paving slabs
– 5 mm or more per 1 m. - Laying granite paving stones
- 10 mm or more per 1 m.
Step #3.
After the height level is reached, the required layer of soil is removed, and the base bed is compacted with a vibrating plate.
Laying technology
Options for laying paving stones are determined by the use of different materials and block shapes, and the purpose of the road. The elements are placed on a base made of sand, concrete or cement-sand. The rectangular classic layout of sidewalk fragments allows you to combine colors and textures.
The herringbone laying technology is performed by laying tiles at an angle of 45° or 90°. When laying out a checkerboard pattern, square bars of contrasting shades are used and the elements are placed in a checkerboard pattern. The “random mixture” technique allows you to design a path with a random arrangement of bars of different sizes and colors.
On a crushed stone base
The technology of laying paving stones on a crushed stone base includes a complex of works. A geogrid is placed on the cleared space, a layer of crushed stone of 10-20 cm is applied on top. A slope is created on the leveled mixture, and the surface is compacted. Then the curbs are installed and secured with a dry cement-sand mixture. Also, in areas of high loads, installation of a road mesh will be required. Stone bars are installed according to the sketch, gaps of up to 3 cm are left between the blocks. The seams between the bars are filled with a dry mixture.
Made from concrete
A concrete base for the blocks is required to strengthen the base. The bonding mixture is necessary when working with thin tiles and constructing sidewalks on moving soil. Laying paving stones over concrete involves installing formwork into which concrete is poured. For large areas of coverage, it will be necessary to install expansion joints every 3 m.
After grouting the joints and installing curbs, pour a 3 cm layer of cement-sand mixture. The elements of the road surface are laid out on the surface. Concrete paving stones are not damaged by strong weight and mechanical loads.
On the sand layer
To form a sidewalk from paving stones on a sandy base, you need to prepare the surface: level it, cover it with geo-textile, form a sand cushion up to 15 cm. It is important what kind of sand is used in the work. Experts recommend formulations without impurities.
The embankment is leveled and a slope is created for water flow. The base is watered and compacted with a vibrating plate. The curbs are fastened with a mixture of concrete, then the laying of paving stones begins according to a given pattern. The gaps between masonry elements should be 2-3 mm. The seams are filled with sand, then the sidewalk is compacted with a vibrating plate and cleaned with water.
Nuances
Methods for installing bars and materials are determined by the purpose of the road. For pedestrian sidewalks, 40 mm tiles are sufficient. A road with constant vehicle traffic is paved with thick paving stones. To create pedestrian paths, a pattern of blocks is laid out on a sand base or a mixture of sand and cement. The methods of laying paving stones also determine the types of loads on the road surface. The coating can be strengthened using a concrete screed.
Tool for laying paving stones
To make the construction of paving stone paths neat and quick, you will need the following set of tools:
- Hydraulic building level (10 m). If you do not own a laser level, which costs a lot of money, buy a regular hydraulic level.
- Construction rack bubble level 1 meter long.
- Metal profile pipe with a cross section of 20 x 40 mm: 2 meter and 6 meter pieces.
- Steel pointed pins and wooden pegs.
- White nylon cord;
- Large rubber hammer. You need to buy one high-quality mallet or three Chinese ones, as they quickly fall apart.
- Master OK.
- Two different tape measures: 2 meter and 10 meter.
- A broom or broom to sweep the seams between the tiles.
- A clamp and a heavy 100 mm steel angle. From them you need to make a device for fastening the paving stones before cutting it
Securing paving stones with a cutting clamp
- A grinder equipped with a steel disk with a diameter of 230 mm. Only use a steel disc and not abrasive cutting wheels. It is better to buy a more expensive disk with normal quality, since cheap samples quickly become unusable and will have to be replaced.
Steel 230 mm disc for cutting stone and concrete products cuts paving stones without any problems
Installation of curbs
Installation of curbs occurs according to pre-made markings. Then a cement-sand mortar is mixed in a ratio of 1:3 and applied to the surface along the laying of the blocks. The curbs are placed on the bonding mixture and adjusted to the level. The finished slabs are left for 1 day so that the solution holds the elements together. In some design solutions, blocks are laid without a border.
Storing paving stones. Mistakes made
Storing paving stones - it would seem, what can we talk about here? The guys who brought the paving stones unloaded them by hand onto wooden pallets. They laid rows of 20, i.e. the pressure per unit area was quite large. After the rain passed, the pallets began to sink into the ground. The rows of paving stones began to move relative to each other, which led to the fact that the upper rows, with their far from perfectly smooth lower surface, scratched the lower rows. The photo below shows four samples: the first sample is in good condition, the rest are damaged.
Paving stone samples 2, 3, 4 were damaged due to improper storage
Don't make my mistakes.
- If possible, place the pallets on a surface that is guaranteed not to sag (asphalt, reinforced concrete slab);
- If the pallets are laid on the ground, in my opinion, there should not be more than 10 rows;
- It is mandatory to cover the paving stones so that rainwater does not fall on them.
Geotextile layer
Preparation for installation of tiles includes laying a waterproofing layer, which is placed above the drainage as a substrate. This prevents moisture from reaching the top load-bearing layer and improves the quality and integrity of the coating. A layer of geotextile is lined on the bottom and walls of the earthen structure. The artificial material does not rot from prolonged exposure to water, does not decompose even with prolonged use, and provides the road with protection from water.
Sealing and finishing work
To maintain the integrity of the coating, it is necessary to grout the joints that separate the blocks from each other. There are three main methods for sealing paving joints. The distance between the elements is filled with sand, poured with concrete mortar or rubbed with a concrete mixture. For pavements made of natural granite, sand and concrete mortar are suitable. For roads made of ceramic paving stones, it is better to use sand. The seams between the concrete blocks are rubbed with concrete mixture. Marble blocks can only be held together with sand-cement mortar.
After filling the masonry joints, excess material is removed with a broom or broom. Then the sidewalk is hosed down with water, the mixture hardens and firmly holds the blocks together. Cement-sand mortar is poured between the coating elements and left for bonding.
Features and types of material
The name paving stones comes from the word whetstone. Initially, this material consisted of fragments of approximately equal size, which were broken off from hard rocks - granite, basalt and others. The crushed paving stones were used to create coverings for sidewalks and squares.
Over time, the surface, lined with crushed paving stones, was polished by the feet of pedestrians and the wheels of cars and became smooth. It is these types of coatings that can still be found in tourist cities in Europe today. The squares and sidewalks paved hundreds of years ago have survived to this day.
With the development of technology, paving stones began to be made by sawing. This made it possible to obtain bars with a smooth surface of the same size. Stones became easier to lay and sidewalks became smoother. Despite the high cost, full-sawn paving stones are widely used today.
One of the varieties of modern paving stones is split-sawn. For production, pieces of stone are first sawed and then split into pieces of the required size. Coverings on which full-sawn and split-sawn paving stones are successfully combined look very original and stylish.
In the 19th century, clinker paving stones began to be produced in Germany. It is obtained from special shale clay by molding and subsequent high-temperature firing.
The technology is simpler than cutting or splitting natural stone. But in terms of quality and service life, clinker paving stones are not inferior to full-sawn or chipped paving stones. Its service life reaches 150 years or more.
A cheaper alternative to clinker and natural paving stones is concrete. The material is made from high-quality cement and mineral fillers. Polymer additives increase the strength, frost resistance, and wear resistance of concrete paving stones.
In addition, special technologies allow it to be painted in almost any color.
Concrete paving stones can be made into any shape, so all path curves, transitions and various other curved elements can be laid out without time-consuming trimming. This gives unlimited scope for the implementation of any site design idea.
Concrete paving stones can be vibrocast or vibropressed. The second is preferable: its performance properties are much higher. Manufacturers' statements that concrete paving stones are in no way inferior to natural granite or clinker stones are only partly correct, since this material is new and has not yet stood the test of time.