Review author: Terrari School of Design
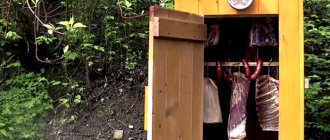
The compost pit at the dacha is used to process organic residues, which are subsequently used as a complex fertilizer on an organic basis. There are many options for constructing such structures. Each gardener independently selects the most suitable model of structure for storing plant residues.
What is used in a garden composter? To do this, mowed grass, tops, and fallen leaves are placed in a special container. After some time, under the active activity of microorganisms, a good fertilizer is obtained. It can be used for root feeding.
The high level of potassium in this mixture ensures rapid growth and increases the decorative qualities of plant crops.
What is compost
Compost is a mixture of organic waste prepared and placed in a special way. The basis is grass and leaves. A special laying method promotes the spread of humus-forming bacteria, which increases the efficiency of rotting.
Compost - a mixture of organic waste prepared and placed in a special way
Compost contains nutrients necessary for normal growth and development of plants. Therefore, it is used as fertilizer for various types of crops. The product improves the condition of the soil, renews its composition, and transforms its structure.
Advantages and disadvantages of compost
Compost has the following benefits:
- availability;
- can be done on a plot of any size;
- replaces all types of organic, mineral fertilizers;
- contains a large amount of useful substances;
- It loosens the soil well, unlike other fertilizers.
Minuses:
- long cooking;
- contains little nitrogen - special additives help solve this problem.
Compost contains nutrients necessary for normal growth
Additives for compost pit
Briefly about the main thing
There is nothing complicated about how to make compost at your dacha with your own hands. To do this, various organic waste collected on the site and in the house is stored in a heap. To prevent the appearance of decomposing organic matter from disturbing the eye, boxes are built for it from boards, construction pallets and other similar materials, mesh baskets are made, or any containers of suitable volume are installed. There are also ready-made plastic composters on sale. The ripening time and quality of compost depend on compliance with the laying rules.
Ratings 0
How can you fill the hole?
There are two types of waste that can be used for compost.
Products that emit carbon
These include:
- parts of plants - fallen leaves, broken branches;
- old clothes, cotton and wool fabrics;
- bark, sawdust, tree shavings;
- rotten boards;
- paper, cardboard;
- nutshell;
- printed materials - newspapers, etc.;
- plant roots;
- cereals;
- mown grass, hay;
- flowers.
Carbon-emitting products for compost bins
Products that release nitrogen
These include the following types of waste:
- fruits, vegetables, berries that are not suitable for consumption or processing;
- egg shells;
- wool scraps;
- coffee grounds;
- tea leaves;
- cleaning vegetables and fruits;
- cow dung;
- bird droppings.
Products that release nitrogen are an excellent option for a compost pit.
Feedstock for creating organic fertilizer: which components should not be added
Any plant or food waste can be used for composting, but it must be limited, understanding that:
- fresh feces contain helmite eggs. To destroy them, microbial treatment is required - exposure to air for about a year;
- thick branches and bones will not have time to decompose during composting by microorganisms;
- plants treated with chemicals will be harmful: they will change the composition of humus not for the better;
- Potato and tomato tops affected by late blight will become the cause of infection of garden crops in the future;
- Grass mowed with seeds will serve as a source of weeds. But if you plant it for the next season after winter, the seed pods will most likely open up and become empty. In addition, birds and various rodents will work on them.
Naturally, any garbage of inorganic origin, and this is plastic, polyethylene, synthetic materials, rubber, will simply clog the prepared fertilizer.
What should you not fill the hole with?
The following cannot be used in compost:
- some types of plants - wheatgrass, loach, horsetail, hogweed, horseradish;
- fresh animal products;
- parts of crops affected by pathologies, sprayed with chemicals;
- bones, fruit seeds;
- plants with ripened seeds;
- non-degradable materials;
- tops of tomatoes, potatoes;
- cabbage roots affected by clubroot;
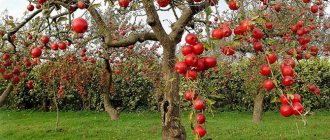
- a large number of apples;
- leftover prepared food;
- products - meat, eggs, milk, etc.
Products that should not be added to the compost bin
Options for ECO-humus facilities
Making compost bins is a creative and exciting process that is practiced by gardeners and gardeners everywhere.
There are many creative ways to organize space for collecting, “ripening” and storing compost.
Requirements for a compost pit
The compost pit must meet the following requirements:
- width, height - more than 1 meter. It is these dimensions that guarantee that the waste is heated to the temperature at which rotting occurs. The larger the dimensions, the faster the compost matures;
- lack of bottom. This will ensure unhindered access of the worms to the biomass and necessary bacteria, and the excess liquid will quickly “leave” from the waste;
- good ventilation. This will create optimal conditions for waste rotting rather than rotting;
- presence of shelter. This is necessary for protection from ultraviolet radiation, so that the biomass does not dry out and seeds do not germinate;
- use of antiseptic solutions for processing construction materials. This will protect products from rotting, mold, and mildew.
Compost pit layer diagram
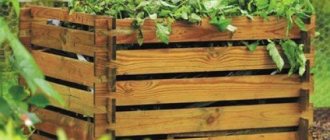
Wooden eco-container
A wooden humus container is characterized by the greatest environmental safety. You can make it yourself from scrap wood and scrap materials.
The structure should be treated with an antiseptic and painted to prevent drying and cracking under the influence of sunlight and precipitation.
There can be a huge number of different design options (open, closed, from one or several sections).
The wooden ECO-container looks very original and aesthetically pleasing, suitable for most areas of landscape design (French Provence, rustic country, Russian, ECO-style).
Where to make a pit
The place for constructing the pit is chosen where there are no plantings. It is better to use an area that is unsuitable for planting, where there is infertile soil and other conditions unfavorable for plant growth.
Requirements for a place for a compost pit:
- reliable wind protection. This will prevent the spread of unpleasant odor throughout the area;
- Free access. Waste must be turned over throughout the entire maturation period, so the pit must be made so that nothing interferes with approaching it;
- Smooth surface. If the composter is made in a depression, then excess moisture will accumulate inside, which will lead to rotting of the material;
- The composter is installed above the soil level. This will facilitate maintenance and ensure deep heating;
- the area should be in shade or partial shade. Direct sunlight contributes to the drying of raw materials and the growth of seeds;
- Do not place the pit next to trees, especially conifers. Waste will lead to the death of plants.
Place for arranging a compost pit
Video description
This video talks about the correct placement of compost:
It is advisable to place green and brown waste in a compost heap in layers and sprinkle it with earth, manure, humus or already matured compost, in which active bacteria are present in large quantities. The green part of the waste releases heat during decomposition, and the brown part, due to its low caking ability, provides breathability.
Rules for placement and construction of composters
To prevent the sun from evaporating moisture from the heap, it is better to place it where its direct rays do not penetrate - in the shade of trees or buildings. In this case, the composter should be located at a distance from sources of drinking water and on the leeward side, so that odors from it do not reach the windows of your and neighboring houses and recreation areas.
To ensure rapid decomposition, the compost must be stirred periodically. But this is not an easy task, so it is better to arrange a composter of 3 sections. One will store fresh waste, the second will ripen last year’s compost, and the third will contain ready-made fertilizer.
DIY 3-section composter made from pallets Source blogspot.com
It is not necessary to make a lid for the composter, but its presence makes life very easy - it eliminates the attacks of cats, dogs and rodents who want to feast on kitchen waste, protects the pile from drying out, and protects you from unpleasant odors.
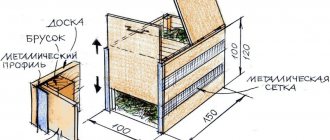
Design Features
The compost ripening period is 2 years. For this reason, the structure must be of such a size that there is enough space for the preparation of old waste and for the installation of new raw materials. For this reason, it is best to use a two-piece pit.
The optimal dimensions of the structure are 1.5x2 meters. In a small pit, waste will begin to rot due to poor heating. To get good humus, it is necessary that the temperature inside the structure be maintained at +600C.
A removable cover is installed on top of the structure. This provides free access to raw materials for ventilation and stirring. In addition, the lid protects the contents from precipitation, birds, etc.
Features of the compost pit design
Ready-made eco-container for humus
The finished container, made of UV-stabilized, waterproof, frost-resistant plastic, has an attractive appearance and is in harmony with any stylistic direction of landscape design.
You can buy ready-made humus containers in various shapes, sizes and colors at hardware stores.
Types of pit
There are several types of composter, which allows you to choose the most optimal option.
Regular
This hole, despite the technical requirements, is dug directly in the ground. This is done so as not to incur the cost of purchasing materials. As already mentioned, it is better to build a composter above the ground, but this option can also be used. The main thing is not to cover the recess with film, so that excess liquid does not accumulate inside and so as not to limit the worms’ access to waste. The top of the pit is covered with a lid. You can use black film.
The main advantage of the pit is accessibility. Flaws:
- low efficiency;
- the difficulty of mixing the contents;
- poor heating, which can lead to rotting of the material or increased cooking time.
Compost pit dug in the ground
Compost pile
Another simple way to make compost. To do it, proceed like this:
- Choose a free space on the site. Clear it of unnecessary debris.
- All dacha waste is piled on top. The pile is turned in a timely manner to ensure oxygen access inside.
- The compost is regularly replenished with fresh waste. The finished product is taken from below with a shovel.
- The pile is covered with black plastic wrap.
To prevent the pile from spreading across the site, you can build a fence.
Compost pile
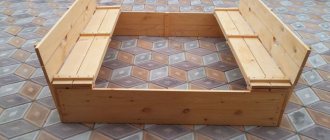
Wooden box
Old pallets are used to make it. Step-by-step instruction:
- Take 3 old pallets. Each is treated with an antiseptic to protect against rotting. Waiting for the pallets to dry.
- A layer of turf is removed from the area. Its dimensions must correspond to the dimensions of the pallet.
- Pallets are placed on edge so that the side with the boards is on the inside. They are nailed together to prevent the structure from collapsing.
- Slats are attached to the free edges of the pallets. Boards are inserted into the grooves. This wall can be easily disassembled, which allows you to quickly remove finished compost from the box.
- A covering material is fixed to the walls, which allows air to circulate. It will securely hold the contents inside the structure.
Wooden compost box, drawing
The box is covered with black film or a lid is attached. You can make partitions inside or install two composters to separate the finished product from the new material.
This design is short-lived, since the boards are subject to rot. After 4-5 years the box will have to be updated.
Concrete composter
This is a stationary, reliable, durable design. To do this, proceed as follows:
- A pit is formed on the site, dimensions 2x3 m, depth 0.5 m.
- Install the formwork.
- Concrete is poured. Waiting for the composition to harden.
- The formwork is removed.
- Install the cover.
Such a composter will last for several decades without the need for updating.
Compost concrete structure
Ready made plastic container
It is not necessary to set up a composter yourself. It is enough to buy a ready-made plastic container. It is equipped with holes for ventilation, a lid, and a lower door for removing the finished product. Container advantages:
- availability;
- aesthetics;
- long operational period;
- ease of use;
- ease of maintenance.
Ready-made plastic container for compost
Punch
Video description
Watch a video about the construction of a wooden composter:
Mesh composter
A suitable material for making a composter is a durable galvanized steel mesh with cells of any size. In addition to this, you only need wire and air-permeable non-woven material - spunbond or lutrasil.
- A cylinder is rolled out of the mesh, making an overlap of 15-20 cm, and fastened with soft wire.
- The resulting basket without a bottom is placed in place, having first removed the turf from the ground, and tied to a fence, pole, or any other support.
- The inner walls are covered with spunbond.
If appearance is not important, you can do without non-woven material Source myhappyhomestead.com
Rules for filling the pit
To make a good nest, it is important not only to properly arrange the hole, but also to fill it. There are several rules to consider when making compost.
Preparation of material
It is best to grind all components before adding. This will make the worms' work easier and speed up the maturation of the material. You can use garden shears, a shovel, and other available equipment for this.
It is better to grind the components before placing them in the compote structure.
Selecting Additional Components
To improve the quality of humus, additional components are used to prepare compost:
- pieces of vegetables, fruits. They accelerate the ripening process of the product, attract worms, and increase the content of nutrients in raw materials. However, they are added in limited quantities to avoid the occurrence of fungus;
- clay, garden soil. These products quickly absorb excess moisture, allowing you to obtain not humus, but a soil mixture that can be used for growing seedlings;
- lime. It increases the potassium content in the finished product, normalizes the acidity level, destroys harmful microorganisms, and prevents the growth of seeds;
- ash. Increases the potassium content in the product, normalizes the acidity level;
- rotted horse manure. Accelerates compost maturation.
To improve the quality of humus, additional components are used to prepare compost.
Preparing the composter
Not only the material needs preparation, but also the composter itself. It is necessary to place wood chips or crushed stone at the bottom. This is a drainage layer that removes excess liquid from the product and prevents the material from getting wet.
The walls of the composter need to be insulated. Branches are used for this. They are installed vertically in several layers.
Instead of branches, you can use compressed hay.
Warming compost with branches in several layers
Waste stacking
Rules for laying materials:
- each layer should have a thickness of 5-10 cm;
- the material is compacted tightly after laying each layer;
- When laying, alternate raw materials that emit carbon and nitrogen. Ratio 3:1 respectively;
- you need to alternate layers of wet and dry material. The first raw material should be 5 times more than the second;
- The top of the compost is moistened, but not abundantly.
The quality of humus in a compost facility depends on the correct placement of materials.
Slate ECO-brut
The slate ECO composter is a simple and convenient option using remnants of universal roofing materials, which are fixed on boards.
A slate-lined compost heap is ideal for the oxygen or aerobic method of producing natural organic fertilizer.
Slate ECO-brute can be stylized to suit such trends of landscape design as loft, minimalism, hi-tech.
Rules for operating the pit
To get good humus, it is important not only to prepare the pit, materials and fill the composter, it is also necessary to ensure proper care of the raw materials:
- hydration. Raw materials must be watered regularly, since in dry material the rotting process stops. To do this, you can only use non-chlorinated water that is rich in oxygen - rainwater, well water, etc. The frequency of the procedure depends on the air temperature: +200C and above - 2 times a week, +15-200C - once every 10 days, +5-150C - once every 2 weeks. For every 1 m3 of raw materials, 1-3 liters of water are required;
- warming up. To carry out the procedure, use hot water at a temperature of +40-600C. This will not only moisten the mass, but also create optimal conditions for rotting;
- tedding This procedure ensures a flow of fresh air to the products, which speeds up the ripening process of raw materials. It is best to use a pitchfork for tedding. The procedure is performed once a month;
- replanting earthworms. This will help speed up the maturation of the compost.
Adding earthworms will help speed up compost maturation.