If you decide to make a water mill yourself, you will need to select materials and a suitable place to install the decorative structure. In addition, in order for a decorative water mill to work, it is necessary to provide artificial circulation of water, that is, install a device that will transmit the flow from the reservoir to the blades, setting them in motion. It is necessary to step by step disassemble all the stages of manufacturing the mill structure from choosing a style, constructing a model and drawing up a diagram to assembling the house and installing the blades.
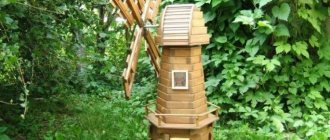
The principle of operation of the mill is very simple: water can flow onto the blades from above, through a chute, or supplied from below. The general principle is to use the flow of water. A decorative hydromill in an old style will decorate a garden area, and the sound of water being distilled by the blades will relax and soothe.
In order for the decorative water mill to be useful after production, and not just decorate the area and relax, you can connect a small generator to it. The generator will only work if there is a stream on the site, the flow of which rotates the mill wheel, and otherwise the generator will be useless. You can place the generator in a decorative wooden house.
Preparing for the construction of the mill
The appearance of the design differs depending on wishes, but the principle of operation of a water mill is the same for all types: the blades move under the influence of water flow. The water mill consists of the following elements:
- Wheel with blades;
- Water supply chute;
- A frame to support the wheel or a decorative house on the side of the wheel;
- Hinges, axle for wheel rotation and fasteners.
To build a water mill, prepare the necessary tools and materials. For a wooden water mill you will need plywood, bars of different lengths, a metal rod; for a gutter, plastic or roofing tiles are suitable, you will need a drill, a grinder, a jigsaw, a hammer and screwdrivers. Don't forget to prepare a special impregnation for wood to increase the service life of the mill parts.
Water wheel assembly
It is better to assemble the water wheel by weight, that is, put the two halves of the frame on something, maybe use a crowbar and hang it up.
We will connect the two halves of the frame using connecting boards. The length of these boards is 40 cm. Any material can be used as a material for their manufacture, preferably with a lock (tongue and groove). For example, often after construction, pieces of imitation timber remain, or you can use any edged board with a thickness of at least 20 mm. But it doesn’t need to be very wide, we lay it around the circumference, the optimal width is 13-15 cm. In the drawing, an imitation beam of 145 mm is used as a connecting board (working 135 mm), 40 pieces of 40 cm each were used for everything in a circle, that is 16 m .P.
Before assembling two frames, align the diagonals on them and start twisting. We fasten the boards through the arcs with self-tapping screws, 4 pcs. on the board. It is advisable to drill a hole with a thin drill before tightening the screws, so that the boards do not burst. If you use boards without a lock, try to fit the boards tightly to each other (if it doesn’t work, use silicone), and if you use boards with a lock, then do not connect them tightly, move them apart a little. It is advisable to cut off by trimming.
Next, we make partitions from boards 20 x 150 mm. or 25 x 150 mm. We also need 40 pieces of 40 cm each. A total of 16 m.p. It is preferable to cut with a trimmer. We fasten with self-tapping screws, 4 pcs. onto the board, also pre-drill holes with a thin drill. That's it, the water wheel is ready.
Let's calculate the cost of the material:
Beam 30 x 70 mm, 16 lm required. 40 rub. per m.p. = 640 rub.
Board imitation timber, you need 16 m.p., 3 boards of 6 m = 750 rubles.
Board 20 x 150 mm, 16 m.p. required, 3 boards of 6 m = 800 rub.
Self-tapping screws, bolts and metal 2mm 1m2 = 700 rub.
Source
Mill water supply system
If a pond is landscaped on the site, half the work is already done. If you are just about to build a reservoir, choose the right place for the water mill. Avoid areas with a lot of trees and bushes, if there are uneven ground - use this to your advantage. In order for the mill to start working, it is necessary to provide an artificial flow of water; to do this, use one of the options:
- Installing a water mill under the gutter from the house drain will perform two important functions: water drainage and decorative placement. The disadvantage of this solution is the time limitation: the mill will only work after rain.
- The unevenness of the site, which I wrote about above, will become an original way to supply water. Use an alpine slide on your site; if you don’t have one, create it yourself.
- On a level area, supply water using a pump. Install the pump in the pond, lay the hose to the gutter, and cover it with stones and plants. The construction of such a system is similar to the construction of a waterfall on a summer cottage.
- If there is a pond with moving water on the site, place the wheel a third of its height in the water. The wheel will start moving naturally.
Principle of operation
Before moving on to the process of constructing such a structure, you should learn how a water mill works. To operate it, they usually use water supplied from a reservoir - a river, pond or reservoir through a pipe through which it is directed to the wheel. At the moment of the collapse of a powerful stream of water, the wheel blades begin to rotate, causing, in turn, the movement of the mill axis.
The design feature of the full-size mill is that it is equipped with sluice gates that control the passage of liquid and prevent flooding. The same principle can be used as the basis for the work of a decorative building. Water from a country pond pours onto the wheel from above, and under the force of the falling liquid the blades begin to rotate.
Water is usually supplied using a hose: for this, one end is placed in a pond, and the other is attached to the roof of the mill. The pump will be able to maintain the circulation of the liquid, causing it to flow in a circle and driving the wheel.
Construction of a water mill
Let's take a closer look at the stages of creating a water mill. Start by designing a drawing of the future structure, calculate the dimensions of the parts, and prepare the site for the water mill. After approval of the mill drawing, begin creating structural elements.
- Water mill wheel. The classic solution is to create a wooden mill wheel from solid wood or plywood. The use of improvised means will give the wheel originality: a bicycle rim, a tire from a car wheel, plastic elements or rubber hoses. Make the wheel blades from wooden blocks or aluminum profiles. The design of the wheel involves the presence of two round disks or rims, with blades between them, installed at equal distances, and a central hole for the axle for rotation.
- Water mill housing. Most often it is presented in the form of a decorative house, which can also be used as a technical room. Lay the base with paving slabs or fill it with screed. Assemble the frame of the house from wooden beams, cover it with clapboard or lath. Cover the roof frame of the house with plywood, on top of which lay the selected roofing material.
- A separate and important stage in the construction of a water mill is the processing of wooden elements. Carefully sand each part and cover it with protective impregnation in several layers. To preserve wooden elements, repeat the treatment every 2-3 years.
- Installation of a water mill. Drill a hole in the wall of the house, put the wheel on a metal axle, insert it into the hole and secure it to the external support with nuts. Connect the hoses and connect the pump to start the water.
Do-it-yourself real windmill made of twine
From improvised, waste materials you can get a real windmill, exactly the same as the one Don Quixote fought with.
You can make the craft yourself in just an hour, no special materials or tools are needed:
- 2 liter plastic bottle;
- leg-split;
- wooden skewers and toothpicks;
- glue Moment or Titan;
- cardboard and scissors;
- white and brown beans;
- sequins and wheat grains.
We roll a cone out of cardboard, fix it with glue and decorate it with twine. Important: the diameter of the lower edge of the cone should be slightly larger than the diameter of the plastic bottle. The fact is that we will “put” the cone on an element made from a bottle.
We assemble the blades from wooden skewers. We fix two identical parts with twine “cross to cross”.
The work on the upper part of the mill is completed by connecting the parts - we glue the blades to a cone decorated with twine.
We seal the bottle, like the cone, with twine. We fix the upper part of the mill to the lower part with glue. You can start decorating. We make the door from short fragments of skewers, placing white beans along the contour.
Decor does not require compliance with rules. You can do the finishing yourself and to your taste. As an example, there are windows made of toothpicks, a “dormer” window above a door made of sequins, a “edge” along the bottom of the product and on a dome made of brown beans.
Types of garden mills
A DIY decorative windmill is a unique piece of garden design. Despite the variety of homemade garden decor items, it is easy to identify several main types of garden mills.
Depending on the material, a homemade design can be:
- wooden;
- made of wild stone.
Based on appearance and type of construction, it is customary to distinguish:
- water (with wheel);
- wind (with blades) mills.
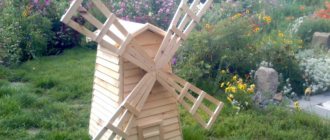
The classic model, regardless of overall dimensions, has a trapezoidal shape and characteristic blades on one side. A water mill is appropriate near a small pond or stream.
The advantages of wooden products primarily include their mobility. If necessary, the mill can be easily moved to a new location.
The advantages of stone structures include, first of all, their durability. In this case, it will no longer be possible to rearrange the decorative structure when redeveloping the site.
For the little ones
Breeze, spinner, mill. Each of us had such a toy in childhood; we gladly made it with our own hands from ordinary drawing paper or soft cardboard. Let's remember our childhood and involve our children in making crafts.
One option is the origami technique. It will take no more than 15 minutes to create a pinwheel. You will need a cocktail stick, a sewing pin and a square of construction paper. Let's fold the wind pinwheel in a few steps:
You can complicate the task and make a children's windmill with eight blades. First, let's prepare a pattern for the craft parts with our own hands - there will be two of them.
We prepare the parts, insert one of them into the grooves of the other.
We make holes in the corners and bend them towards the middle. All that remains is to fix the turntable on the handle. You can use any sticks as a handle - cocktail sticks, wooden skewers. And so that our breeze moves freely, we use beads. We wind a wire around the tip of the stick, put an oblong bead on it, and only then - a mini-mill.
An even more simplified version of this craft is a “breeze” with six blades, which you can make with your own hands from just one part. As the main material we use colored paper with a dense texture or soft cardboard. Pattern details:
We transfer the workpiece to the base material, including marking the blades (semicircles). Carefully cut out and bend the semicircles. We attach the part to the handle.
Such a toy can be multi-layered, multi-colored and very fun. Use your imagination and involve your child in the design.
Choosing a location for the mill
A decorative windmill for a garden can become the dominant feature of a landscape composition. It is reasonable to supplement it with an imitation of a well, a small haystack, animal figures or a flower bed.
The choice of location depends on the layout of the site and the tastes of the owner. A decorative mill looks most impressive among fruit trees or in an open area surrounded by flower beds.
A water mill will harmoniously complement a recreation area with a decorative pond or fountain.
At the planning stage, it is important to choose a location so that the structure does not interfere with free movement around the site and care of cultivated plants. The choice of materials depends on the general design style of all other buildings.
It is not difficult to develop an individual design by studying numerous photos of a decorative mill.
A real do-it-yourself cardboard mill
Real buildings and structures are made from paper or cardboard. But it is worth considering that creating such crafts takes a lot of time, you will have to be patient, and best of all, enlist the support of loved ones.
Materials and tools:
- cardboard and paper;
- scissors and stationery knife;
- Ruler and pencil;
- glue.
On a cardboard rectangle measuring 19*10 cm, draw 6 identical wedges and cut them out.
We fasten the wedges with masking tape or strips of plain paper, we get a cone.
We will add “planks” to the resulting cone. We cut them into different sizes so that they completely cover the “body” of the cone. We leave a distance of approximately 1.5 mm open between them.
We decorate the corners of the workpiece with strips of plain white paper 0.8 cm wide.
The next stage is the roof. We make it from a rectangle measuring 11*5 cm. It needs to be divided into three parts by lines.
We form triangles on the sides of the workpiece and bend them.
We cut another 11*5 cm rectangle, bend it in half and fix the roof blank in it with glue.
The roof of the craft also needs to be finished with “planks”. Their size is 5*1 cm. We cover the ends of the part with strips of white paper.
All that remains is to make the blades for our cardboard mill with your own hands. To do this, you will need a strip of material measuring 3 by 8.5 cm. We divide it into wedges, which we then cut into strips 5 mm wide.
We glue strips of wedges onto a piece of cardboard 5 mm wide and 6 cm long, leaving a distance of 3 mm between them.
We prepare 4 such blades and attach them to a cardboard cross.
All that remains is to put together all the details of our mill, add some decor to it, and the original craft for the garden and school is ready.
Calculation of dimensions and purpose
The dimensions of the decorative structure directly depend on its purpose. If the mill will only carry an aesthetic load, then its size is determined based on the size of the zone allocated for it.
In a situation where any functional structure will be designed in the form of a mill, the size is calculated individually.
Thus it is easy to arrange:
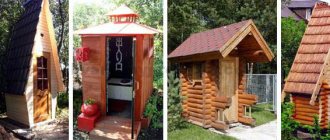
- children's playhouse;
- a small shed for gardening tools;
- a booth for a street dog;
- outdoor shower or toilet;
- small gazebo.
In addition, the decorative structure will help hide the septic tank cover, well or irrigation installation from prying eyes.
The dimensions of the building must be correlated with the total area of the site. A bulky mill for a summer cottage in a small area will look out of place.
For a structure that will serve only as a decorative element, the maximum height is limited to 1.5 meters. A neat miniature mill, complemented by a couple of decorative details of a similar theme, will look harmonious in a small flowerbed.
Mill in the landscape of a Dutch garden
Since this structure was quite common in Western Europe, it may well become the highlight and main element of the landscape in the Dutch style. The ideal environment for the object would be compositions of daffodils, tulips, and garden roses. The building should have a laconic and colorful design.
This could be a half-timbered house, which serves as a hallmark of the architecture of many Dutch and German cities. It would be appropriate to install a weather vane; you can choose figurines of gnomes as garden sculptures.
Materials for creating a mill
For a stone structure, you need to select wild stone or brick. In addition, the work will require:
- cement;
- sand;
- decorative slats for blades;
- threaded pin (for rotating blades);
- fastening elements.
For wooden structures you can use:
To protect wood from aggressive environmental influences, it is wise to use protective compounds. They will reduce the ability of wood to absorb moisture, extending the life of the product.
Receiving water flow
If it is not possible to ensure natural water flow, they resort to an artificial method. Here are the options:
- Decorative structures are placed under the gutter, and then the wheel rotates when it rains. Although a small pump and a watering hose, through which water is supplied to the roof, will allow you to start the mechanism even in the absence of precipitation. The water that flows onto the wheel can then be discharged into the garden.
- To organize the flow, uneven terrain of the site is used. On a hill, a container is dug into the ground in which precipitation accumulates or water flows from a well. A mill is placed near the container, to which the liquid is supplied through a chute.
- On a flat area, a hill is created, if desired, artificially, using the “alpine hill” technology - using compacted soil and cobblestones. You can wall up a hose in the middle of the architectural form; the water gushing out of it will simulate an underground spring.
- The pump power must be sufficient to pump water from the reservoir below to the storage tank at the top or supply it to the mill wheel itself. The power depends on the distance over which the liquid is supplied.
How to make blades
The main component of a windmill is the blades. If you want to make rotating blades, you must follow a certain procedure:
- From plywood, you need to cut out two round parts with a diameter of about 20 cm. A hole is drilled in them for the pin.
- The blades are made from slats, treated with a protective compound, stained, and varnished.
- The finished blades are placed between round plywood parts and securely fixed.
- The part is attached to a stud using nuts to secure it.
- The propeller is placed on the mill body at a slight angle to ensure maximum air capture.
For a small decorative mill, you can make a propeller from two slats by drilling them and connecting them at the intersection with a pin. If the blades are made of metal, then sharp edges must be processed to avoid accidental injuries.
Making a water wheel frame
We start manufacturing the wheel with a frame, which consists of two rings (rim) and diagonals that fasten the fragments of the ring and give rigidity to the entire structure.
We make the rings from boards 30 x 200 mm. Each ring consists of eight arcs (parts), and for two rings we will need to make sixteen such parts. Here is a drawing of the arc with exact dimensions.
The width of the arc is 134 mm, this size was obtained as a result of minimizing the cost of building materials, a board with a width of 200 mm is popular and you can easily find it in any market or store. You can also use a board of a different thickness, if you don’t have 30 mm, feel free to take 25 mm thick, its strength will be enough and will make the construction easier, I was just playing it safe.
To make arcs, make an exact template from cardboard or tin; it’s easier to measure and draw once on the template, and then transfer it to all the workpieces. Use a jigsaw to cut out the arched sides. The end sides must be smooth for the arches to fit snugly against each other, so cut them with a miter saw or circular saw.
After making the arcs, lay them out on a flat surface, you should get a ring, if the joints do not match well, adjust them a little, but this is not so important, the most important thing is that the ring has the correct round shape, and to check this, wherever you measure the diagonal , the diameter size must be the same.
Fasten them with self-tapping screws as shown in the sketch:
But don’t move the ring, there is no rigidity, you need to make and screw the diagonals, now we’ll start making them. We make diagonals from timber 30 x 70 mm. For two rings we will need 4 long pieces of 2 m each and 8 short pieces of 1 meter each (16 m. in total). We make long ones by sawing them to a size of 2000 mm, and then sawing them in the middle to join each other as in the drawing:
We make short ones according to the drawing, 8 pieces:
We join the long ones and twist them together, but away from the middle, where we will then drill a hole with a diameter of 30 mm.
First, we apply the long diagonals to the ring so that the diagonals overlap the joint of the arcs, and the joint of the arcs is in the middle of the diagonal. Don’t rush to screw it on, double-check that everything is even and symmetrical; the correctness of the design depends on this. Screw the long diagonals to the ring with several self-tapping screws, later we will strengthen them with bolts.
We also attach short diagonals and attach them using self-tapping screws.
Then we make four mounting plates that will strengthen the structure. We use metal of at least 2 mm. We cut it to the required size with a grinder and drill holes for the bolts according to the drawing:
Next you need to screw the plates, but to do this we measure all the diagonals again. We apply the plate, the central hole in the plate should be exactly in the center of the circle, we drill holes in the diagonals through the plate one at a time so as not to disturb the alignment, we apply the plate on the other side and screw it together.
Exterior design of a decorative mill
The external decoration of the mill is the final stage of work. The structure is sheathed with moisture-resistant plywood, clapboard or block house. When decorating, varnish and paint are used to highlight some structural details.
Additionally, it is appropriate to imitate windows and doors. This will give the mill a more aesthetic appearance.
Around the decorative mill you can plant various flowers and place decorative figures, creating a single composition. The appearance of the mill itself and its surroundings depend on the imagination of the owner of the site, the style of design of the territory and the purpose of the mill.
By showing a creative approach, it is easy to decorate your site with a stylish element of landscape decor.
Source
Site preparation
To build a building, the first thing you need to do is choose a suitable location and prepare it. The area should be cleared and should be planned .
The ideal place to install a water mill is the bank of a stream or river: flowing water creates a constant torque for the wheel.
But since our mill is decorative, it can be built on any garden plot. A small pond is enough for the wheel to function .
If the reservoir is already equipped, then there should be no problems with installing the building. But if you are just going to build a pond and a water mill in it, then the following tips will be useful to you:
- You should not locate a pond with a mill in places with a large concentration of trees and bushes;
- the place should be well ventilated;
- if there are uneven places on the site, then it is better to build a mill on them;
- humidity and wet soil near the water mill
Trellis for climbing plants will decorate your summer cottage and divide it into zones.