Against the background of traditional log huts and more practical structures made of profiled timber, frame houses for living are the most in demand. This is explained by the simplicity and speed of their construction, the absence of shrinkage, as well as low loads on the foundation.
Also, thematic designs are visually attractive. When placing a bet on a frame house, all that remains is to decide on its type.
Configuration of frame houses
At first glance, frame houses look the same. However, upon careful analysis of their construction technology, it turns out that the corresponding buildings are:
- Frame-panel;
- SIP panels;
- Power;
- Half-timbered.
Each type has a specific frame and walls, which means the operational properties of frame houses differ.
Historical reference
The very first houses built using frame technology arose in Europe more than five centuries ago. In Japan - even earlier. In Germany, the Scandinavian countries, the USA, Japan, and Finland, frame houses for individual families are built using this technology. Panel houses have been built in Canada for more than two hundred years.
In Europe, three- to four-story public buildings are being built everywhere. In Japan and most European countries, it is allowed to build frame houses up to seven floors high.
Frame-panel houses
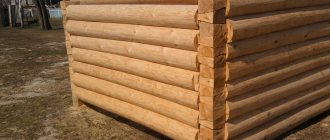
The corresponding structures have a rigid frame that can withstand significant loads for decades.
The walls of a frame house of this type serve as shield fencing. They are made of OSB (oriented strand board). The advantages of using thematic boards are obvious:
- Consistent and operational installation;
- Possibility of detailed dismantling;
- Suitable for filling gaps between the inner and outer skins with polystyrene foam for thermal insulation;
- Low loads on the foundation and supporting frame.
In the finished structure, you can immediately carry out interior decoration, installation of doors and windows, because its frame and walls do not shrink.
This frame-panel house is relatively cheap thanks to OSB, which is recycled lumber.
Types of frame knowledge
There are four main types of frame buildings:
- Canadian, or frame with slabs, or “platform”. Layer-by-layer installation: first the lower floor (platform, pallet), the racks rest on it and are tied with lags. It turns out to be a platform - a support for the next floor. This technology is often used for one-story houses.
- Finnish - frame houses with continuous posts. The racks are solid in height for two floors or for a floor with an attic. The ceiling rests on support boards embedded in the posts. This is a very durable structure that requires perfect precision of all elements and installation. Perhaps this is the most popular design of two-story frames.
- German - post-and-beam frame houses (half-timbered). The technology comes from Germany and Northern Europe. This technology is characterized by the use of a support beam of a very large cross-section with a side of 150-200 mm, and thick boards for cladding. The building will be so strong that windows and doors are mounted into the walls without crossbars. All frame elements are connected using the insertion method. Some houses in Germany made using this technology have existed for several hundred years. This technology also requires highly qualified installers.
- Post-frame houses. The building rests on pillars. Sometimes the posts are installed on the foundation or buried in the ground and at the same time serve as piles. The structure is tied with horizontal beams - the ceiling is attached to them. The frames are mounted between the posts and filled with insulation. Buildings of this design are often used in flooded areas - it is convenient to raise the living space above ground level.
There are many more combined technologies, using metal frame elements, factory-assembled panels, SIP panels (frame-panel technologies).
Frame houses made of SIP panels
The technology for constructing these structures is similar to the previous one, but instead of standard OSB, SIP panels are used.
The latter are an improved version of OSB. Their peculiarity lies in their multilayer nature, where OSB acts as the outer and inner layers, and filler serves as the inner filling.
Therefore, turnkey frame houses made from SIP panels are built quickly, without requiring the installation of thermal insulation yourself.
Turnkey construction of houses: the right decisionArtificial stone countertops
- Combisystem Gardena
The construction technology of SIP-panel frame structures welcomes:
- Monolithic foundation;
- Installation of strapping beams;
- Installation of floors;
- Organization of the second floor and attic if necessary.
Advantages and disadvantages
The main advantage of the frame is the speed of construction. A country house is built in two weeks, and a cottage on two floors from the foundation to the rough finishing - within 2-3 months . That is, if you start construction in the spring, then by winter you can already move into a brand new, warm, beautiful frame house.
In addition, construction does not require expensive specific equipment and tools, so when building on your own, the main cost item will fall on building materials. Even if you sell a standard one-room apartment on the outskirts of the city, the proceeds will be enough to build a house several times larger in area.
Further expenses are also important, most of which will be spent on heating. After all, to create and maintain a comfortable atmosphere in a frame structure, you need two times less fuel than to heat a stone structure of similar size.
Other benefits:
- construction is possible at any time of the year;
- affordable cost of square meters;
- high level of thermal insulation (large thermos);
- no strong foundation required;
- resistance to earthquakes, due to the absence of rigid connections in the structure, the house easily compensates for significant ground movements;
- simplicity of finishing work;
- location of communications inside the wall frame;
- no wall shrinkage.
But, as with everything, there are also disadvantages :
- self-construction requires skills and knowledge;
- relative fragility;
- high-quality ventilation is required, the walls do not allow vapors and air to pass through;
- Violation of the integrity of the “pie” of the walls leads to a decrease in the service life of insulation and sheet materials.
Frame residential buildings are a revolution in construction. By looking at photos of finished houses and comparing prices, pros and cons of each, you can make the right choice.
Power frame houses
Both OSB and SIP panels can be used to cover the frame of these structures. But the supporting base must be extremely strong.
This can be achieved in different ways:
- Strengthening the load-bearing part with racks, crossbars, jibs and beams;
- Using timber made of durable wood - cedar, ash, oak;
- Impregnation of the array with antiseptics and fire retardants.
Unless a one-story frame house is not too demanding for additional reinforcement.The corresponding operations can be performed with frame panel-panel and SIP-panel houses so that they become more stable by default.
- Which staircase to choose for a private house to the second floor: types and varieties of material
High pressure washers
Well in the house: advantages and disadvantages
Step-by-step construction instructions with photos
There are several different technologies for frame house construction, but the classic method of construction is Canadian. It is also called the platform method, since first the floor of the frame house is assembled, and then the skeleton of the walls is assembled on it, like on a platform. We'll tell you how to build a house using this method. It won’t be difficult to figure out the rest: only the sequence of actions is different.
Step 1: Foundation for a frame house
Choosing a foundation is a separate complex and voluminous topic. The geological picture on the site, the height of the groundwater, the weight of the building and the seasonality of living in it, the region in which construction takes place, snow and wind loads are taken into account. But in general, foundations for frames are most often piled, piled-grillage or strip foundations.
In our country, the palm in do-it-yourself frame house construction belongs to the pile-grillage foundation. It is quickly built, requires small material investments, is correctly calculated and built, and is reliable. Combining the advantages of both pile and strip, it evenly transfers the load to all supports.
More reliable when constructing a pile or pile-grillage foundation are TISE piles. Due to the widened heel, they have a greater load-bearing capacity and better resist heaving forces.
Construction of a pile-grillage foundation with TISE piles
You can drill holes for piles using a hand drill or a motorized one. As formwork, use roofing material rolled into pipes of the required diameter (at least three layers must be rolled), secured with tape. Other options are asbestos-cement or PVC pipes of suitable diameter. Three or four reinforcement rods are installed inside the piles, connected to each other in the form of a triangle or square. The reinforcement rods are cut so that at least 0.7-0.8 meters protrude above the surface of the pile. Everything is filled with concrete of a grade no lower than M25 (read about concrete grades here).
After pouring the piles, the tape formwork (grillage) is installed, and the reinforcement is laid and tied into it. Longitudinal rods are connected to bent reinforcement outlets from the piles. At this stage, holes are left in the tape for supplying communications and ventilation (insert sections of plastic pipes across the tape).
The strapping beam will subsequently be attached to the foundation strip. To install it, studs are fixed in the tape. They are installed in increments of 1-2 meters. From each corner, 30 cm are retreated in both directions. Here, studs are required, the rest depending on the dimensions of the house, but at least every 2 meters. Please note that it is the studs that connect the frame of the house to the foundation. That’s why it’s better to deliver more often. And one more thing: no matter how short the wall is, there must be at least two studs.
When everything is ready, the concrete is poured.
Filled grillage. The foundation for a frame house with your own hands is ready
After pouring the concrete, so that it does not dry out, but gains strength, it is better to cover it with polyethylene (look at the photo). If the temperature after pouring the foundation remains within +20°C, construction can continue after about 3-5 days. During this time, under such conditions, concrete will gain more than 50% of its strength. You can work with it freely. When the temperature drops, the period increases significantly. So at +17°C you need to wait about 10 days.
Step 2: Bottom Rail and Floor
To prevent the wood of the frame from drawing moisture from the concrete, cut-off waterproofing of the foundation is necessary. The safest way to do this is with bitumen mastic. And it’s better - in two layers. You can also use roll waterproofing. Roofing felt is cheaper, but it breaks over time. Waterproofing or other similar modern material is more reliable.
You can coat the grillage once with mastic, and roll out waterproofing on top. Another option for cut-off waterproofing under a frame house is two layers of waterproofing coated with mastic: the closer the groundwater is, the more thorough the waterproofing should be.
The first layer is liquid waterproofing. While it is not dry, you can glue a layer of rolled waterproofing on it.
Then the beds are laid - boards measuring 150 * 50 mm. They must be dry, impregnated with bioprotective and fire-retardant compounds. The edge of the bed is aligned with the outer edge of the foundation. In the necessary places, holes are drilled for the studs (the diameter of the hole is 2-3 mm larger than the diameter of the stud). Then the second board is laid. It is placed so as to cover the joint of the first row. It turns out to be a castle.
The second board is laid so that the joints overlap
In general, you can lay one beam of 100-150 cm, but its price is much higher than two boards, which together give the same thickness, and properly fastened two boards have a greater load-bearing capacity, although their installation takes more time. To make them work as a single beam, they are knocked down with nails in 20 cm increments in a checkerboard pattern.
We install the harness and logs
Next, a strapping board is attached to the bed. Its dimensions are also 150-50 mm, but it is placed on the edge. Aligned along the outer edge of the foundation, nailed with long nails (9 cm) to the beam every 40 cm.
Installation of the piping: according to the instructions, the assembly of the frame house continues with the installation of the piping to which. the floor joists will rest
The next stage is installation and installation of the logs. These are the same 150*50 mm boards placed on edge. They are attached with two oblique nails (9 cm) at the end to the trim board, two nails on the right and left to the bed. So each lag is on both sides.
Example of installing floor joists
The photo shows that the first joist is installed close to the second - this way the load is better transferred to the foundation. It is installed along the second edge of the bed. The installation step is 40-60 cm. It depends on the length of the span and the cross-section of the lumber used: the longer the length, the smaller the step.
Layed and secured floor joists
If the logs are long and there is a cross beam, as in the photo above, to prevent the logs from “moving away,” jumpers are placed above the cross beam. Their length is equal to the step of installing the logs minus the double thickness of the board: if the step of the log is 55 cm, the thickness of the board is 5 cm, then the jumper will be 45 cm long.
Insulation and flooring
After the base for the flooring has been installed, it is time to insulate the floor. It can be done in different ways, with different materials. We will show you an economical option - with polystyrene foam boards with a density of 15 kg/m3 (more is possible, less is not possible). It is, of course, not environmentally friendly, but it is the only one that is not afraid of moisture and can be installed without a subfloor. The estimated thickness of the insulation is 150 mm, two layers are laid: one 10 cm, the second 5 cm. The seams of the second layer should not coincide with the seams of the first (they shift).
To begin with, a 50*50 mm cranial block is packed along the lower edge of the log. It will hold the foam.
At the bottom you get a frame made of a cranial block, which will prevent the polystyrene foam from falling out
The foam is cut with a regular hacksaw. The blade can be used on wood - it cuts faster, but you get a torn edge, or on metal - it goes slower, but the edge is smoother. The cut slabs are laid in two layers, the seams overlap. Then they seal the perimeter with sealant to ensure waterproofing.
Laying foam
Next, lay the subfloor from boards, level it and lay plywood on top (preferably FSF 5-6 mm). To prevent the rough flooring of boards from warping, lay the boards alternating the direction of the wave. If you look at the cross section of the board, the annual rings go in a semicircle. So, you need the arc to look up and down (see photo).
How to lay plank flooring correctly
You can do without plank flooring. Then the thickness of the plywood should be at least 15 mm. Consider what is more profitable in your region and choose.
In any case, the sheets should be laid in a spaced pattern - the seams should not match (as in brickwork). Also, do not forget to leave a gap of 3-5 mm between the sheets of plywood to compensate for changes in size when humidity changes.
The second stage of building a frame house has been completed: the floor has been laid
The plywood is attached with self-tapping screws 35 mm long (preferably white ones - less waste) around the perimeter in increments of 12 cm, inside in a checkerboard pattern in increments of 40 cm.
An example of using frame technology to build a wooden shed is described here.
Step 3: Frame Walls
There are two ways: the wall frame is assembled (all or part, depending on the size) on the floor, then raised, positioned and secured. Sometimes with this method, OSB, gypsum fiber board, or plywood are attached directly to the floor on the outside of the frame: the rigidity is greater. This technology is called frame-panel or “platform”. Factories generally operate according to this principle: they build ready-made panels according to the design in the workshop, bring them to the site and only install them there. But frame-panel house construction is possible with your own hands.
One of the options for assembling a frame wall, names of elements
The second method: everything is assembled gradually, locally. The beam of the bottom frame is nailed, the corner posts are set, then the intermediate posts, the top frame, etc. This is the technology called “frame house construction” or “balloon”.
Assembling the wall frame with your own hands can be done gradually (balloon technology) or in block-boards (platform technology)
Which one is more convenient? It depends on how many people work and whether it is possible, at least periodically, to attract help. Working on the floor is faster and more convenient than jumping up/down a stepladder countless times. But if the section is assembled large, then it will be difficult even for two people to lift it. The solution is either to call help or to break the wall frame into small segments.
Installation step and cross-section of racks
Corner posts should be 150*150 mm or 100*100 mm, depending on the load and the required width of the insulation. For a one-story frame house, 100 mm is enough, for a two-story frame house - at least 150 mm. The intermediate posts are the same in depth as the corner posts, and their thickness is at least 50 mm.
The installation step of the racks is selected taking into account the load, but in reality it is more often selected based on the width of the insulation. If you will be insulating with mineral wool in rolls or mats, first find out the actual width of the material. The gap between the posts should be 2-3 cm less than the width of the insulation. Then there will be almost no waste, no gaps and cracks through which heat will escape. The density of installation of insulation in frames is the main point, because only it will serve as protection from the cold. The slightest violation will lead to the fact that the house will be cold. Therefore, the selection of insulation and its installation must be treated with full attention.
An option for gradually assembling the frame of a house: corner posts are placed and secured, the top frame is immediately mounted on them, then the vertical posts are installed at a selected step
Fastening the racks is possible in several ways: with wooden dowels, with a notch or on corners. The cut into the board of the bottom trim should be no more than 50% of its depth. The corners are attached on both sides. Fastening with dowels is an old technology, but difficult to implement: long dowels are planed, a hole is drilled obliquely through the stand and beam of the lower trim, a wooden tenon is driven into it, the excess of which is cut off. It works well if the wood used is dry. If not, drying out and loss of fastening rigidity is possible. Installation on reinforced corners is much easier.
According to Canadian technology, the beams to which windows and doors are attached are made double. There is more load here, therefore the support must be more powerful.
Reinforced counters near windows and doors are a must. This is the only way a frame house built with your own hands will be reliable
Read how to make a gazebo out of wood (also using frame technology) here.
Bevels or braces
If the outer cladding is planned to be made of high-strength slab material - OSB, gypsum fiber board, gypsum fiber board, plywood - temporary slopes are installed from the inside of the room. They are needed to level and maintain geometry until the outer skin is attached. The strength of this material is sufficient to create the required structural rigidity.
If the cladding is planned to be made up of linings, etc. installation of permanent jibs is required. Moreover, the best option is not those that are placed on several racks, but four small pieces for each: two on top and two on the bottom (as in the photo below).
Such braces will give sufficient rigidity to the walls of a frame house.
Please note that in the photo above the racks are prefabricated: two boards are nailed together along the entire length in a checkerboard pattern. Such racks have even greater load-bearing capacity than solid ones and cost less. This is a real way to reduce construction costs without losing quality. But construction time increases: you have to hammer in a lot of nails.
Corners of a frame house
The most questions arise when constructing corners. If you place a beam in a corner, then there seem to be no difficulties, except that the corner turns out to be cold. In regions with short and mild winters this is not a problem, but in central Russia it requires some kind of solution.
Even with this option, the corner will be colder
There are several ways to make the corner of a frame house warm. All of them are shown in the diagrams, so it’s clearer.
When building a one-story frame house, you can do this. For a residential second floor, the corners are made using one of these methods.
After assembling the frame, it is most often sheathed on the outside with OSB, plywood or other similar material.
The construction of the woodshed is described in this article.
Step 4: Covering
The floor beams rest on the beam of the upper frame. There are several mounting methods:
- on supporting steel brackets;
- on the corners;
- with insert;
Notching - the depth of the cut should not exceed 50% of the thickness of the top frame timber. It is hammered in from above with two nails, which must go into the harness at least 10 cm. Corners are the usual method. You can use reinforced, but not necessarily perforated staples - the shape may vary
Fastening the ceiling beam using metal brackets
The dimensions of the beams and the pitch of their installation depend on what will be on top. If there is a second residential floor or attic, the cross-section is taken larger, the step is made smaller: so that the floor does not sag. If only the roof and attic on top are assumed to be non-residential, these are completely different calculations and dimensions.
In this one-story frame house, the floor beams also support the rafters. Therefore, they are extended 30 cm beyond the perimeter of the walls
If a second floor is being built, the ceiling is sheathed with the subfloor of the second floor. This will make it easier to work on creating the second floor of a frame house. Its assembly is no different from the construction of the first one. The only reason is that all the lumber has to be hauled to the second floor.
Step 5: Rafter system and roofing material
When developing a house project using frame technology, the most popular are a gable or mansard roof. Their device is no different. All the same principles and calculations. The only limitation concerns the weight of the roofing: it must be a light material, the load from which wooden beams and ceilings can withstand.
This is what the frame looks like before the sheathing. If the walls are not sheathed, slight vibrations are felt when working on the rafter system. The outer cladding makes the frame much stiffer. A gable roof with a raised tie was chosen. For ease of fastening the rafter legs, a 50 * 50 mm block was nailed along the edge of the floor beams. There was a groove made under it in the rafters. During installation, they were first simply rested against the block, then fastened. To fix the rafters in a given position before the sheathing was filled, temporary jibs were used
Another relatively inexpensive technology for building a house from aerated concrete is described here.
Step 6: Insulation
A frame house can be insulated with any of the materials available on the market with the appropriate characteristics. All of them are imperfect, but all problems have standard solutions.
The most popular insulation for frame walls is basalt wool. It is available in the form of rolls or mats of different densities. It is more convenient to install mats in walls: they are denser and hold themselves well due to the pushing force. To do this, as mentioned above, their dimensions should be 2-3 cm larger than the distance between the frame posts. The mats, of course, are additionally fixed with special fasteners, but it is more convenient to work with than with a soft roll.
The most common type of frame wall insulation
Mineral wool has high thermal insulation characteristics and good sound insulation. But there is also a serious drawback: it is afraid of getting wet and it must be protected on all sides not only from moisture (rain), but also from the penetration of steam. Therefore, from the side of the room it is covered with a layer of vapor barrier membrane, which prevents vapors from penetrating inside.
On the street side, the thermal insulation made of mineral wool is covered with another membrane, but of a different type with different characteristics: a hydro-wind-protective vapor-permeable membrane. It is not blown through, it does not allow moisture in liquid or gaseous states to pass through from the street side, and vapors can escape from the insulation: the vapor permeability is one-sided. After installing the insulation, only finishing work remains. Actually, that's it, construction is over.
This is what a basalt mat looks like installed between the posts
Now you know how to build a frame house. The detail of some processes is far from complete, but you have a general assembly sequence.
Video “Turnkey frame construction in 2 months.”
Perhaps another video from a professional carpenter who has been building frame houses for decades will help you (see below).
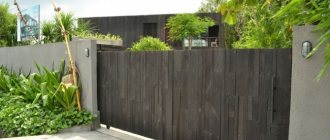
Half-timbered frame houses
These houses came to us from Europe. The costs for them are the highest. But if the future owner of the corresponding design values aesthetics, then you can give up on its high cost.
Among other frame structures, half-timbered houses stand out:
- Visual lines of a dark frame against the background of a white facade;
- Dark tiled roof;
- The presence of two floors and an attic.
The contrast of the stained massif with the light cladding dictates that half-timbered houses be called “gingerbread”.
However, sometimes designers suggest using glass-ceramic slabs and a metal frame so that the finished structure takes on a modern look.In each of the two proposed methods, the load on the foundation is small compared to that observed in the construction of brick or cinder block houses.
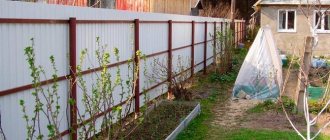
Is it possible to expand an existing living space with such a structure?
If you already have your own home and need to expand it, or you need to make a porch, then a frame extension to the house will do.
Thanks to the use of this technology, a person gets the opportunity to achieve the planned result in the shortest possible time. This will make it much faster to add a full-fledged living space to a finished house, which will fully comply with the necessary parameters.
Frame houses - which project to choose
Guided by photos of frame houses alone, one can only recognize the living area, number of storeys and cladding.
- How to build a house with a garage - interesting layout options with advice from experts (photos and videos)
- Which flexible tile is better? The answer to this and related questions is in the review, find out what the difference is and what is better yourself! (Photo and video)
The best wooden houses - look at the photos for layout options and functional house designs!
But designing thematic structures requires paying attention to other equally important things:
- Place for construction - groundwater level, distance from utilities, panoramic view;
- Type of foundation – light pile-screw, columnar, strip-monolithic;
- The building materials used are load-bearing elements, fastening elements, heat insulators.
The foundation and the building materials used are already more responsible for the reliability of the future structure.
Although if the technology of a frame house is transferred to inexperienced craftsmen, then even the strong “backbone” and “sole” will sooner or later give way.
Variety of styles
Using frame technology, it is possible to implement almost any, even very complex, architectural solution - balconies and bay windows, turrets and rhizoliths, attics and roofs with very complex (curvilinear) geometry. In addition, by selecting external finishing (siding, blockhouse, plastic panels, decorative plasters, lining, etc.), you can get a house with an elegant facade in any style.
A frame house with a triangular shape will highlight your sense of style.
Spectacular frame house in high-tech style
A frame house can have a completely different shape
Stages of construction of frame houses
The sequence of the thematic event has some similarities with the construction of structures from cinder block, brick and other building materials, but requires less effort:
- First, the design takes place based on the characteristics of the area and the type of frame house;
- Then the foundation is built;
- The next step is strapping to organize the supporting frame;
- Next comes the construction of the frame with the installation of floors and roofing;
- After installing the “skeleton”, you can work on the walls, sealing them and laying utilities;
- Finally, all that remains is to install the doors and windows, as well as take care of the interior lining.
Obviously, the construction of frame houses does not require the use of complex equipment for transporting and installing heavy building materials.
The fact is that the bars can be assembled on site without the use of welding. The same goes for wall panels, doors and windows.
Perhaps the most important stage is organizing the foundation. But even it is relatively simple: the lightweight frame and panels do not put much pressure on top, which makes it possible to limit oneself to available building materials for the construction of the foundation, provided that groundwater flows at a great depth - 20-50 meters.
Selection of materials for construction
In a residential building, the use of chipboard and expanded polystyrene is not recommended . When heated, chipboards emit formaldehyde vapors, which can adversely affect people's health. If for some reason you decide to use these materials, you should carefully look at their labeling.
Useful: Programs for designing frame houses
Super E slabs are suitable; they meet all requirements and have a confirming certificate. It is permissible to use materials marked E1 for finishing work, but it is prohibited to use E2 in residential premises.
The harmlessness of expanded polystyrene is controversial. Although many experts assure it is safe, when heated it can release harmful substances. Materials with the letter C at the end of the marking number (for example, PSB-S) are prohibited from being installed in residential buildings.
The safest insulation is mineral wool. One of the new products is ecowool, but its installation requires special equipment.
Photos of the best frame houses
Did you like the article? Share

0