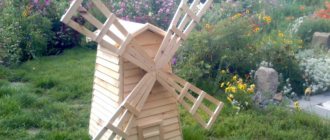
A decorative windmill will become an original decoration on your site. And to save money and surprise others, you can make a decorative mill with your own hands. Our primary task is to decide on the design of the building, what materials it will be made from and write down approximate drawings and a work plan.
Why is the building needed?
Of course, such a mill on a summer cottage is not intended for grain processing at all. The main motive for constructing a mill for the garden is to decorate the summer cottage.
In addition, there are many other purposes for building your own windmill, for example:
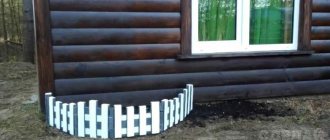
- masking the sewer cover on the site;
- can serve as micro-storage for equipment or children's trinkets;
- creation of a new play area for children;
- original country lamp post with attached spotlight;
- can hide the electrical control panel, electric/gas meter.
A windmill built with your own hands is not only a decoration, but also a pride for its owner. Decorative mills are not a problem for a person familiar with construction. But for a beginner, a mill in a country house may seem like a complex element. Anyone can build a mill for a summer residence if they have the desire.
What to build from? The best option is a wooden mill, since wood is the most affordable material. A bottle mill is a direct competitor to wood, but the first one wins in quality and appearance. In addition, the built wooden mill is a decoration of the site made from environmentally friendly material. Wooden mills are the most popular, but few people know how to make a decorative mill from wood.
It will be useful to read about:
Children's swings made of wood and other materials Garden swings are great fun, leisure time and relaxed play. There is always a lot of joy and children's laughter around them...
What might it be needed for?
In this case, the key point is the independent production of the structure. In addition to certain practical goals that are pursued when creating a windmill, a creative approach and the ability to make efforts to independently design the site are important.
Such a structure can be used in different ways, for example, using a windmill you can decorate a water well. Often, such structures cover the exit to the surface of sewer collectors. The use of a windmill for its intended purpose is not excluded - to drive mechanisms or generate electric current, for example, to illuminate an area.
Important! Decorating the area is an important factor in itself, but if there is the possibility of practical use of a windmill for household needs, its value increases many times over.
Another possible use for such an element is a place for children's games. Children enjoy playing in various houses, and if it is stylized as a mill, it becomes even more interesting.
Material, necessary tools and work plan
For production we will need:
- boards/iron plates;
- hacksaw for metal;
- jigsaw;
- drill, screws;
- glue;
- tape, pencil, ruler;
- shaft, nuts.
A DIY garden mill is a task that anyone can do. The simplest mill is 4 large boards knocked together and the blades glued to the top of the structure. But looking at windmills from photo collections, you will want something more. Such buildings can have multi-level viewing platforms, a fence, real windows, opening doors and much more.
First you need to build a body (can be either 4-, 6- or 8-gonal in shape), then the elements in the body (doors, windows, observation deck), and the upper part with blades. After thinking over the work plan and future design, you can begin to implement the idea. Below we offer a description and step-by-step instructions on how to build a decorative mill on your site with your own hands.
Selecting an area for installation
The choice of location is influenced, first of all, by the owner’s plan and the purpose of the structure. If purely decorative use is planned, then the mill is placed based on considerations of picturesqueness and external effect, that is, in an open area that provides a good overview of the structure. If the device is functional, then the choice will be influenced by the level of the site and the absence of large buildings nearby that can cover the blades from wind flows.
In addition, it is necessary to consider the location of utilities, buildings or structures that may be interfered with by the rotating wings of the mill. If they are located opposite the window, the constant flickering in the eyes will create significant inconvenience for the people in the room.
It should also be taken into account that you will need to have a normal approach to the structure, especially if you plan to make it an element of a children's playground. Taking into account all these considerations, the optimal location for the construction of the mill is selected.
Let's start making the upper part of the frame
How to make a mill? To make it easier to navigate, we will divide the manufacture of a wooden mill into 4 parts - upper, middle, base, millstones and blades. Difficulties may arise when making a wooden wheel with your own hands so that it is proportional. The simplest part of the craft is the top part, so let's start with that. It should be mentioned that this mill is not the simplest, but not the most complex either.
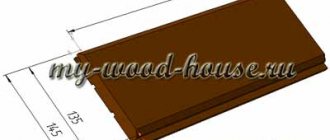
To make the upper part of the windmill, we need 6 wide boards of the same thickness (we choose the length depending on the height of our windmill). Then we give them a trapezoid shape, cutting off the upper corners. Important: the side edges of the boards must also be leveled, processed and made at an angle of about 40 degrees. It is necessary so that, when placing the boards together in a circle, there are no cracks or gaps between them. The procedure can be carried out at the dacha with your own hands using a hacksaw, pencil and ruler.
Next, we fasten the boards with tape from the front side, turn them over to the back side and fill the seams with glue (the most convenient way is with construction “liquid nails” using a special gun). We let the workpiece dry for a day, then we make an upper hexagonal plug from this material - we outline it with a pencil and cut it to size and glue it to the upper (narrower) end.
Model from a car generator
There are several fundamentally important points regarding the assembly of this type of device. To achieve good efficiency of the device, you need to remake the generator and equip it with permanent magnets.
The driving elements should be created taking into account the power of the motor; if the workpieces are very heavy, then the wind generator may jam at low speeds. A large-diameter pipe made of duralumin is ideal for constructing blades; this material is characterized by high durability.
The fastener must be as reliable as possible, this concerns not only the tightening components, but also the racks, their rigidity is adjusted according to the load of the device.
Advice! It is difficult to do without preliminary balancing of the blades; to lighten some parts of the structure, you can use sandpaper or a grinder with a grinding wheel.
Making the middle part
It is necessary to measure a hexagonal blank blank, sized to fit the wide end of the upper part of the structure. We make another similar part and use a jigsaw to cut out a 70x70 mm square hole in one of them. In another part it is necessary to make a round hole in the center of no more than 5 mm.
Now we connect the 2 parts together using boards, as in the upper part. The boards should be in the shape of a square, not a trapezoid. You also need to make the edges with a slight 40-degree cut so that the boards glued to the hexagonal blanks fit snugly against each other. Similarly, we seal the boards with tape, turn them over and seal the joints with glue.
At the same time, you need to glue the blanks to the hex plugs. Simply place 3 boards glued with tape on top of 2 plugs, having previously smeared the joint with glue. Ideally, we clamp the part with clamps. After 24 hours, turn it over to the other side and repeat the procedure with the remaining 3 boards. Now we secure the walls to the plugs using small self-tapping screws.
Important: to prevent the part from splitting, you can drill 2-3 mm holes in the places where the screws are attached with a drill. We insert a 70x70 block into the lower square hole and secure it with a screw through the hole made in advance on the upper part. We connect the completed middle part with the first into one “rocket”, carefully coating the joint, seal it firmly with tape, pressing the parts together.
It will be useful to read about:
Homemade shower for the dacha After pleasant but tiring dacha chores, I really want to wash off all the fatigue of this day under warm streams of water...
A little history
A real windmill is an aerodynamic mechanism that converts wind energy. Due to this energy, it performs mechanical work - grinding grain.
Mentions of wind structures begin in ancient times. Therefore, it can be assumed that for a long time wind and water mills were the only machines used by mankind.
Traditional mill with horizontal rotor
Historians believe that ancient mills were common in Babylon. This is evidenced by the code of King Hammurabi, which dates back to approximately 1750 BC.
Documented evidence of the use of wind machines for grinding grains dates back to the first century AD, and it belongs to the Greek inventor Heron of Alexandria. It is also known that Persian mills existed in the ninth century, as reported by Muslim geographers.
Persian mills differed from the European designs we are accustomed to, with a vertical axis of rotation and perpendicular blades. They had blades on the rotor, and were covered with a shell on one side. Without this shell, the wind pressure on all blades would be the same.
The Chinese mill also had a vertical axis of rotation. They differed from Persian ones in having freely rotating sails, while in Persian mills the sail was rigidly fixed on the axis.
Chinese windmill illustration
Thus, Asia is characterized by designs with a vertical rotor arrangement. But a windmill with a horizontal rotor is common in Europe.
Classical mills are especially widespread in windy lowland regions. In addition, they were built on the Mediterranean coast.
In our country, they were mainly widespread until the beginning of the 20th century, however, already in the 19th century, with the advent of steam engines, their number began to decline. True, these mills have not been completely abandoned to this day.
Well, for us, summer residents, windmills are simply a beautiful element of landscape design, which, moreover, symbolizes prosperity and well-being in the family.
Making the base
Now we move on to more complex units - making the base and top. The base consists of 3 parts:
- The lower one is a wider copy of the middle part. But instead of plugs on the sides, you need to attach a wide board to the bottom with a small square fixed on it to fix the block coming out of the upper structure. All elements must be fastened together with small self-tapping screws.
- The middle part of the base is a wider copy of the very top part. It is important to combine all the dimensions so that the bottom of the base is wider than the top, coincides with the bottom part, and the middle part of the base matches in size with the upper structure of the entire mill. We take 6 boards, glue them with tape, fill the seams with glue. We assemble the structure into a pyramid shape and let it dry for a day.
- The upper part of the base is a copy of the middle part of the entire mill. But there are a couple of differences - there are no plugs and there are cuts at the joints, details below. We glue the part in the same way as the middle part of the mill. We take 6 boards, glue the front part with tape, saturate the seams with glue, and let it dry for a day.
After that, at the top of the part, at the joints of the boards, small grooves are made for small bars (for example, 20x20 or 10x10 mm). In shape, when viewed from above, the grooves should diverge symmetrically to the sides, like the rays of the sun, without distortion in the corners. They are needed to secure the observation deck.
The procedure is done with a jigsaw with a metal blade and a hacksaw for metal, in order to avoid peeling off the glue at the joints of the boards. Then we glue all three elements of the base into one - saturate the joints with glue and place a bucket of water on top.
The undeniable benefits of a wind generator
After viewing numerous photos of a homemade wind generator, individuals interested in the work are faced with the question of how practical a stationary installation will be.
The design can act as an additional and permanent source of electricity.
Thanks to the functioning of the device, it will be possible to operate such devices as:
- Lamps.
- Heating equipment.
- Household appliances.
- Boilers.
Schemes that require the presence of a battery have proven themselves to be excellent; it accumulates a resource if there is no need to supply the building at the moment.
Important! To implement high-quality heating of the entire building area, it is enough to create a structure with a power rating of 4 kW.
Observation deck
A small observation deck is needed to make a full-fledged decorative windmill for the garden with your own hands. We need 30 bars, fixed in the form of a hexagon-web, 5 bars on each side and 5 thick bars corresponding to the size of the cut in the upper part of the base of the mill. Important: the dimensions of the internal hexagon must be no less than the dimensions of the upper part of the base of the mill, otherwise the platform will not be able to be fixed.
For manufacturing, we will need a base with double-sided tape attached to prevent the bars from moving. We lay out the “web”, cutting the bars to size. Each new hexagon will be smaller in size. The most convenient way is to lay out 6 bars at once and cut them at the same time with a hacksaw. Then, at the junction of the hexagons, we glue the main bars that will fit into the grooves; first you need to make 2 holes in each bar along the edges.
The internal holes are used for fastening to the middle part of the mill, and the external ones are for fastening the railings. The latter are attached according to the same principle - small blocks are attached to the main beam, and between them there is a railing. After drying, screw the element to the inverted middle part of the mill. For double and triple viewing platforms, we simply duplicate the upper part of the base, it is only needed for this. Following the example of the observation deck, windows and doors are made in the lower, middle part. We cut out holes with a jigsaw, glue the bars for the windows, glue several bars into one sheet and glue them in the form of a door.
Expert recommendations
Only those individuals who thoroughly understand electrical engineering should undertake independent work, and also adhere to specially designed diagrams.
- The choice of power source is no less important than the purchase of materials for the frame; alternating current generators and asynchronous motors have proven themselves to be excellent.
- When organizing a place for installation, several nuances should be taken into account; the support must fully correspond to the load, especially if the device is located on the roof of a building.
- After performing the manipulations, different masters obtained units weighing from 200 to 800 kg, quite weighty samples.
- On the ground, it is better to fill the platform with concrete so that when there are gusts of wind, the structure will not be torn out; it is attached to a dense and stable base.
Neodymium magnets have high performance indicators; such elements are often used in wind generators; maximum care must be taken when working with them. When thinking about the shape of the finished product, it is better to choose a round or rectangular type of moving part.
Upper part of the mill
Let's move on to the most difficult element - making millstones and blades. First we need to think - how best can we protect our millstones from the weather? There are several options for making a roof:
- In the form of a pyramid from a piece of roofing iron (we lubricate the joints with sealant);
- From pieces of slate (in the form of a small box on top, attached to slats in the form of a cube);
- From an old ball/semicircular object that can be soaked in glue for strength;
- Made from a hollow polystyrene ball or polystyrene foam ball, which is used for packaging household appliances.
Now we need a wooden plate that is sized and shaped to fit the roof. It should be larger than the top of the mill to prevent rain from getting inside. You also need a small piece of wood that will attach to the roof and be glued to the wood plate. This can be a wooden disk, a figured part in the shape of the roof, or simply slats nailed to the bottom of the roof.
Step-by-step instruction
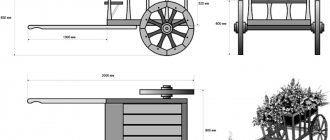
The creation of a mill occurs according to the usual scheme used in the construction of any structures:
- creation of a project (working drawing)
- purchase of materials, selection of tools
- site preparation
- housing and rotor assembly
- installation of mechanical elements (if planned)
- launch, debugging operating modes
Some steps in this list may be unnecessary; sometimes, on the contrary, additional actions may be necessary. The final action plan can only be drawn up after considering the specific structure, its operating conditions, dimensions and other parameters.
Important! In no case should you neglect the creation of a project. It is often at this stage that significant errors or additional factors are discovered that radically change the approach to the work being performed. Making at random can result in a waste of time and materials.
Blades - the main element
What is a mill without a blade? Creating it is a responsible process, since the general appearance of the structure depends on it. Without it, it’s just a trapezoidal house on the site. In your work you can use:
- Wooden slats and plywood. This design will be lightweight and practical. In this case, you need to take moisture-resistant plywood.
- Wooden blocks and dense captivity. A possible, but not the most practical option, since under UV rays the film breaks within 1 season.
Classic thin board blades
The weight and size of the blades are very important; they should not touch the ground and be heavier than the “house” itself. Normal weight is 2-3 kilograms in general. If the mill is larger, then they should not weigh more than 10% of the weight of the structure.
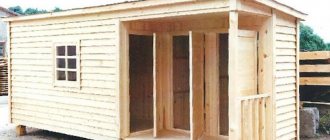
Children's playhouse in the form of a mill
Finishing touches
The mill can be painted
At the final stage, the finished decorative mill is painted with varnish or paint. When the paint layer has dried, you can place the mill in the prepared area of the garden. It should be ensured that there is no direct contact with the ground.
To do this, you can place it on a large flat stone or a prepared concrete platform. You can also attach legs made of durable plastic to the frame of the mill, which are immersed in the ground.
Note!
The inside of the mill is hollow, so air will circulate well, which means that the likelihood of mold and rot will be reduced.
A self-made windmill will look appropriate in any part of the garden. Ideally, there will be a beautiful and trimmed lawn nearby, as well as several perennial plants. The decorative mill looks good at any time of the year: among lush greenery, fallen yellow leaves, and also lightly dusted with snow. But if you want it to serve you for a long time, then it is better to hide it for the winter.
Briefly about the main thing
Elements of small architecture today perform an aesthetic and practical function. A decorative mill can decorate any area; with its help it is easy to disguise the presence of a well, an antiseptic hatch, valves for gas equipment and water supply. Inside a large object you can organize a recreation area, an area for children's games. It is very convenient to place a workshop or storage shed inside the mill for storing tools. Wood or stone is more suitable for its manufacture. The video presents master classes on creating decor from wood and stone.
Final finishing
Like any craft made from wood, a mill should have an attractive appearance and a coating that ensures its durability. For this purpose, all wooden parts without exception are impregnated with an antiseptic, which will protect the wood from rot and pests, thereby guaranteeing a long service life.
The finishing touch will be painting. Any wood paint for exterior work is suitable, the color and shade is at the discretion of the master. A mill made of beautiful wood can simply be coated with several layers of varnish.
Main useful functions
It is extremely important to understand the role of a windmill in a household, because in many individual cases they can come in handy. Thanks to her it is possible to:
- Hide the sewer suite from prying eyes.
- Scare away crows from your garden.
- Create a suitable daily entertainment object for children.
- Give your own yard an extra eye-catching element to the overall design.
It is also worth noting that in the work on arranging a windmill, tools and materials such as a saw, hammer, pliers, screwdriver, nails and dowels will become important. But no less in demand in practice will be a reliable frame for this craft, because without it it will not be possible to recreate a truly worthwhile object.
Cable twist protection
As you know, the wind does not have a constant direction. And if your wind generator rotates around its axis like a weather vane, then without additional protective measures the cable running from the wind generator to other elements of the system will quickly twist and become unusable within a few days. We bring to your attention several ways to protect yourself from such troubles.
Method one: detachable connection
The simplest, but completely impractical method of protection is to install a detachable cable connection. The connector allows you to untangle a twisted cable manually, disconnecting the wind generator from the system.
w00w00 FORUMHOUSE user
I know that some people put something like a plug with a socket at the bottom. The cable got twisted and I unplugged it from the outlet. Then he unscrewed it and stuck the plug back in. And the mast does not need to be lowered, and current collectors are not needed. I read this on a forum on homemade windmills. Judging by the author's words, everything works and the cable does not twist too often.
Method two: using a rigid cable
Some users advise connecting thick, elastic and rigid cables (for example, welding cables) to the generator. The method, at first glance, is unreliable, but has the right to life.
user343 FORUMHOUSE user
I found it on one site: our method of protection is to use a welding cable with a hard rubber coating. The problem of twisted wires in the design of small wind turbines is greatly overestimated, and welding cable #4...#6 has special qualities: hard rubber prevents the cable from twisting and prevents the windmill from turning in the same direction.
Method three: installing slip rings
In our opinion, only installing special slip rings will help to completely protect the cable from twisting. This is exactly the method of protection that user Mikhail 26 implemented in the design of his wind generator.