Having a personal plot, I want to make it more beautiful, improve it. Here the imagination of the owners of the site, as well as knowledge of landscape design, will come in handy
Various flower beds, waterfalls, small lakes, alpine slides, sculptures and decorative compositions would be appropriate on a personal plot.
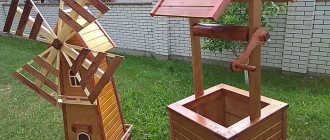
A decorative mill will look very nice on the site. You can get ideas for decorating your garden plot by looking at the photo of a decorative mill in fashionable landscape design magazines.
Advantages of decorative mill
A decorative windmill for a garden on a site will give it a little rustic charm, give it a feeling of peace, and decorate the site itself.
If desired, you can also use it with a small functional load - as an option, hide small communications that are on the site, as well as those details that can spoil the entire appearance of the garden.
For example, these could be some kind of valves, ugly hatches that do not fit into the landscape design of the site.
A DIY decorative mill can be made from various materials. The height of the decoration can vary depending on functional needs - from 30 centimeters to two meters.When choosing a decorative mill, you need to take into account the size and area of the site where it will stand.
If the size of the plot allows, you can design the decorative staircase as a small gazebo, where you will feel comfortable sitting on warm summer evenings.
If the decorative mill on the site is small in size, it can be used to store garden tools. This will be a stylish storage room or shed.
A water mill would look appropriate on the shore of a small lake. A small cascade or decorative waterfall will fit beautifully into such a background.
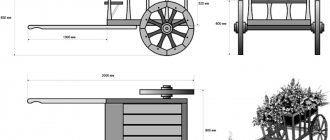
When and how to prune roses in autumn for winter: tips and step-by-step instructionsA decorative cart is a beautiful option for landscape decoration, see options and ideas on how to make a cart with your own hands (photos and videos)
- Creating a rock garden - features of application in landscape design. 145 photos of the most beautiful design elements
Preparing for work. Tools and materials
As a rule, a do-it-yourself mill made of wood is not particularly complex, however, before starting work, it would be useful to make a drawing, a sketch of the future product indicating the main dimensions. This will allow you to evaluate the design of the future structure in advance and help avoid gross mistakes during assembly.
To work you will need a tool. It's worth worrying about in advance. A complete list of everything needed depends on the specific design, but the minimum set will look something like this:
- electric saw or hand saw;
- plane (preferably electric);
- screwdriver;
- Sander;
- sandpaper;
- hammer and nails;
- several brushes of different widths;
- tape measure and pencil.
To assemble the product, you will need wood screws of different sizes. An antiseptic will help protect the wood; in addition, you cannot do without varnish or paint for final finishing.
A lath is suitable as a material for the frame of a future building; for the walls you need thick plywood or wood-based sheet material. A “premium class” designer mill can be created from scraps of clapboard left over from home renovations.
Stone mill
Stone products are known for their durability. A decorative stone mill will last a long time.
Unfortunately, it is difficult to move from place to place, and also not very easy to dismantle. That is why you should take the utmost care in its construction.
So, let's start construction. You will need a project. To do this, decide on the size and appearance of your decorative mill for the garden.To make it easier, you can draw a construction plan in advance. This will make it easier to calculate the necessary materials for construction.
Wind
These designs fit perfectly into absolutely any design. They do not necessarily need to have ponds, artificial ponds or fountains. The wide blades of a windmill look very organic if there is free space around. Do not install it under a tree or in dense thickets of flowers.
Often miniature windmills are placed on lawns surrounded by other garden sculptures - gnomes, deer, animal figurines, etc. Sometimes the owner of the lot combines the utilitarian and decorative roles of the building. He is building a residential outbuilding designed to look like a windmill. The size of such a structure can reach two floors.
Photo of a beautiful decorative mill
Did you like the article? Share

0
Wind turbine assembly
Windmill frame
The shape of the windmill resembles a cross, so the frame should be cross-shaped. To do this, the longest strip is taken as a basis - 91 cm. Then the 45.5 cm strips are screwed in with self-tapping screws. The required shape is obtained. What follows is a step-by-step process.
- At each end of the 4 parts of the frame, 17 cm long strips are attached to form a swastika shape. Now you need to attach a 26 cm strip in parallel to the added strip, and close the resulting rectangle with a piece of 8 cm. We cover the frame with 5 strips 19 cm long in increments of 2 cm, nailing them with small nails. The blades are ready.
- For the axis of rotation in the center of the windmill, we fix two circles of plywood with 4 screws. We drill a through hole in the center with a drill, the diameter of which should completely correspond to the spire. A hole is also drilled in the center at the ends of the mill roof at a height of 9 cm in accordance with the diameter of the bearing. Hammer the bearings. We thread the pin through, put on washers and secure with a lock nut (a simple nut will do). We put 2 nuts on top, then the windmill itself, and the nut again.
Ready windmill
All that remains is to install the roof, which, together with the fixed windmill, is placed on the frame of the mill and secured from the inside with long self-tapping screws.
Note!
To drill a small hole in the roof for the bearing, use a pin drill.
Japanese style
The main components are water, stones and plants. There should be nothing superfluous, because the style is based on elegance and minimalism. In a Japanese garden with a water mill, nothing should distract from the contemplation of the natural elements.
The mill will be complemented by a stone castle and a bench made of the same material. The shore of the reservoir or its bottom can be lined with white pebbles and shell rock, and Japanese maple and low-growing sakura can be planted in the front garden. Plants with bright flowers will break the deliberate severity, but the use of bamboo tubes in the design will come in very handy.
Country
This design option is suitable for those whose entire plot resembles a cozy house in the village. A water mill with a wooden wheel and a thatched roof fits perfectly among the wooden benches, log bridge and well. The most ordinary reeds will highlight the atmosphere.
Russian style
The design in this style has similar features to country, however, it evokes the familiar charm of the Russian village. The mill house should look like a classic wooden hut, assembled from rough timber, and the windows should be closed with carved shutters. A traditional weather vane in the shape of a rooster can be placed on the roof. Details will add atmosphere: a ceramic figurine of a miller, clay pots hanging on a wicker fence, a yellow sunflower peeking around the corner and a bed of daisies. You can look for other design ideas in Russian folk tales.
Rustic garden charm
Once upon a time the mill was a real working giant. Using the energy from the rotating blades, flour was ground, wood was processed and water was pumped. Today, majestic buildings have lost their significance, however, people still have the idea of this element of the landscape as something attractive and majestic.
Below we will talk about a miniature copy of a real mill, which will serve as a decorative decoration for your personal plot. It will create a feeling of style and harmony, and also evoke pleasant associative images of the atmosphere of the last century. The mill will give the site a rustic charm and coziness that a city dweller so lacks.
Varieties:
- wooden;
- stone;
- with a waterfall.
It can also be wind or water.
A standard windmill is shaped like an isosceles trapezoid. Blades are attached to one of the walls, which can rotate if desired. This will make the structure more interesting and authentic. The entire structure can be divided into four elements:
- foundation and foundation;
- frame;
- roof;
- blade wings.
Additionally, you can build a spinner on the roof, which allows the mill to rotate in the wind, however, this is not necessary.
Dutch style
This style arouses a lot of interest among landscape designers, because it so successfully combines bright rich colors and provincial charm. A water mill can be in the center of the composition; for this, the house must be made in the traditional Dutch style of half-timbering, the supporting frame of which is located outside the building. Another characteristic feature is the parterre lawn. Let the mill be surrounded on all sides by tulips, crocuses and hyacinths, and let the hedge curl around it.
Technological process
Before you begin certain actions, you should carefully prepare. And you need to start by developing a drawing of the future decoration and marking the site diagram. Step-by-step instructions include the following stages of work:
- development of a scenery sketch;
- creation of a detailed drawing indicating the size of each part;
- selection of material based on the characteristics of each specific mill;
- directly assembling the composition.
Stone mill
A stone mill is much easier to build than its wooden counterpart, because here you can skip the stage of developing a drawing.
To give the mill stability, it should be placed on a foundation. The optimal depth of the base is 1.5–2 shovels. We place reinforcement in the prepared hole, pour concrete and leave it to dry for several days.
The size of the future structure depends on your preferences. The main thing is that the parameters of the structure correspond to the dimensions of the foundation.
Now we begin to build walls from stones and mortar, trying to maintain the required trapezoidal shape of the structure. Don’t forget to mount a special pin in the upper part of the structure on which we will attach the wings of the windmill.
The propeller can be made from a regular sheet of plywood by cutting a hole in the center the size of a pin. If the size of the plywood allows, the blades and disk can be combined and cut from one sheet. If not, then cut out the windmill wings separately and attach them to a plywood disk. We install the resulting element on the stud and secure it on both sides.
Made of wood
The wooden decorative windmill consists of several modules:
- lightweight foundation design;
- base platform;
- mill body;
- blade wings.
Even for a wooden mill, a simple foundation is necessary - without it, the decoration will simply fall apart. The best option is a metal strip poured into concrete to a shallow depth. Moreover, the decoration mounted in this way cannot be stolen. We make the supporting platform from thick boards to give the structure stability and monumentality. Its size should be slightly wider than the mill body.
The finished platform is laid on a prepared foundation, pre-treated with protective agents to minimize the negative impact of atmospheric phenomena. We assemble the body in the shape of a pyramid from beams of different diameters, fastening it with screws or nails. After this, we assemble a classic gable roof from chipboard or plywood, fastening the elements with slats into a single whole. We fasten the roof to the mill body with self-tapping screws. Now it's time to assemble the blades and attach them to the structure. We fold the wing slats crosswise, make a hole in the center and attach the parts to the front side of the body.
With a waterfall
If you set your sights on building an analogue of a water mill, you will have to additionally assemble a swivel wheel. For this purpose, it is quite possible to use an old bicycle wheel or any object equipped with an axis of rotation. If there is nothing suitable, the wheel can be assembled from moisture-resistant plywood by drilling holes in the center for mounting on a stud.
Otherwise, the process of assembling a mill with a waterfall is no different from building a windmill. We install a water mill on the shore of a decorative pond, supply the composition with a small pump that will supply water from the pond to the mill wheel. The latter will rotate randomly under the influence of water entering the wheel pockets.
Decor options
Just a mill, assembled and installed in the right place in the garden, will look boring and uninteresting. The composition requires additional decoration: equip your mill with carved shutters, place a figurine of a miller inside, or you can light it with LEDs, and then at dusk the mill windows will glow mysteriously.
It is not difficult to build a decorative windmill, and the effect produced in the garden will be stunning. Believe me, the result is worth the effort.
Observation deck
19. Now the painstaking work begins. Prepare a base on which you will temporarily attach the "viewing platform" using double-sided tape. You need to cut 30 blocks to form 5 hexagons. Every six bars should be shorter than the previous ones, as they should form a “web”. You will also need to make 6 bars of complex shape with holes, which are attached with glue to each of the 6 corner joints of the “web”. When the glue has dried, carefully remove the still unfinished structure from the temporary base.
20. Now you need to cut out 6 more simple-shaped bars and attach them with screws to the outer sides of the complex-shaped bars.
21. Using glue, attach a “railing” consisting of three boards to these bars on each side.
22. Turning the structure over, install it on the upper part of the base and secure it with screws, connecting the inner sides of the complex-shaped bars to the base.
Popular articles How to replant crocuses
Step-by-step instruction
House
The water mill house can be made of any shape and from any material or be absent altogether. The construction of the building is standard: platform, base of the house and roof. It is better to erect the building in the same order as in the case of a windmill. First, the platform is assembled or, if necessary, the foundation is laid. It is better not to neglect this stage; an insufficiently fixed structure can be demolished by the flow of water.
We install the base of the house on the finished platform. An 18th century watermill looked like a regular rectangle with a roof, windows and a door. The base can be assembled from timber and trimmed with boards, or made of stone or tiles.
The roof frame is assembled from timber and plywood. The roofing material is laid, after which all the parts of the house are assembled together and fastened with screws and glue.