A metal brazier made by yourself is much more reliable than one bought in a store. In this article we will tell you how to make a barbecue with your own hands using the example of three models: from small kebab makers to a convenient brazier on a transportable stand. And the recommendations of the masters, step-by-step instructions, diagrams, drawings and photos will help in the upcoming work.
Technical features and correct dimensions
Before manufacturing, you need to choose the correct dimensions of the barbecue grill. For detailed instructions on choosing all the characteristics, see the article “Ideal dimensions of a barbecue.”
Briefly:
- The length of the product is determined by the number of eaters. 60 cm is the most versatile length, allowing you to fry up to 10 servings, as well as combine skewers with a grill.
- Width of the roasting pan. The most universal - 30 cm is suitable for most skewers and racks. If you have good skewers, focus on their length. Subtract 8-10 cm to get the width of the roasting pan.
- Depth - no more than 20 - 25 cm.
- The thickness of the steel determines the durability of the structure. Recommended thickness is from 3 - 4 mm.
- The convenient height of the barbecue grill is up to 1 m.
You can make them according to ready-made drawings, which you will find in the article, or adjust them to suit your individual needs.
Even a beginner with basic knowledge of welding and a little ability to cut metal with a grinder can take on making a barbecue with his own hands.
Adviсe
It is best to make ventilation in the lid so that excess steam can escape freely;
Installing a heat diffuser will equalize the temperature throughout the entire space;
It is worth installing a damper for ash, and at the design stage provide a hole in the bottom.
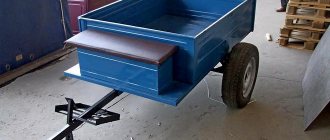
How to make a grill on a stand with a cutting table
The roasting pan, installed on a movable stand with a cutting table, provides almost everything:
- the ability to prepare food, supply dishes, spices;
- conveniently, “at hand”, place accessories by hanging them on hooks;
- store fuel supplies and kitchen utensils;
- transport the kebab maker within the site.
In case of rain, the unused roasting pan can be turned upside down to prevent it from rusting and placed in the same location.
Grill drawing:
The technology for manufacturing the fryer is similar to the previous version:
- We cut out the body blanks from a sheet 4 mm thick.
- We weld the body.
- We weld handles from a 25x25 mm corner with a length of 100 mm.
The drawings schematically show the holes in the grill for air intake and the distance between them, as well as grooves for skewers. Why you don’t have to read them in the article “Ideal dimensions of a barbecue.”
How to make a brazier with your own hands, watch the 11-minute video.
Stand for barbecue: drawings with dimensions.
Making a frame from a 20x20 mm pipe:
- We cut the pipe to the dimensions specified in the drawing specifications, taking into account the angles of connection of the parts.
- We weld the three-dimensional frame frame. In the corners from the inside we strengthen the upper structure, grabbing it with 4 plates. We weld the handle. Install 2 wheels.
- We weld a cutting table from 4 pieces of pipe, and grab 4 plates from the inside at the corners. We weld 2 parts to it for attaching to the stand and hooks.
- We cut out the wooden parts of the tabletop and lower base.
- We assemble the structure:
- install the fryer,
- we install wooden elements.
How to choose a barbecue oven
Most people consider a barbecue grill and a barbecue roaster to be exactly the same in design and operating principle. In most cases, for homemade metal structures this is an absolutely fair statement. Masters do not particularly attach importance to the intricacies of arranging barbecue grills, whereas for true connoisseurs and admirers, all the nuances and secrets of the design of “branded” braziers are extremely important.
How does a barbecue oven differ from a barbecue box?
There are two fundamental differences.
Firstly, despite the similar principle of operation and general structure, the grill and barbecue roaster are slightly different in the operation of the combustion part. Accordingly, the generated heat affects the cooked meat or fish differently, resulting in a different final effect. In a barbecue, food is heated by the combustion products of wood and partly by the heat of hot coals. In a barbecue, the main heating and cooking occurs due to radiation, since the flow of air to the burning surface is much less organized and directed towards the interior.
Secondly, in a barbecue the process of heating the product is much softer, the main part of the heat is spent on heating the metal and coals, and the use of a grate allows cold air to flow around and simultaneously cool the fried surface. What this means for the process of cooking meat can only be explained by a chef who specializes in baking meat and fish dishes. Moisture and fat remain inside the product and are not carried away with a stream of hot gas. For a barbecue, cooking a juicy steak on a metal grill is not particularly difficult; on a barbecue, to obtain a similar result, the product will need to be wrapped in metal foil.
The classic design of a barbecue roaster involves the presence of a metal bowl in which charcoal is lit and smoldered. In older versions of barbecue, instead of coal, ordinary firewood was used, which was piled up in metal containers and burned to the state of coals. As soon as the volume of burning coal filled the metal container to the brim, a metal grate or just a few steel rods was installed, and the cooking process began.
To get a similar effect in the grill, you have to constantly turn the skewers with meat and try very hard not to dry out the baked product, and at the same time thoroughly fry it.
BBQ grill design
The classic barbecue device involves the use of a round bowl made of metal or stone, over which a metal grate is installed; it is better to choose a nickel-plated one, but you can also use a regular one welded from thick steel wire. Modern designs of metal barbecue roasters, as in the photo, have special heating glasses in the bottom of the cauldron.
The air entering through the glass burns part of the coal, after which the combustion products flow through the metal walls and are removed outside. Thus, you can maintain the high temperature of the coals and the container without tedious fanning with a metal fan, as is the case with a barbecue.
There are no small details in a metal barbecue; each design element serves its own purpose. Before choosing plans for a barbecue to build yourself, pay attention to two main features of metal construction:
- In the design of the brazier, the metal grate should have an adjustable installation height, from the highest position at the cut level of the cauldron to the lowest position - 4-5 cm below the edge of the container;
- Barbecue experts and connoisseurs advise equipping the roasting pan with a removable protective side that covers the leeward part of the fireplace, which avoids splashes of fat, smoke and coals on your hands and clothes;
- A hot barbecue roaster should be, first and foremost, safe, so the heavier and more stable the container with hot coals, the less chance of getting burns.
For your information! To avoid burns, the side surfaces of rectangular barbecues are often lined with metal screens.
In exclusive versions, the furnace structure is installed on a steel or ceramic base fixed to the ground. For mobile and portable structures, the supporting legs of the furnace are fixed to the ground using special metal pegs.
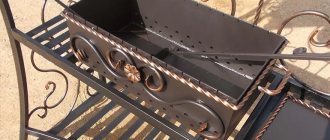
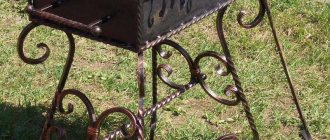
Beautiful barbecues with forged elements
Forged elements give the product originality, lightness and individual style. Even a simple cover or curled handle on a brazier makes it different from other kebab makers.
Forged elements are not only decorative, but also add strength to the structure. For advice from a master on how to properly weld a barbecue using ready-made forged elements, watch this dynamic 7-minute video:
How to make a barbecue without welding with your own hands, read the article “Dismountable barbecue”.
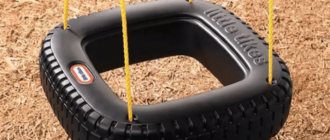
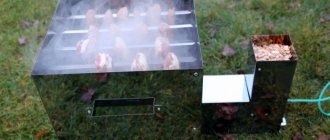
Grill, aka a rocket
This type of grill is a variation on the rocket oven theme. This technology allows the combustion of biofuels. Branches, wood chips, etc. are excellent fuel.
A variation of the grill will allow you to burn off accumulated dry debris and at the same time prepare a delicious lunch.
The model is suitable for boiling water or stewing, it will not be bad for baking.
It is called a rocket for its characteristic crackling sound, simulating the take-off of a rocket.
What you need: to accomplish your plan, you must have access to welding.
Rules for using a homemade device
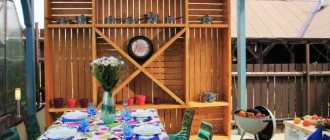
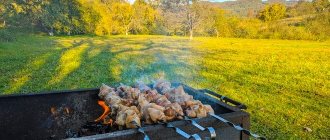
If you have figured out how to make a barbecue with your own hands from metal, study the instructions for use. A smokehouse stove or grill is placed in the yard in a place to relax. The furniture is installed in such a way that the grill can be approached from different sides. Then it’s easier to cook together and follow safety precautions.
Important! Metal barbecues heat up quickly; if used incorrectly, it is easy to get burned.
Also, the grill area should not be placed under low tree branches, near flammable substances, or dry grass. The stove should not come into contact with the fence or wall of the house, as this may cause a fire. Portable barbecues are placed in such a way that smoke and ash particles do not fall onto the roof or neighbor's yard.
A DIY garden grill made from high-quality materials will delight its owners for a long time. And relaxing in nature with delicious dishes will definitely be remembered.
Making a stationary fryer
It is most convenient to consider the main stages of work using the example of making a simple stationary barbecue. There are two of them: drawing up a drawing and designing a furnace. Additionally, you can consider decorating (painting) the structure and creating additional elements. How to make a metal grill with your own hands?
You need to prepare:
- sheets of metal 3 mm thick - stainless steel, black or heat-resistant steel are suitable;
- corners with a width of about 30 mm or fittings with a diameter of 10 mm;
- grinder;
- drill;
- welding machine.
Design
When creating a homemade metal barbecue with your own hands, you can select any size, depending on the operating characteristics of the stove. The main criterion for selecting dimensions is the amount of meat fried at one time. The optimal dimensions of the barbecue are as follows.
- Width - 30 cm. This corresponds to the length of a standard skewer, on which 8 pieces of meat are placed.
- The length can be any. Selected at the rate of 10 cm per skewer.
- Depth - 20 cm. This space will be enough for the coals to warm the meat without burning it.
- The overall height is adjusted to the height of the person. It is better not to bend your back during cooking. Usually the height is made from 80 to 120 cm.
Having decided on the size issue, you need to determine what to paint the grill with. The paint will protect the metal from corrosion, but it itself must be resistant to atmospheric influences and high temperatures. It should not release toxins when heated. Acrylic heat-resistant paint or silicate varnishes are suitable.
Construction of a roasting pan
The choice of 3 mm thickness is due to the fact that thinner metal will quickly burn out, and thicker metal is a waste of money. The work of creating a box is simple - you need to cut out the walls and bottom in accordance with the drawing, cut air holes in them and carefully weld the elements together.
Thus, the work is carried out as follows.
- Parts are marked on the blanks and cut out with a grinder.
- The optimal place for air ducts is the side walls. They are drilled at a distance of 20 mm from the bottom edge in increments of 50 mm. The diameter of the holes is 10–15 mm.
- Grooves for skewers are cut along the upper edge of the side walls. The first is done at a distance of 5 cm from the end, then every 10 cm.
- The walls and bottom are welded to each other. There is no need to make a perfect seam - spot welding is enough; additional cracks will only add heat to the coals. That is why it is not necessary to be a professional welder.
- Legs are welded to the corners of the grill.
At this point the main structure is ready. Next, you can weld handles to the ends, make a lid, weld fasteners for skewers and pokers, etc. A brazier made of metal can also be painted: before doing this, you need to remove old rust and prime the surface.
Grill hood
We should also consider equipping the barbecue with a hood. It is a cut-down pipe through which smoke is effectively removed, which under normal conditions prevents the meat from being cooked calmly. The hood is usually a metal dome that is either welded to the main structure or suspended from above if the stove is located under a roof.
To manufacture this device, the same sheets of metal are used, which are welded in the shape of a truncated pyramid, on top of which a short pipe is placed. The area of the base of the hood should be slightly larger than the area of the grill.
The steel hood is easy to clean and simple to manufacture. To prevent it from deteriorating over time, it should be painted with heat-resistant paint.
Required Tools
To create a metal grill you need to take
- welding unit (if a person does not know how to use such equipment, the elements are fastened with bolts);
- drill;
- grinder, jigsaw;
- fasteners, screwdriver;
- corners and loops;
- tape measure, square;
- metal barrel or container.
You can also take a mask, goggles and gloves for protection.