To expand the usable area of the home, an additional extension is being built to the brick house. You can build the structure yourself by carefully studying the instructions, diagrams and drawings. If you are not sure that the structure will be reliable, it is recommended to hire a team of builders. When the extension is ready, it needs to be additionally insulated in order to preserve the thermal insulation of the house.
Projects and documents
Before constructing a brick extension, it is necessary to legalize the additional premises. To do this, an application is submitted to the architectural department with a request to make the necessary construction projects. If the structure does not pose a threat and does not interfere with neighbors, permission is given, based on which construction can begin. If the brick extension to the house is already ready, its design will follow different rules. First, they contact the design organization, where they prepare a technical report for the redevelopment. Afterwards, a fine must be paid to the architectural control for unauthorized construction. Next, a special commission is created that will study the projects and draw up a conclusion on the readiness of the extension for operation. The entire package of documents is submitted to the BTI, where permission or refusal to register the extension is given.
The foundation is the basis in every sense
No matter what kind of extension construction you start, you cannot do without a foundation. Since the extension is a structurally independent structure, it is also advisable to carry out its construction in two steps to make the foundation, and after a year, when it has settled down and shrinks, continue the construction of everything else. This will help to avoid deformation changes in the structure and, therefore, prevent the occurrence of cracks and other defects.
The foundation is always built taking into account the terrain, soil, and the weight of the house and extension. It may be U-shaped adjacent to the house, or it may not be connected to it at all (this also happens when they decide to build a fourth wall in an extension).
As for a wooden house, the foundation of the extension requires special attention. Depending on the choice of material for the extension and on the method of docking it to the house, the foundation base can either be tied to the house with reinforcement, or separated from it by expansion joints - so that parts of the house different in materials sit independently and do not lead the corners of the house along with them.
Preparation
Before building a structure adjacent to the house, you need to decide on the dimensions, choose where the entrance and window will be located. At the preparatory stage for the extension, you need to level the site well. After this, markings are installed around the perimeter, which will serve as a guide for laying the foundation.
Materials purchased for the construction of the extension:
- bricks;
- cement, sand, crushed stone;
- reinforcing mesh and rods;
- wooden lintels for roofing;
- heat insulator;
- roofing materials.
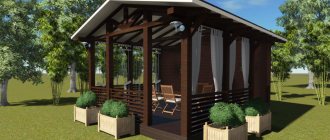
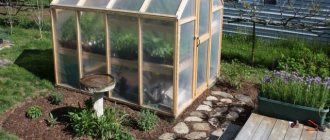
A frame extension to a brick house made of timber is quickly being erected. Such a structure is assembled according to the principle of a constructor, consisting of a wooden frame and assembled panels. Immediately after assembling the log structure, you can begin finishing the room from the inside.
Preparatory work
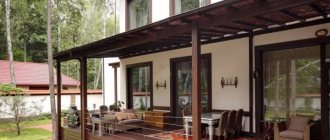
Designing a house building begins with determining its size and location. Usually the veranda is adjacent to the front door of the house, thereby being to some extent its continuation. However, the extension can also be erected against a blank wall, acting as an independent separate building.
In order not to bother yourself with calculations, you can rely on already known data - for a small family, the area of the property is approximately 12 square meters. m. Everything else depends on the configuration of the house itself and the imagination of its owner.
Before marking begins, the land plot is prepared - cleared of grass and possible debris; it is recommended to remove a small layer of soil over the entire area. The area for the foundation, which can be strip or columnar, is marked; pegs are driven into the corners of the building under construction, and a construction cord is pulled between them.
Pouring the foundation for an extension to a brick house
To ensure that the extension to a country house or residential building is reliable and strong, it is recommended to form a strip foundation. The sequence of work is as follows:
- A ditch is dug along the marked perimeter, the depth of which is equal to the size of the foundation of the main building.
- A layer of sand and crushed stone is poured into the bottom of the ditch and everything is compacted well.
- A waterproofing film is laid on top of the sand-crushed stone layer, which should cover not only the inside of the base, but also the above-ground formwork structure.
- A reinforcing mesh is laid on the waterproofing material to give the base strength.
- The entire structure is filled with thick concrete mortar. After hardening, another layer is formed to the remaining height of the base.
- To decorate the base, a wooden formwork is installed, which is filled to the top with concrete mortar. After this, it is given time to dry.
- When the concrete dries, additional external waterproofing of the base is carried out.
The strip foundation is formed from brick or stone blocks. To properly secure the space inside such a base, it is recommended to make a concrete screed or build a flooring from floor beams with joists for arranging a wooden floor. Options are selected individually, taking into account the taste preferences of the owners.
Materials
This is an equally important aspect, in which making the right choice is not so easy. What influences this is, first of all, the financial situation and appearance of the planned project. It would be a good idea to seek help from an architect; a specialist will select the right combination of materials, both aesthetically and financially.
timber
A simple and easy-to-produce option that is also suitable for any building; the purpose does not matter. Moreover, it does not cause any harm to the environment.
The cost is also pleasing and fits perfectly into any budget, but what can we say about the types? The main ones are glued, planed and rounded. In terms of technical characteristics, the best one is glued, but aesthetically it is inferior to rounded.
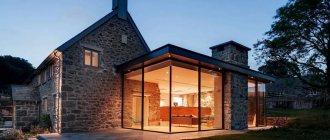
Brick
This material is quite ambiguous. On the one hand, when you buy it, you get a really long service life and durability.
On the other hand, you are guaranteed high construction costs, because Its installation by good builders is always very expensive; it is not so easy to install it yourself.
Connecting to the main building and constructing a good foundation (without which the building simply will not withstand the weight of the brick) will cause many difficulties.
Foam blocks or aerated concrete blocks
This option will significantly reduce the requirements for the foundation due to its lightness. In addition, the construction process itself will not be difficult or long. It performs very well in maintaining heat and is affordable.
But it’s worth considering that with all these advantages there is still a drawback - you can’t go anywhere without cladding, because... it is very fragile in the face of natural conditions (precipitation, etc.) and is easily destroyed under their influence.
We build walls
From laminated veneer lumber
If you are planning a timber extension to a brick house, before installing the frame, log crown beams are pre-installed. Next, the beams are connected to the beams. It is better to assemble the entire structure in a horizontal position, and when everything is ready, install it vertically. Afterwards it is necessary to join the load-bearing wall of the house with a wooden frame. To do this, a vertical line is drawn along the brick wall, according to the level, to which the finished frame element will be attached. To give the log house strength, it is recommended to connect all the bars with a metal corner. Then the frame is sheathed with boards, and a horizontal beam is installed at the top, which can be connected to the main wall with iron corners. The insulation is installed on the walls of the attached structure after the installation of the ceiling.
How to connect a brick extension?
It takes longer and more difficult to build a brick extension to a wooden house. Before laying, a rope is stretched around the perimeter of the future wall, which will serve as a guide to control the horizontalness of the wall. The vertical is checked using a plumb line. If the extension is used for a kitchen or as a residential building, the brick walls are laid in one or two bricks, which will make the room warm. The joining of a brick extension to a wooden base is carried out in the following way:
- The wooden wall is drilled through vertically.
- Rebar with a transverse end is installed in the holes every 2-3 rows, which will hold the extension.
When the brick extension is completely laid out, its top is filled with a concrete belt for a reliable connection. To do this, formwork is formed, which is additionally reinforced, and then poured. When the poured solution has set, the formwork is dismantled, after which they begin to arrange the roof. It is much easier to build an extension using gas silicate blocks with your own hands. The connection of the structure to the base is carried out using a rigid reinforced connection or an expansion joint, which is considered a more economical and simpler option.
Completion of work
Upon completion of the main work, the structure is inspected for the presence of possible unfilled spaces between the roof and walls, which are additionally sealed with mineral wool and mortar.
A so-called blind area is built around the house - a concrete platform around the entire perimeter of the house, 50-70 cm wide and 20-30 cm deep. The blind area is designed to reliably protect the wall material of the building from getting wet and destroyed, taking on and draining into the ground all moisture coming from the roof .
To construct a blind area, remove a layer of soil 10-20 cm to the specified width along the entire perimeter of the veranda, install wooden formwork 7-10 cm high along the outer edge of the prepared area with a slight slope from the wall.
To prevent the concrete platform from peeling off from the extension, it is recommended to “link” it to the main structure with a single-layer reinforcement frame. To do this, holes are drilled from the bottom of the building according to the size of the reinforcement in increments of 20-25 cm, into which metal rods of a given length are driven. The finished structure is poured with concrete mortar and allowed to “settle” for 3-5 days.
You can ask your question to our author:
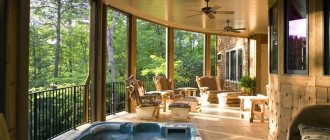
Ceiling and roof
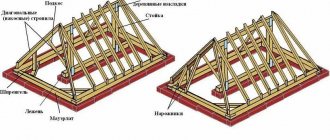
When the walls are completely ready, they begin the final stage of construction - the arrangement of the ceiling, for which it is necessary to purchase beams. The distance between wooden beams should not exceed 70 cm; special corners are used for fastening. If the beams are mounted on a brick building, for reliability it is recommended to embed them in a concrete belt. Before this, it is important to protect the tree from moisture with roofing felt, carefully wrapping the edges with it. When the bars are securely fastened, the covering is then decorated with boards or plywood sheets on which the insulation is attached.
Then the roof itself is installed. For extensions, the best option would be a lean-to structure. It is recommended to use beautiful metal profile sheets and bitumen shingles as roofing materials. A simpler option is regular slate, roofing iron. Before installing the covering material, it is recommended to lay a waterproofing layer of a special film. If the room is residential, it is worth additionally insulating the roof for thermal insulation. After arranging the roof and ceiling, they begin to decorate the room from the inside.