Paved paths are gaining popularity among summer residents. This is not surprising, because the material is durable, does not wear out, and is suitable for regions with different climatic conditions. The installation technology does not cause any difficulties, so it can be done by owners without any knowledge of construction. You just need to follow the recommendations of the masters.
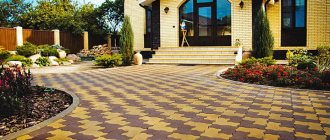
Garden paths made of tiles will add uniqueness, practicality and neatness to the landscape of your yard.
Required tools and materials
When the issue of the location of the future path has been resolved, it is worth preparing the necessary materials and tools.
Photo: checking the horizon using a level
These should include:
- wooden pegs and rope (for marking);
- rubber mallet (mallet);
- rake;
- watering hose with sprayer;
- Master OK;
- shovel;
- building level;
- roulette;
- grinder and diamond-coated disk (for cutting tiles);
- manual rammer;
Photo: manual tamping - sand;
- crushed stone;
- geotextiles (for moving soils);
- cement grade no less than M400–500.
In addition, it is important to ensure the possibility of unhindered connection to electricity and water supply. It is better to work in rubberized pants or knee pads and mittens.
You need to remember that tiles are sold by square meters, and borders are sold individually. To calculate the number of the latter yourself, you need to multiply the length of the path by two and divide by the length of one curb.
And knowing the approximate price of the coating, you can calculate the average construction costs. So, it is worth adding another 20% to the amount of expenses for tiles, taking into account possible damage and trimming of products.
What to look for when purchasing
How to choose paving slabs for the yard so that it pleases the owners not only with aesthetics, but also with practicality, wear resistance and long service life? To do this, attention is paid to the following points:
- material . It can be: concrete, clinker, natural stone, various polymers. If we are talking about arranging the area around the pool, preference is given to rubber;
- water resistance indicator. Since the main purpose of the covering in the yard is to create favorable conditions for movement around the garden, the tiles should cope well with increased moisture. If it absorbs water, then there will be constant puddles and dirt on the site. To prevent this, experts recommend giving preference to material made using the vibrocompression method;
- form . Beginners in this area should choose large tiles of simple shapes. Otherwise, he simply won’t be able to handle styling it. If you have some experience with laying paving slabs, you can safely choose complex forms of material for laying out original ornaments and patterns;
- color. Too colorful and bright colors usually indicate low quality products. Since a large amount of pigment is added to such material, which makes concrete less durable.
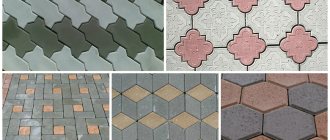
Laying options
There are many interesting options for laying tile in your yard. If we are talking about professional masonry, then masters of their craft use the following diagrams:
- scales;
- rhombus;
- California;
- turtle;
- checkers;
- Old city;
- eight.
Beginners are recommended to use simpler patterns:
- wave;
- brick;
- clover.
Attention : when laying tiles with unusual patterns, material consumption increases significantly (due to the generation of waste).
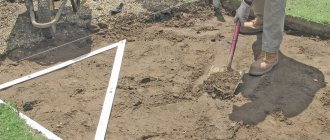
Preparatory work
Schematic arrangement of layers
At this stage, the procedure is as follows:
- Along the edges of the future garden path, pegs are driven from paving slabs, to which a rope is attached at a height of 7 cm, and then a rope is pulled.
- The area is cleared of vegetation, tree roots, and stones.
- The territory is leveled, so soil from the hills is removed and poured into holes, if any.
- The surface is smoothed with a rake and compacted.
- The height of the base is calculated taking into account 2–3 cm of shrinkage. To create a sand cushion and lay tiles, 30 cm is enough.
- It is recommended to lay geotextile flooring to prevent the formation of excess moisture and the growth of weeds.
- A layer of crushed stone or sand is poured. It serves as a drainage system for the path.
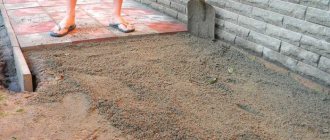
- The sand is evenly distributed over the area with a rake. Moisturizes well with water.
- After a few hours, the pillow is given a smooth shape so that you can begin laying.
Photo: checking the horizontal plane of compacted sand
If you need to arrange communications, then this should be done precisely at the stage of preparing the foundation.
For pedestrian paths, a sand cushion 10 cm high will be sufficient; for the roadway, the layer increases to 20 cm.
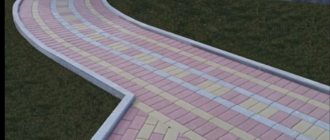
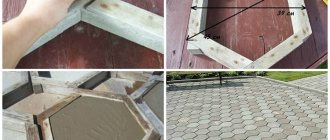
Reinforcing the edges of the path with curbs
Masters advise not to forget that the base is created approximately 25 cm wider than the future area of the masonry. After all, curbs are also installed on the sides - elements that protect the coating from deformation and spreading.
Installation of parts of a heavy structure is carried out before laying the tiles, deepening them into the ground, and of light ones - after completion, securing them with crushed stones on both sides.
Photo: installation of curbs completed
Borders should only be placed on a level base. For structural reliability, it is better to do this on top of M100 liquid concrete mortar. It can be level with the tiles or slightly higher.
Builders advise taking shrinkage into account, so the pavement must be laid at least 5 mm above the curb.
Is it necessary to make an incline?
Yes, this is a mandatory measure so that water can flow away from buildings and not towards them. Depending on the location of the path, the slope is made:
- longitudinal;
- transverse;
- longitudinal-transverse.
It is considered optimal to install a covering with a slope of 5 mm for each meter of sidewalk.
Why are garden paths needed?
If equipped paths are not laid on the site, then problems arise related to the characteristics of the soil:
- In rainy weather, walking along the paths is unsafe - the trampled ground with high humidity is very slippery, in such a situation it is difficult to avoid falling.
- Dirt sticks to shoes, which is then carried into the house. There is already a lot of labor-intensive work on the site, and frequent cleaning of the premises adds unnecessary hassle.
- Driving a garden cart along an uneven path is problematic, especially if you need to move a heavy load.
- Wet grass touches clothes, so you often have to change wet clothes for dry ones.
- Baby strollers and bicycles for children have difficulty overcoming bumps and holes in the ground surface.
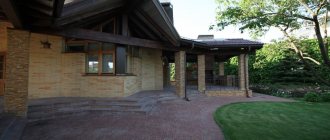
In addition to practical benefits, beautifully designed garden paths effectively decorate the landscape and create a harmonious space.
Step-by-step description of DIY installation
Although creating paths from paving stones and other types of paving should not cause difficulties, let’s take a closer look at the main stages of construction.
Trimming
To do this, you will need a grinder with a diamond-coated disc. You should put on safety glasses and a mask in advance to prevent dust from getting into your eyes and lungs.
Trimming is necessary for maximum tight joining of elements. It must be accurate, otherwise you will end up with a large number of broken or broken tiles. The optimal incision size is in the middle.
To avoid wasting material, you should first mark the width of the path and approximately apply one row. With the formation of decorative patterns, everything is more complicated: their placement is marked with dots on the sand.
Installation of paving slabs depending on the type of base
The material can be laid on sand or cement-sand concrete mortar.
Let's take a closer look at both options.
On the sand
The easiest way. The distance between stretched ropes or already installed curbs is filled with a sand cushion to a height of 6 cm and moistened generously. When it dries a little, it is leveled with a rake and then compacted. The tiles are laid on wet sand. The cord is pulled tight. The first row should be created strictly according to its level. You need to walk in the direction away from the curb.
Photo: to avoid splitting the tiles, use a rubber mallet
To ensure that the width of the seams between the plates is the same, it is worth using special crosses.
For cement-sand mixture, concrete
The procedure is as follows:
- A dry mixture of sand and cement is prepared in a ratio of 3:1.
- Spread in an even layer on the base.
- If the site is on moving soil, it is recommended to add concrete.
- After moistening the mixture, you can begin laying.
If the tiles are not laid level, they need to be removed, sand added underneath or the excess removed. Compact each element with a mallet.
It is not recommended to install the coating on clean concrete mortar. It does not allow water to pass through, and with temperature changes, the path will begin to deform.
Styling design
Every owner wants to furnish his dacha or cottage complex in an original way. Creating garden paths with patterns is one of the elements of a unique landscape design. But this is painstaking work that requires knowledge of the intricacies of masonry, experience and patience.
Therefore, if you have the financial means, it is better to enlist the help of specialists. They will be able to create a neat turnkey coating.
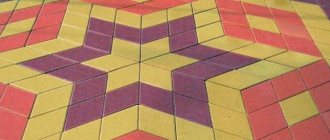
Various installation schemes
If you decide to decorate the path with patterns yourself, then the photo above shows the most popular design options. A simplified method is straight-line masonry. It is better to install elements diagonally, this will make it easier to maintain an even horizontal line.
When laying in a circular pattern, you should purchase paving stones of the appropriate shape, and start work from the center of the pattern.
When creating mosaics from curved parts, you should stock up on sand. Since the distance between the elements will be much greater than with conventional masonry.
Grouting joints
At the next stage, you need to start filling the seams between the parts of the tile covering. A small layer of sand or a cement-sand mixture (depending on the type of base) is poured on top and distributed with a brush into the gaps between the elements. The path is moistened with water from a watering hose.
Photo: the process of grouting paving stones
Strengthening the path
To extend the life of the alley, it is recommended to compact the tiles after filling the joints. This can be done by walking over it with a vibrating plate weighing up to 100 kg. This measure will finally eliminate the discrepancies in height.
If you see that even a small part of the sand has fallen through, you should add the required amount into the gaps.
Arrangement of steps
It is recommended to build steps in the area of the yard where the slope exceeds 20 degrees.
This part of the path or porch is quite difficult to construct due to the work on a hill and the need to install retaining walls. The main thing here is the convenience and safety of walking.
Suitable materials:
- paving stones;
- slabs;
- concrete mortar covered with tiles.
But it is much easier to buy ready-made stepped elements, which are laid according to the same principle as paving stones. Do not forget about creating a reliable layer of waterproofing so that in severe frosts the coating does not begin to deform. The decoration of the sloped area will be lanterns installed on the sides.
Historical reference
Roads have been paved with natural stone since the “beginning of time” - they were simply laid unprocessed, in large pieces. Later they began to give it the shape of a flat cube and the first granite paving stones appeared. For centuries, there was no alternative to this material, until the industrial boom of the last century began to dictate its conditions. The preparation of stone and small-format paving itself have ceased to “keep pace” with rapidly growing cities. And in our country, granite has been replaced everywhere by asphalting not only roads, but also pavements and walking alleys. However, asphalt also had enough disadvantages, and over time it became clear that paving stones had been written off early. A compromise between asphalt and stone paving stones has become concrete paving slabs, also known as concrete paving slabs or concrete paving stones.
Recommendations for caring for the coating
They are quite simple:
- The path must be swept regularly and promptly cleared of debris and sand.
- In case of serious contamination, oil stains, wash with water from a hose.
- Remove snow with shovels made of any material other than metal - it spoils the integrity of the coating. You should not sprinkle salt on an icy tile; it destroys the product and forms a coating on it.
- Swelling areas of the path can be easily repaired. Therefore, it is easy to remove individual tiles, level the base and put them in place.
- To protect against moisture, you can purchase a water repellent solution.
It is worth considering that a pavement made by vibration compaction will last 100 years or more. But vibration-cast products wear out much faster and last much less.
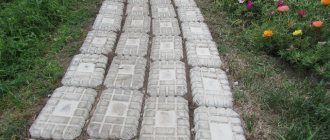
Photo: multi-colored paving stones
Choosing a color for paving slabs
As for the color spectrum, it is unlimited, which allows the homeowner to choose the optimal solution. At the same time, color can serve as an indicator of the strength of the material; for example, a concrete mixture that is too bright will turn out to be fragile and unreliable. When choosing paving slabs, it is best to give preference to natural shades that imitate marble, granite and other natural stones. To create a unique landscape design, you can use more daring solutions, for example, green, red or yellow surfaces. Designers recommend combining several shades to create bright and contrasting combinations.
The best manufacturers
Let's take a closer look at 5 well-known manufacturers in the CIS countries that have proven themselves with high-quality products and affordable prices.
"Siyan"
Russian paving slab factory. Each view is fully painted over. Therefore, when worn out, the products do not lose the integrity of the color coating. SIYAN produces tiles of various shapes and thicknesses. It is suitable for laying garden paths, driveways, and highways. Prices are available. The products are durable and reliable.
"Unigran"
A Ukrainian manufacturer that has its own raw material base, from which it produces wall blocks, tiles, and borders. All products are certified by the ISO 9001:2015 quality control system.
Paving, ceramic coating is created using vibrocompression technology. The company offers more than 30 types of goods. All tiles are frost-resistant, with a service life of 50 years.
"Stellard"
The company and production are located in Russia. The products are manufactured using the method of semi-dry vibrocompression. German equipment is used to create tiles. The plant carries out individual orders for the production of tiles of various shapes and colors. The work of the workshops is automated.
Stellard products are a worthy replacement for old road or garden surfaces.
"White Hills"
A Russian enterprise that has been specializing in the production of facing bricks, stone, tiles, paving slabs and related decorative elements for more than 10 years. With a wide selection of textures, shapes, colors. The paving stones they produce are very popular, imitating natural stone such as gabbro and diabase.
"Steingot"
A relatively young Russian enterprise. It was founded in 2015. Engaged in the production of paving slabs and facing materials. The workshops are equipped with modern German equipment. The production process is automated. The main consumer market is Moscow and surrounding regions.
Whatever manufacturer you choose, a garden covering decorated with paving slabs will be a profitable, convenient, and most importantly, durable option for arranging a summer cottage. Construction is easy to do yourself. And if you want to post entire drawings, you can invite specialists to help you who will bring your ideas to life.
Types of paving slabs
As mentioned earlier, paving slabs have different shapes, sizes and thicknesses, in addition, various building materials can be used for their production. As for the latter, the tile can be:
- With rubber crumbs.
- Made from natural stone.
- Concrete.
- Plastic.
- Polymer sand.
- Clinker.
- Luminous (equipped with LEDs).