how to make a feeder out of plywood
In winter, when natural food for birds becomes inaccessible, it’s time to feed our feathered friends. to make a bird feeder with your own hands from plywood ; it will be a house with a roof, an open platform or a bunker with automatic feeding. For birds, the main thing is safety and the availability of food. Therefore, whether your feeder is simple or complex is not so important.
In this regard bird feeders made of plywood are a good choice. They may be less durable than wooden bird feeders, but plywood is much easier to work with. No complicated tools or any woodworking equipment needed. Of course, if you want to do something original and attractive, that’s up to you; this article presents such options.
Plywood bird feeder drawing
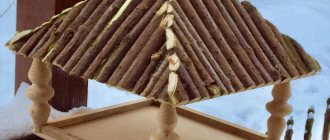
Here is a version of an open bird feeder made of plywood on a platform. The idea is simple, make a decorative feed box and then install it on a sheet of thick plywood. Birds won't mind leftover building materials, so you can use what's left over from the renovation.
Both in terms of the amount of time spent and cost, this is a very profitable project. You can even install plastic windows on the box, it will be more convenient.
To fill this cleverly designed bird feeder , rotate the threaded rod that serves as the hook so that it is aligned with the groove in the roof. Then simply raise the roof and add bird food.
It will be necessary to cut out such parts
- A Base. Plywood sheet 40 × 40 cm, thickness 2 cm
- B Wall 4 pcs. 2x2x18 cm
- C Side 4 pcs. 0.8 × 15 × 18 cm
- D Side 2 pcs. 2 × 4 × 44 cm "
- E Side 2 pcs. 2 × 4 × 40 cm "
- F Roof panel 2 pcs. 0.8 × 18 × 50 cm
- D Spacer 2.5 × 50 cm
Tools: circular saw, drill, belt sander.
Materials: 6mm threaded rod with matching nut and washer, hot glue, nails.
Photo source web.archive.org/web/20071228124735/www.blackanddecker.com/ProjectCenter/ProjectDetail.aspx?DOC_ID=p_2_99_23589_23593.html
The main mistakes when making feeders
When doing needlework, you need to take maximum care of the safety of the birds; to do this, you should not make the following mistakes:
- sharp edges, left unprotected cuts of plastic bottles or cans can harm the birds' feet after freezing, so they should be handled carefully;
- decorating feeders in the form of birds of prey and cats will only scare away small birds and all the work will be in vain, so it is better to use the most neutral ideas;
- large openings in feeders will attract pigeons and even crows, while titmouses and sparrows, bullfinches and other birds will not get food, so it is better to make the openings small;
- large and low-lying feeders will become a springboard for hunting by yard animals, cats and dogs; it is best to ensure the safety of the birds' food by hanging the feeders high.
Having taken all safety measures, you can provide the birds in your yard with tasty and healthy treats by making feeders together with your children.
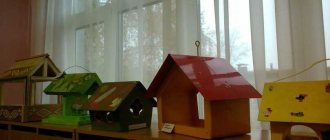
Simple feeder - gazebo
This model can be used as a universal one; it is suitable for any birds, which is why it can most often be found in sales departments of gardening products. In addition, a plywood feeder has the advantage of a more expressive design, so it will easily fit into the interior of a gazebo or covered terrace.
Feeder assembly diagram:
- We cut out a rectangular bottom from plywood 8 mm thick, the dimensions can be arbitrary, for example, 250x300 mm;
- From a wooden strip with a cross section of 40x10 mm we cut out blanks for the sides, two pieces of 290 mm and 240 mm each. We attach the sides to the plywood bottom using self-tapping screws;
- We cut out four vertical supports from 20x20 mm bars, and also attach them to the plywood bottom with self-tapping screws;
- Next, we cut out two blanks from 10 mm plywood in the form of right triangles with the largest leg of 250 mm and a side of 170 mm. These are the roof gables, we attach them to the racks with self-tapping screws;
- The last pair of parts are the roof slopes; we cut them out of plywood in the form of two rectangles 300x180 mm.
All that remains is to lay the slopes on the gables and fix them with polyurethane glue. The ridge strip line is usually sealed with tape or thick plastic film. Feeders of this type can be installed on a vertical support or suspended on branches. Sometimes experts recommend covering some of the openings with mosquito netting to avoid attacks from yard predators.
Rules for making crafts for birds
Before implementing an original creation project in your home workshop, you must study all the recommendations.
Such a balanced approach will allow us to produce a practical and reliable, aesthetically designed structure that will attract birds for many winters.
Whatever idea is implemented, there are a number of simple and relevant rules that should be followed when developing and designing:
- taking into account structural features, the base being processed or its side walls must contain a hole for birds so that they can get inside;
- It is recommended to equip the top part of any container or tray with a lid; without it, the food will quickly get wet and spoil;
- It is best to decorate horizontal jumpers with a soft finish so that sharp cuts do not damage the paws and skin;
- It’s easy to choose neutral solutions for decoration, because even a beautiful figurine in the form of an owl or a cat will scare away the birds, because these are their natural enemies;
- It is imperative to include a suspension element in the project, otherwise it will be difficult to attach such a feeder to a tree branch;
- everything that is used for manufacturing or decoration must be moisture-resistant and wear-resistant, easy to process.
Products can be placed on balconies and loggias, hung on bushes or trees, installed on poles and supports.
You should first think through the location and hang them as high as possible so that predators cannot get close to the birds that are feasting on the treat.
Another important requirement remains open access to replenishment, because feed supplies will gradually deplete and need to be replenished regularly.
Stationary feeder
Most "dining rooms" suspended from tree branches have one common drawback. To replenish food supplies, you have to use a ladder. Yes, and loading the tray by weight with one hand, holding the box with the other, standing on a stepladder, is not very convenient and unsafe.
Therefore, many summer residents prefer to place feeders on a vertical support. The birds don't care, and it makes cleaning and maintaining the litter box much easier for owners. The body of this design is made more rigid, with an additional plate and a metal cup for the pipe.
The assembly procedure for the stationary model is as follows:
- We transfer the contours of two side walls 250x230 mm onto a sheet of plywood with a thickness of at least 10 mm. Thanks to the pentagonal shape, roof slopes can be attached directly to the end surface of the workpieces;
- Using a jigsaw, we cut out two square blanks of 300x300 mm from plywood for a gable roof, and a supporting bottom of similar sizes and shapes. Additionally, we will cut out the bottom for a tray 250x300 mm;
- We connect the two walls and the bottom of the tray at the end. First, 2.5 mm holes must be drilled in the plywood at the points where the self-tapping screws are screwed in, otherwise the fasteners may tear the material into layers when screwed in;
- In a similar way, we lay and fasten the roof slopes to the frame of the feeder;
- We nail a block with a cross section of 50x50 mm and a length of 150 mm to the supporting bottom at the end. Its dimensions are selected in accordance with the thickness of the vertical support.
In a pre-selected place, we bury a 180 cm inch steel pipe in the ground, in a vertical position. Bricks or stones can be placed in the dug hole to make the position of the support more stable. Next, we nail the body of the feeder to the supporting bottom and fasten the structure by the block to the pipe using wire clamps.
Winter feeders
According to science, it is correct to create feeding areas for birds based on their use in winter and early spring. This is the most difficult time for birds, so many gardeners and simply bird lovers try to introduce titmice, starlings and even rooks to their territory. Thanks to a good feeder, the birds get used to the territory and no longer leave it throughout the summer.
Advice! Plywood makes it possible to make light and voluminous feeders with a closed design. The main difference between a winter feeder and a gazebo or box feeder is the presence of a protected space. Food is also stored here; birds often hide inside from gusts of wind and severe frosts.
What other options are there?
As already mentioned, there are a huge number of options.
Feeders can be made from almost anything you can get your hands on: cardboard, plywood, glass jars and other materials.Most of these options are suitable for creating a children's feeder craft - a child can make a feeder on his own or together with his parents.
Attached to the article are photographs of unusual feeder crafts that you can try to make yourself.
Popsicle stick house
If you often buy ice cream for your kids, don't throw away the sticks. You don't need a bird feeder drawing. Lay out two parallel rows of sticks. Insert the sticks perpendicularly on the sides between them. It should look something like a log house.
Tie the resulting product at the corners with twine. Connect all four ends of the rope at the top above the branch where the feeder will be located. Attach the bottom from a piece of plywood. Now you can call the birds for lunch.
Hanging balcony feeder
Often the presence of birds on the balcony irritates residents, so the box of bird food is removed outside the balcony area. The easiest way is to hang the feeder from the outside to the fence of a concrete slab using cords.
Structurally, this model consists of two trays, separately for small birds and large individuals
The build process is as follows:
- We assemble two 30x40 cm frames from a wooden slats. We use one for the lower level, we line it with thin plywood. Inside the second frame in the corners we vertically attach slats 30 cm high, connect them to the lower level and also hem it with a bottom made of thin 4 mm plywood;
- We nail two horizontal slats 30 cm long onto the heads of the racks; the edges at the ends need to be cut off with an arc or a wedge;
- To close the upper part of the feeder, we nail a thin strip around the perimeter so that birds no larger than a sparrow can get inside. One of the walls can be covered with plywood;
- We nail a ridge strip in the center, with a cross-section of 20x40 mm. It has to be installed with its side surface on the frame of the feeder, otherwise the roof slope will be too flat.
For the roof we use 4 mm thick plywood. The material must first be soaked in drying oil and painted with oil paint. After processing, the plywood becomes flexible enough to be bent with an arc. It is best to fasten with wallpaper nails with a wide head.
Window feeder
The bird table can be fixed directly to the glass, for example, using rubber suction cups. If the size of the feeder is small, then even a window or window transom is quite suitable for these purposes.
Assembling the body:
- We cut out two U-shaped blanks from plywood for the facade and rear. One wall will differ from the other in height by 25-30 mm;
- We cut out rectangles from a sheet of plywood for the side walls, and cut out another piece of double length for the bottom of the box;
- After assembling the facade, rear and sides, you need to cut out the internal partition from thin plywood. It is installed inside the feeder to one of the walls to store food supplies;
- On the outside of the rear part, four rubber suction cups are screwed onto self-tapping screws.
All that remains is to fix the roof; it is also better to make it from plywood, this will give the feeder body additional rigidity. Be sure to glue the joints with PVA or any glue that is harmless to birds.
From a plastic bottle
A bottle feeder is easy to make. Here are some simple designs:
Opposite each other, windows are cut out on both sides of a 1.5-2 liter bottle - round, rectangular, in the form of an arch. Cover the bottom edge with something soft so that the bird does not injure its paws.
Make a through hole under the window and insert a stick-perch. If you make the hole rectangular, you don’t have to cut through the top part, but bend it back - you get a small canopy.
Feeder-hopper. Take 2 bottles of the same volume. Cut holes in one, as in the previous version, cut off the top third.
For the second bottle, you need to make several holes in the neck area so that grain can fall through them. Place the bottle, neck down, into the first container after the food has been added and the lid has been screwed on.
A large-volume feeder can be made from a 5-liter plastic bottle using a similar principle. In a large bottle, do not cut off the neck, but make large holes through which birds will fly into the feeder.
Fill a 1.5-liter bottle with grain, make several holes near the lid and place the bottle inside the large one, after turning it over.
From a juice box
You need to cut holes on the opposite sides of the tetra-pack, slightly retreating from the bottom, so that the food does not spill out of the feeder and is not blown away by gusts of wind. Strengthen the edges of the cut-out window with adhesive tape, then the bird will not be injured by the edges of the window.
Make a “perch”: pierce a through hole under the window with scissors, insert cardboard or paper rolled into a tube.
Make holes in the top and stretch a cord or wire to hang the feeder. If you attach it to a tree trunk, the wind will not rock it and the food will not fall apart.
Model for the exhibition
Sometimes you not only need to make a dining room for birds, but also give the feeder a certain shape and style. It is quite possible to cut complex parts from plywood, but it takes a lot of time and effort.
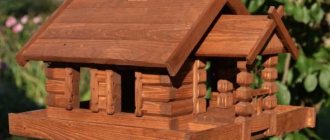
It is much easier to make a slatted model in the shape of a log house. We make the bottom and gable roof from plywood.
The bird feeder model is assembled as follows:
- We cut blanks from 15x15 mm slats; you will need to make 12 pieces of 150 mm in length. We fold them into a frame and connect them together with casein glue or PVA;
- We cut out four blanks 200 mm long, the tops need to be cut off with a wedge at an angle of 60°. We also glue them into the corners of the log house, but in a vertical position;
- We cut out three blanks from 6 mm plywood. One, square 120x120 mm, is used as a bottom, the other two 150x100 mm will go to the roof slopes;
- We cut four pieces of 100 mm each from the slats and use them to connect the tops of the vertical posts;
- We cut out four more 170 mm slats and fasten them as roof rafters.
All that remains is to glue on the roof slopes, cover the plywood and wood with tinted varnish and stick on a toy chimney cut out of a piece of polystyrene foam.
In general, birds may like such a dining room, but it is better not to leave it outdoors, but to place it on a balcony or covered terrace.