Surely every dacha has one or more outbuildings. As a rule, they store inventory, and they do not look very presentable, and the inside is cluttered. However, everything can be changed if you use ideas for arranging the interior of a barn. As a result, a change house can be not only a place to store tools, but also a room for relaxation, cooking, and growing beautiful ornamental plants.
Racks, shelves, cabinets
Perhaps the main problem with many sheds is that inventory is stored haphazardly, and therefore difficult to find when needed. The first thing you should start with is arranging shelves, cabinets, and racks. If you alternate sections of shelving with free spaces on the walls, you will be able to ensure that each item has a prominent place, which means it will be easy to find. Modular or stationary shelving allows you to create an orderly environment.
The shelving can be made by attaching support slats to the walls, on which transverse strips are stuffed. Shelves are installed on them. You should leave more space at the bottom of the rack to place large equipment there. You can make mezzanines under the ceiling. You will need them for things that are rarely used. You can also store hermetically sealed substances used for fertilizer, plant treatment, and paint and varnish products here. Children and pets will not be able to reach them there.
Unlike shelving, the advantage of cabinets is that they have doors that make it easy to hide clutter. The cabinet can be installed either inside the barn or taken outside by attaching it to an external wall. In this case, it will be possible to expand the internal space of the utility unit.
With proper organization of the internal space using shelves, racks and cabinets, you can carefully lay out and hang all the tools. Thanks to this, it will be possible to restore order inside the shed, make it attractive, save free space, and save time when searching for the necessary tools.
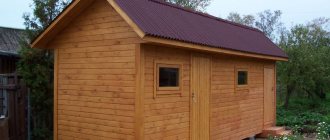
Ready container shed
This is one of the easiest ways to purchase a finished structure. This shed is made on the basis of a metal frame, where there is insulation inside the casing and electrical wiring is laid. There are several types of ready-made buildings; some of them already have a shower, toilet and rest area.
It can be placed using a crane on concrete blocks or piles. If there is a need to supply water, then this should not be difficult since you can easily do it yourself.
After using the container, it is easy to sell it without unnecessary difficulties, since this structure is not real estate.
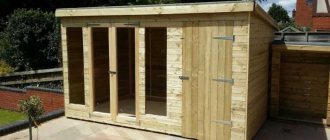
A garden shed is a house from a fairy tale. We would have to urgently build a new shed for the equipment. But this is not a problem: there is no shortage of ideas, here are a few more interesting ones. You can double the use of a garden shed by equipping it with a mini-greenhouse for growing seedlings.
Various shades of green and white look good. In my opinion, the design option for the garden shed in the photo below is an excellent solution with a lot of natural wood texture and just a little bit of delicate pastel.
It so happened historically that most summer residents do not have a separate garden shed: they have a large common one, and they make do with it. But this is not always convenient: everyone in the household actively contributes to filling it, and for some reason the only suitable place for a new thing turns out to be right at the doorstep. Naturally, over time, an insurmountable blockage forms at the entrance.
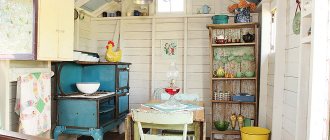
A garden shed may well become a decoration for a dacha. Don’t forget one more feature: many of us are simply unable to immediately send an item that has gone out of use to a landfill, be it an old coat or a lame coffee table - what if it’s good for something? No, let it lie there for a while, but not in the house! It is clear where old things are sent for foster care. As a result, it is not always possible to get a rake out of the shed without bringing down a pile of things on yourself. A garden shed is a completely different matter. Personal, where only our belongings are stored: pitchforks and rakes, hoes and scoops, soil and pots, pegs and twine, markers and a gardening journal. And if your imagination helpfully drew a picture something like this (as in the photo below), don’t worry: a barn doesn’t have to be shabby, dusty or unsightly.
An Old Garden ShedA garden shed can be so cozy and charming that you'll want to spend as much time as possible around it without having to worry about decorating it.
Hooks, holders and stands
Garden tools can be placed not only on shelves, but also on hooks fixed to the walls. You can make hooks yourself from ordinary large nails or use clothes hangers under them. Some craftsmen even adapt old rakes for these purposes, which they nail to the wall, and small tools are hung on their ends.
Magnetic holder strips are an excellent option for storing small metal items.
Tools with handles can be hung on convenient holders made of transverse bars or sections of plastic pipes attached vertically to the wall. The latter option is especially popular among summer residents due to its simplicity and accessibility.
If it is not possible to make such devices yourself, then they can be purchased at a hardware store. There is a wide range of wall holders made of metal on sale.
Wooden stands can also be used for storing equipment. This design resembles a fire shield. You can quickly and easily take any tool from it. The stand is made very simply: longitudinal slats are driven into the wall, and long nails are driven into them at equal distances from each other.
An excellent stand can be made from a perforated board. A large number of holes allows you to attach a variety of fasteners. They can be swapped and the height of the location changed.
Selection of materials
The modern building materials market provides a huge selection of insulation materials. But industrially produced products can be easily replaced with cheap organic materials that can be found in any household (Figure 6).
The most commonly used organic insulation materials are straw and sawdust. These materials must be dry. Otherwise, they will begin to rot and all work will have to be done again.
Note: For additional protection of such insulation from moisture and rodents, it is mixed with lime and only after that is poured onto the floor or the frame is filled.
The most popular industrial insulation materials are:
- Expanded clay: suitable for bulk insulation of floors and ceilings from the attic side. This is an inexpensive option that does not burn and does not allow moisture to pass through, but at the same time perfectly maintains the temperature inside the room.
- Foam plastic: suitable for both exterior and interior use. Its cost is low and its service life is long. In addition, this material weighs little and is very easy to work with. However, polystyrene foam is often eaten by mice, so you will have to carry out additional treatment of the walls or frame to protect it from rodents.
- Mineral wool: another good insulation material. Its only drawback is that it quickly absorbs moisture, so this material is usually used for interior work.
Figure 6. Industrially produced materials are mainly used for thermal insulation
If you plan to keep birds or animals in the barn, it is better to give preference to polyurethane foam. It does not allow cold to pass through, is resistant to moisture, and the material itself does not contain toxic substances that can harm the health of livestock. The only drawback is the high cost of the material.
Stands and organizers
The equipment can not only be mounted on the walls, but also special stands can be made for it. Plastic containers are available for purchase at hardware stores. You can also make them yourself from available materials, for example, from impregnated wood. A rack made of pallets is very convenient and functional. If it is assembled correctly, many cells are formed. It is easy to remove equipment from such a stand and return it back.
You can make a mobile organizer in the form of a cube on wheels from wood. On its upper edge you should make holes for the cuttings of garden tools. On the sides - attach hooks on which to hang small items. This organizer is good because it can be easily transported around the site without having to return to the barn each time, for example, to get a shovel or rake.
The simplest but convenient organizer is made from an ordinary barrel or tank. If the barrel is closed with a lid, it is enough to make holes in it to insert a tool into them. The plastic container needs to be weighted so that it does not fall under the weight of the equipment.
The top of the tank must be equipped with a grid with large cells. You can place it on a stand with wheels for easy transport around the site.
To avoid dulling of garden tools, it is recommended to store them in a basin of sand soaked in machine oil. Such equipment not only remains sharp, but also clean. If you don’t like the smell of machine oil, you can use natural flaxseed oil, which you boil beforehand.
An interesting option for convenient storage of equipment is a mobile cart. Just like organizers on wheels, it allows you to transport the necessary items to the garden and at the same time save time on going to the barn to get them. Such designs can be found on sale in finished form. If you like to craft, then it’s easy to make a cart with your own hands from available materials.
Peculiarities
The barn is, as is commonly believed, simply an auxiliary building. And it may seem that when finishing it, it is enough to get by with the simplest solutions, as long as the material is reliable. But this opinion is outdated - on the contrary, the aesthetic properties of coatings cannot be underestimated. There are quite a few materials that have an attractive appearance. Among them, it remains to choose those that:
- relatively inexpensive;
- mechanically strong;
- serve for a long time;
- resistant to negative temperatures and temperature fluctuations;
- withstands precipitation;
- installed without any problems.
Small Item Storage
In order to quickly find the necessary small items at any time, each of them needs to determine its place. So, nails can be stored in small jars. For small-sized items, work clothes and shoes, it is worth allocating drawers, baskets, boxes, and containers.
For small items, as well as for large equipment, you can make organizers from improvised materials. For example, an old bucket is made into a cover from old jeans with several pockets. A short tool with handles is placed in a bucket, and light things are stored in the pockets, for example, gloves, small tools. This organizer is easy to carry and deliver to the site of gardening work.
It is very convenient to store small items in hanging fabric or oilcloth organizers. A wide range of such devices are available for sale. You can also sew them yourself from a piece of unnecessary thick fabric.
Exterior finishing options
The exterior decoration of a barn is done in different ways, using several types of raw materials.
Siding
The walls can be covered with vinyl siding. This process is not too complicated and takes little effort. An electric jigsaw equipped with a saw with a small tooth helps to cut the siding. If you don’t have one, the simplest hacksaw for metal will do. Cutting siding with tin snips is a very bad idea.
It is advisable to attach siding using the hanging method. With this approach, a small gap remains from the hardware to the material. This gap is usually 1-2 mm and prevents full contact. The reason is simple: vinyl has fairly powerful expansion and compression properties.
It is imperative to ensure that the installation gap between the edge of the panel and the structures of the shed itself complies with the manufacturers' instructions.
Profiled sheet
Laying corrugated sheets allows you to equip both an old barn and a completely new outbuilding in the country. The choice between a sheet with a wavy or trapezoidal surface is largely a matter of personal taste. It is quite simple to mount a corrugated sheet on a façade using either the continuous or overlapping method. Self-tapping screws of a special type are used for the work. The corrugated sheet is resistant to moisture, weighs relatively little and comes in a variety of colors; Of the obvious disadvantages, it is worth noting only the loud noise during rain, but for a barn this, of course, is not important.
Tree
External lining is often done using a slab . A slightly less profitable, but significantly more elegant option is the use of edged boards. The boards themselves are most often mounted in a herringbone pattern. If you plan to keep animals and birds inside, windproof and vapor barrier materials are additionally used.
Wood is environmentally friendly, but it requires special fire-retardant, biological impregnations, and does not last too long.
Other
The easiest way is to sheathe a barn or outbuilding with your own hands using plywood . A lot of this material remains after repairs, and it doesn’t make much sense to focus on color and thickness - these factors are unlikely to play a role. You just need to pay attention so that the plywood does not rot or become saturated with moisture. Quite strong walls can be covered with plywood even without adding auxiliary posts; in this case, it is simply attached from the inside to special slats.
What's inside?
A window, even a small one, will create the feeling of a living room, and not a warehouse for shovels and rakes. Can you imagine how pleasant it will be to sit by the window, writing down the date of planting seedlings or calculating the deadline for the next feeding of tomatoes? A garden shed with a window will be more comfortable
For the arrangement, improvised materials will do: several boards and drawers will provide us with a work desk. Desk made of boards and drawers
You can continue to sort through successful design options for garden sheds ad infinitum) Perhaps it’s time to return to reality.
How you can inexpensively sheathe the inside of a wall in a wooden house: 6 great options
The 21st century has arrived a long time ago, and wooden houses do not even think of going out of fashion. More precisely, it’s difficult to call it fashion.
Rather, common sense, coupled with a subtle sense of taste, because what other natural material so organically combines environmental safety, reliability and home comfort? True, you won’t be able to escape from the interior decoration (read about how to insulate walls with polystyrene foam from the outside).
This is an important component of any construction, and people often have a question: what can be used to inexpensively and beautifully cover the inside of the walls? Moreover, not every material is suitable for use in a wooden house. We have selected 6 excellent options for you that will definitely help you overcome your doubts and achieve optimal interior design.
Lining
It seems that we started with a finishing material that does not need additional recommendations. And indeed: in any building materials store you can find several dozen texture variations. As they say, pick it up - I don’t want it.
However, it would not be amiss to recall some criteria by which the choice will definitely be correct:
Installing lining is one of the most common options for inexpensive, but successful sheathing of walls in a wooden house. In addition, it is not particularly complicated:
And in this article you can familiarize yourself with step-by-step instructions for installing lining.
, which may help with installation.
Cork
This is the case when the obvious visual advantages of a cork correlate with its technical characteristics and the numbers on the price tag.
This option is certainly suitable for a respectably furnished wooden house, in which a lot of money has been invested. If you plan to cover the walls inexpensively, then you can use a little trick - use cork to decorate individual wall fragments.
In this case, the costs will not be so high - and nothing will interfere with the pleasure of contemplating the spectacular wall cladding in the house.
It is better to glue cork to a wall in a wooden house using special contact glue. It grips the sheet perfectly even with low consumption. Of course, before this it is necessary to prepare the surface of the wall itself:
It is best to thoroughly level the walls before doing this, but if you don’t really want to do this with plaster, then gypsum board sheets will be an excellent and, most importantly, inexpensive alternative.
Decorative rock
One of the advantages of using decorative stone for interior wall cladding in a wooden house is the low cost of the base material. As a rule, this is gypsum, but there are also options combined with cement.
The latter, as a rule, are a little heavier, but in any case much more convenient for cladding than “wild” stone.
The only downside is the increased demands of this cladding material on the wall surface. It must be perfectly smooth, otherwise the created relief will not be so expressive. In order to cover the walls with decorative stone, it is best to use tile adhesive or liquid nails. The first option is recommended if the cladding material is made on the basis of a weighted mixture of gypsum and cement, the second - for cladding based on lightweight gypsum that is convenient for cladding.
Plastic
People's love for plastic is as imperishable as their love for wood. What if it turns out to be correctly combined in one room?
Due to its good moisture resistance, plastic can be successfully used for inexpensive and reliable interior decoration of walls in the bathroom, toilets and kitchen in a wooden house.
In order to properly frame the walls, you will have to build the usual frame - such sheathing will allow you to achieve a perfectly flat surface. If previously the choice of plastic for wall coverings was quite modest, now you can choose sheets with a wide variety of textures and colors.
There are also beautiful relief models, which in some rooms of your house can fit perfectly into the simulated interior.
Ceramic tile
Another good answer to the question of how you can inexpensively and beautifully cover the walls of your home, if it is made of wood.
Good - in terms of material costs and the final decorative effect. However, in order to lay the tiles evenly and correctly, you cannot do without special skills. Still, good specialists are worth it.
The tiles are glued to the base surface using tile adhesive, and after direct cladding, the seams are sealed with fugue - a special grout that prevents the appearance of pathogenic flora on the walls of a wooden house and, at the same time, by adding various dyes, also helps to emphasize certain shades in the interior.
Conclusion
We looked at 6 of the most attractive finishing materials that can be used to beautifully, quickly and not at all costly cover the walls of a wooden house. With the exception of cork, of course, because this material cannot be called cheap, but through its targeted use you can significantly reduce costs.
Most modern wooden houses often use the usual lining and ceramic tiles, but who said that you have to follow the opinion of the majority? A creative approach does not at all imply significant material costs - it presupposes, first of all, a non-standard vision of the interior, and the decorative qualities of the finishing materials used often do not depend in any way on their cost.
How to get rid of mold on the walls in a private house - 50 photos