The need to finish slopes from the outside
External finishing of plastic windows in a wooden house performs the following functions:
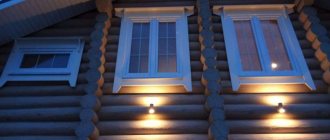
- aesthetic. Slopes hide installation flaws and defects. You can admire the finished slopes for a long time. They give the house a finished, impressive look;
- protective. They protect the frame, opening and insulation from precipitation, wind and sunlight;
- thermal insulation. Slopes will reduce heat losses and create a barrier to the penetration of cold;
- soundproof. They prevent the passage of extraneous street noise.
Scheme for finishing windows in a wooden house
No. 4. Choosing the right glass unit
A good profile is only half the battle. It is also important to choose a high-quality double-glazed window, because it makes up about 90% of the area of the entire window. We will not consider ordinary old-style windows - today, in all respects, double-glazed windows are better, which may differ in the following characteristics:
- number of cameras. The camera refers to the distance between the glasses. Two glasses are a single-chamber double-glazed unit, three glasses are a two-chamber unit, etc. The more chambers, the better the heat and sound insulation qualities. For the domestic climate it is better to take double-glazed window – single-chamber is suitable only for technical non-residential premises and southern regions, where in winter the temperature does not drop below -50C, but its soundproofing qualities are still not very good;
- glass type can significantly change performance. Popular today are low emissivity glass, which, thanks to a special coating (the most common option is silver ions), do not allow heat in in summer, and do not release heat from radiators in winter. As a rule, only one glass in a double-glazed window is low-emission, and its effectiveness can be assessed by the fact that a single-chamber energy-saving double-glazed window has the same heat transfer resistance as a regular double-glazed window. In addition to energy-saving ones, there are double-glazed windows with protection from sunlight, noise, burglary and fire. Dirt-resistant double-glazed windows and double-glazed windows that change the level of transparency have also appeared;
- distance between glasses affects heat and sound insulation. As the chamber increases to 16 mm, the thermal insulation properties increase; then, as the width increases to 24 mm, they remain unchanged, and then deteriorate, as the process of convective heat transfer begins to turn on. In order for a double-glazed window to have increased sound insulation, the width of the chambers must be different. Also, sound insulation is increased by different glass thicknesses, so on sale you can find double-glazed windows where the outer glass is made using triplex technology. This technique, by the way, allows you to increase burglary resistance;
- The chambers of a double-glazed window are usually filled with dried air, but inert gases perform much better, as they more effectively prevent thermal convection. The cheapest option is to fill it with argon. Xenon and krypton are even better in terms of thermal insulation, but they are very expensive, as is a very promising solution for creating a vacuum in the chamber.
How to choose the right finishing element
To choose the right finish, it is important that it meets the following criteria:
- matched the style of the window and the interior of the house;
- was durable and moisture resistant;
- served for a long time, at least the window service life: 15-20 years;
- It was installed easily and simply so that any beginner could cope with its installation.
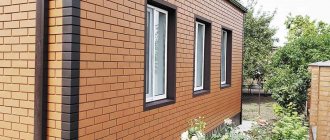
Slopes made of painted metal - in the case of finishing the facade of a house with metal cladding
Elite fittings and handles
Expensive wooden windows require high-quality fittings. It is ordered at the window selection stage. This is not only decor, but also functionality, ergonomics and ease of use. Fastening elements, locks and opening mechanisms must be designed for heavy frames, operate smoothly and silently, and prevent distortion. Therefore, it is not worth saving on them.
Functional elements are often made of steel or brass. The advantage of brass is its resistance to corrosion and wear resistance.
Decorative fittings must externally match the style of the interior. To decorate windows made of natural wood, handles made of antique or with a patina effect, forged, wooden, steel or brass, inlaid with porcelain or rhinestones are used. You can order fittings based on historical samples or purchase antique ones.
Classification of slopes
Slopes are classified by size, material of manufacture, shape, location.
Based on material they are divided into:
- metal, powder coated. Suitable for finishing exterior windows on facades covered with metal cladding or vinyl siding.
- plasterboard. This is an excellent option for leveling slopes. But plasterboard does not withstand exposure to precipitation, so it is used for interior cladding. In order for drywall to withstand weather conditions, frost and heat, it is important that it be moisture resistant. It is not the final covering. Ceramic tiles or painting can be used as cladding;
- plastic. Plastic is the best finishing for slopes. It meets all the criteria for choosing cladding: practicality, low price, high installation speed, attractive appearance. Sandwich panels are considered one of its varieties. In them, the outer and inner panels are connected by insulation: foamed polyurethane foam;
- MDF. The material is highly resistant to mechanical stress, is inexpensive, but can absorb moisture. Therefore, it is not suitable for external slopes;
- wooden. To improve the quality of wood and extend its useful life, it is treated with antiseptic agents before installation. Coating with several layers of varnish will help protect the wood from external influences.
When the window is placed as far outward as possible, the frames in the house are made of profiled timber
By size
Depending on the size, slopes can be narrow or wide. The latter have a width of more than 200 mm. They are installed in log houses. The width of narrow ones varies from 50 to 200 mm. The choice of type of slope depends on the size of the window and its location relative to the central axis of the facade.
If the window is small, then narrow slopes visually reduce its dimensions. If the window block is pressed inward, but not deeply, then a wide slope is installed.
For a window flush with the wall, a narrow slope is used.
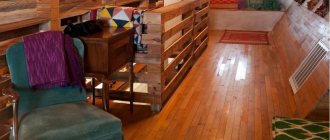
Internal slope made of furniture board - 18 mm thick pine
By location
Internal slopes give the room a beautiful look and protect from drafts. They are made from any materials.
In order for external slopes to be durable and protect windows from environmental influences, it is important that they are strong and wear-resistant. They are made of plastic, wooden lining or planed boards.
By shape
The shape of slopes can be straight or oblique. Direct ones are mounted to windows with standard double-glazed windows. Oblique ones are necessary for roof windows. They protect glass from freezing and condensation.
Sloping slopes on a dormer window made of lining
Tree selection
The selection of the type of wood from which the windows will be made primarily depends on the taste and preference of the homeowner. The quality of a particular wood plays a special role. To do this, you need to know all the characteristics of a particular material.
Larch
A decent wood with a high level of hardness. It surpasses pine by several tens of percent in these parameters. It is slightly inferior to oak, but the strength indicators are much higher. It owes its popularity to its aesthetic, naturally reddish tint.
By installing larch windows, you can easily do without additional painting. What is important is that larch is highly fire resistant and has decent resistance to rotting. By choosing larch windows, the buyer will pay 40% less than for an oak product. Compared to pine, the price will be more expensive.
Pine
In the construction market, the most common and inexpensive window material is pine. It amazes with its thermophysical characteristics. If you compare a product made of pine and high-quality plastic based on these properties, you can put an equal sign between them.
One of the advantages is that it can be easily painted in any color. Due to the presence of a large amount of resins in pine, this wood has excellent moisture resistance.
Oak
The very name of the tree already exudes hardness, extraordinary strength and durability. Oak wood is considered an elite material. Also attractive are the aesthetic qualities and biological resistance to various fungal plants.
Of all the listed materials, oak is a fairly expensive material for making windows. In the photos presented in our photo gallery, you can easily choose windows for a wooden house to suit every taste and budget.
Do not discount the important advice of experts: do not forget about the correct installation of the window. After all, the service life of the product will depend on its quality. And if the window arrangement is done poorly, the performance of wood or plastic will be reduced to zero.
Features of PVC and wood material
Slopes in a wooden house are often made of wood and plastic. Let's consider their features.
Plastic is a synthetic polymer without taste or smell. The density of PVC is 1.34 g/cm3. It has low heat resistance and high dielectric properties.
The advantages of plastic include:
- strength and reliability;
- moisture resistance, the ability to protect windows from destruction and pathogenic microorganisms
- does not fade in the sun;
- its cost is low, which saves the budget;
- it is not affected by chemicals: acids, alkalis and alcohol. Therefore, any detergents are suitable for cleaning. Simple cleaning with soap and water helps keep the panels clean;
- the material is environmentally friendly, does not emit toxic substances, and is hypoallergenic;
- has frost resistance, can withstand low temperatures, does not crack from cold;
- a variety of designs will allow you to choose the finish to your liking;
- has a long service life. It is estimated at more than a dozen years.
Plastic slopes when finishing the interior with MDF panels
The disadvantage of PVC is the inability to replace individual parts. The plastic is dismantled if the appearance is completely lost.
The advantages of wood are:
- naturalness and environmental friendliness;
- high breathability. Wood breathes, improving a healthy microclimate in the home;
- easy replacement of individual elements;
- aesthetic appearance;
- strength and resistance to physical influences, durability.
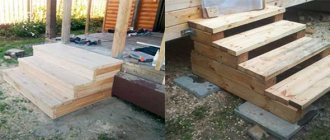
Economical solution - slopes made from the remains of imitation timber
The disadvantage of wood is the high price, especially of valuable tree species.
Characteristics of wooden windows
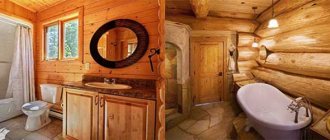
The interior of any wooden house will only benefit from such windows and at the same time completely preserve the original style. Since wood is an environmentally friendly material, ventilation between the street and the house will be natural and constant ventilation. By properly caring for wooden windows, their service life can be extended for decades.
When choosing these attributes, special attention should be paid to the manufacturer. Low-quality wood may be used, which will lead to various defects.
How to make slopes on windows in a wooden house
Window decoration in a wooden house, slopes and window sills can be easily installed with your own hands. It is important to choose high-quality material without damage. It is better to take wooden or plastic slopes. A wide range of products will allow you to choose slopes of the appropriate size. For installation you will also need the necessary tools: glue, sealant, nails, screws, screwdriver.
May be interesting: Step-by-step instructions for installing a metal entrance door in a wooden house
Window sills
Even at the window selection stage, they decide what material the window sills will be made of. Window sills made of wood or natural stone are best combined with wooden frames.
Stone window sills are made of marble or granite. The main shades of granite are black, red, gray. It does not absorb dirt or moisture, is resistant to mechanical damage and household chemicals, is not afraid of temperature changes, and is easy to clean. It can be restored and polished. The main disadvantage is the large weight of the slabs, which complicates installation.
The main colors of marble are milky, light gray, pink. It is strong and durable, withstands temperature changes, in winter it is evenly heated by radiators and prevents the formation of condensation on the windows. Due to its porous structure, marble absorbs moisture and dirt. However, it cannot be cleaned with simple detergents. In addition, he is afraid of acids.
You can also use window sills made of cast (artificial) marble. It is cheaper, does not absorb dirt and is absolutely safe.
Wooden window sills are reliable and durable. The best materials for them are cherry, beech, oak, mahogany, and walnut. For harmony, the color and texture of the window sill and window must match. Veneer is often used for this.
Step by step instructions
The stages of work depend on the material of the slopes. The installation of slopes made of wood and plastic differs from each other. We will talk about how to properly install plastic slopes and wood trim.
Sandwich finish
Technology for installing plastic slopes
Plastic slopes are installed in stages.
- First, the starting bar is mounted. It is attached around the perimeter of the opening.
- Slopes are inserted into its grooves. They are fixed with self-tapping screws.
- Decorative corners are glued with silicone.
- The window sill is matched to the color of the slopes. It is attached to the horizontal strip of the opening using sealant. Self-tapping screws are not used.
Wooden slopes
Wooden slopes are secured with nails with small heads or self-tapping screws. The screw heads are puttied. The surface of the wood is stained and varnished. The planes of the opening are carefully leveled.
You can use lining for finishing. Internal slopes made of wood will be in perfect harmony with the cladding of the façade of the house using wood materials.
- A plastic starting strip is mounted to the frame.
- Lay the lining horizontally from the window sill upward, connecting with a tongue-and-groove lock. The width of the lining should be equal to the width of the window slope. Its edge is inserted into the starting bar.
- The second edge is attached to the wall with self-tapping screws.
- Trim the corners. Decorative corners are glued to the wall and part of the slopes.
How to install casing
This is what the casing installation technology looks like:
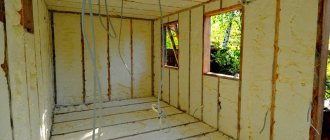
- You need to cut a window opening in the wall; this is the most critical stage, requiring accuracy, compliance with dimensions (especially if the windows have already been ordered), checking the horizontal and vertical. The opening must be soaked with an antiseptic.
- Insulate the opening with jute tape. Why use jute tape - it is an excellent wind barrier in itself, and this material will also improve the sliding of a log or beam in the casing during shrinkage of the house. The jute is secured in the opening with a construction stapler.
Trojan1User FORUMHOUSE
The tow is stuffed only from the top; jute is laid from the sides under the casing.
Olegos33FORUMHOUSE user
Between the casing and the wall - tow/jute. Between the window and the casing - professional mounting foam.
- Select a groove on the sides of the opening, or, conversely, form a tenon.
The groove is selected for a T-shaped casing; its width should be 1 cm larger than the width of the casing tenon. The tenon is made for a U-shaped casing, and it should be a centimeter narrower than the casing groove (in both cases, you need to leave space for laying two layers of jute tape).
Master FORUMHOUSE user
I did this: a groove is cut out in the wall, a block is driven into it, wrapped in jutolene for tightness. A box is placed on the bars, and a foam window is already inserted into it.
- Mount a wind block on the bottom of the opening; it also needs to be insulated with jute fabric or an analogue. How to do this: lay a layer of jute, mount a wind block on it, and another layer of jute on it.
- Mount the window sill;
- Install risers;
- Mount the top;
- Seal the gap between the top and the opening with soft insulation. The size of the gap is determined depending on the material from which the walls are made. If they are from an array of natural moisture, the gap should be large, even 60-70 mm per linear meter of wall. If the situation is not so dangerous, then:
Serg89 Moderator FORUMHOUSE
You can increase it to 80 mm, and that’s enough.
The foam has very good adhesion to wood, so the gap is sealed with it when the house has definitely undergone shrinkage, and by this time the enlarged fence may disappear naturally.
You can also close the gap like this:
Olegos33 Member of FOUMHOUSE
You need tow and a pipe for thermal insulation of water pipes (approximately 100mm). You wrap the tow around the pipe (in a dense layer), push it into the gap (so that the pipe insert is compressed by a third) and stuff a little more tow (without tamping) into the upper part of the junction of the pipe to the wall and to the casing.
To fill the gap, you can take any materials common on the market: mineral wool, tow, flax wool.
The side gaps also need to be filled with soft insulation, and not foam - it will simply tear when the wall moves relative to the frame during shrinkage.
The house will shrink and press against the insulation for about 3-5 years, so during this period it is better not to install platbands on the side of the room in order to control the process, or to install them so that they can be quickly removed.
In frame houses they do not make staking.
When buying windows, you need to start from the size of the opening. The height of the opening is 120 cm - which means the frame is 116, so that there is somewhere to insert the sweet clover, a supporting plastic profile. It is necessary to check that the sweet clover is included in the package; it is needed to correctly install the window sill; You need to check the entire package and its quality so that there are no minor damages. Pins almost always have to be purchased separately.
Fastening slopes to polyurethane foam
The installation procedure is as follows:
- measure the dimensions of the slope;
- cut out the sandwich panel in accordance with these dimensions with a margin of 0.5 cm;
- excess foam is cut off after installing the window unit;
- Make a furrow 0.5 cm deep along the window in the foam;
- try on the panel, insert it into the groove, align the edges;
- remove the sandwich panel, and apply polyurethane foam to the wall, having previously moistened it with water;
- apply foam from bottom to top, departing from the corner 1 cm. You do not need to foam the entire surface, but only part of it: along the edges and in the middle. The fact is that the foam expands, taking up free space. If you do not leave room for its expansion, the foam will squeeze out the slope;
- moisten the foam with water from a spray bottle and lay the panel on it; attaching to the wall with masking tape;
- other slopes are mounted in the same way;
- The cracks are filled with sealant.
Sprats/layouts
To decorate windows, decorative lintels are used - bars made of metal, wood, plastic. They can be wide, narrow, straight, carved, arched, round. With their help, they create any design drawings on the window leaf.
Main types of layouts:
- Constructive. In this case, the decor divides the canvas into independent double-glazed windows. Such structures are used for glazing large areas. Sprats have a width from 56 to 160 mm.
- Venetian. This is a fake binding glued to the glass on 1 or 2 sides. It can have a trapezoidal or semicircular cross-section. Protrudes above the surface by 5-15 mm. The width of the planks ranges from 20 to 40 mm. They are glued with tape or silicone glue. Contact with glue can lead to a decrease in the thermal insulation properties of glass.
- Viennese. They are placed like the Venetian ones, but using spacer frames in the middle of the glass unit.
- Interglass. These are slats that are placed inside the glass unit. To ensure that the spacers do not reduce the thermal insulation properties of the glass, the distance between them must be at least 12 mm. In addition, spacers are used around the perimeter of the frame.
- Invoices. This is a separate frame made of metal or wooden slats, placed outside the windows at a distance of 3 mm. It is simply attached to a wooden box using latches or hinges.
The frames for wooden windows look beautiful and are made of the same material as the frames or metal.
If the house is old
When repairing an old wooden house, the window sill is part of the window opening, therefore, if it is not deformed or rotten, then there is no need to dismantle it. A new plastic window sill is placed on the old one. The length of the window sill and the angle of rotation are measured. Dimensions are marked on plastic. Cut out the part with a jigsaw. The workpiece is mounted on silicone or polyurethane foam. They place the load.
A day later the slopes are installed. The starting profile is screwed into the frame. Remove excess foam from the window opening. PVC slopes are placed on the foam and the panels are secured with masking tape. The final profile is glued along their perimeter.
Window installation
Installation technology varies depending on the type of structure being installed, the type of house, climatic conditions, specific design, and the wishes of the owner.
In any case, one should take into account the fact of constant movement of the structure: shrinkage, the effect of wood expansion, etc., which does not allow the window frame to be fastened rigidly enough to the wall. An intermediate box is used in the window opening.
There are two types of such a device:
- A simple means of preventing various consequences of house shrinkage consists of cut grooves at the end of the opening and mounted window carriages (beams with a groove). With this option, the drying logs, shrinking inside the carriage, do not put any pressure on the window at all. This type is used for installing plastic windows.
- A complex frame is used only for wooden windows. A protrusion is cut out in the window opening, into which a U-shaped beam is placed, and the space between the beams is covered with polyurethane foam. This allows you to withstand a fairly large load.
Installing a window using this product reliably strengthens the window frame, its lower part acts as a window sill board and becomes a component of additional insulation.
Frequent mistakes and problems when finishing window slopes
Window slopes in a wooden house, if done incorrectly, lead to a number of problems during operation. Let's look at installation errors and problems associated with them:
- installation of slopes under profiles, and not on them, leads to blowing;
- incorrectly selected linings under the window sill violate the level of the structure;
- displacement of the window sill can cause its deformation;
- early removal of cargo from the window sill will reduce its service life;
- For external cladding, materials that are intended for interior use are used. They are destroyed under the influence of external influences;
- Do not seal the cracks under the window sill. Such an error can lead to moisture getting under the tide;
- cutting out the polyurethane foam completely from the window opening violates the tightness of the structure.
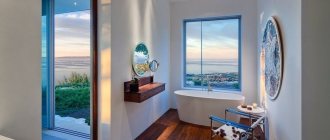
Panoramic windows
The functionality of a home is a matter of practicality, convenience, and rationality. On the other hand, design is more focused on appearance, the perception of everything we see.
Windows are an important design element, and therefore it is desirable that they look good and fit well into the overall picture of the house or apartment.
At the same time, windows have a very clear practical purpose - to provide access to natural light into the house.
Despite the fact that design is an individual matter, the best option for maximum access of light into the room are panoramic windows that make maximum use of the entire wall area.
It is worth noting that we are talking not only about solid window structures, but completely about glazing, which can be panoramic.
In recent years, it has become increasingly popular, regardless of the direction and access to natural light.
Additional threat to the lungs: how building materials spoil our health- Staircase to the second floor - an overview of the best options for a private home. DIY staircase construction instructions + photo
A metal roof is a popular and practical material for arranging the roof of a house (photo + video)
The installation of windows of this type requires certain features of the construction project of the house, namely the presence of an open external wall that is not load-bearing.
If we talk about a wooden house, there are many options for using panoramic windows, ranging from simply increasing the window opening in the bedroom to creating a transparent wall in the living room or on the veranda.
For our climate, this solution seems extremely impractical, according to a huge number of people, but is it so?
First of all, it all depends on the window itself, because even a regular-sized window can be considered cold if it conducts heat too actively.
PVC windows with 3 or more chambers are best suited for this, and for particularly cold regions we would recommend installing at least 5 air chambers.
Combined houses - on the way to economy, beauty and practicality, the main advantages and disadvantages of combined structures- Glazing the facade of a house - fashionable and modern trends in modern housing construction
Roofs of private houses - variety of shapes and materials, selection rules and recommendations of builders
At the same time, an increase in the number of air chambers helps to improve sound insulation, which is important when there is a highway or other unpleasant source of noise nearby.
First of all, we recommend installing such systems in places where they will give you a view of the beautiful natural landscape.
What tools and equipment are needed?
To finish the ends and edges of window openings after installing translucent structures, you will need the following set of tools:
- A steel ruler, a carpenter's corner and a tape measure for measuring the dimensions of the opening, the thickness of the gaps, and the finishing material.
- A pencil with a soft lead or a marker for cutting blanks.
- A screwdriver or hammer for fixing wooden boards to the casing.
- A jigsaw, circular saw or hand saw for cutting wooden materials.
- To cut platbands at 45 degrees, you may need a miter saw or a special saw with a fine tooth and a miter box - a template with the ability to make error-free corner cuts.
- Construction knife with a retractable blade for cutting drywall (if necessary).
- Liquid nails with a mounting gun, if fastening is carried out without the use of mechanical hardware.
- Paint and varnish composition, roller, brushes for finishing.
- Rags for cleaning and degreasing the surface that is being treated with an adhesive synthetic composition before fixing the finishing elements of the slopes and the cashing device.
The tools listed below must be in good working order, free of dirt and ready for use.
Errors, difficulties and their consequences
When refining an opening on their own, beginners can make a number of serious mistakes that will lead to negative consequences. To prevent this from happening, experts recommend taking into account several important nuances :
- The geometry of the finished opening after finishing is disrupted - before installing the frame, you need to measure the diagonals of the rectangular or square structure in both directions in advance.
- The window is ventilated - the cracks must be sealed in full, with mandatory quality control of the finished result.
- Condensation forms at the end of the inner part of the window - the sealing tape must be vapor-permeable.
- The window sill board is installed with a slope towards the frame - this element must either have a reverse slope or be mounted strictly horizontally.
- When operating a window unit, water enters the room - the first thing to check is the quality of the installation and the sealing of the ebbs, after which you need to disassemble the decorative frame from the inside and check the connection of the sealing tape around the entire perimeter.
The main mistake of any home craftsman is performing work without a technological map. Before you start installing any structure or finishing element, you should draw up a plan in advance so that you don’t have to correct accidental defects later .