A barn is, of course, a necessary building on any summer cottage. This is the place where garden tools, various equipment and even bicycles are usually stored. All such buildings are divided into two main types, which are based on the material from which they are made.
The first type includes metal utility sheds. They can be custom-welded, made from containers, or designed from a template or ready-made. The second main material for making utility blocks is wood.
Brief overview of the article
- Welded sheds
- Shipping container sheds
- Ready-made metal sheds
- Wooden sheds
- Panel utility block
- Frame sheds
- Foundation
- Frame installation
- Barn roof
- Utility block floor
- Barn ceiling
- Walls
- Photo of a barn for a summer residence
Welded sheds
Comparing photos of a garden shed, we can conclude that welded utility blocks mostly resemble ordinary garages. The fundamental difference is that a garage has a gate, while a barn has a door. In order to create such a shed with your own hands, you need a welding machine.
The obvious advantages of the structure include the ability to adjust its size. For interior decoration, plywood, which is moisture resistant, OSB-3 or boards are often used.
How to calculate the optimal dimensions of a shed and turn it into a universal utility unit
As can be seen from what is written above, by the word “shed” each developer means his own building. In one case, you need a small outbuilding for storing garden tools and various small items, and in another, the barn grows to the size of a house. But there is one nuance that unites them. This is ease of use.
The shed must be practical, which means it must be made for specific needs.
Therefore, instead of taking the dimensions of the shed from the Internet or from a neighbor, it is better to decide for yourself what you need the shed for and what you plan to store in it.
There can be many options for such planning. For example, at the initial stage of construction in the barn it is necessary to place tools, some building materials, and equip sleeping places.
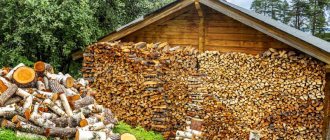
In the future, the barn can be transformed from just a “storage room” on the site - into a workshop, as well as a place for storing firewood or pellets.
Or it can turn into a “garage” for storing various equipment - a motor cultivator, lawn mower, vibratory rammer, snow blower, etc.
Any summer resident has a basic set of tools and agricultural equipment, which he cannot do without on his plot. It is from this list that you need to start when calculating the minimum dimensions of the shed.
For example, to store a simple set of garden tools - shovels, rakes, axes, hoes, small spades, saws, brooms - you can allocate 2 square meters. m.
If you plan to actively garden and store fertilizers and greenhouse materials in the shed, increase the area to 3-4 square meters. m.
If you have electric tools: a gas trimmer, a high-pressure washer, garden pumps, hoses, sets of ordinary tools, you need even more space - 5 or more square meters.
The given figures cannot be considered dogma. They are a rough guide.
Practice shows that the average and optimal size for an outbuilding can be taken as dimensions of 3x6 meters with a height of 2.5 m.
In this case, it will be possible to place long building materials in the shed - boards and fittings. Set up a small workspace for a home handyman, install racks for storing hardware and various household items.
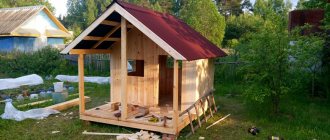
When building a shed, do not forget about arranging a small terrace with a canopy, where you can work outside in bad weather or just relax, sitting at the table in the evening.
This significantly increases the usability of the utility unit.
An important stage is zoning the barn. To do this, we divide the building into a number of rooms - blocks, each of which stores its own. For example, “dirty” things - a garden wheelbarrow, shovels, rakes, spades, watering hoses, etc. It is better not to drag what is needed for working with the soil into the outbuilding, but to place it on the side in a small compartment with separate doors.
This way, these tools will always be at hand and you won’t have to sweep/wipe the floor in the barn every time, cleaning out sand, black soil, fertilizers or clay.
We allocate space for a work table, shelves with carpentry and plumbing tools and places to store bolts, nuts, nails, screws, etc.
Rule : we place what is needed first and most often closer to the entrance. Anything that is rarely used or used seasonally can be placed in the back of the shed against the far wall.
If you plan to store long materials in the barn, then, for ease of pulling them in, you should make the door not in the middle of the building, but on the side - on the right or left, or at the end. If you are not “greedy” at the height of the barn, then the attic can also become an optimal place for storing leftover fittings, boards, plywood, and pipes.
Those. everything that is not needed often, but can be easily obtained if necessary. In addition, even before construction we think about whether the barn will be insulated. In our climatic conditions, this will allow working in outbuildings in late autumn and winter.
Shipping container sheds
From these containers you can make a utility block, which will include a shed and a country shower. Moreover, such a frame shed, created on the basis of a transport container, will not only be durable, but also maximally functional for a small garden plot.
What is the container change?
- it is necessary to build a partition
- doors and, if necessary, windows are installed
- container communication, pipe carrying
- to expand functionality it can be insulated
- installing an additional roof to maintain the optimal temperature inside the container and save it from strong heat in the sun
Fabulous beauty
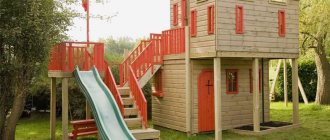
Surely many would not refuse to store gardening equipment in a hut, as if straight from the pages of a fairy tale book.
A fabulous solution for decorating a garden shed Or in such a wonderful house. True, there is a high probability that the children would quickly reclaim it for their own needs, leaving the hoes and rakes without a roof over their heads =)
A garden shed is a house from a fairy tale. We would have to urgently build a new shed for the equipment. But this is not a problem: there is no shortage of ideas, here are a few more interesting ones.
Ready-made metal sheds
This metal shed is considered the most expensive. But at the same time, it is easy to assemble and can be installed quickly enough in a place chosen and prepared in advance. As a rule, such ready-made projects are already designed in such a way that they directly include a shed, a shower stall and a toilet.
Place to build
Usually they choose a place in the backyard that is unsuitable for recreation and planting. When planning, current sanitary, fire and building codes and regulations should be taken into account. On the site itself, owned by one owner, buildings are placed at the discretion of the owners, and the building must be located at a distance from:
- residential building - at least 3 m;
- other buildings - more than 1 m;
- trees – 4 m;
- from the barn to the borders on the street side - at least 5 m.
In relation to neighbors:
- construction of utility purposes – 6 m;
- flock - 12 m to the nearest house.
If the site has a noticeable slope towards the neighboring dacha, it is worthwhile to provide a drainage system, and also make sure that the shed will not create shading that interferes with the growth of plants and the rest of the neighbors. This can be easily done using a pole equal to the height of the future barn, after observing for several weeks.
If the purpose of the barn is determined as a place for keeping animals, the wind rose of the area must also be taken into account. To do this, you can use your own experience and observations or make a request to the hydrometeorological service.
Local administrative authorities may make their own adjustments to the current standards, so before starting construction it would be good to check them with the relevant organizations or with the chairman of the cooperative.
Before registering a building, a representative of the Ministry of Emergency Situations is invited to inspect and make an expert assessment of fire safety. After this, registration documents are drawn up and construction begins.
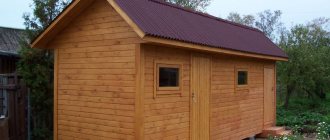
Panel utility block
Its main difference from the second type is the nature of the assembly. It is used less often, as it is more painstaking in terms of fitting. The walls are prepared on the ground, and then the entire frame is installed, which is previously prepared below.
It is difficult to make such a wooden shed alone. After installing the timber base, the shed walls are usually finished both inside and outside.
Design
A barn (workshop) for a summer residence, the designs of which help you choose the simplest or most original option, has ceased to be just a warehouse of necessary and unnecessary items. Today's buildings are selected in accordance with the general design of the site and the decoration of the house.
To give more space, light shades are perfect; climbing vines or paintings will add additional attractiveness to the structure.
Even the most practical barn can be turned into an attractive structure if you first think through its layout, exterior and placement.
Frame sheds
In order to figure out how to build a shed, you need to look at several options and choose the most suitable one for your garden plot. Next, it is important to develop a project that takes into account the following construction details:
- type of foundation
- frame dimensions
- how will it be installed
Purpose and dimensions
The parameters of the barn directly depend on the purpose of its use.
A universal option is a building 3x6 m (18 m2), with a height of at least 2 m. A room of 1.5 by 1.5 meters will be sufficient for storing equipment; if short-term storage of building materials, fertilizers, feed is planned - 1.5 by 2 m, for the sake of placement of equipment - lawn mower, cultivator, pump and accessories - the area increases to 6 m2 or more.
For animals, the size of the room is calculated based on the specific species recommended for keeping. You should also provide a walking area or trail for transporting animals to free grazing. This will avoid animal diseases, damage to crops and crop losses.
The purpose of the barn also determines the materials from which it will be built, its location, the presence and type of foundation.
The room in which only garden utensils and tools will be stored can be made of the simplest materials, but for equipment, fertilizers, building materials, feed, vegetable and fruit preparations, a more solid structure will be needed with protection from weather factors and pests.
Foundation
Despite the fact that a wooden utility block is far from the heaviest structure, it simply needs a foundation. Since in this case it also plays an additional protective function against contact with excess moisture. And, as you know, for wooden structures, excess moisture over a long period of time will contribute to failure.
A foundation that is considered columnar is often used. To install it, it is necessary to rid the required surface of any type of plants, make markings for accuracy of construction, make a recess directly in the place of the post, then compact it and fill it with sand and gravel.
Frame installation
It is worth noting that you need to work not only with dry wood, but also necessarily treated with antiseptic substances. It would not be amiss to use fire retardants. Before installing the bottom layer, it is worth covering all concrete columns with a layer of roofing material, preferably even a double one.
Next, a frame is installed, which was made to the specified dimensions. The same material is used to form openings where windows and doors for the barn will be located in the future.
To attach load-bearing posts, special corners made of metal are used. In order to secure the structure as correctly as possible, the timber is additionally secured with jibs.
Before attaching the closing links, it is necessary to check all corners so that the structure does not float to one side.
Subtleties of work
After the land plot has been graded and the residential building has been built, you can begin installing the shed. At the same time, some summer residents prefer to purchase a prefabricated barn or ready-made outbuildings that are easy to install. If the landscape design involves the presence of an original and beautiful building, then it is best to build it yourself according to an individual project. The most suitable option for this would be a frame structure made of slabs or unedged boards; such a shed will be inexpensive, will serve reliably for more than 10 years, and can be built in the shortest possible time, without the help of craftsmen. Construction work in this case will consist of several stages:
Preparation
The selected location next to a private house is carefully leveled and covered with gravel. Then you need to dig four pillars into the ground to a depth of 60 cm. In order for them to serve for a long time, their bottom should be wrapped in roofing felt and everything should be secured with carpentry starter. This will help protect the supports from rotting. To ensure a good roof slope, the columns of the rear walls should be placed 20 cm lower than the front ones.
Making the lower and upper trim
As a building material, beams with a cross section of 50×50 mm are usually used; they are fixed to installed columns at a level not lower than 10 cm from the ground. It is important to control the level position of the strapping, in order to avoid its distortion, you need to use a level when installing. After installing the lower trim, carry out similar work with installing the upper one. Next, the gap between the lower and upper planks is divided in half and four additional beams are nailed.
Construction of walls
The boards are prepared in advance, then they are fixed vertically to the top, middle and bottom bars.
Roof installation
To do this, markings are first made, and three bars are nailed to the beams at the same distance from each other. They should be placed transversely, as they will act as rafters. They are sheathed with boards, and any roofing material, most often roofing felt, is laid on top. Sheets of roofing felt should be placed from the bottom edge, leaving a small overlap of 5 cm and moving upward. To securely secure the finish, vertical boards are placed on it.
Final stage
The doors are being installed and the flooring is being laid. In addition, the interior arrangement of the barn is being carried out: shelves and cabinets are installed for storing household supplies and garden tools. You can also plant small bushes and ornamental plants next to the utility room, which will serve as an excellent decor for it.
If the owners of a summer house want to build not only a multifunctional, but also a beautiful barn, then they will need to put in maximum imagination and effort.
First of all, it is worth considering the layout of the building: shape, size and finishing materials.
Such a construction will require both time and financial costs, but it will pay off, since it will serve reliably for at least 20 years. To carry out construction, you can optionally use the services of craftsmen or do everything yourself. In the case when the work will be carried out independently, it is important to follow the construction technology, which consists of several stages:
- Laying the foundation. Since the structure will not be heavy, you can make a foundation on piles, or make a columnar foundation. For this purpose, a site is prepared, it is cleared of debris and leveled. Then you need to dig asbestos pipes to a depth of at least 1.5 m and fill them with concrete mortar of medium consistency. Concrete is prepared from sand, crushed stone and cement, the constituent components are taken in a ratio of 3: 4: 2. The foundation is given time to harden, as a rule, this takes several days.
- Construction of a barn. Wooden boards that are planned to be used to build a barn are pre-impregnated with special antiseptics. They will help protect the material from rotting and extend its service life. Then the frame of the structure is assembled, and the lower frame is laid on the foundation. It is best to use beams for tying. Next, logs are prepared on which the floor covering will be convenient; this can be done both immediately and after construction is completed.
After this, vertical posts are fixed to the harness and attached to the top of the structure.
If a corner utility block is planned, then the number of racks will be increased; they are additionally installed in the corners of the building, as well as in those places where window and door openings will be located. Then you can proceed to the construction of the roof, and if the barn is installed with a canopy, it is enough to lay a pitched roof. But it is worth noting that the gable roof type will give the barn a more attractive appearance, which is why it is often chosen for outbuildings located next to the house.
Upon completion of installation, the walls are covered with boards. After this, windows and doors are installed. To decorate the barn, you can also additionally decorate it with clapboard. Inside the building, it is necessary to finish the ceiling and equip it with the necessary shelves.
Outbuildings made from blocks are also extremely popular among summer residents. Compared to unedged boards, such objects have many advantages; they are durable and reliable in use, and are also resistant to moisture and temperature changes. In addition, the blocks are easy to install, which simplifies the construction process. The construction of such a barn involves several stages of work:
- Pouring the foundation. As a base for block structures, a strip foundation is usually chosen, on which an additional layer of waterproofing is laid.
- Laying blocks. This building material is laid using a mortar made from sand and cement. When fixing the blocks, it is important to control the thickness of the seams; it should not exceed 5 mm. First, lay out the corners of the future building, then, using a plumb line and level, level the surfaces of the walls vertically and horizontally. In addition, a reinforcing belt must be made at the bottom and top of the building.
- Roof installation. The construction of the roof is carried out according to the same scheme as during the construction of frame structures.
- Installation of flooring, windows and doors.
- Finishing work. Inside the building, the walls can either be plastered or sheathed with sheets of plasterboard. Moreover, the last option is considered the simplest and most accessible. Drywall provides a beautiful, durable finish, but applying plaster correctly can take a lot of time and labor. If you plan to use the barn as a workshop, then it needs to be equipped with special shelves and cabinets inside.
There are also many other ways to build a shed, using building materials such as metal, plastic or polycarbonate, but the principle of their construction is similar to the above steps. If the material is light, then construction begins with assembling the frame and wall cladding, and if the outbuilding is built from stone or brick, first lay a solid foundation and proceed according to the usual scheme. The main thing is that after the work is completed, the shed does not spoil the landscape design of the site.
Therefore, regardless of its purpose and the material used to cover the frame, it is recommended to decorate it.
For example, a beautiful flower bed of ornamental plants and a path laid out of natural stones will become a real decoration of even the simplest building.
Barn roof
Designs that are classified as typical, as a rule, have a pitched roof. In order to start attaching it, you need to make grooves in the upper frame of the beam. Further, much depends on whether the utility block will be heated and on the material that will be used for the covering.
Ondulin, slate, and tiles can be used for the roof. Before using one of these materials, it is necessary to make a kind of lattice on which they will need to be strengthened.
Walls
If the shed does not need insulation, then it is sheathed exclusively from the outside. Otherwise, external finishing, a special moisture-resistant film, insulation, a film protecting from excess steam and, finally, internal finishing are required.
Shed designs may include a variety of sheds, attached firewood sheds, verandas, which are complemented by recreation rooms. Which project will be most suitable for a particular garden plot should be chosen taking into account its size, and not just the cost.
So, on a small plot, you should not build a large utility block, which includes a veranda and, for example, a recreation room.
Two in one
You can double the benefits of your garden shed by adding a mini-greenhouse for growing seedlings.
Garden shed with a greenhouse Or build a small shed, under which a woodpile or garden wheelbarrow can be conveniently placed.
Garden shed with canopy
Or arrange a cozy place to relax, where you can wait out the light rain and drink some tea.
Garden shed with seating area
And my friend has a canopy attached to her garden house, under which there is a small sandbox and a swing. It’s very convenient: the work is progressing and the children are under supervision.