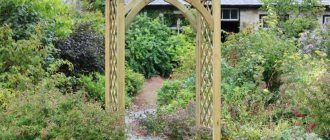
Living arch in the garden
Garden arches are often used to frame a path, as in this case, or you can use it to decorate the entrance to the garden. Installed alternately, the arches emphasize the calm and comfort of the alley. Of course, if the size allows. Sometimes these structures serve as symbolic boundaries of plots. If the arch is not passable, a bench installed under the arch will look very cozy. Here you can relax pleasantly, especially under the shade of blooming greenery.
Arches are made from different materials, from solid ones made of stone and brick, to simple airy structures made of reinforcement rods . Let's look at the last option.
Features of garden arches
Decorative structures in the form of semicircular gates attract attention with their ability to transform the space of the site into a corner of the royal garden. Arches not only decorate the territory, but also successfully zone it. They look interesting at the entrance, creating a general impression of the estate.
An original design solution can be considered a green tunnel of several arches located one behind the other, which represents a shelter for a fairy-tale path. It should be remembered that structures are installed taking into account human height.
Types of door arches: types and sizes of interior arched openings
When arranging your home, you dream of getting not only maximum practicality, but also try to highlight the style of your own design. Choosing one of the original arch finishing options will allow you to achieve a competent combination of the interior and emphasize a smooth transition from one room to another. Moreover, there are plenty of methods and configurations today. Below we will reveal all the nuances of this type of design.
Large opening in a private house in a classic style Source timeszp.com/
Finishing the opening with wood Source portaprima.ru
Variety of materials and shapes
In any of the presented photos of arches in the garden, you can see an original structure made of metal or wood and be convinced that the creative imagination is quite multifaceted, since each product is unique. The most commonly used manufacturing materials include:
Variety of options
An arch is a narrow openwork structure consisting of two vertical surfaces and a horizontal surface lying on them, which can be flat or arched. And arches installed one after another, forming a kind of corridor, are called a pergola.
In addition to its purely practical application - a support for climbing plants, an arch in the garden is used as a diverse element of landscape design.
- It can be used to decorate the entrance or decorate a gate.
- A garden arch is often used to delimit zones.
- By placing an arch near the wall of the house and placing a bench under it, we get not only a wonderful place to relax, but also a chic decor for the building.
- If you have a large plot, then a flowering arched corridor will become the main decoration of the garden.
- A small arcade (pergola) can replace a gazebo.
Pay attention to the photo; garden arches of various types make any landscape unique.
When arranging an arch for a summer house, you should definitely take into account some requirements.
- The height of the vault must be at least 2 m so that a person of any height can walk freely.
- When determining the width of the structure, you need to take into account that plants can grow over time and narrow the passage.
- The arch in the garden should match the style of the entire site.
- When placing the arched frame, do not forget to provide a suitable place for planting climbing plants.
- A garden arch should be decorative at any time of the year, both with and without flowers.
- The arched structure must be strong and well reinforced, able to withstand the weight of plants and strong winds.
- If you are planning to build not a collapsible arch, but one that stands all year round, then pay attention to the characteristics of the material and its correct processing so that frost and bad weather do not spoil the structure.
The selection of material for making an arch for flowers at the dacha is determined by its durability, affordability, and compatibility with the overall style of the estate. It can be wood, metal, plastic or a combination of these materials. Each of them has advantages and disadvantages.
Tree . This material attracts with its availability, moderate pricing, and ease of use. You can use boards, timber, lattice, simple unprocessed branches, and vines. Wooden arches go well with most design styles. However, wood is susceptible to environmental influences and is therefore not durable. It requires periodic painting or other protective treatment. The disadvantage of this material is also its lightness; a wooden arch requires serious strengthening.- Plastic . You can purchase a ready-made plastic structure, or you can make your own arch from plastic pipes. It’s easy to make, you can even choose the desired color of the material. And the price will be the lowest. But plastic does not withstand frost, and such an arch is only suitable for the warm season, and also needs additional strengthening. You should also pay attention to the rustic appearance of this material, so it is advisable to completely cover such an arch with flowers and it is not suitable for all styles of landscape design.
Metal . This material is durable, the metal structure is strong and stable. You can use pipes, timber, fittings, thick wire. But metal arches are more difficult to manufacture (a welding machine is required), they also require protective painting. It should be taken into account that when plants come into contact with a metal surface in winter, they may freeze. Forged garden arches are very beautiful and popular, but they are expensive and can only be made by a master.- Stone or brick . Durable and durable material. Decorative arches for the garden made of stone look very solid and can be quite original even without floral decoration. However, such structures are appropriate only on large areas; their creation requires the skills of a mason and significant material costs. Also, massive stone arches will not be appropriate for some style decisions (for example, a garden in the Provence style).
When creating garden arches with your own hands, you can show maximum imagination and combine various materials in one design. And our step-by-step instructions will help you successfully bring your project to life.
Metal
The most common and inexpensive material, the structures from which are strong and durable. All parts of the structure are assembled from reinforcement and fastened together by welding. A characteristic feature of metal garden arches is their elegant lightness.
The simplest version of the product is metal rods bent in an arc and fixed in the ground. Typically, to give the structure stability, two arcs are used, connected by jumpers made of wire or rod.
Expensive models of metal arches include structures decorated with artistic forging. Such products are made to order; not everyone can create them themselves.
The only drawback of the metal is its instability to moisture. Painting and treatment with special substances are used as protection against corrosion.
Catalog “Forged arches” / 2022
Sorting: — Name Price Description
Side width: 800 (mm) Overall width: 1200 (mm) Ridge height: 2400 (mm)
Side height: 2000(mm)
CONSTRUCTION: forged welded (cold/hot forging/stamping)
MATERIAL: profile pipe 25/25/1.5mm, solid square 14/14mm, 12/12mm. Decorative forged elements - 3mm steel.
Find out turnkey cost Side width: 200 (mm) Overall width: 1200 (mm) Ridge height: 2400 (mm)
Side height: 2000(mm)
CONSTRUCTION: forged welded (cold/hot forging/stamping)
MATERIAL: profile pipe 25/25/1.5mm, forged steel - wicker, steel 3mm. Decorative forged elements - 3mm steel.
Find out turnkey cost Side width: 400 (mm) Overall width: 1200 (mm) Ridge height: 2400 (mm)
Side height: 2000(mm)
CONSTRUCTION: forged welded (cold/hot forging/stamping)
MATERIAL: profile pipe 20/20/1.5mm, solid round timber 12mm. Forged decorative elements.
Find out turnkey cost Side width: 400 (mm) Overall width: 1200 (mm) Ridge height: 2400 (mm)
Side height: 2000(mm)
CONSTRUCTION: forged welded (cold/hot forging/stamping)
MATERIAL: profile pipe 20/20/1.5mm, solid square 12/12mm steel 3mm. Decorative forged elements - 3mm steel.
Find out turnkey cost Side width: 400 (mm) Overall width: 1200 (mm) Ridge height: 2400 (mm)
Side height: 2000(mm)
CONSTRUCTION: forged welded (cold/hot forging/stamping)
MATERIAL: profile pipe 20/20/1.5mm, solid square 12/12 steel 3mm. Decorative forged elements - 3mm steel.
Find out turnkey cost Side width: 400 (mm) Overall width: 1200 (mm) Ridge height: 2400 (mm)
Side height: 2000(mm)
CONSTRUCTION: forged welded (cold/hot forging/stamping)
MATERIAL: profile pipe 20/20/1.5mm, solid square 12/12mm steel 3mm. Decorative forged elements - 3mm steel.
Find out turnkey cost Side width: 300 (mm) Overall width: 1200 (mm) Ridge height: 2400 (mm)
Side height: 2000(mm)
Tree
If creating a metal arch requires the purchase of material and welding equipment, then with a wooden model everything is much simpler. Selecting a few bars and planks for the structure will not be difficult, and the manufacturing process itself will also be simple.
The only difficulty may be the top element, which forms an arched semicircle. Making it yourself is difficult; in this case, you will have to order or purchase a ready-made one. Therefore, most often the dome of wooden arches is in the form of a crossbar forming the letter P, a triangle or a polygon.
Wood products can also be composed of several arches, creating complex structures in the form of tunnels or gazebos with benches. But the tree is short-lived. It does not like moisture and sudden temperature changes.
To increase the service life of the material, it is necessary to treat it with special protective substances and regularly varnish or paint it.
Arches in small apartments. To be or not to be?
Arches in small homes are often a necessary measure. In small studios, former “Khrushchev” buildings and one-room apartments, the need for visual separation of the sleeping or cooking area is very urgent, while there are not enough free meters for a full-fledged room with a door. In this case, an arched opening comes to the rescue. It is important to compare it as much as possible in size and style with the rest of the design. An arch with antique columns in a small Khrushchev building will look at least strange, but the laconic portal will become an unobtrusive highlight of the interior. If the area and style of the room are not suitable for a classic semicircular arch, a rectangular open portal without platbands will be the solution.
Important: in a small apartment, completely dismantling the doorways between the living space and the gasified kitchen is prohibited by law.
Like any type of structure or decorative technique, the arch will decorate the interior of a functional kitchen-living room and be an inappropriate addition. Its presence should be considered at the earliest stages of renovation, in coordination with the style, functions and proportions of the room. It is in this case that you will receive a harmonious solution, the icing on the cake of a design project, from which the interior in any style will only benefit.
Bright interior of a spacious living room
Plastic
Some craftsmen have been able to adapt plastic water pipes for the manufacture of garden arches, which are strong, durable and resistant to moisture.
The process of creating a structure is similar to working with metal, the only difference being that plastic bends easily without special tools. The parts are connected using a welding machine for plastic products.
PVC arches are inexpensive and are available for sale in finished form. They are light in weight, so they can be easily transported from place to place.Several important recommendations for planting climbing roses near arches
In order for the arch for roses with your own hands to have a beautiful appearance, you should plant flower crops correctly. An important rule is to maintain the optimal distance between bushes. It depends on how magnificent the arch will be. A suitable distance is 1 meter.
It is better to plant roses in spring. For the bushes, holes are made with a diameter of 40 cm, depending on the varietal variety. Regular garden soil is suitable, since roses are not picky about soil composition.
Having planted the bushes, it is recommended to immediately feed them; it is better to use nitrogen substances for this. In summer, additional mineral complexes are added; they will add lushness to the bushes.
As the roses develop, flower shoots should be attached to the slats. This is done obliquely and not in a vertical direction. This ensures the development of branches not only to the top, but also to the sides. It is better to form the bush throughout the growing season to prevent branches from developing only upwards.
A beautifully designed arch for roses with your own hands will be a wonderful addition to the site, allowing the flowers to fully develop, creating an incredible atmosphere in the area.
Other materials
The variety of options for garden arches amazes with many creative ideas. If desired, you can create compositions from natural stone, decorative brick, or intricate driftwood. A lantern, wooden or plaster sculpture can be built into the design.
Non-standard products can have the shape of a circle, an asymmetrical figure, or an intricate tower dome. Any owner of a plot of land is able to transform the territory with the help of interesting design ideas and the use of beautiful and unusual arched structures.
Making a metal arch with your own hands
You can easily make a simple arch from metal reinforcement yourself. It will be a structure of two rods bent in an arc with jumpers connecting them.
Before starting work, you need to prepare everything you need:
- 2 pieces of reinforcement 5-6 m long;
- connecting crossbars (their length and number are determined independently based on the design model;
- welding tool.
Then you can begin assembling the structure, following the step-by-step recommendations:
- Bend long pieces of reinforcement to form an arch.
- Connect the main elements using welding and short rods (you can weld them crosswise, in diamonds or in a cross). You need to start the connection from the middle and from the ends to secure the structure.
- Markings are made in the selected location on the site and holes are dug using a hand drill, into which pipe cuttings are inserted and concreted.
If the arch is assumed to be stationary, then the ends of the arches are welded to the pipes. The removable structure can simply be inserted into the recesses in the spring and removed for the winter. After installation, the product must be painted.
Shape selection
The key distinguishing element by which interior arches are classified is the shape of its arch. Currently you can use one of the following options:
- Classic. The most common type. Ideally matches any room interior. The vault is made in a semicircular shape. The rounding radius is equal to half the width of the entire opening.
Important! The classic version of the interior arch is more practical to use in rooms with a ceiling height of at least 2.7 m.
Rectangular arch Source www.pinterest.com
- Portal. One of the simplest types of arches, since during installation no additional design of the corners is required. The disadvantage is the need to carefully select the design of the room; it does not fit with any interior.
Arch with highlight Source www.ppapc.com
- Modern, another name is “British”. Outwardly it resembles something between the “Portal” and “Classic” styles. The upper part of the arch is rounded, but not as clearly expressed as in the classical one. Most often it is installed in modern apartments, where the ceiling height does not exceed 2.5 m.
Decorated arch with lighting Source blog.postel-deluxe.ru
- Romance or Slavic arch. The difference from other designs is that the top is parallel to the floor. The only condition is the mandatory presence of smooth, symmetrical, rounded corners.
See also: Catalog of companies that specialize in interior redevelopment.
Trapezoidal arch to the kitchen and dining area Source italstroy.ru/
- Trapezoid. Used as the most suitable option for zoning two small rooms. Unlike the usual interior arches, it has sharp corners in the shape of a trapezoid.
Arch with a wide opening Source kursremonta.ru
- Ellipse (Turkish Arch). The complete absence of rounding in the corners allows use in combination with or without columns. The versatility is confirmed by the possibility of installation in rooms with different ceiling heights. Installing an interior arch of this type simplifies the task of partially separating a room from an area for another purpose. For example, a study, a dressing room or a boudoir in the bedroom.
Arches in the hallway Source homeli.ru
- Half-arch. Characterized by a complete lack of symmetry. One corner may refer to the classical style, the second to the portal. The rounding radius does not play a role in this case and is determined according to your preferences (or based on the characteristics of the rooms).
Types of arches Source liceosantaanadelsur.co/
Classic version of the arch design Source www.stavros.ru
There are several more ways of original arch design that came to us from other countries. Of these, we can name such types as:
Thai, differing from the usual classical style by the presence of a rounded side from the floor itself.
Gothic, with its top reminiscent of the dome of a Western European castle. The decoration of such arches is most often done with mosaics, stone or ceramic tiles.
Drywall arch in the hall Source market.sakh.com
Arch in oriental style Source homerenovates.com
Homemade wooden arch
Making a simple wooden arch for plants in the garden or on a summer cottage is even easier than making a metal one. To do this, you need to prepare three bars from 5 to 10 cm in cross-section (depending on the choice of climbing plants: for light bindweeds, thin parts are enough, and for perennial vines, the structure should be stronger). The bars for the racks are usually two meters long, and the size of the crossbar corresponds to the width of the structure.
The arch is assembled using self-tapping screws and a screwdriver:
- For a more durable connection, you can use corners or diagonal crossbars made of slats.
- The lower parts of the racks must be treated with used machine oil or a special compound.
- Next, the holes are marked and prepared.
- After installing the arch, the holes are filled with crushed stone, gravel or broken brick, then concreted.
- The finished product should be stained, varnished or painted.
In the spring, various climbing plants can be planted near the base of the structure, which will delight the eye throughout the summer. Any photo of a garden arch entwined with greenery and flowers attracts attention with its beauty and harmony with the design of the surrounding landscape. An original decorative element, created with your own hands, will make even the simplest garden cozy and attractive.
Installing a wooden arch
The wooden arch is very easy to install. For this we will need: a wooden beam about 4 cm thick (at least), laminated wood about 10 cm, nails, crushed stone, glue.
Arch shapes for plants
Schematically, the order of work is as follows:
- We dig the rack bars into a pre-selected and prepared place.
- We pour crushed stone into the base of the wooden posts, and it is advisable to treat the wood remaining above the ground surface with resin or burn it.
- We fasten the upper parts of the racks with a crossbar in the shape of the letter U, and we connect the sides with jumpers like staircases using screws.
- On top of the resulting structure we mount an arched crossbar, which we fasten in the same way as the previous one.
- We cover the finished structure with a primer and paint it with a special composition for wooden surfaces.
- The final touch remains - we decorate the arch with plants, flowers, etc.
Photos of garden arches with your own hands
0