In suburban construction, sometimes it is necessary to cover a large span without the use of intermediate supports. Our portal has already told you how to use wooden I-beams to make a support-free floor in a long country house, as well as calculate the permissible loads and cross-section of wooden beams. In this article we will talk about the independent production of a wooden truss for an unsupported span over 7 meters long.
Selecting the type of structure and installation location
They create canopies taking into account the type of structure and environmental conditions. If you decide to attach a canopy to your dacha, you need to analyze the condition of the fundamental part and the front wall of the house.
Attention! It is better to build a wooden structure on an elevated place, away from woody plants.
The next stage in construction is the creation of a project. Experts recommend sketching on paper the future canopy for a wooden house and indicating the dimensional characteristics of the elements - this will make it easier to calculate the amount of material needed.
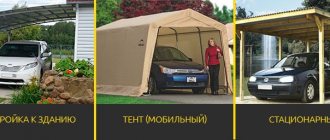
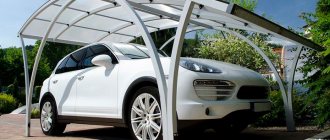
Mobile carports
Nowadays you can buy compact, folding carports. I imagine a metal frame with a tent roof. The assembly diagram is simple; the structure can be installed with the efforts of 1-2 people in 1-2 hours.
You can install a carport in your country house with your own hands in 2-4 hours
This option is convenient for summer cottages and outdoor trips. The kit may include side walls made of soft glass or an awning.
A mobile carport for a car in the country; if necessary, you can always roll it up or move it to another place
Description of species
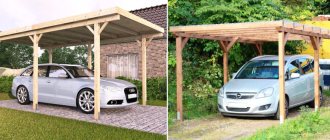
To build a wooden structure yourself, you need to decide on the type of structure. Depending on the location, canopies are divided into:
- free-standing;
- integrated into the overall architectural ensemble.
According to their purpose they can be divided into:
- decorative - they are created to decorate a site, to create a place to relax;
- canopies-shelters - for protection from bad weather, storage of things, etc.
The form is:
- single slope type;
- gable type;
- curly.
General information
Advantages of the canopy:
It occupies a small area compared to a garage, thereby helping to save space.- The car under the structure is protected from precipitation and sunlight. Keeping your car outdoors prevents rust from forming.
- Compared to a closed garage, in which, due to improper arrangement of the ventilation system, condensation forms - a direct path to corrosion.
- You can use any materials to build a canopy.
- Based on his wallet, the car owner has the opportunity to choose any materials from those offered on the market.
- If necessary, the canopy can be easily removed to another place, lengthened, shortened, or made wider. It is worth mentioning that the approach to the car is not difficult in any way.
Cons of the canopy:
- If it rains heavily, the car will still get wet. In winter, the area will be covered with snow, which will need to be removed. Partially, the problem is solved by installing canvas curtains.
- A canopy in front of the garage entrance will not protect your car from theft.
- There is no way to store things and wheels under a canopy.
- It is inconvenient to approach the car and service it in winter.
- The car is not protected from dust and dirt.
Note
Installing a canopy over the entrance to the garage has its advantages if the owner of the car permanently resides on the premises.
A good option is a country canopy for a garage. In this case, a major garage is not justified. After all, the dacha is used seasonally, and it makes no sense to invest in building a garage. To store things, build a shed-like building. You can store spare parts, tools, and building materials in it.
General requirements for structures
The main list of rules that must be taken into account during construction: Racks are created from the strongest materials that can withstand heavy loads: logs DM from 10 to 20 centimeters. The length of the cross-sectional sides is from 9 to 15 centimeters. All materials must be treated with bactericidal impregnation. It is also necessary to treat with fire retardants. Typically, cellular polycarbonate is used to create a canopy. Advantages of the material:
- affordable price;
- weighs little;
- flexible:
- you can arrange an arched canopy;
- transparent;
- variety of color solutions.
Flaw:
- high coefficient of thermal expansion.
The dimensional characteristics of the canopy are determined by its purpose: the minimum permissible height for the roof is 2 m, 2.5 m is also suitable.
Choosing the optimal dimensions of the building
When deciding to build a carport on your site, you should first of all decide on the size of the future building.
The dimensions of the building structure depend on the number and dimensions of cars that will be stored under its roof. But in any case, the length and width of the canopy should exceed the dimensions of the car by one or two meters
To accommodate a car 4 meters long, you will need a canopy measuring 5x2.5 m. To store larger vehicles, such as a minivan or jeep, you will need a canopy measuring 6.5 x 3.5 m.
As for the height of the structure, it should be calculated taking into account the height of the car itself and the possible load on the upper trunk. At the same time, a structure that is too high is far from the best option, since there is a possibility of the roof loosening during strong gusts of wind, as well as slanting precipitation.
The optimal ratio of canopy sizes to accommodate one car. On average, the height of the canopy does not exceed 2.5 meters
When planning to build a structure exceeding three meters in height, it is necessary to provide for the installation of powerful transverse beams that will cover the entire perimeter of the canopy, thereby increasing the strength of the wooden structure. The roof should be made with a gable roof, since this arrangement option is considered more reliable.
Examples of drawings and standard projects
The process of creating a canopy for a house made of wood with your own hands is simple: you can work with wood even with hand tools; assembly does not require electric welding, as for steel products. But it’s still better to make a drawing in advance. This will speed up the work and ensure rational use of materials. Creating a drawing begins with measuring the construction site of the canopy.
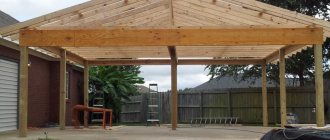
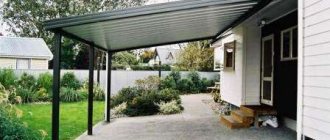
Next you need to understand the design. The simplest option is the flat single-pitched type. Covered with transparent polycarbonate, this structure will be a wonderful place to relax.
It is difficult to make an arched canopy from rigid wood: arches are formed from several elements cut with an electric jigsaw. Therefore, most often preference is given to flat roofs. Small buildings are placed on six racks; if the dimensions are large, you will have to make eight or ten.
Wooden carport: how to build a shelter for your car
When planning the arrangement of a suburban area, every car owner must allocate a place to place one or even two cars. But even if you have a garage on your property, you don’t always have the time or desire to drive a car into your yard every time you drive into it. A do-it-yourself carport is an excellent addition to a permanent building. The main advantage of arranging such a canopy is the ability to leave the car in the open air, the free movements of which contribute to the rapid evaporation of moisture, thereby inhibiting the process of corrosion of the metal elements of the car.
What wood to use for awnings
To create a roof you can use:
- Glued and profiled timber.
- Logs.
- Beam.
- Thin boards 15-40 mm, plywood sheet.
- Trunks of woody plants.
- Lining, block house, boards, panels.
Important! A canopy made of timber, trunks, or logs goes well with stones, concrete mix, metal, and polycarbonate. These materials help make the structure more beautiful and elegant.
Options for constructing a garage canopy
- Before entering the garage.
- Near the side wall.
- Between the garage and the house.
- In the backyard behind the garage.
- Freestanding canopy.
Designing a garage with a canopy on the site
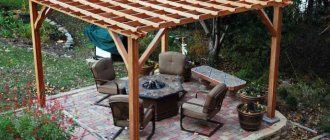
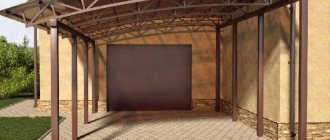
One of the popular options for constructing a canopy is a pavilion. This makes it possible to increase the space. In addition, it facilitates access to the machine and maintenance. It is convenient to disembark passengers under the canopy; families with small children and elderly people will especially appreciate it. Here you can park your car throughout the working day, provided you arrive and depart several times a day. The size of the canopy is increased if it is necessary to place two cars under it.
An open garage shed is equipped only with a roof, which is supported by support pillars. The closed view is distinguished by the installation of entry gates and walls. The gates are equipped with a hinged opening system. This allows you to hide the car from ill-wishers.
A canopy near the garage, which is located in the backyard, does not attract the attention of passers-by. The design can perform two functions - to shelter the car from bad weather, and also serve as a veranda.
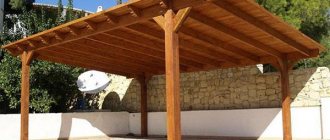
The roof shape of a garage canopy can be single-pitch or gable. The shed roof is simple in design and installation. It can be installed in any climatic conditions. The standard slope angle is 15º – 30º, allowing you to choose any material for the roof.
A gable roof for a canopy is suitable for cases when there is a need to cover a large area or to repeat the contours of the roof of a house or other buildings on the site. The design is practical and easy to use.
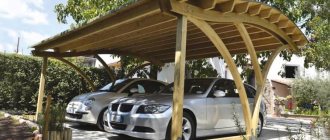
An arched canopy is a variant of a gable roof that has an attractive appearance and does not retain snow and rain.
Materials for building a canopy
The frame and support pillars are constructed from timber, metal profiles and rounded logs. For the roof, metal tiles, polycarbonate and corrugated sheets are most often purchased.
Tent garages and carports will be a good alternative and budget option. The advantage of the canopy will be the ability to fold and move it to any convenient place. Most often it is used in summer to protect the car from rain and scorching sun.
To build a canopy over a polycarbonate garage, a metal profile and sheet material are used. The design is particularly durable and has a long service life. The color range of polycarbonate is quite wide, which allows you to make a garage canopy in the design you like.
A shed is often used as a warehouse for building materials, storing tools and things. Also, the design is suitable for equipping it as a workshop.
For a comfortable stay, vines, ivy or a vineyard are planted on the south side. As the plants grow, they will create a continuous green wall.
A canopy in the form of a pavilion, in the case of a garage in the basement, will provide protection from wastewater, rain and melt water. Such protection will be especially valuable during a rainstorm.
Features of arranging a canopy over a garage
- Covering a large area near the garage, without creating obstacles for the movement of people.
- The roof of the canopy must be of the correct shape so that snowdrifts do not accumulate on it, and the area does not flood during heavy rains.
- Ensuring proper circulation of air masses.
- When constructing a canopy, windage is taken into account. In stormy winds, the structure must remain in place.
- For canopies, gazebos and pavilions, a simple foundation is built, regardless of the weight of the roof and the choice of material for it. In addition, preparing the base will protect the car from collapse of the structure.
- Before constructing a canopy, you should calculate all the parameters and make a drawing. This way you can navigate the dimensions of the canopy and adjust them if necessary.
Preparatory work
Preparation should begin with the formation of a sketch, and then a drawing based on it. Calculate a flat, lean-to wooden canopy and find out what materials are needed and in what quantities. Most often, the following lumber is used to create a roof:
- Bar for racks - section 70 by 70 mm.
- The beam attached to the wall is 40 by 60 mm.
- Front type beam – 40 by 80 mm.
- Beam for floors – 40 by 60 mm.
- Polycarbonate.
- Antiseptic.
- Hardware.
- Wood cutting device and screwdriver.
- Crushed stone.
- Geotextiles.
Features of the supporting structure
When building a stationary type canopy, we install at least 4 racks, which are subsequently connected to each other. Before installing the supports, we decide on the structures. We install supports in increments of no more than 1.5 meters. We calculate the dimensions in advance and put them on the drawing.
Stone, concrete, brick
Massive pillars do not require constant maintenance. But when installing heavy supports, the use of heavy equipment may be required. It is more difficult to build a canopy from brick, concrete or stone with your own hands than from wood or metal.
Brick shed diagram
Structures with massive pillars, upholstered on the sides with siding or clapboard, look solid and last a long time. Their construction costs a little less than the construction of a full-fledged garage.
Metal
Making a carport with your own hands from metal pipes ᴓ 80 mm is the right solution for creating supports. We make the indentations with a drill. Metal is afraid of corrosion, so you need to buy material that is protected from moisture.
We insert supports and fill the holes with concrete mortar. We connect the racks with crossbars. If you decide to make a canopy out of metal, you should use a welding machine.
Wooden
A wooden canopy is easy to make. Wooden posts are inserted into pre-dug holes. Wood is afraid of dampness, so when installing supports, treat the wooden canopy with antiseptics.
Tar the bottoms of the posts that will be buried in the ground. The measures taken will increase the service life.
Construction stages
The work will cost much less, and the roof will be built faster if everything is done according to a step-by-step plan. The construction of a canopy made of logs consists of several stages that must be completed. So, do the work sequentially, first do the planning, calculate the amount of materials, and then proceed to construction.
Carport with pitched roof
To create, you need to prepare the following materials:
- A – six metal anchors, pipes (about 30 cm), cement composition, sand, gravel.
- B – two bars measuring 10 by 10 cm and a length of 2.4 m, 2 bars measuring 10 by 10 cm and a length of 3.2 m.
- C – four boards measuring 5 by 15 cm and 3 m long.
- D – eight boards with dimensional characteristics of 5 by 10 centimeters and a length of 0.65 m.
- E - twelve boards measuring 5 by 10 centimeters and 3.15 m long.
For a lean-to canopy, the following may also be useful:
- F – plywood sheets.
- G – lining type carpet.
- H – soft roofing material.
Required tools and materials
To build a carport you do not need a large number of special tools. You can get by with a regular saw, a hammer and several containers.
However, to quickly build the structure, it is recommended to prepare the following tools:
- a circular saw;
- rope and stakes;
- shovel;
- building level;
- any container for water;
- concrete mixer;
- screwdriver or screwdriver with replaceable bits;
- keys.
Construction materials include:
- cement, sand and gravel;
- roof covering to choose from - slate, tiles, glass insulation, metal sheets;
- construction corners (minimum 8, if built without additional reinforcing beams);
- self-tapping screws, bolts, nuts, nails;
- construction timber of the required size in the required quantity.
Creating a canopy
First you need to make the correct markings. To do this, you need to make a structure from cast-offs and twine. A cast-off is an additional product that helps to evenly mark the location of the supporting columns of the canopy. You need 10 pieces of such products.
The dimensional characteristics of the roof are 3 m by 6 m. Mark a place with similar dimensions. Then, at a distance of 30 centimeters from each of the 4 corner points, dig 2 cast-offs into the ground. Measure 3 meters along the two long sides of the site from the corner point. A central type of support should be located here.
How to lay out the site
The easiest and most inexpensive way to make a platform under a carport is to fill it with gravel. To do this, you will need to remove the turf, dig the curb, pour crushed stone and compact it well using tamping platforms. Then the platform will be rigid and ruts will not form.
Compacted crushed stone is a good surface for car parking
Recently, areas paved with paving slabs or paving stones have become more popular. They have a more attractive appearance, but their construction is more expensive. Preparation begins the same way: first the soil is removed. But the pit is made about 20-25 cm deep. Crushed stone is poured onto the bottom, which is also compacted well. Then it is advisable to spread a layer of geotextile on the crushed stone. This is a non-woven material that will prevent the sand that will be poured on top from spilling out and mixing with gravel. Geotextiles also redistribute the load more evenly, preventing the base from sagging under the wheels of a car (it is used in road construction). A layer of sand is already poured onto it, which is also compacted. Paving slabs, clinker bricks, cobblestones and other similar materials are laid in the sand.
Paving slabs
In the middle in terms of costs is a concrete site. The base is also prepared from compacted crushed stone. Wooden planks are laid on it at a distance of 1 m, which are set level or with a slight slope to drain water. These strips serve as beacons during pouring, and then play the role of damping joints, compensating for the thermal expansion of concrete. With this structure, cracks appear less frequently.
A metal mesh made of galvanized wire is laid between the slats. You can, of course, use stainless steel, but it is expensive. The thickness of the wire is 3-4 mm, the cell is 10*10 cm. The top is filled with concrete not lower than M 250. The thickness of the concrete layer is 7-10 cm.
Concrete platform under a carport
Installation of a lean-to canopy
To ensure that the liquid completely drains from the canopy made of boards and does not accumulate, cut the edges of the boards of the crossbars at an angle of 15°. You can install the crossbars using two methods. The first is using self-tapping screws through a support-type beam into the end part of the crossbar. The second is through metal corners. The distance between the rods should be from 0.5 m to 0.55 m.
First, fasten two crossbars of the lean-to canopy sheathing on the sides of the middle support columns, then two more rods along the edges of the product. Secure the rest between them. Various materials can be used to cover a lean-to model. If it is a cellular type of polycarbonate or slate, then the work on the frame is completed, because they are attached directly to the sheathing of the canopy. Other materials have their own technologies.
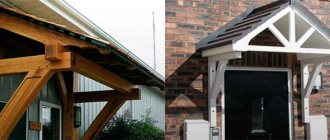
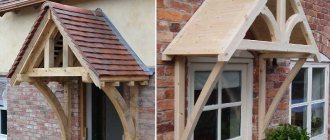
Construction of a canopy over the porch
You will have to buy the following devices to form a canopy made of wood:
- hacksaw;
- metal corners;
- screwdriver;
- self-tapping screws;
- anchor fasteners;
- hammer.
When the lumber to create a canopy for a wooden dacha has been purchased, as well as the tools, you can get to work. First of all, you need to make a drawing of the roof. When developing it, the type of fundamental structure, materials for the canopy, decoration and much more are taken into account.
Construction of a carport made of wood with your own hands
Any construction process includes several stages. When constructing a structure for a car, you will need to do the following:
- choose a suitable place for construction;
- pour the foundation;
- installation frame;
- carry out roofing work;
Choosing a place to build
Before you start building a canopy at your dacha, you need to decide whether it will be an independent structure or an extension to an existing one. The best place to build is the area in front of the entrance. You can also store equipment there while working. In addition, it is advisable to build the canopy on a hill. Then puddles will not accumulate under it.
Foundation
The foundation for the structure must withstand the entire load of the frame and roof. There are two options for pouring the foundation. You can use a pile-screw structure, which will make the finished structure stable.
An alternative is to dig small holes, insert piles and concrete. The best diameter for load-bearing piles is 120-150 millimeters. Burying depth is at least 100 centimeters. During digging, it is worth checking with a construction meter whether they are fixed evenly.
Construction of the frame
After installing the vertical piles, longitudinal beams are installed along the entire length of the structure. In this case, it is necessary to control the mounting angle. Longitudinal beams, which are fixed on the opposite side of the roof, are installed only after checking the level of inclination. It is not advisable for the tilt angle to exceed 3 degrees.
After this, you need to lay the rafters so that you can install the roof on them. It is worth leaving a distance of at least 60 centimeters between the rafter boards. Such boards are screwed to the support beams. If there is a gutter in the plan for water drainage, about 10 centimeters need to be cut off from the last rafter.
Roof installation
The final stage of construction is laying the roofing material. For the roof you can use slate, tiles, wood, glass insulation or polycarbonate. However, when using boards, the roof may leak, so it will be necessary to cover it with a layer of material that protects against rot.
When using slate or polycarbonate, such problems will not arise. The sheets are attached from the bottom to the top, so that each subsequent sheet overlaps the joint with the previous one.
On a gable roof, attach a canopy on top of the structure to protect against moisture getting inside. After laying the gutter, it is worth pointing the pipe vertically downwards. Around the foundation, at a short distance, it is worth digging small trenches to drain excess water. To avoid inconvenience, you can cover them with a rigid mesh.