Have you long dreamed of creating a cozy place in your own garden, but are not yet ready to build a full-fledged gazebo? This means that one of the modern types of canopies will be ideal for you: wooden or plastic, with a reliable roof or one through which all the night stars are visible. Add a little textiles and imagination, and such a budget building will look no worse than a real summer cafe!
Moreover, building a canopy with your own hands today, with all the abundance of construction and finishing materials, is not at all difficult. The main thing is to decide for what specific task it is needed - for a car or summer get-togethers with friends, a swimming pool or just a bench, and choose the appropriate material. And our photo instructions will help you consider the whole process in detail and become well versed in this matter.
Preparing the base for different types of soil
First of all, when arranging a canopy, you need to take care of a solid foundation for the canopy. If you don’t want a strong gust of wind or a spring thaw to damage the strength of the entire structure, then you need to approach this issue carefully.
So, a lot depends on what kind of soil you have on your site. Moreover, you need to consider not just the ground anywhere, but exactly where the canopy will stand. The fact is that literally plus or minus two meters, and there may already be a completely different composition.
The depth of drilling under the foundation posts depends on whether your soil is heaving or not. It should always be no less than the freezing depth. This is necessary so that while the ice inside the ground melts and the soil “moves” a little, the racks will remain in place.
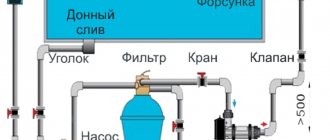
This is the whole secret, i.e. how to make a canopy on unstable soil: the posts will end below the freezing depth level, and the frame will not warp. In Russia, the standard freezing depth is often more than 2 meters, and therefore the racks are installed 2.30-2.50 meters into the ground. In special illustrations, the freezing depth is marked as H:
But, if we are talking about non-heaving soil (it is clear from the name that it “does not lead”), then it is advisable to make a foundation in the form of concrete or brick pillars to the depth of the plant layer. Those. not deep.
Additionally, backfilling with coarse sand or small pebbles, which it is advisable to protect with geotextiles, helps to reduce the severity of frost heaving of the soil. By the way, if it so happens that you installed the pillars higher than the freezing depth of the ground, then over time the structure will become skewed, but this can be easily corrected by wedging and jacking up the sagging sides.
Do-it-yourself structure design
When independently building a lean-to canopy, if it does not have a permanent foundation and walls made of flammable materials, you can completely do without coordination with the architectural department and the VDPO. The main things you need to prepare:
- Select an acceptable project.
- Mark out the frame of the canopy from a profile pipe in a certain area.
- Make a preliminary calculation of the strength of the structure under the weight of a snow covering of maximum thickness.
- Prepare budget cost and step-by-step execution of operations.
IMPORTANT! When working with a project, you need to evaluate the most suitable option for supports that would support the heavy iron structure of the canopy made from a profile square pipe.
The size of the pipe profile directly depends on the size of the building, and primarily on the supporting beam of the supports. In order not to make a mistake in the assortment of components, you need to make a full calculation of all the elements and only then plan the estimate.
Choice of canopy material: wood, stone or plastic?
The stronger and more solid the material, the more reliable the canopy will be, and the more expensive it will be. The more fragile and lighter the frame, the cheaper it is. We would advise you to look for a “golden mean”, but a lot really depends on what exactly you expect from this building.
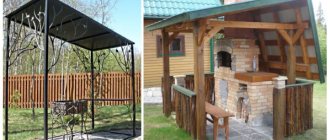
So, the most reliable and strong canopy will be made of brick, a timber canopy is similar to it, and metal, forged and plastic structures are built that are more lightweight and elegant.
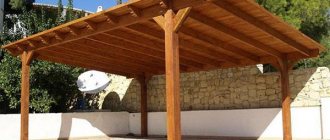
Cozy wooden canopy made of boards and logs
Wooden canopies, which have a wide choice of colors and textures, quite often turn out to be quite durable, although wood is susceptible to moisture and fungus. The whole secret here is in the correct preparation of the wooden canopy, treating it with antiseptics and special paints and varnishes for an open atmosphere. Plus, many types of wood themselves are able to perfectly withstand nature (for example, larch).
A canopy and timber or log house always looks quite solid and expensive, especially if it continues with the main house. But it is not easy to build, and it will need to be maintained every year. And at the same time, wooden racks are still fire unsafe, less resistant than stone ones, and require systematic treatment with antiseptic and fire-resistant mixtures.
But such canopies are easy to install, because they do not require welding, which not everyone knows. But anyone can assemble a canopy using bolts and anchors like a regular construction set.
In addition, lumber is cut and sanded quite easily. True, if you prefer arched canopies, then making them from wood is quite problematic. After all, bending a wooden beam is not easy, although it is possible to assemble an arc from individual wooden blocks.
So, to build a wooden canopy you will need timber for the posts - 70x70 mm, for attaching to the wall - 40x60 mm, and for floors - 40x60 mm. In general, the timber for the racks, of course, can be smaller in size if the area of the canopy itself is very small (although we do not recommend doing this). The minimum value is 40x40 mm, and when the area exceeds 5 m2, then from 60x60 mm.
A columnar foundation is well suited as load-bearing supports for a wooden canopy. The installation process itself will look like this:
Once the posts are ready, secure the rafter beams at the desired height. It is convenient to make them from 150x50 mm boards, while checking the correctness with others using even boards:
Now install the rafters. You need to place them in increments of up to 1 meter (less is better), and take 150x50 mm for the boards themselves. Attach the rafters to the supporting posts and beams with bolts, and simply cut off the excess protruding parts.
So that later there is at least some shadow from the canopy, make a thin sheathing of 5x5 cm bars and secure them with self-tapping screws. And fasten 30x100 mm frontal boards around the perimeter of the roof. If desired, install your favorite roofing material on the sheathing:
This is what the final canopy should look like:
Now let's demonstrate all this theory in practice. In this project, the master used a trick and created from the sheathing and rafter legs one smooth and flat surface for the future translucent coating.
How did he do it? He simply made cuts in the rafters:
If you decide to attach a canopy directly to the house, you can make it semi-closed, for example, with a trellis under a grapevine:
Here's how to build such a canopy:
- Step 1. Let's start with the vertical posts, for which we need to prepare the foundation. The racks must be installed at the interval of the canopy rafters. Make a mark and drill several holes with a drill, from a meter to a meter and a half deep.
- Step 2. Insert roofing felt sleeves into the resulting holes, and into them - racks of steel pipes. Align them.
- Step 3. Pour concrete into the sleeves and prepare the elements of the wooden structure.
- Step 4. Sand the boards, treat them with an antiseptic and drill holes for future fasteners. 150x50 boards were used in this project.
- Step 5. Now you need to make grooves in the places where the rafters are installed, and screw the boards themselves both to the house and to the vertical posts. Use nuts, washers or long studs for this purpose.
- Step 6. Let's move on to making the ramp. The angle of inclination will need to be calculated in advance, taking into account the installation feature of the roofing material, the snow load in your region and whether snow will fall from the main roof of the house. The greater the risk that the snow cap will break through the canopy, the steeper it should be.
- Step 7. Install rafters, at least two meters long, and nail them. Make the sheathing.
- Step 8. Now you can lay the roofing covering - the one you chose initially. Of course, when it comes to a house, they don’t make a roof that is too steep due to the high consumption of materials, but for a canopy it won’t take much of it, and changing the angle of inclination will not play a decisive role.
- Step 9. Cover the open ends of the rafters with clapboard or fascia board, and attach the drain directly to it.
- Step 10. We cover the open ends of the rafters with a front board made of clapboard, and subsequently install a drain on it.
- Step 11. To install the trellis, you will need at least a primitive foundation. In this regard, the most successful would be a tape one, right between the racks. To do this, dig a trench with a bayonet, then pour 10 cm of sand and install the formwork. Next, lay the reinforcement and fill everything with concrete.
- Step 12. Make a brick wall on top of the finished foundation, and install trellises made of 20x30 mm slats on it.
- Step 13: Finally, cover the posts with decorative covers (siding and clapboard work too).
This canopy turns out to be quite cozy! After all, wood is closest to nature and always fits well into the landscape. Especially when it is massive and has retained its natural texture, not hidden under a layer of paint:
However, white paint is not bad at all when decorating such a canopy:
Note that wood itself is inexpensive, much cheaper than metal, but if durability is your priority, you can also purchase laminated veneer lumber. This type is made from several layers of wood at once, and therefore it has a more complex geometry, increased strength and price.
A good-quality brick canopy: in harmony with the architecture of the house
As we have already said, a brick canopy is considered an excellent option in terms of reliability, stability and durability. It doesn’t need to be painted or otherwise looked after every year; it’s built once and that’s it. At the same time, such a canopy looks environmentally friendly, aesthetically pleasing and is absolutely not subject to fire.
A brick canopy always fits well into the appearance of a house, no matter what material it is built from. But such racks require a reliable foundation (usually concrete), which will further increase costs. See how these pillars are built:
When the foundation is ready, proceed to laying the pillars, while reinforcing each row with a mesh. It is important to lay the bricks so that the seams do not match, and fill all voids with mortar. To make the pillars themselves even, a rope is pulled between them for convenience.
Cold and refined metal: forging and profiles
Forged metal makes the most “weightless” and elegant canopies:
Forged metal is durable, reliable and environmentally resistant. Such canopies are always made to order, where you can add any decorative elements, even make a family coat of arms visible! The forged structure will not only decorate the site, but also give it exclusivity.
Technical features of frames
In order to describe in detail the characteristics of canopies made of profile pipes, it is necessary to create a definition of the concept “canopy”. It is a small architectural form, often acts as a component of a covered area, and at the same time has important architectural or decorative significance. The main purpose of canopies is to protect a certain area from precipitation and external environmental influences.
High resistance to biological, physical and chemical influences allows metal profiles not only to differ significantly from other materials in functionality, but also to be quite advantageous in use and mass consumption. All types of frames built from this material are easy to install and section.
What to make a reliable canopy roof from?
There are so many roofing coverings today that it’s dizzying, and you can easily use absolutely all of them to decorate the roof of your shed. Let’s take a closer look at those materials that you may have been afraid to tackle. But they make the best projects!
Glass and polycarbonate: translucent structures
Today, quite a lot of offices and hotels decorate the facades of their buildings with large glass canopies over the entrance. So this space becomes both more comfortable and safer, and the glass itself gives the building a tangible feature of the desired style. If you like this idea, then why not implement it on your own site?
You need to choose durable glass - one that will not break into small pieces if something hits the roof. Therefore, both tempered glass and laminated glass, otherwise called triplex, are suitable for this. In this, several sheets of hardened glue are connected with transparent glue. It is almost impossible to break!
Here is a very interesting video of the installation of such a canopy for a residential building:
Look how light and airy canopies with translucent coating look:
If you skillfully play with color, it is not difficult to achieve the feeling of a real sunny day even in the cloudiest weather. And in the dark season, cozy lighting will be provided by a built-in lamp, which is attached directly to the arched structure:
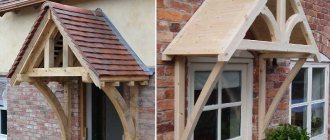
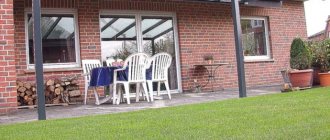
Shed with a wooden roof in front of the house entrance
If you are looking for some interesting architectural solution, then look at how unusual a canopy can be:
Let's go through the construction of this shed step by step. Its parameters: 110 cm height and 3.5 meters width:
- Step 1. Set up the porch. To do this, we first pour a concrete base, and then build a frame made of timber, 150x150 mm.
- Step 2. Coat the timber with a colorless antiseptic, which will protect the wood from insects and fungus.
- Step 3. Now we lay the floor on the porch and finish the steps.
- Step 4. We proceed to the construction of a canopy over the porch. To do this, you will need to weld a metal frame and cover it with wooden boards (preferably made of larch).
- Step 5: Paint a protective glaze over the canopy, steps, and porch sides to also highlight the visible wood grain. It is important that neither the wooden frame of the canopy nor the steps are afraid of precipitation and temperature changes.
Scope of application of structures
At the moment, household pipe structures based on metal profiles are the leading direction in the manufacture of frames and canopies with polycarbonate coating. Great success is due to the long service life achieved due to the additional invisible aluminum shell, which prevents the influence of oxygen on the metal.
It is worth understanding that the structure requires proper care and supervision, otherwise its service life may be reduced several times. Otherwise, the frame will last for at least 10 years.
The use of awnings made of profile pipes extends to the following areas of consumption:
- Parking lots and parking lots: the main purpose of operation is to create good and reliable protection from weather conditions; in clear weather, the construction of covered areas that prevent the negative impact of ultraviolet rays on cars.
- Suburban plots, cottages and the private residential sector: here the main emphasis is on creating structures that protect crops from external environmental influences. Another goal is to equip individual recreation areas with a roof that provides protection from both the hot sun and cold rain or snow.
- Public places: for the most part, these structures are needed here for recreation or shelter from bad weather. Often, you can gather here with a small group and relax.
Despite the fact that the purposes of using canopies made of profile pipes are completely different, the main goal in their construction is always the same - drawing up drawings. This is the main and vital stage, without which the construction of protective structures of this kind is impossible. In addition, diagramming is reinforced by additional complexities caused by application values.
Market news and unusual technologies
There are more interesting and unusual ways to construct a canopy. For example, German students managed to create shadows using drones! Their system is autonomous and is called Cyber Physical Macro Materials.
The essence of the idea is that drones independently select places that need to be protected from the scorching sun (for example, with people on vacation), and rally for this purpose. It looks simply amazing, and savvy summer residents are trying to repeat something similar using cheaper and more readily available materials.
For example, by installing umbrellas or large plastic crafts on a long cane that is easily stuck into the ground, and creating rest areas in the country simply by a cluster of such umbrellas, easily regrouped in the right place. Or they hang such elements in the air on thin ropes attached to the frame of the canopy.
What kind of canopy do you have at your dacha? Share your ideas!
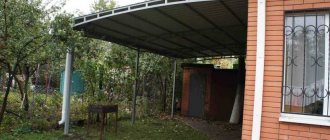
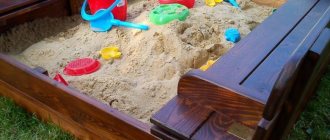
Options for canopies that protect cars from sun and rain
In summer cottages, three types of awnings are most often found:
- Extensions to the building. Even a novice builder can carry out the construction with his own hands. They are fixed to the wall on one side, so you will have to dig in fewer pillars.
- Stationary ones have at least four supports, their design is varied.
- mobile awnings can be easily moved to another place and rolled up to be stored.
Tip: To reliably protect your car, you should build a carport with side walls.
The choice of building a summer garage depends on the size of the summer cottage and the location of the house. The second option is more profitable; the structure is installed near the fence.
Construction tips
Any construction includes a whole range of works. This includes the purchase of materials, the selection and preparation of a site for installation, the engineering calculation of a canopy made from a profile pipe, and of course the assembly process itself.
Gable roof.
Preparatory activities
If you have several options for placing a canopy, you should first decide on the location. It is better to place such structures on a hill or on a relatively flat surface, where it is easy to arrange drainage. Water will collect in the lowlands, hence the additional costs for storm drainage.
A preliminary drawing of a canopy made from a profile pipe must be made
In addition to the location of the structures themselves, it is important to take into account the cross-section of the pipes. So, in the case when the length of the building does not exceed 4 - 6 m, and the width fluctuates around 3 - 4 m, for racks it is enough to take a pipe with a cross section of 60x60 mm
For a larger quadrature, a section of 80x80 mm is used.
The simplest drawing of a canopy made from a profile pipe.
The top frame, on which the trusses for the six-meter canopy will be based, is made from a 40x25 profile. The pipe for arches and cross trusses is selected depending on the amount of precipitation in the area. For courtyard structures with a small square footage, as a rule, products with a cross section of 30x30 mm are sufficient.
The material from which it is planned to construct the roof plays a big role here. For curved arched roofs, it is currently advisable to use lightweight, translucent cellular polycarbonate. It is better to make a straight single or gable canopy in the barbecue area from a fireproof metal roofing sheet or cover it with slate. Naturally, the heavier the material, the thicker the structures should be.
Roller pipe bender.
Canopy installation
Any work of this kind begins with marking and installing support columns. It is recommended to install supporting metal columns for light structures in the yard or at the dacha in increments of about 2 m. If the spans are larger, then the cross-section of the pipes will need to be increased, and the price will naturally increase.
Demountable connection.
Holes for installation are conveniently and quickly made using a garden drill with a diameter of 300 mm; a depth of 60 cm is sufficient. When all the holes are ready, the bottom of them must be compacted well, otherwise the column may shrink.
Before installation, a gravel or sand base 50 mm thick is filled and compacted at the bottom, after which the column can be installed and filled with concrete. All columns are mounted strictly level or using a plumb line. It is better to carry out such work with an assistant, since there is a high probability of making mistakes alone, and when the concrete sets, it will no longer be possible to correct it.
Straight trusses from profile pipes.
Concrete is poured to the level of the beginning of the pit for the construction of the screed. The floors under the canopy, depending on the financial capabilities and purpose of the structure, are laid with paving slabs or a concrete screed is made.
In both cases, you will need to make a small pit. To do this, the soil is selected to a depth of 100–150 mm, after which the surface is leveled and compacted. If paving slabs are being laid, it is recommended to cover the surface with geotextiles to prevent grass from breaking through.
To arrange the sole, you can use sand or gravel. The filling is done to a level of 50 mm and is also compacted. This layer is necessary to ensure normal drainage.
Next, the reinforcement frame is laid and a layer of concrete 50 mm thick is poured. This screed can withstand loads of up to 3 tons.
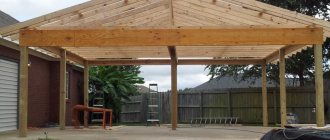
Covered parking on 4 pillars.
On top of the columns, a strap is made around the perimeter of the canopy. The transverse trusses for the sloping roof will be based on this horizontal frame. For a straight single or gable roof, trusses are installed in increments of 800 mm. The installation pitch for a curved roof varies depending on the width of the polycarbonate sheets, but, as a rule, it is about 500 mm.
The video in this article shows some of the intricacies of installation.
Tips for choosing a quality profile
Before erecting any structure, you should decide on the choice of material. When purchasing a metal profile or pipes, you should carefully inspect the workpieces to see if there are any cracks, cavities, sagging, inconsistencies along the seams, or a large number of dented and bent workpieces. When purchasing galvanized materials, it is advisable to check the quality of the coating - whether there are any peelings or sagging.
When purchasing, you must request a copy of the certificate and a receipt. It is imperative to ensure that the pipe wall thickness corresponds to that stated in the documents. You can’t make pipes in a garage on your knees, and there are no fakes, but you can come across poor quality material, so it’s better to buy in fairly large stores.
Online calculator for pitched roof
This calculator will simplify the selection of materials for the rafter system and the final roofing covering, and will allow you to calculate the angle of inclination of the slope, the amount of sheathing and the size of the rafters.
Before making calculations, it is strongly recommended:
- Study the features of the rafter system for a specific roofing material. To a greater extent this applies to the sheathing. So, for bitumen shingles, the sheathing must be solid (the board can be replaced with sheets of OSB or plywood). For metal tiles, the lathing is installed taking into account the size of the wave.
- Check the reliability of the selected rafter angle and pitch. The program “Rafters 1.0.1.” will help with this.
Calculation results:
Roof angle: 0 degrees.