A canopy or other structure over the porch is required not only to complete the building, but also serves practical purposes. The element protects the entrance and porch from precipitation, making them more convenient and safe for the owner.
Brief overview of the article
- Design requirements
- Canopy or canopy
- Visor options
- Materials for making frames and roofing
- Single-pitch canopy
- Manufacturing of a single-pitch structure
- Gable visor
- Manufacturing of a gable structure
- Arched canopy
- Making an arched canopy
- How to attach the visor
- Canopy over the porch
- Design ideas
- Photo of a canopy over the porch with your own hands
Design requirements
When planning to decorate the entrance to your house with your own hands, it would be wise to first familiarize yourself with the various design options and safety requirements.
- To fully protect the porch from precipitation, the dimensions of the protective element must exceed the area of the porch by no less than 50 cm.
- The canopy must be strong, have reliable fastenings to withstand gusty winds and withstand the mass of possible snow cover.
- The appearance of the structural element must be in harmony with the overall design of the building.
For this reason, at the planning stage it is necessary to consider the design and fastening of the protective structure.
Canopy or canopy
Despite the external similarity, both products have a number of fundamental differences.
- The canopy must be equipped with vertical support posts, while the canopy does not have any.
- The canopy area is noticeably larger than the canopy.
When choosing the option that is most suitable for the structure, it is important to consider a number of factors.
- The design must correspond to the size and purpose of the building. For example, forged canopies will look out of place when placed on modest temporary country houses. A massive and bulky canopy can ruin the impression of the front entrance to the cottage.
- It is advisable to make the supporting elements for the canopy from the same material as the building itself. Otherwise, the design may seem like an alien addition and cause sincere bewilderment.
- At the planning stage, it is necessary to accurately determine the dimensions and design of the structure.
What materials are they usually made from?
When the shape and style of the future visor are determined, it remains to decide what to make its base from and choose a coating.
Metal tiles
Making canopies from this material is most popular because:
- the canopy over the porch goes well with the roof made of the same metal tiles;
- the material is not afraid of exposure to the sun, precipitation and temperature differences;
- retains its original appearance for many years;
- does not require special care and maintenance;
- Easily mounted on any base (wood or metal).
The big disadvantage of a metal visor is noise. You can still put up with raindrops, but when an apple or something similar falls on the roof, the roar will be very strong. This disadvantage can be solved by proper sound insulation.
Ondulin
Lightweight, practical roofing material has replaced the old, impractical slate and almost completely forced it out of the market. Ondulin is used to cover houses, cottages, bathhouses, outbuildings and, of course, sheds.
Advantages of Euroslate:
- wide palette of colors;
- ease of installation;
- little weight;
- acceptable price;
- noise absorption;
- water resistance.
The disadvantages are lower (compared to metal tiles) strength, durability, and flammability. In addition, the material fades in the sun, so after a while not a trace will remain of the bright visor.
Polycarbonate
For canopies, special monolithic polycarbonate is used - cellular polycarbonate will not work in this case.
The advantages of thermoplastic include its transparency (it will be light on the porch), flexibility (ideal for arched, semicircular, dome canopies), lightness (suitable for any base).
The disadvantages of a polycarbonate porch canopy stem from its origin: the plastic “walks” with temperature changes, fades in the sun, and gets scratched. The latter is especially noticeable, because the roof is transparent.
The photo shows a combination of polycarbonate and metal
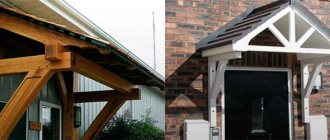
Tree
Eco-friendly natural wood is at the peak of its popularity, so it is suitable not only for a chalet-style country house, but will also fit into the exterior of a modern cottage. Making a wooden canopy over the porch is easy and quite inexpensive.
But when choosing wood as the main material, you need to be prepared for regular care: about once a year you will have to coat the wood with special impregnations that protect it from moisture, insects, and fungus.
Often, wooden elements serve only as supports, and the roof is covered with something more suitable - for example, corrugated sheeting.
Corrugated sheet
This roofing material differs from metal tiles primarily in price. But when betting on a favorable price, do not forget about the likelihood of rust, as well as problems with sound insulation.
If the above nuances do not bother you, choose corrugated sheeting. For a small price, get a durable coating that is not afraid of snow, rain, and UV rays.
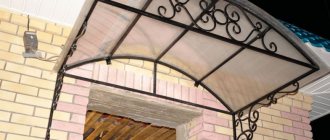
Forged visors
Perhaps the most spectacular are the forged visors! Thanks to the almost limitless forging possibilities, the design can be absolutely anything - from classic curls to romantic flowers or original abstraction.
Forged structures have a safety margin, a long service life and are not afraid of atmospheric surprises in the form of hail or gusty winds.
Forged canopies are covered with metal tiles, ondulin, and polycarbonate. But the most stylish forged visors are obtained by combining metal with transparent glass.
Glass
Transparent canopies over the porch literally float in the air. Thanks to the visual lightness of the material used, the design does not weigh down the facade, does not attract unnecessary attention, and at the same time copes with the task with an 5+.
For canopies, only tempered glass is used: reliable, safe, and in appearance no different from standard glass - it also transmits light.
The only negative is the difficulty of washing. After rain, smudges will be visible on the glass roof, which must be removed regularly to maintain an aesthetic appearance.
The photo shows a minimalist design made of glass and metal
Visor options
There are several types of construction.
- A single-pitch (sloping or straight) element, the upper side of which is necessarily attached to the wall.
- A gable structure, the slopes of which are directed in opposite directions.
- A semicircular visor in the shape of a round arch.
- Tent structure.
The choice of construction type is determined by the overall building design, skill and financial investment.
Materials for making frames and roofing
At the initial stage, it is important to decide what the product will be made of.
Traditionally, profiled metal, aluminum tubes or wooden beams are used.
- To form an iron base, you need the ability to work with a welding machine.
- The wooden frame has a relatively short service life.
For roofing work, it is easy to use polycarbonate, slate, metal tiles, profile iron, glass, and ondulin.
Often the canopy is covered with the remnants of the roof that was used during the construction of the house. The weight of the roofing material is also taken into account. This affects the features of the frame and the type of fastening.
The selection of building materials should be made based on the design of the building, as well as financial capabilities, availability of tools and professional skills of the craftsman.
The type of roofing used also depends on the shape of the canopy. For arched or shaped hipped structures, a flexible roof would be the best option.
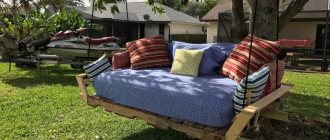
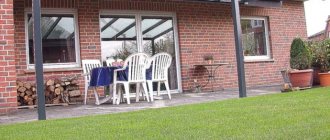
Wooden canopy supported by piles
The canopy can vary in design and size. Metal pipes or wooden boards are often used for the frame. It can be mounted or supported. A canopy on a support can be quite large in area, protecting the porch and a small area in front of the house.
Let's take a closer look at how to build a canopy over a porch on a support made of piles with your own hands; the step-by-step instructions with photos are very clear and accessible even to a beginner.
To work you need to prepare:
- wooden beam;
- slats;
- metal bases for piles;
- cement;
- self-tapping screws of different sizes.
The canopy should be made like this:
- Assemble 2 supports. Each of the boards is 220 cm in length and there are short boards laid between them, fastened together with screws or long screws.
- Dig holes for the piles, install metal bases, and fill with concrete.
- Screw the supports to the metal bases.
- Connect the supports on top with a board with 4 slots.
- Fasten the exact same board to the facade of the house with self-tapping screws.
- Place the logs in the grooves for the foundation under the roof.
- Secure the metal corners along the edges with self-tapping screws to secure the roof.
Also read: How to choose a table and chairs for your kitchen set
The frame is assembled. All that remains is to cover the canopy. For this, you can use any roofing material, for example, metal tiles or soft tiles.
Single-pitch canopy
The single-pitch version is characterized by its low weight and structural simplicity. Inclined or straight visors of this type are easy to make without prior experience in such work.
Manufacturing of a single-pitch structure
- The dimensions of the element are calculated based on the area of the porch, taking into account the slope of the structure within 20 degrees. To ensure complete coverage of the porch, the dimensions of the structure are calculated to be 30-50 cm larger than the porch.
- After making the base, it is fixed in the right place. Experts recommend fixing the wall beam and slopes using anchor bolts.
- A slatted sheathing for metal tiles or corrugated sheets is screwed onto the frame. For soft roofing, it is recommended to use a solid base.
- The next stage of work will be attaching the roof, top strip and parts for the drain.
- Parts of the structure should be coated with protective compounds to extend the life of the product.
It is recommended to supplement the metal visor with original openwork thrust elements.
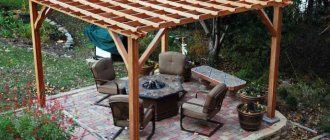
Manufacturing of a gable structure
- Work on the manufacture of a gable canopy begins with careful measurements and the creation of a drawing.
- The frame beams are connected at an angle of 40-60 degrees.
- The finished frame is attached to the wall, lathing is placed on it and covered with the material chosen for the roof.
- Gable canopies in the country are often complemented by two support pillars dug into the ground.
- Experts advise, regardless of the size of the structure, to take care of the protective strips and gutter.
It is easy to use any type of roofing as a roofing material. A canopy made of metal tiles or corrugated sheets on a wooden frame will require the use of self-tapping screws with a neoprene gasket as fasteners to secure the roofing sheets to the sheathing.
Canopy made of corrugated pipe and polycarbonate with dimensions and drawing
Polycarbonate can be considered one of the cheapest and most reliable materials for canopy roofing. It is easy to work with, and it protects well from rain, snow, and sun rays.
To create the frame of the canopy, a 20 by 20 corrugated pipe is used. For the roof, polycarbonate 10 mm thick is used. The material color shown is bronze. The step-by-step instructions further describe in detail how to build a canopy over your porch with photos and explanations.
The canopy is located in the center of the door. The width will correspond to the width of the porch, and the length will be 210 cm, which corresponds to the width of the polycarbonate sheet. All dimensions are in the drawing. It is important to first draw a picture with all the guides, so that later it will be convenient to make a metal frame.
Manufacturing process:
- You need to start with the frame: cut blanks, jumpers and forms into arcs. Clean until shiny.
- Bend the arcs and place them on the assembly table.
- Weld 2 trusses with an openwork pattern from blanks.
- Assemble the visor on oven mitts, scald the bottom, turn it over and scald the top. Clean the seams.
- Degrease the frame and paint it. When it dries, you can screw the polycarbonate and secure the canopy over the door.
You can choose the paint and color of polycarbonate to your taste; the shades in the sample are in harmony with the color scheme of the front door.
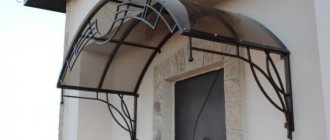
Arched canopy
The arched design will fit organically into any style. As a rule, semicircular products are provided with a frame and profiled pipe and covered with colored polycarbonate.
Making an arched canopy
- The first step is to take measurements and make a competent drawing of the product.
- The frame is made from aluminum pipe. Two blanks must be bent, giving them the desired shape.
- The resulting arcs are fastened with straight parts.
- Elements are welded to the rear arc to fix the structure on the wall.
- If the visor is significantly wide, it must be equipped with an additional arc for strength.
- The finished frame is coated with a primer and painted.
- After the paint has dried, it is securely fixed to the wall and covered.
The polycarbonate visor is lightweight and reliable in use. If the arched structure is planned to be covered with soft tiles, then it is necessary to make a thin sheathing.
Canopy made of metal pipes and corrugated sheets
Let's take a closer look at how to build a self-supporting canopy over a porch with your own hands, and step-by-step instructions and photos will help even a beginner cope with the process without any problems.
Here the work uses metal pipes to create a frame, which is then attached to the facade of the house above the door. Corrugated sheeting was chosen for the roof, as it is an inexpensive and very reliable material that will last a very long time and protect from any bad weather and scorching sun.
The design of the frame is quite simple, it is a cellular rectangle. The sizes can be selected individually. It is advisable to first draw a sketch and write down the dimensions so that it is convenient to cut the workpieces and assemble the structure.
You need to do this:
- Work begins with the manufacture of a metal frame. To do this, blanks are cut from the pipe and adjusted to size.
- The frame is assembled on the ground, all the parts are welded one by one, according to the sketch. After welding, it is important to clean all seams.
- Install anchors by drilling holes.
- Attach the frame to the wall above the door.
- Cover with corrugated sheets to size and secure with bolts.
Also read: How to make a flowerbed from stones and cement
The structure is ready. The frame can be painted to match the color of the roof or walls of the house.
How to attach the visor
The service life of protective elements is directly determined by the quality of their fastening.
There are several types of methods for fixing homemade structures and ready-made canopies over the porch.
These include:
- fastening with brackets;
- use of anchor bolts;
- fastening by welding to the built-in beam.
The use of anchor bolts involves securing them to a supporting horizontal beam. The frame parts are secured using shaped brackets or grooves made in advance in the horizontal beam itself.
If the canopy is not very large, then brackets can be used to fix it.
If a metal beam was already laid when laying the walls, then the frame is simply welded to it.
How to fix if the wall is multi-layered
Recently, more and more buildings have multi-layered external walls - ventilated facades, insulation... The load-bearing part of the wall turns out to be covered with a couple of layers of materials, the load-bearing capacity of which is only enough to hold its own weight. You won't be able to attach anything to them. The entire load must fall on the load-bearing wall.
How to attach a canopy over the front door to a three- or two-layer wall
Even if the outer layer is a finishing brick, it costs nothing to attach to it. Masonry is usually carried out in half a brick. So it only looks durable on the outside. Even the smallest and lightest canopy cannot support the weight, and the supporting columns do not help either.
Therefore, with any multi-layer wall, holes are made in all finishing/insulating layers, and the structural elements are attached to the load-bearing wall.
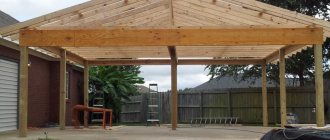
Canopy over the porch
If you plan to install a fairly large canopy, then it is reasonable to take care of additional supports that can withstand a significant load.
In this case, we are talking about building a canopy.
Arranging a canopy with your own hands will require a detailed drawing to accurately calculate the need for building materials.
When building a canopy, it is important to take care of the safety of the structure and build a strong frame with full rafters.
The available material is wood. If desired, the support pillars can be easily assembled from blocks or bricks.
As a roof, you can use the same material that was used for the roof of the house.
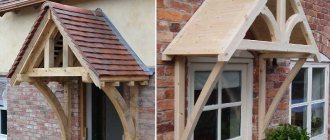
Carved plywood canopy covered with iron
Below are step-by-step instructions with photos on how to build a carved canopy over a porch with your own hands from plywood. This canopy looks quite nice, but it will not last long and can be damaged by constant rain and snow. For reliability, the canopy can be coated with varnish or any moisture-proof impregnation.
In the work you need to use plywood with a width of 15 mm in 2 layers and a board for the frame.
Do this:
- Draw a sketch of the corners on the prepared plywood. You can do this arbitrarily to your taste or prepare a preliminary drawing on paper. Cut out 2 corners.
- Connect the corners with boards, and make a crossbar in the middle to strengthen the frame.
- Cut out the openwork front crossbar at the front.
- Coat the frame with varnish in 2 layers. Dry each layer.
- The frame is ready.
- Make a roof. It can be made from any material you have.
- Galvanized steel will make it reliable. It is better to make grooves on the sheet for drains and bend them. Screw the sheet to the frame.
All that remains is to hang the canopy over the door. To do this, you can use bolts and screws.
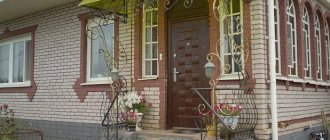
Design ideas
By showing ingenuity and creativity, it is not difficult to make a unique element that will decorate the entrance group.
Beautiful forged structures coated with colored polycarbonate look dignified and attractive.
In many ways, the design of the canopy depends on the design and purpose of the building itself. An ancient building requires a stylized curtain element with thematic wrought iron patterns. A household canopy for storing firewood requires a simple design.
Modern cottages can be equipped with original semicircular or arched structures with additional details for climbing plants.
It’s easy to take ideas for inspiration from the gallery of photos of canopies over the porch.
Photo
In this photo gallery, you will see many interesting ideas for making a visor:
Wooden canopy
Metal
On the balcony
Corner over the porch
Above the entrance Original shape With forging elements
Beautiful visor Small size
Decorative