Have you long dreamed of creating a cozy place in your own garden, but are not yet ready to build a full-fledged gazebo? This means that one of the modern types of canopies will be ideal for you: wooden or plastic, with a reliable roof or one through which all the night stars are visible. Add a little textiles and imagination, and such a budget building will look no worse than a real summer cafe!
Moreover, building a canopy with your own hands today, with all the abundance of construction and finishing materials, is not at all difficult. The main thing is to decide for what specific task it is needed - for a car or summer get-togethers with friends, a swimming pool or just a bench, and choose the appropriate material. And our photo instructions will help you consider the whole process in detail and become well versed in this matter.
Advantages of hanging structures in a summer cottage
Sheds are a good option to complete your landscape design. Such elements decorate and fill empty space, fulfilling a functional role. The structure protects cars, recreation areas, etc. from the negative influence of direct sunlight and precipitation. These structures have many positive aspects, thanks to which they become in demand in a summer cottage. The advantages of canopies are:
- The structure is durable, but not capital - when compared with buildings and gazebos.
- The design is lightweight and easy to install.
- A roof that is permanent will last longer than an awning.
Attention!
A canopy is a good solution for a summer cottage, but there is one drawback - it is windy.
In addition, a canopy is a structure that does not require large financial costs compared to buildings of a similar type.
With retractable roof
Such purchased canopies are quite expensive, but if desired, you can make a folding fabric structure with your own hands. It can be opened to let in the sun and closed when shade is needed. You will need polypropylene pipes with plugs, a metal cable, fabric and screws with ears.
The awning is mounted on wooden supports and a crossbar in the form of a board. Choose fabric with water-repellent impregnation so as not to remove the canopy during rainfall.
A self-created canopy will not only be protection from the sun, but also a source of pride for the dacha owner.
Special purpose
Self-made hanging structures can be permanent (major) or temporary (collapsible). But, both of these varieties are united by the main function - to protect a certain space, sometimes a significant one, from precipitation and sunlight. Based on their design features, canopies are conventionally divided into the following types:
- Open - several vertical supports on which a light roof made of different materials is located.
- Closed - stationary buildings with glazed openings or covered with sheets of materials that are resistant to moisture and wear.
- Semi-closed - frame buildings with a stationary roof and parapets.
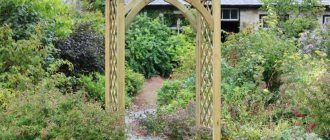
Wall-mounted structures can stand alone or be supported by another structure. Awnings can play the role of canopies over a porch, gate, or gate. These structures can be used as shading for shade-loving plant crops, which enhances the originality of the landscape design of the site.
Stage VI. Roofing pie device
What is insulation? First of all, it is a waterproofing film, which is located directly under the roofing. The main task is to prevent moisture from getting in after rain or from melted snow through problem areas in the roofing.
If this is planned, you will do everything in the following sequence:
- Step 1. Place a vapor barrier film on the finished canopy joists and nail it in place using nails or a construction stapler.
- Step 2. Place thermal insulation on the film.
- Step 3. Cover it all with another film - waterproofing. Also nail it to the joists.
- Step 4. Nail the batten and roofing on top.
Ventilation of such a roof is mandatory. Forced, if you install a special fan, or natural, if you position the dormer window correctly or leave a mandatory gap between the waterproofing film and the insulation so that the air takes moisture droplets from it.
Types of canopies
There are few design options for canopies. This is confirmed by photographs of these structures. All hanging structures are divided into two types depending on where they are located:
- adjacent to the house;
- standing separately.
The canopies, which are built as an extension to the main building, are located close to it. Most often, such canopies are connected to the front wall of the house (facade). However, there are also structures located on the side or behind. Various materials are used to install awnings adjacent to the house. Most often, the canopy is built in combination. This means that different materials are used for its construction.
Independent structures located separately from the house have a different functional purpose. They play the role of a gazebo for relaxation. It is also possible that a canopy is built to protect the car from precipitation. Separately, it is worth mentioning the roofing of the canopies.
If everything is more or less clear with the frame, then there are many types of roofing. Moreover, this applies not only to the type of structure, but also to the material from which it is made. The canopy roof can be straight or at a certain angle. Also an important parameter is the number of stingrays. The roof can be made of metal, wood, polycarbonate, covered with fabric material, etc.
DIY construction of a lean-to canopy
Before starting construction, it is necessary to consider the design of the drainage system, taking into account the flow of water in one direction. This is especially important for a wooden shed with a pitched roof.
No less important is the development of drawings of the future structure. At this stage, the dimensions of the structure, the expected load on the supports and the calculation of their number are specified.
Stage 1. Design and installation of the farm.
This stage involves drawing up a diagram of the future structure, determining its parameters, including the angle of inclination of the polycarbonate lean-to canopy. In addition, at this stage, the exact quantity of required materials and trusses that are needed to build the shed is determined. If you plan to attach polycarbonate to a wooden frame, you should understand this installation technology in advance.
For sheds with one slope, the trusses are located at the edge of the structure and in the middle directly under the roofing material. Most often, trusses are made from a round profile pipe, the diameter of which is 30 cm. A square profile pipe with a cross section of 30*30 cm can also be used. To create a truss angle, the upper pipe is taken slightly longer than the lower one. The spacers between them are joined at an angle of about 25 degrees and installed in a zigzag. The sheathing elements are attached directly to the trusses.
Stage 2. Site preparation.
According to the drawn up drawing of the canopy, on the site allocated for construction, appropriate marks are placed for the location of the supporting elements of the structure. It is taken into account that a larger area is required to accommodate a car than for a recreation area. The dimensions of the transport canopy are calculated based on its dimensions.
To install supports in the marked places, you need to dig holes, pour a little concrete into them and install formwork from larger pipes. You need to pour crushed stone around the formwork and pour concrete mortar. Without waiting for the mixture to harden, they set up the supports, immersing them in the formwork and also filling them with concrete. It is very important at this stage to ensure correct installation. Otherwise, distortions and poor stability cannot be ruled out, which can cause structural failure. The concreted supports are left until the mixture has completely hardened, approximately 72 hours.
Stage 3. Installation of trusses and laying of roofing material.
According to the drawing of a canopy with a pitched roof, the trusses are installed directly on the poles and fixed by welding. The sheathing is laid and secured on top of the trusses, then the roofing material is installed. Self-tapping screws with thermal washers are used as fastening elements for polycarbonate; for corrugated sheets and metal tiles, ordinary self-tapping screws are used. After completion of the roofing work, a drainage system is installed.
The answer to the question of how to make a canopy roof with your own hands cannot be called very complicated. But quite often home craftsmen do not have special knowledge and skills, so they encounter many difficulties.
Qualified specialists who know all the nuances of the installation process help solve the problem. They will perform the work at the highest level, taking into account the preferences and requirements of clients. As a last resort, you can purchase a ready-made structure that can be assembled quickly and easily.
Constructive points
To facilitate the construction of a suspended structure, it is necessary to carefully review in advance the features and subtleties of the design solutions that are used during construction. All types of canopies have common components - nodes. But the difference between these elements is in the execution technique. The main 3 nodes in the structures are as follows:
- Suspension of console models, otherwise – frame or support frame. Concrete-filled or dug-in pillars, frames, and a set of fastening elements.
- Rafter system. There are different types - arched, domed, wavy, hipped, lean-to. It consists of sheathing and rafter legs, crossbars, mauerlats, tie rods, and struts.
- Roof. They are made from different materials - slate, PVC, roofing felt, metal tiles, ondulin, polycarbonate, profiled sheets. Lighter types (corrugated sheeting, etc.) are more often used to make the structure less heavy and reduce the load on the supporting part.
Large canopies must have a complex rafter system assembled from trusses with a large number of struts and supports.
Using different types of rafters, roofing materials, and supports, it is possible to create a unique structure that enhances the decorative and functional components of the local area. You can place tubs of flowers on the supports of the hanging structure or plant flowering and fruiting plants along them.
Advantages of metal tiles
Quite often, when building a lean-to shed with your own hands, you use metal tiles, which are also made from galvanized steel sheets. Unlike corrugated sheeting, the material has the following advantages:
- High strength and reliability.
- Resistant to the formation of corrosion spots and mechanical damage.
- Excellent soundproofing and thermal insulation properties.
- Large selection of colors and profiles.
When choosing between metal tiles and corrugated sheeting, it is worth remembering: the first material is laid on a roof with a slope of more than 12 degrees, the second roofing covering has no restrictions of this type.
Stationary and temporary suspended structures
Stationary suspended structures do not imply the mobility of the structure, as in the case of temporary structures. In permanent buildings, the frame must meet many conditions: protection from wind, waterproofing. Because of this, a good location for stationary canopies is their extension to the wall of the house.
But, it is necessary to think about how the new structure will be connected to the foundation of an already built house - the fastening area must be reliable.
Stationary hanging structures are very similar and differ little in useful use from gazebos and terraces. Roofing materials are often used as a covering or a polycarbonate roof is made. To protect from the wind, if side panels and window openings are not provided, awning fabric is often used. After the end of the summer season, it is removed and brought into the house.
Attention!
For an awning, you can use a thin tarpaulin or parachute fabric.
Temporary canopy structures are often collapsible protection from sunlight and precipitation. An awning is often used as a covering. Such mobile structures are assembled for the duration of their presence at the dacha - before leaving, the structure is simply dismantled and brought into the house. Sometimes temporary canopies are even made frameless - the awning is stretched between the trees.
Stage III. Construction of the foundation
So, we’ve decided on the material – it’s time to start construction:
- Step 1. So, we dig cylindrical holes. Make the depth from 60 centimeters to 90. In total, for this option we will need 6 holes.
- Step 2. We prepare the concrete separately, for example, in an old bathtub, where it is easy to mix cement and sand with gravel. Take the proportions 1:3:5. Add water.
- Step 3. Mix well and pour a layer of concrete into the holes so that the thickness is 5 centimeters, and lower the pipes there. They will serve as formwork for the foundation.
- Step 4. Now we fix the pipes from the outside. Fill with concrete.
- Step 5. Level the pipes and make shelves for them from boards.
- Step 6. Now we wait three days for the mixture to harden. The easiest way to install wooden posts on such a foundation is with an anchor, which is installed on completely hardened concrete.
- Step 7. Now we connect the support beams to this pillar. We screw the boards with self-tapping screws so that they protrude about 3 centimeters beyond the edges of each post. And on the side these protrusions will be needed to fasten the crossbar of the sheathing.
- Step 8. To give the entire structure greater rigidity, especially if the anchors have come loose, use spacers. The spacers are cut at an angle of 45 degrees and screwed with self-tapping screws.
That's all! The hardest part is behind us.
Necessary for construction and finishing
The structures are made from various building materials, which are sold in any store. The frame of the canopy is made of wood or metal, sometimes metal parts are combined with wooden ones. In addition, to facilitate and simplify the design, plastic pipes are used as a base. The roofing material is chosen at your discretion, it can be:
- monolithic polycarbonate;
- corrugated sheeting;
- fiberglass;
- metal tiles;
- durable polyethylene;
- waterproof fabric;
- plexiglass, glass;
- slate.
Each variety has its own advantages and disadvantages. When choosing a specific coating, it is necessary to take into account the design features and strength of the base. But, in any case, it is recommended to use lightweight types of covering that will not overload the frame and foundation of the canopy.
It makes sense to use metal sheets, tiles and slate only in the case of permanent structures attached to a country house.
Advantages of corrugated sheets
A canopy made from corrugated sheets does not require additional decoration, as it initially has a pleasant appearance. A careful choice of color and shape of the material will allow you to complete the design of your personal plot.
Attention!
Corrugated sheeting is easy to install and you don’t need to buy special materials to secure the sheets - standard consumables are not enough.
The key positive aspects of using corrugated sheets are as follows:
- resistance to mechanical stress;
- long service life;
- environmental friendliness;
- frost resistance;
- does not require careful care;
- The dye is resistant to sunlight.
In addition, the described option has good operating parameters.
Advantages of polycarbonate
Polycarbonate construction is a good choice, as the sheets are flexible and can be changed to the desired shape. The material is lightweight, which allows you not to weigh down the hanging structure and not to make the frame too strong.
There are several types of polycarbonate. Any type of this material is characterized by certain features and advantages:
- Monolithic - similar to glass, it can be colored or transparent.
- Cell phone – the price is modest and it’s easy to fix.
- Profiled - similar in characteristics to monolithic, but has a wave-like shape - like slate or metal tiles.
The choice of a certain type depends on what the owner of the summer cottage wants to get in the end. Nowadays, monolithic polycarbonate is in demand, which, in addition to strength, is characterized by high appearance properties.
The monolithic type of polycarbonate, with the exception of decorative purposes, is also able to withstand high mechanical loads - it is not a fragile material.
Textile
Awning fabrics are often used as the main material for canopy roofs. This material is used not only for self-construction of hanging structures; many automatically assembled structures also have a fabric roof. The frame of such canopies is mainly metal.
The following types of fabric are used for covering:
- canvas;
- acrylic;
- tarpaulina;
- polyester.
A removable fabric roof for a canopy is often found, since the owner does not have to worry that bad weather will damage it while he is away from the dacha. Moreover, in fact, 9 out of 10 cafes and restaurants that have open areas use fabric as a canopy roof. This is explained by the fact that such summer areas are easy to clean for the winter - they do not require constant maintenance, like permanent structures.
Bamboo and reed
Canopies made of bamboo and reeds are an original construction option for a summer cottage, which allows you to increase the uniqueness of a particular landscape design.
The reed stems are in several layers, laid in rows and pulled together into plates. Reed layers are suitable for covering. Such a reed roof will not allow water to pass through and will not heat up under the rays of the sun, and the shading will be strong.
Attention!
To enhance the aesthetic beauty, the frame of a canopy structure is often made of bamboo, but wooden beams are often used.
Bamboo canopies protect from the sun and precipitation not only because of the characteristics of the material. Such structures are made in a certain way - the design of such a coating is most often in the form of a cone, but it is also possible to make other shapes. You can make single-pitched, arched, or gable roofs from bamboo, but you must maintain the slope angle.
Advantages of profile pipes
Canopies made from profile pipes are distinguished by their ease of construction and lightness of the final structure. This option is characterized by high strength due to stiffening ribs, the function of which is performed by the edges.
The profile pipe can be used to make curved and straight surfaces. The hollowness of the material affects the strength, which is an advantage over solid-rolled pipes. There are several types of profile pipes:
- painted;
- unpainted;
- covered with special composition.
The pipes are secured by welding or bolts; different projections are used - both parallel and perpendicular. This option can be used in the construction of not only temporary canopies, but also stationary ones.
There are many photographs and a large number of drawings of original canopies, which are made using profile pipes. In addition, this material is relatively cheap, and if you take unpainted pipes, you can save an additional 30% of the cost.
Features of wooden canopies
Wooden structures fit well into any design concept for summer cottages. The tree does not spoil the overall idea, but only complements it, adding naturalness and home comfort to the design of the garden area.
The wooden structure is easy to decorate, thereby making the building unique. A wooden canopy is made from various processing options for natural materials:
- rounded logs;
- timber;
- tree trunks;
- boards
You don’t need any special skills to build a wooden canopy. This material is easy to decorate using carving and painting. But the main disadvantage of wood is that it wears out a lot and does not tolerate dampness well. To reduce the negative impact of atmospheric phenomena, the wood must be pre-treated with special compounds. Then this treatment will need to be repeated annually, which entails additional financial losses.
Features of polycarbonate
Polycarbonate is a synthetic material, transparent like glass, but more durable and durable, despite its light weight. This polymer can be monolithic or cellular. The second type is characterized by a cellular structure.
Among the advantages, the following can be noted:
- High strength characteristics.
- Resistance to various natural phenomena and chemicals.
- The material is flexible and elastic, which allows it to be used at low temperatures.
- Transparency of about 90% ensures normal natural light.
- The low weight makes it possible to create structures that do not place a large load on the walls and foundation of the house.
- Low thermal conductivity coefficient.
- Good soundproofing characteristics.
- Compliance with environmental regulations.
- Long-term operation without loss of quality.
- Fire resistance.
- Convenient and simple installation.
- Ability to protect against ultraviolet rays.
Polycarbonate has few disadvantages, but you also need to know them:
- The material expands greatly when heated.
- Mechanical stress and alkalis can destroy polycarbonate.
- The surface of the material reflects the sun's rays.
Preparation
Before you start building a timber canopy, you need to decide where it will be located. Finding a place on the site for such a structure is not difficult if the area has a sufficient amount of free space. For small areas, experts advise choosing a drawing of a small-sized canopy.
To build such a structure, wooden beams and boards are used.
Attention! Support posts are the basis of the structure, so it is recommended to choose beams made from durable wood for them. The most affordable option is pine beams.
For roof construction, you can purchase metal tiles, which have an attractive price. The classic version of a wooden roof is also quite popular and takes into account the use of edged boards.
Technology and stages of canopy construction
Having settled on the final version of the design of the local area, it is necessary to plan further activities and study the stages and construction technology of constructing protective structures.
The easiest way would be to attach a canopy to the house, as the best solution for saving money on consumable building materials and your own time required to build a functional and practical building.
- Lawn laying
A garage at the dacha is not a warehouse, but a modern and comfortable space!
Diesel generator for home: which one to choose?
The simplest option for a canopy would be a structure made from affordable and easy-to-process materials; when considering free-standing structures, it is better to choose those that do not require a foundation.
Before starting construction, you need to carefully consider the location of the canopy on the site and select those building and decorative materials that will allow you to make a beautiful and practical canopy yourself.
Construction stages
The construction of a canopy consists of the following stages.
Foundation
To achieve stability of the canopy structure, you must first take care of a solid foundation. Of course, the foundation for a shed will not be massive when compared with the foundation for a residential building.
However, in any case, you will need to make a few simple calculations to determine the size of the future foundation and the amount of consumables. The best option for a canopy foundation is to fill a hole with cement mortar under each frame post. The maximum depth of the base should not exceed 50 cm, this is enough to support the frame and roof.
The construction of the foundation involves the following steps.
- Excavation of holes up to 0.5 m deep in pre-marked places where the frame pillars will subsequently be located.
- Filling each hole with a small layer of crushed stone to create a cushion.
- Inserting a beam or pipe and filling the hole with cement.
When the main work is completed, you will need to wait until the concrete hardens. Only after this is it recommended to proceed with further assembly of the frame. Yes, the standard duration for concrete to gain strength is a month, however, after just a week you can start building the suspended structure again.
The next stage is assembling the frame. The process involves installing wooden beams or piping pipes around the perimeter of the suspended structure. The connection of elements is carried out through:
- self-tapping screws;
- bolts;
- welding
The choice of fastening method depends on the type of materials used and the capabilities of the site owner. Assembling the frame is an important stage, since the evenness and durability of the structure depends on how correctly the installation of horizontal elements is carried out. When the strapping is completed, you will need to install the rafters.
This is done quite simply if polycarbonate canopies or other available materials were chosen as the roof.
What to make a reliable canopy roof from?
There are so many roofing coverings today that it’s dizzying, and you can easily use absolutely all of them to decorate the roof of your shed. Let’s take a closer look at those materials that you may have been afraid to tackle. But they make the best projects!
Glass and polycarbonate: translucent structures
Today, quite a lot of offices and hotels decorate the facades of their buildings with large glass canopies over the entrance. So this space becomes both more comfortable and safer, and the glass itself gives the building a tangible feature of the desired style. If you like this idea, then why not implement it on your own site?
You need to choose durable glass - one that will not break into small pieces if something hits the roof. Therefore, both tempered glass and laminated glass, otherwise called triplex, are suitable for this. In this, several sheets of hardened glue are connected with transparent glue. It is almost impossible to break!
Here is a very interesting video of the installation of such a canopy for a residential building:
Look how light and airy canopies with translucent coating look:
If you skillfully play with color, it is not difficult to achieve the feeling of a real sunny day even in the cloudiest weather. And in the dark season, cozy lighting will be provided by a built-in lamp, which is attached directly to the arched structure:
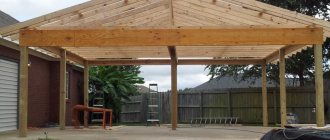
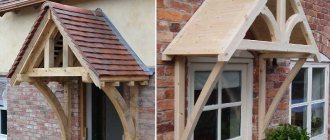
Shed with a wooden roof in front of the house entrance
If you are looking for some interesting architectural solution, then look at how unusual a canopy can be:
Let's go through the construction of this shed step by step. Its parameters: 110 cm height and 3.5 meters width:
- Step 1. Set up the porch. To do this, we first pour a concrete base, and then build a frame made of timber, 150x150 mm.
- Step 2. Coat the timber with a colorless antiseptic, which will protect the wood from insects and fungus.
- Step 3. Now we lay the floor on the porch and finish the steps.
- Step 4. We proceed to the construction of a canopy over the porch. To do this, you will need to weld a metal frame and cover it with wooden boards (preferably made of larch).
- Step 5: Paint a protective glaze over the canopy, steps, and porch sides to also highlight the visible wood grain. It is important that neither the wooden frame of the canopy nor the steps are afraid of precipitation and temperature changes.
Construction of support pillars
The designs of this pit can be made of both metal and wood. In order for the structure to be stable and reliable, it is necessary to use concrete supports.
In this case, a boron is used, with the help of which holes are dug to the distance where the ground freezes. This depth is approximately one meter. In some areas you need to dig even one and a half meters.
Next, a sleeve made of roofing felt is inserted. The bottom of the hole is filled with half a bucket of sand. Everything is compacted well and filled with a small amount of concrete.
Then a metal support is inserted. The stand is leveled vertically and the rest is poured with concrete at ground level. Next, formwork is made to secure the sleeve. A bracket with reinforcement is placed in the concrete, after which the timber is secured.
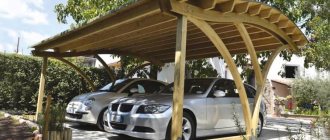
Carport: an alternative or addition to the garage
Many car enthusiasts advocate for a warm garage, but a dry, clean car must enter a warm garage, otherwise the temperature will only help moisture, dirt and salts to quickly destroy the body of your car.
From the point of view of body safety, a canopy is the optimal solution, since it protects from all external factors (sun, precipitation) and does not create its own microclimate. When driving under a canopy, the car is not exposed to changes in air temperature and humidity.
In addition, if you compare the costs of building a shed and a garage, it turns out that the shed will cost several times less.
How to build a wooden carport
Building a wooden carport with your own hands begins with laying a base of wooden elements. After installing the supports, we nail the transverse cutting boards. We lay the rafters on the supports, make recesses on the rafters according to the template. Stepping back 10 cm, we lay the outer rafter on the beam. Plank trusses cover a long span without any problems. They are assembled on the ground, then lifted and mounted on supporting structures. This reduces construction time. After completing the roof installation work, we install the gutter. We cover the gables with clapboard.
Wooden roofing material is treated with a waterproof mixture and fire-resistant impregnation. We secure the boards to the frame with galvanized screws. Roofing felt was previously laid on top of this traditional shelter, but recently metal tiles or ondulin have been laid.
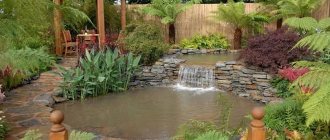
Features of placing canopies in the country and near the house
Before you do the construction yourself, be sure to do painstaking work to create a diagram. Consider the ease of access to the summer garage, what the pillars are made of, and what roofing material will be used. Make a drawing with the dimensions of the width and length of the building. If you wish, buy ready-made projects.
Before building a shed, we select a suitable location on the site, level the site, and remove obstacles. We fill the low-lying area with sand, crushed stone, and install storm drains. Parking a heavy vehicle will require a reinforced concrete slab.
A canopy for a house is a simple solution to improve the area
If, when building a house, you did not include the presence of an extension in the project, then at any time you can take care of installing the missing object. You don't even need to apply for a permit to build a shed. But the construction of a full-fledged veranda may require the availability of an appropriate project, and you must additionally take into account the costs of the work and its duration. When you decide to make a canopy, everything will be different.
Additional elements for high-quality canopy design
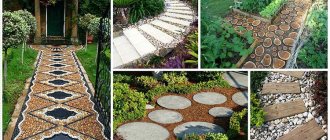
The canopy design may include a drain. The smallest gutter should be installed unless you plan to stabilize the soil around the shed, as otherwise the water running off the roof will drip and stain the space in and around the shed. An easy way to stabilize the soil under your cover is to also use gravel. Such a solution, however, will require the implementation of a suitable "floor" frame, because otherwise the gravel layer will quickly disperse from side to side.
Check out the huge number of gazebos for your home to choose the most suitable option for yourself.
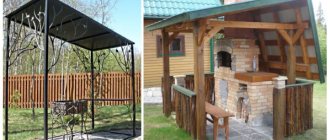
Decoration and arrangement
You can decorate a gazebo canopy in a variety of ways. A relaxation area is usually set up inside - for this purpose, chairs, benches or swings, and tables are placed. If metal was used in construction materials, then it should also be used in decorative elements. These could be, for example, shaped candlesticks or stands for plants.
Did you know? If today polycarbonate is known as a building material for roofs, walls of greenhouses, etc., then initially it was used only in the space and defense sectors.
It began to be produced in 1955 to create some parts of military equipment, spacecraft, and aircraft. You can hang flowers in pots around the perimeter of the roof. This will help not only add elegance to the recreation area, but also create additional shade. It would be interesting to combine a wooden rocking bench with flowers in a pot. As part of the theme, you can build a dummy fireplace near the wall of the house. It is very easy to make from cardboard boxes: they are fastened together, then puttied, the surface is leveled and decorated. You can place LED lights inside to simulate fire.
Lights should be provided to the gazebo. Typically connected to the home's electrical source. Considering that midges will flock to the lamps at night, you need to install a mosquito catcher or cover the structure with a mosquito net. Instead of the latter, you can also use special curtains.
So, the simplest option for arranging a recreation area in a dacha is to build a gazebo-canopy directly next to the house. To implement the idea, it is better to take materials such as wood and polycarbonate. They are cheap, easy to use and look quite attractive.
Types of attached buildings
Canopies made from corrugated pipes are classified according to the type of support and rafter systems.
The type of support system depends on the location of the canopy relative to other buildings. There are attached, cantilever and free-standing structures.
| Canopy type | Scope of application | Design Features |
| attached | terraces, verandas, open cafes, attached parking lots, canopies over entrance areas | attached to one or more walls of an existing building, have additional supports |
| cantilevered | small canopies over entrances, windows, balconies | has no supports, is attached directly to the wall of the building, additional fixation is provided by a suspension system, also attached to the wall |
| standing separately | outbuildings, canopies over playgrounds, sports fields or individual equipment, private and public parking lots, summer cafes, bus stop pavilions, etc. | rests on one support (umbrella canopy) or a support system of several posts |
Since the roof is the main part of the canopy structure, the complexity of erecting a canopy depends on the shape of the roof.
According to the type of rafter system, single- and double-slope, arched and hipped canopies are distinguished.
| Canopy type | Design Features | Installation features |
| single-slope | one side of the support system is higher than the other, if the canopy is free-standing; for cantilever and attached canopies, the upper ends of the rafter legs are attached to the wall, the lower ends rest on a suspension or support | the simplest type of canopy to implement, which does not require complex calculations and special equipment; any roofing material is suitable; for installing a canopy over a large area, the rafter system is assembled based on trusses in the form of a right triangle |
| gable | the upper ends of the rafter legs rest on each other or on the ridge; additional vertical and inclined elements are required for the stability of the system | if you have the correct calculations and drawings, installation is not much more complicated than a single-pitch canopy; installation of roofing material is complicated only by the need to install a ridge; trusses for installing the rafter system of a large canopy have the shape of an equilateral triangle |
| tent | the rafter legs meet at one point - the top of the tent | the calculation of the rafter system becomes more complicated as the number of roof slopes increases; to complete the roof, precise cutting of the roofing material is required; special roofing elements are needed to protect the joints and the roof top |
| arched | the roof has the shape of a wave, arch or semi-arch; the rafter system is assembled on the basis of arched rafter legs or trusses | independent production of rafters or trusses is only possible if you have a pipe bender and the skill to form equally curved pipes; the roofing material for such a canopy must be flexible; curvilinear canopies are rarely installed with your own hands |