Sheds are a fairly common structure on a summer cottage or in a private yard. They can perform a lot of different functions: to cover a recreation area, to protect the front door from rain and sunlight. Quite often such canopies are used in private farming, gardening and gardening.
Photos of polycarbonate canopies made by yourself can be found on the pages of landscape design and practical construction magazines.
Brief overview of the article
- Advantages of choosing polycarbonate
- Tools and materials for work
- Types of awnings in relation to the house
- Separate canopy
- Attached polycarbonate canopy
- Types of polycarbonate for work
- Cellular polycarbonate
- Monolithic polycarbonate for canopies
- Types of canopies by structure
- Making a canopy with your own hands
- Preparation of the drawing
- Installing a canopy frame
- Attaching polycarbonate to the frame
- Photo of a polycarbonate canopy with your own hands
Advantages of choosing polycarbonate
Polycarbonate is a fairly affordable material. In addition, the advantages of choosing consumables include:
- Strength.
- Scatters sunlight and filters certain ultraviolet waves. The presence of such a protective layer is an undoubted advantage of the practical use of polycarbonate.
- Ease of working with the material: it is easy to cut, drill, and attach to the underlying frame.
- The sheets have sufficient plasticity. The material bends easily, taking the desired shape (for example, the arched shape of a canopy).
- Low weight polycarbonate structures.
- Easily tolerates high temperatures and the effects of chemically aggressive substances.
- Not afraid of moisture, fungus and pests.
In addition to all these advantages, polycarbonate has a long service life (more than 20 years) and a pleasant external design.
Features of frame manufacturing
As mentioned above, the frame can be made from either wood or a metal profile. The choice depends on the required strength of the final product. For example, if the canopy is made for a picnic and relaxation, then you can build a frame from timber. If you need a shelter for a car, then it is preferable to make a reliable metal frame. In the latter case, there is no way to do without the skills of a welder. If you do not have any, then you will need the help of a qualified welder.
Canopy support
To save money, you can purchase a ready-made frame that is assembled with bolts. Such a design, of course, will not be as strong as a welded frame, but in some cases it is the only right solution.
So, to make such a frame you will need a metal profile with a cross-section of 60×60 mm or 100×100 mm. The choice of profile depends on the load. For example, for the purlin, you can choose a profile with a smaller cross-section - 40x40 or 60x60 mm. For sheathing it’s even smaller, you can use 20x20 mm.
Tools and materials for work
For independent work you will need the following set of materials and tools:
- Polycarbonate sheets.
- Fasteners (screws, self-tapping screws).
- Screwdriver.
- Grinder for cutting material.
- Construction pencil and tape measure for marking sheets.
- Material for making the frame (wood, galvanized profile, profiled pipe).
- Welding to connect frame elements.
Decorating materials are at the discretion of the master.
Installation of plastic sheets
The sheets are not cut immediately. This must be done directly on the frame - this way the true dimensions will be clear. If you make the cut in advance, then perhaps there will not be enough material or there will be a lot more of it - both of which lead to cost overruns.
The sheets are spread directly over the surface of the sheathing and appropriate marks are made on them for cutting and holes. Below, the polycarbonate is brought into the appropriate form - cut and drilled. Before laying on the frame begins, the holes in the sheathing and trusses are sealed with rubber sealing rings - they will not allow moisture to seep into the metal and will be completely pressed with polycarbonate.
Laying occurs as follows:
- The sheet is fixed with self-tapping screws along one edge.
- Then the connecting profile is put on, the edge of the second sheet is inserted and the middle is fixed.
- The following elements are attached in the same way.
Decorative profiles placed on the ends of the polycarbonate will complete the work - they will protect the plastic from water accumulation. In addition, we must not forget about the cavities of the pipes - they also should not be exposed to moisture - the ends should be welded.
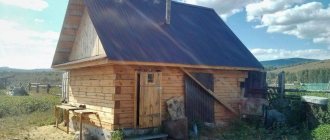
Separate canopy
Separately from a residential building, a canopy is used in the following situations:
- Covering a recreation area or area with a barbecue.
- A small carport in the absence of a garage.
- Shelter for a summer kitchen in a summer cottage.
The canopy is completely placed on support posts, so special attention during construction is paid to the strength of the frame.
The main stages of arranging a canopy
Stage #1 – design of the building structure
Having decided on the location of the building structure, you should develop a project for the canopy. The design, which is carried out before making a polycarbonate canopy, allows not only to correctly calculate the required amount of materials during construction, but also to prevent the occurrence of possible deformations during operation.
When designing the base and above-ground part of the canopy structure, you must first measure the parameters of the site and, based on this, calculate the frame taking into account the longitudinal and transverse steps
When developing a project, one should also take into account the climatic features of the area and the loads created by external factors.
To install polycarbonate sheets with a thickness of less than 8 mm, a step of 600-700 mm is sufficient. When arranging heavier panels, longitudinal steps are made with a size of 700 mm, and transverse steps - up to 1 meter
Stage #2 – construction of a platform for a canopy
The area for the construction of the canopy is marked out using pegs and leveled. Along the perimeter of the site, at a distance of 1-1.5 meters, using a drill, dig holes for the installation of support posts, which are most often used as wooden beams or metal poles.
The supports are buried directly into the ground by 50-150 cm, leveled using a building level and concreted, or secured to embedded parts specially dug in according to the same principle.
When using wooden beams as support posts, the lower part of the pillars is treated with bitumen or any protective compound that prevents wood from rotting.
Recent Entries
Lilac perennials that are beautiful, compact and do not crowd out other plants Why when buying seedlings you should not take the sellers’ word for it and how to determine the age of the plant using 3 signs Tomato seedlings have turned purple or whitish: why the color has changed and how to save the plants
After waiting a couple of days until the supports are stable and the concrete gains sufficient strength, a layer of soil 15-20 cm thick is removed from the entire territory of the marked area. The bottom of the resulting pit is covered with a sand or crushed stone “cushion” and compacted.
At this stage of construction, it is advisable to provide for the arrangement of grooves and the placement of drainage pipes to drain rainwater.
As a final coating you can use:
- concrete screed;
- paving slabs;
- lawn lattice.
To lay this covering, formwork is installed around the perimeter of the site. The bottom of the pit, covered with a gravel “cushion,” is filled with a concrete solution 5 cm thick, on top of which a mesh of reinforcement is immediately laid and re-filled with the same layer of concrete. The formwork is removed after 2-3 days, when the concrete has hardened. The concrete-filled site itself must sit for at least 2-3 weeks: during this period, the concrete will gain the necessary strength and naturally get rid of excess moisture.
Concrete screed is well suited for flat areas where the soil is not subject to displacement
Paving slabs are more suitable for “floating” and heaving soils. Unlike concrete screed, covered paving slabs do not form a monolithic layer, thereby allowing the earth to “breathe”
The tiles are laid directly on the sand “cushion”, compacting the elements using a rubber hammer, which does not damage the surface of the coating. It is better to use a curb stone as a frame that will prevent the coating from spreading beyond the site. Having laid out the tiles, the surface of the site is watered. Natural stone, clinker bricks or paving stones can also be used as a covering.
Lovers of natural materials can opt for a lawn lattice, through the cells of which grass grows
The polymer material, which serves as the basis for the grating, will provide water drainage and protect the lawn from trampling, maintaining its attractive appearance throughout the season.
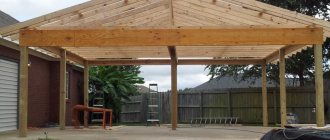
Stage #3 – installation of the frame
Vertical support posts are attached to the embedded parts. When constructing a frame from metal pillars, the upper trim around the perimeter and vertical posts of the structure is performed by electric welding. After this, using vertical struts, the transverse elements of the frame are fastened to the load-bearing beams.
Most often, transverse elements are given arched and dome-shaped, single- and gable-shaped shapes. In addition to a presentable appearance, arched structures prevent the accumulation of snow, dirt and fallen leaves
All frame welds are cleaned, primed and painted.
Polycarbonate is also perfect for building a greenhouse; you can learn more from the material:
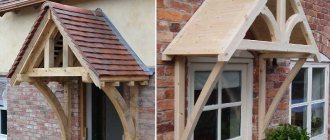
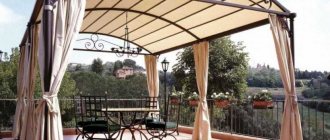
Attached polycarbonate canopy
A canopy is used as an extension in the following situations:
- Design of a summer terrace with installation of a roof with sufficient light transmission.
- Making a canopy over the entrance to the house.
- Construction of a platform near the entrance to the bathhouse (sauna).
Attached polycarbonate canopies have an advantage over the previous model, since one side rests on a residential building.
When working, attention is paid to adjusting the opposite frame post.
Metal construction
Before making a metal canopy in the yard, you need to take into account the following parameters of the structure:
- A forged base will be the most elegant and attractive, but it will require significant expenses. If funds allow, it is better to make an exclusive product to order.
- The most common and relevant building is a canopy made of round or profile pipes. The size of the pipe directly depends on the size of the building.
- Prefabricated finished model made of aluminum.
The main advantage of an iron canopy is its durability, but despite this fact, it is easily susceptible to corrosion.
To avoid such a nuisance, it is recommended to first clean the product with a stiff brush from possible rusting and scale, then treat the entire surface with abrasive and wipe with a solvent. The next step is coating with primer or paint.
Please note that the railings of a porch or gazebo should be made of wood, since metal quickly heats up from the sun and cools down from frost!
- Lawn laying
A garage at the dacha is not a warehouse, but a modern and comfortable space!
Diesel generator for home: which one to choose?
Types of polycarbonate for work
Today, manufacturers of building materials are constantly updating their range, expanding polycarbonate manufacturing technologies. There are two types of polycarbonate sheets, differing in a number of properties:
- Cellular option.
- Monolithic option.
Both types of materials presented are successfully used to create canopies in private homes and summer cottages.
What thickness to choose polycarbonate
The thickness depends on the purpose of purchasing cellular carbonate.
Using the material in accordance with its intended purpose, you can significantly increase its service life:
- four-millimeter sheets are used for window displays and advertising;
- sheets 6 mm thick are used for equipping canopies and greenhouses;
- 8 mm - suitable for large greenhouses, partitions and roofs;
- 10 mm - for glazing of wall structures;
- a sheet with a thickness of 16 mm is suitable for the roof;
- 20 mm is used for glazing car parks, loggias, swimming pools;
- a 25 mm sheet is indispensable for equipping greenhouses;
- 32 mm is used for roof construction under high loads.
Thus, for canopies adjacent to the house, sheets 6 mm thick are used.
Cellular polycarbonate
The latest polymer material that optimally combines pleasant properties:
- Sufficient flexibility.
- Elasticity and strength.
- Exceptional resistance to high temperatures is determined by the porous structure.
Due to its special structure, it is not exposed to chemically aggressive substances.
Useful tips
Be sure to read the full version of the article - how to make a veranda for your house with your own hands. You will find lots of useful tips there!
When installing a roof, do not forget about insurance.
After installing the main extension, you can make a platform. The easiest way is to cover the entire area with gravel. To do this, you need to remove the turf, dig in the curb and pour in crushed stone, then compact it well.
You can also pave the area with paving stones or paving slabs. Equipping the site with concrete will cost less.
Types of canopies by structure
Based on the shape of the structure, the following types of polycarbonate canopies are distinguished:
- Arc-shaped models.
- Sheds for summer cottages.
- Gable models.
In practice, you can find more complex options, but their arrangement is more of a decorative task in landscape design.
Frame painting and care
The design of the canopy, made of profile pipes and polycarbonate, does not require anything special. It is only important to coat the metal with a special paint that prevents corrosion. This must be done before the frame is covered with sheets of plastic, so as not to miss a single section and not to stain the polycarbonate.
For greater beauty, the frame is varnished on top. The roof requires the simplest cleaning - water and mild, non-abrasive detergents. Timely prevention consists of identifying pockets of corrosion, cleaning them from damage and covering them with a new layer of red lead. Then the canopy can serve the owners much longer than the stated period.
If you want beauty and sophistication, then before purchasing polycarbonate, you should pay attention to decorative models - they can look like stained glass, have intricate patterns and colors. Some examples are made using silk-screen printing - such models are expensive. But the view is beautiful. Owners whose budget is limited can easily get by with film of different colors and fix it from the inside of the canopy, thereby giving the structure the desired color.
Making a canopy with your own hands
For successful work, the master must follow clear instructions and follow the sequence of actions:
- Preparation of the drawing.
- Installation of a canopy frame.
- Fastening polycarbonate sheets.
Each stage presented requires skills and a certain dexterity from the master.
Preparation of the drawing
An optimally designed plan diagram allows you to correctly calculate the material consumption and mark the points of attachment of the sheets to the underlying frame. They prepare the drawing either independently or use the services of a specialist. For all canopy models, the following parameters must be displayed on paper:
- Canopy dimensions.
- Frame structure.
- Shape of the canopy (single-pitch, gable or arched model).
The scaled image allows you to carry out work with the highest quality possible, without making gross mistakes.
Project development
First of all, it is worth considering the design of the future canopy over the porch or other place. To complete the project, you will need to think about the following parameters:
- Measuring the site and calculating the frame.
- Determining the type of material for the frame. It can be metal or wood.
- Determination of the type of polycarbonate - monolithic or cellular.
- Drawing up drawings.
Installing a canopy frame
Instructions for building a simple do-it-yourself lean-to canopy:
- At the designated points, small holes are drilled for support pillars.
- The pillars are filled with cement mortar to ensure the stability of the structure.
- Leave the pillars until the concrete solution hardens, periodically wetting the surface with water (to prevent cracks from appearing in the concrete).
- The tops of the support pillars are connected by upper trim in the form of profiled pipes.
- The rafters are welded at the bottom and then attached to the supports.
- Next is the sheathing.
Rafters and sheathing can be made not only from pipes, but also using wood. Wooden parts are less stable and durable than metal.
Therefore, before starting work, all surfaces are thoroughly impregnated with an antiseptic, antipyretic, moisture-resistant and antifungal compounds. This approach significantly extends the service life of the canopy.
Material properties
Polycarbonate is a modern high-tech material based on polymer plastic, which has a cellular structure. This material transmits light; colorless, colored and patterned products are produced. A polycarbonate canopy will be an excellent roof for a gazebo and a garage attached to a house, or a separate structure. This material has gained popularity due to the following qualities:
- Ease. The weight of a polycarbonate sheet is 7-8 times lighter than glass of the same size. Therefore, it is used for DIY construction of lightweight structures that do not require a solid foundation. Properties of polycarbonate
- Flexibility. Polycarbonate sheets bend well without pre-treatment, so they are used to construct arched canopies and round-shaped structures. The flexibility of this material allows you to bend sheets with your own hands without the use of special tools.
- Light transmission. Polycarbonate transmits up to 87% of sunlight; under a roof made of this transparent material it is always light and comfortable. At the same time, it perfectly protects from ultraviolet radiation and creates a pleasant shadow.
Coating. protects against UV rays - Strength. Polycarbonate sheets have high impact resistance and load-bearing capacity, several times greater than those of glass. Thanks to its cellular structure, a self-assembled lean-to canopy with a polycarbonate coating will not break under the weight of snow or when hit by hail.
Types of polycarbonate
Note! Experienced craftsmen note the excellent soundproofing ability of this material, thanks to which even in the heaviest rain the sound of drops does not interfere with conversation and sounds quiet. High-quality polycarbonate has a service life of up to 25 years.
Attaching polycarbonate to the frame
Holes of the required diameter are drilled on polycarbonate sheets in marked places. Fastening is done using special washers. A lean-to canopy is formed by installing polycarbonate sheets at a certain angle.
Drawing
A simple lean-to shed is a rectangular or square structure according to the purpose. You should set the required height and width dimensions in advance, taking into account that part of the frame will go under the concrete. Also, the diagram must take into account the thickness of all components - pipes, polycarbonate.
This is important, since snow and wind loads should not affect the strength of the structure. It is better to use special tables to determine the cross-section and data on the climatic zone. Having entered all the required values on the drawing, you can begin to work.