The hungriest period for birds is the last month of winter and the beginning of spring; it is at this time that it is most difficult for them to find food. But you can make their life a little easier and hang edible feeders in the yard. You can make them at home and give them a beautiful shape in the form of a ball, heart or star. But first, you should figure out how to make bird food with your own hands, as well as what products you can use.
What are the features of edible feeders?
To begin with, it is worth realizing that the winter period is the most difficult in the life of birds. At this time, they do not have the opportunity to eat their natural food, which they obtain from spring to autumn. And by feeding birds during a harsh period, you not only save them from starvation, but also benefit your garden. After all, many birds that find food on your site will often visit your garden in the future, knowing that they will find something to eat here. And with the arrival of summer, they will become the first assistants in the fight against garden pests. For example, by installing one feeder you can save up to 50 tits and other birds from starvation in a snowy winter.
Feeders for birds can be built on a permanent basis: from plastic, wood and other raw materials. They can last a long time. But to create a structure, you need to have tools, materials and often a lot of time on hand, which is not always enough.
We want to share how to create edible bird feeders. They are disposable, but quite aesthetic, made from natural raw materials and do not require much time and expense to prepare. And by adding a little imagination, you can create amazing edible products that you can use to decorate your garden. You also need to remember that not everything from your diet can be given to birds.
What should you not feed birds?
Not everything that can be found in your kitchen can be given to birds. We list those ingredients that should not be fed to birds:
- Products containing salt: sunflower seeds, salted nuts, chips, fish;
- roasted nuts, seeds, grains and other foods;
- freshly baked bread, rye bakery products;
- cereals such as rice, millet, buckwheat;
- canned foods;
- food for cats or dogs.
Required materials and tools
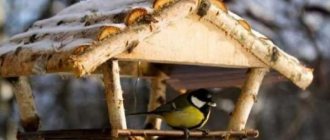
Mangers are often made of wood. You can probably find extra wooden boards on almost every garden plot, so this method is the cheapest and easiest to implement.
In addition, wood is a material that is easy to use and also harmless to the health of your horned animal. The most durable structure is considered to be one made of pine or oak.
How to make a mounted wooden feeder is a question that requires certain skills.
First, let's look at what tools you will need in the process:
- wooden boards;
- measuring tape;
- blueprints;
- steel rods;
- devices for wood processing.
If you have a barn built for 2 cows, then two hay feeders are made at once so that both cows have free access to green feed. If desired, you can also build a group container.
Berry edible bird feeders
To create such a colorful feeder, prepare:
- 3/4 cup flour
- 1/2 cup water
- 2.5 teaspoons gelatin
- 3 tablespoons corn syrup
- berries - rose hips and hawthorn are popular; dried fruits may be suitable;
- seeds intended for wild feathered guests;
- oatmeal;
- cheese (at your discretion);
- medium-sized saucepan with hot water;
- a bowl (larger than the size of the pan);
- cookie cutter;
- lace or twine.
Manufacturing process:
- Mix flour, water, gelatin and corn syrup. Add seeds and berries, mix well.
- Wipe the inside of the mold with vegetable oil.
- Place the mixture inside the mold and press the mixture with greased fingers.
- Using a stick, make a hole for the twine.
- Let the mixture dry for 6-8 hours.
- We thread the rope and tie it in such a way as to fix the knot inside.
Now every miniature edible bird feeder is hung in the garden. A prerequisite is to place it 1.5 meters above ground level, this will prevent cats and other animals from attacking feathered guests.
You might be interested
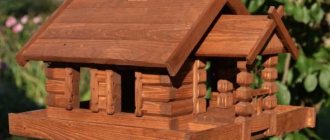
Making a birdhouse with your own hands: materials, manufacturing options and drawings
List of gardening work that needs to be done in November
Covering garden plants for the winter
Types by feed type
The main types of feeders, taking into account the type of food, are for dry food, for grain and hay.
Models for hay
Even during pasture walks, the animal may not have enough green grass. To solve this problem, equip the space with hay feeders.
. You should not pile material on the ground - cows will trample it down and feed consumption will increase.
The best option is to make a conical-shaped feeder, into which a whole roll of dried grass is placed. An additional advantage of the solution is that there is no need to regularly replenish the container, since the cattle will get the hay gradually.
Containers for dry food
Models that are easy to operate and maintain, are highly durable and safe.
The basic model is a regular square cage, but keep in mind that animals in it can be injured by getting stuck between the bars. So, if possible, provide a safer "open" option.
Grain and combined feeds
To be kept at home, animals need a balanced diet rich in valuable substances.
To supply grain raw materials with mixed feed, it is most convenient to use automated feeders, which are the most practical and easy to maintain. Be sure to install them in rooms where young animals are raised - they especially need vitamins and microelements.
If adult animals eat all the food, and the calves remain hungry, use drinking bowls and automatic feeders with limiters - the head of an adult animal simply will not fit into them. Pay special attention to the diet and additional feeding of dairy cows.
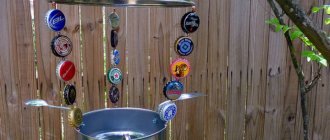
Treat for birds in the form of beads
This bird treat takes just a few minutes to prepare. You need to take a strong thread, fishing line will also work, and then attach the goodies for the birds there.
Even children can easily make such an edible feeder.
Mushrooms, unsalted lard, dried fruits, rowan berries, pieces of white bread, and nuts are suitable treats. Such feeders are hung in the garden like holiday garlands.
Arrangement of the stall
When the time has come to set up a stall, you must immediately provide for the presence of several types of feeders and allocate a place for their most rational placement. Let's look at the features of feed containers.
For wet food, you should purchase a special plastic model. They are sold in a form completely ready for use. There are economy options, the cost of which is in the range of 1-3 thousand rubles.
For a large farm, more functional, spacious models are chosen. Their price can reach 25 thousand. At the same time, they are durable, environmentally friendly, durable and comfortable.
Note! Wet food containers will need to be emptied regularly to maintain cleanliness and sanitary conditions. Therefore, consider in advance how comfortable it will be for you to remove and then attach the model again.
Dry food is most often placed in rectangular containers. It is preferable to choose mounted options.
The front grill will help you maintain order, because the hay and grass will not constantly fall apart. Be sure to ensure that the cows stick their heads through without difficulty and do not get stuck in the fence.
Bread feeders
Another easy option for hanging your own bird treats is to use a loaf of wheat flour bread. Holes are cut into the crust of the loaf and the pulp is removed.
The feeder is hung in a conspicuous place. Unroasted seeds or grains are placed inside.
Important! For such a feeder, it is prohibited to use black types of bread products, as well as loaves on which mold has formed.
Design features
Taking into account the design features, feeders can be stall or pasture. Let's look at the features of each option.
For the stall
Stall tables are usually installed in aisles and surrounded by walls (they do not need to be large). You can raise the table above the floor by 15 cm.
Such indicators as type of maintenance, number of livestock are important; also take into account the format of farm maintenance - it can be manual or automated.
This article will help you learn how to make stalls for cows.
These feeders have the following advantages:
- The food is easy to place;
- cleaning is not difficult;
- The design can easily be done with your own hands, which means you can save additional money.
In the case when cows move freely around the stall, the tables are equipped with vertical, automatic or inclined grids.
This prevents animals from scattering feed, trampling grain and combined mixtures into the litter or ground. With tethered content, this is not necessary.
For pasture
Capacious feeder for pasture, using a mesh limiter:
On open pastures, you also need to use special equipment for feeding cows. Use containers that are practical and large enough to minimize maintenance work.
Separate structures must be used for dry and wet food; grass and hay are stored in rectangular hanging boxes.
Feed can spill out, so it would be advisable to provide a mesh front wall in the feeders. The main thing is that the animal’s head fits freely between the bars.
In order to save space, it is convenient to use wall-mounted and corner models. A wide range of feeders for pigs, goats, calves, cows and horses are currently on sale.
The size of the container is also important - for cattle it is advisable to use feeders at least 100 cm in length and 40 cm in width.
The outer side should be about 70 cm. Models with folding side walls and hay grates are considered the most hygienic.
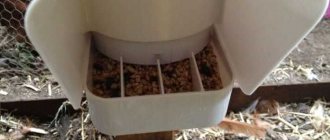
Grids
This type of feeder is suitable for bullfinches, tits, waxwings, and thrushes. To make it you will need mesh fabric or gauze (the cells are the smallest).
We place pre-prepared mixtures of rowan, wheat grains, and other food into the material, then tie the edges of the product and hang it on a tree. The process of making an ecological feeder takes no more than 10 minutes.
How to make a feeder for cows?
If you need to decide how to set up a cow feeder, you can use proven and inexpensive methods. There are many options for such designs. Some of them deserve close attention.
Feeder with folding walls
Drawing, photo:
If you have woodworking skills, creating a wooden cow feeder is the best option. It is possible to equip a structure that will be as comfortable as possible for cows and effective in terms of saving feed. For this purpose it is better to use hardwood.
To build a feeder you will need to prepare the following tools and materials:
- plane or grinder;
- construction tape;
- a circular saw;
- boards;
- drawing of a feeder;
- wooden slats - they can be replaced with fittings.
All work on creating a feeder for cows with folding walls is divided into the following stages:
- When creating a design, you must first prepare a drawing of the product. It is necessary to indicate its exact dimensions. The width of the bottom of the structure should be 0.45 m, the width - 0.8 m. The inner side should have a height of 1 m, and the outer one - 0.3 m.
- Preparation of materials. All wooden elements are checked for moisture levels. If necessary, dry. They are then cleaned and polished.
- Then all the elements are fastened together. To do this you need to use nails.
- in the inner side for the head and neck of the animal.
- on the completed feeder so that the food does not get thrown out on the floor.
Knowing the stages of constructing a cow feeder, you can build a durable and convenient structure.
Group feeder
To make feeding cows quick and convenient, large farms install group feeders. They are usually made of metal elements.
To construct such structures, it is necessary to prepare:
- Metal pipes. It is necessary to prepare elements with a diameter of 13 and 19 mm.
- Welding machine.
- Bulgarian.
- Paint and varnish composition.
- Fittings. It is necessary to select rods with a diameter of 8 mm.
Such feeders begin to be built by preparing each element for assembly. To do this you need to work with an angle grinder. First, the pipes are cut into specific pieces according to the dimensions indicated on the drawing.
It is necessary to carry out the following preparatory activities:
- 13 pipes that have a diameter of 19mm. They will have different lengths, 4 of them should be 68 cm long, 2 should be 90 cm long, 4 should be 35 cm long and 3 should be 201 cm long.
- To equip a compartment with hay, the frame of the product should be made from 13 mm pipes. For this work, two pipes of 205 mm and two of 55 mm are cut. In addition, you will need 26 rods of 68 cm each.
After all the preparatory work, the assembly of the feeder parts begins. First, the frame of the structure is constructed. For this purpose, 4 pipes are welded together - two 201 cm each and two 68 cm each. The result is a metal rectangle.
Then 4 pieces of 35 cm each are welded to it. As a result, 4 legs are formed. Between them, to ensure stability, pipes of 68 cm are placed. At the final stage, pipes of 201 cm are installed.
Pipes installed vertically must be placed at the ends of the base. The pipe that remains must be secured between them.
After preparing the base, you should begin installing the part of the structure in which the hay will be placed. For this purpose, it is necessary to weld a rectangle of sections of 55 and 205 cm to the highest point of vertically installed pipes.
Then reinforcing bars must be welded between the lower pipe and the upper rectangle. Now you can start painting the metal structure.
Attention! To paint a cow feeder, you need to choose a composition of natural dyes. The mixture must be environmentally friendly.
For calves
Feeders for calves should be located separately from those from which adults eat. It’s even better when the young animals are kept in a separate room. With disorderly housing, calves often do not have enough food.
The cows simply eat all the feed and do not let the calves near the feeders. In order for young animals to develop properly and grow quickly, they require their own diet and nutrition separate from adult cows.
Feeders for calves are made according to the same principle as for adult cows.
The maximum length of the manger should not exceed 1 m, width -40 cm. It is also necessary to arrange sides with a height of approximately 1 m. It is best to make a manger from hard wood; it is easier to work according to a previously created drawing.
The boards must be sanded and free from sharp chips and knots. The feeder should first of all be convenient for the calves: at first they are hesitant to eat feed such as hay.
It is also necessary to adapt drinking bowls for calves. They should not be as bulky as for cows. Securely secured buckets will suffice.
Uses of buds
You need to take a large cone, tie a rope to it so that you can conveniently fix it on the tree.
After this, the cone is coated with margarine, butter, and covered with millet or seeds. You need to hang such a device on trees located on the north side so that the sun's rays do not melt the butter. This type of feeder is optimal for tits.
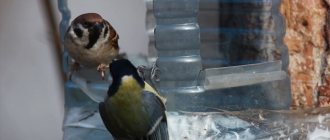
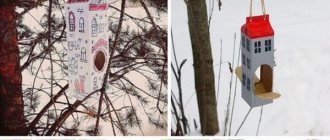
Feeder for feathered “friends” from a bottle.
To create it you will need:
- directly the plastic bottle itself, with a volume of at least 1 liter;
- scissors or stationery knife;
- strong rope or fishing line;
- felt-tip pen;
- tape or tape;
- any weighting agent, in our case it will be linoleum;
- 15-20 minutes of your free time.
On opposite sides of the bottle, use a felt-tip pen to mark “windows”—the entrance to your bird feeder. Try to make them as large as possible, but within reasonable limits so that the wind does not blow food through them.
Use a utility knife/scissors to cut holes along the specified contours. Cover the edges of these holes with tape. It will prevent the birds from getting hurt.
Make several holes in the bottom of the feeder. Moisture will escape through them if it accidentally gets there.
Cut the weighting material around the perimeter of the bottle, and then reduce its diameter by about a centimeter and place it on the bottom of the feeder. If linoleum is used, it should be laid in at least three layers; accordingly, there should be at least three weighting blanks.
Make a small hole in the center of the bottle cap and thread the ends of fishing line, twine or other tight rope through it, with which your feeder will be attached to the tree. Tie them into a large, strong knot and screw on the lid.
Pour food into your feeder and secure it in the chosen place (on a tree, outside a window, etc.).
Video.
Bird Pie
Preparing this delicacy will take a little longer.
To create, take:
- melted lard (can be replaced with margarine),
- wheat grain (in equal proportions with the first ingredient)
- sunflower oil – 1 part.
You will also need to add a grated apple, nuts, boiled eggs, honey, boiled potatoes, and oatmeal. The components are thoroughly mixed and placed in a cold place until completely solidified. The resulting cake is placed on the tree in the container in which it froze.
An original edible bird feeder will be an excellent option for feeding birds in the garden. Manufacturing takes little time, and the ease of the process allows you to involve children in this process.
Healthy kozinaki
Such delicacies can be made together with children; there is no doubt that they will really like this manual labor. And then you can hang them together in the yard or kindergarten. Bird treats can be prepared in reserve, stored in the freezer, and taken out if necessary. The basis for all is the same - it is grain, only the binding ingredients change.
Basic recipe
These goats happily eat all types of birds, including bullfinches, titmice and pigeons. To prepare the food you need to prepare the following components:
- raw seeds ¼ of the total volume;
- water;
- millet;
- oatmeal;
- carrot;
- corn grits;
- gelatin.
First, you should take care of the carrots, wash them and then grate them on a fine grater. Pour warm water over the gelatin, remembering to stir the mixture, then wait until the mixture swells well. Next, you need to put all the prepared ingredients in one bowl. The next step is to mix everything thoroughly. The result should be a mass with a consistency reminiscent of kozinaki.
Now all that remains is to form the figures, make holes in them for the ropes and freeze them. As soon as they set, you need to insert the lace, and then you can hang them on trees. Eco-feed is considered ready.
It is worth adding that you cannot make kozinaki with sugar syrup or honey. Bee product contains toxic proteins, and birds are very sensitive to them.
Bread option
In the following recipe, the main component is white bread; you can even use crackers, as long as there is no mold on them. Making such a bird feeder is easy if you follow the step-by-step instructions. To prepare feed, you must do the following:
- pour clean water into a deep bowl and place bread pieces in it;
- give it time to soak and then squeeze thoroughly;
- add the grain mixture to the main component and mix the mass thoroughly;
- roll small balls with your hands, beat them slightly so that they do not crumble;
- place the semi-finished products on a baking sheet and dry in the oven for half an hour, temperature - 120 degrees;
- tie the finished balls with thread so that you can hang them on tree branches.
Even a child can make these edible balls. After drying, you can put them in the freezer. But you shouldn’t do too much; these bird feeders made from bread do not last long, since the center is not completely baked.
Potato starch
Another way to prepare healthy food. This time, potato starch is taken as the main component; birds eat such kozinaki with great pleasure. The cooking process is as follows:
- Pour two tablespoons of starch into a plate, pour in 50 grams of water, and then pour in one glass of boiling water. Mix everything well until the powder swells.
- After the mass reaches room temperature, you should add grain: oats, wheat, barley. Place the mixture in the molds, take the thread and use your finger to place the tip inside.
- Wrap in cellophane film and place in the freezer until completely frozen. You can simply dry them in the fresh air, the effect will be almost the same.
These kozinaki are very easy to take out of the mold, you just need to support them a little under warm water without removing the film. After this, all that remains is to turn them upside down and they will easily slide out of it.
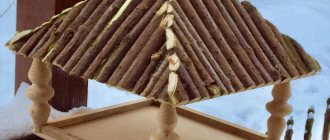
An original feeder made from popsicle sticks.
To make it you will need: ice cream sticks, strong thread and glue.
- Place several sticks in a row so that their total width is equal to or slightly exceeds the length of the sticks laid perpendicularly. Two such sticks should be placed parallel to each other, along the edges, and glued.
- Turn the workpiece over and glue the same two sticks on the back side.
- Now, on the very edges of the glued sticks, glue one more stick on each side, thereby closing the perimeter above the base.
- Glue the sticks on the perpendicular sides one by one, thereby forming a “fence” of the required height.
- Stretch a strong thread under the top sticks of the “fence” through the bottom on both sides of the feeder, pour food into it and hang it.
For the convenience of your feathered “friends,” you can also insert an additional stick in the center of the feeder; it will act as a perch.