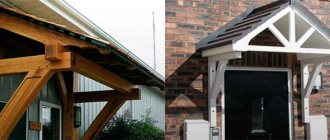
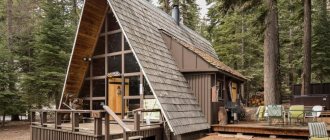
Sometimes cottages or houses need additional extensions, such as do-it-yourself awnings. This design is not only a decoration for the main building or garden, but also performs protective functions, preventing direct sunlight or rain from penetrating the porch.
A canopy can be made from various materials and have completely different shapes. Everything depends not so much on the possibility as on the imagination of the owners, and to build a canopy yourself, you don’t need any special skills.
Cantilever canopy
The first way is to build a canopy from consoles. Before you figure out how to attach a canopy to your house or on the property, you should create a project for it. In this case, it is necessary to take into account during calculations:
- dimensions of the new building;
- the force of the load on it from wind and precipitation;
- snow load;
- the place where the canopy will be erected.
Different types of awnings are made from different materials. If you have a project, you will be able to choose the ideal amount of building materials.
If a cantilever carport is being built for a car, then it is necessary to take into account the passage of a loaded car under it.
If the canopy is associated with any building, then its height will be limited by the roof of the building. In this case, it will not be possible to create a full-fledged arch. Due to the lack of free space near the house, small sheds are often erected.
How to do it yourself?
It is easy to work with polycarbonate sheets; it is a lightweight and reliable material; it does not create problems during cutting; it does not crumble or split. Therefore, it is quite possible for the owner of a private house to build a simple canopy from polymer on his own. Let's tell you in more detail how this can be done.
Selecting a location
Sheds in private yards have different purposes, which directly affects their location.
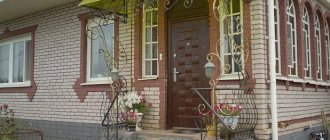
- The canopy is placed directly above the entrance to cover the porch from the heat and bad weather. You can leave your shoes under it without fear of them getting wet, or stay dry while you get the key to the front door.
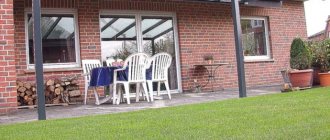
- The canopy over the terrace takes up more space than the canopy at the entrance. The wall of the house becomes part of such a structure.
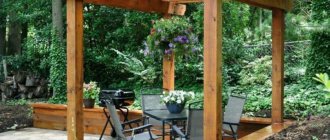
- A separate canopy is built over the recreation area, and it can also be adjacent to a gazebo, summer kitchen, or any other outbuilding. Often a barbecue or barbecue oven is installed under a canopy, so an area is located near the kitchen, from where you will have to carry dishes and food, and also near a water source.
- The canopy over the playground is mounted in a clearly visible place, from where it is easy to watch the children.
- A large canopy that hides the yard from the gate to the front door of a residential building will always allow you to have a dry and clean local area.
- They try to locate the carport close to the gate. The access road to it should be in a place that is safe for household members.
Project
Having chosen a place for construction, a drawing of the canopy is made based on the size of the allocated area. The supporting elements and the load on them of the roof covering are well calculated. The amount of material that will be needed to construct the canopy is taken into account. It is better to purchase it with a small margin to cover possible errors when installing the canopy. Next, material is purchased, the construction site is cleared and leveled.
Installation of supports
Markings are made on the prepared area: using a tape measure, ropes and pegs, they mark the places for installing the repellent. The number of piles depends on the size of the canopy. In addition to 4 corner columns, large coverings will require intermediate supports; they are installed in increments of 1.5-2 m.
In the marked places, holes are dug with a depth of 50-80 cm and a diameter of 40-50 cm. Drainage is made at the bottom of the depressions - sand and crushed stone are filled. Then the pillars are installed and filled with concrete. Using a level, level the supports and leave them for several days until the cement dries completely.
Frame
When the supports are installed, proceed to the installation of the frame. A strapping is made along the upper edge of the supports: if the frame is wooden, beams are installed, if it is metal, profiled pipes are installed. The sheathing is mounted on the frame by laying wooden beams or welding metal profiles. The next step is to prepare and secure the drain.
Polycarbonate roof covering
Markings are made on polycarbonate sheets according to the drawing, and cut lines are drawn with a marker. The plastic is cut using a circular saw, and the sheets are well fixed to avoid vibration.
When cutting, you should take into account the direction of the cellular polycarbonate channels; their location should help moisture not to accumulate, but to freely leave the cells. It is necessary to cut the fragments to exact sizes so that the edges coincide with the beams to which they will be attached. Upon completion of the cut, the honeycomb holes are freed from sawdust and shavings.
Lay the roofing covering with the protective film facing up, and try to ensure that the seams fall on the sheathing, since polycarbonate is mounted to it. Fastenings are made with thermal washers; they should be 4-4.5 cm from the edges of the sheets.
The hemmed polymer fragments are connected to each other with a plastic profile that matches the color of the roof surface. Seams protected in this way will prevent moisture from destroying the canopy. The upper ends of the polycarbonate are covered with aluminum tape. Perforated protection is installed on the lower ends; it helps condensate seep out.
Key points
There are many options for building a canopy in the yard with your own hands. To get the best result, it is worth considering several basic parameters during the construction of a canopy.
Peculiarities
A utility block is a small room designed for specific needs, but there are courtyard buildings for universal purposes. You can place in them:
- shower and toilet;
- storage for garden, construction and household tools;
- workshop;
- residential cabin used during the construction of the main house;
- chicken coop, goat coop and other dwellings of domestic animals;
- a place for growing seedlings and storing preserves;
- small summer kitchen.
This is not the entire list of useful tasks that outbuildings on private plots solve; everyone can extend the list based on their own needs.
Sheds increase the useful area of the utility unit and serve for different purposes.
- A canopy at the workshop will allow the owner to make large structures outside the cramped walls of the building.
- A canopy over the seedling house will help keep it in the fresh air during the day, protecting it from the scorching sun.
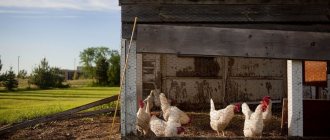
- A canopy over the chicken coop is also important for protection from the heat.
- Near the summer kitchen, in artificially created shade, there is a relaxation area.
- Most often, carports are arranged for cars. Even garage owners leave their car in the yard for a day. This saves time on parking and allows you to quickly use the vehicle if necessary.
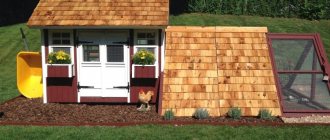
When building a utility block, the canopy can be immediately included in the project and both structures can be built under one roof. This approach will save materials, construction time and, as a result, the owner will receive a harmonious building. Those who did not take advantage of this opportunity in a timely manner attach a canopy to an already completed outbuilding. Or, on the contrary, they install a change house next to the built canopy.
Canopy shape
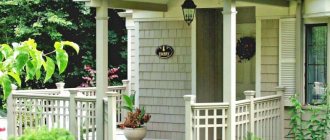
Canopies over the porch of a country house can have different shapes:
- Arched. Such a canopy usually has very good parameters;
- Gable. A canopy of this shape has identical characteristics to the roof of a private house;
- Single-pitch. This option is the simplest and is very reliable.
The main types of such structures
The design can be:
- Closed type. Such canopies usually have closed openings and have windows;
- Semi-closed type;
- Open when making a light roof on several supports.
Racks
Typically, when creating canopies, wooden or metal posts are used. But the structure will be much more stable if you use concrete supports. The holes for the supports must be dug below the freezing level of the ground, somewhere around one meter.
However, if the shed is being built in the northern region, you will have to dig a much larger hole. Sand is poured and compacted at the very bottom, then concrete is poured and a support is placed. First it needs to be leveled, and only then should the hole be filled to the end.
Materials
When creating a canopy, as a rule, the frame and roofing are made of different materials, therefore, we will consider them separately. First, let’s figure out what kinds of supports there are and what frames for canopies are made from.
Brick, stone or concrete
These types of materials produce stationary, strong and durable structures. But if you just need to install metal piles, then for brick and stone you will need a careful calculation of the load and the amount of building material required. Concrete columns require additional finishing. Brick and stone are left unchanged, they look beautiful and status, but from time to time they will require some maintenance.
Metal
Metal supports are installed after pouring the foundation, markings are made and holes are drilled with a drill. Then the pillars are mounted, filled with concrete and proceed to the frame structure. To create a frame, profiled pipes are most often used, which are connected to each other by welding. The metal for the supports and frame must be coated with anti-corrosion compounds.
Tree
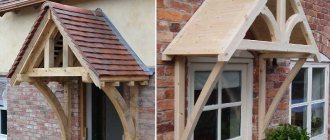
For those who have experience in carpentry and carpentry, assembling a wood frame will not be difficult. The materials and tools you will need are beams and all kinds of hardware to connect them. The wood is treated with antifungal agents. Preparation of the material can last a week, but the assembly process itself takes place within a day. Wooden buildings look organically in suburban areas. They are inferior in strength to metal and stone products. In dry, hot climates, poles can crack over the years. But this does not stop lovers of beautiful natural materials from choosing a canopy made of wood.
For the plane of the visor, you can use any roofing material. The canopy will look especially harmonious in the local area if its surface coincides with the roof covering of the main building.
Glass
A glass canopy installed on a frame sheathing will not protect from the sun, but will also prevent precipitation from getting on the car. This material for a visor is rarely used; it is necessary in certain conditions:
- if the canopy is located near the wall of a building with windows, the transparent coating will not prevent daylight from penetrating into the rooms;
- to maintain the overall style of landscape design;
- to create an original modern design.
Polycarbonate
This polymer is one of the most popular materials for creating canopies. It can replace glass, not being inferior to it in many properties, and sometimes even surpassing it. Polycarbonate is 100 times stronger than glass and 10 times stronger than acrylic. It can withstand temperatures from -45 to + 125 degrees. To cover the roof, monolithic and cellular types of this polymer are used.
Externally, monolithic polycarbonate looks like glass, but is twice as light. The material transmits up to 90% of light. Multi-layer color options differ in additional properties: one is more transparent, another is more durable, and so on. A two-layer monolithic product that does not transmit ultraviolet radiation is in particular demand.
Cellular (structured) polycarbonate consists of multiple jumpers interconnected, placed on an edge. Due to the design features, the sheets look as if they are filled with air, they allow it to be flexible and impact-resistant. This type of polymer is 6 times lighter than glass, absorbs sound twice as well, and is capable of transmitting light up to 85%.
Corrugated sheet
When choosing corrugated sheeting, they take into account not only its thickness and strength, but also its aesthetic appearance, wave shape, and ideal edge. Too thick material will increase the load on the supports, which means you will have to purchase more powerful and expensive racks. The optimal thickness of the canopy roof should be 5 mm.
Roof tiles
To cover the canopy, you can choose ceramic tiles, soft (bitumen) or metal tiles. Each material has its own characteristics.
Ceramic. It is made of clay, so it has a lot of weight (40-70 kg per sq. m). The supports for the canopy need to be reinforced, but the roof will last up to 150 years. This is a fireproof, environmentally friendly material, is not afraid of frost, and does not fade in the sun. The disadvantages include the complexity of installation, heavy weight and high cost.
Canopy made of wood and metal
It is not advisable to dig wooden posts into the ground, even if they have been treated with moisture-proofing compounds. It is recommended to pour concrete supports with a minimum depth of 0.5 m.
Reinforcement is placed in the concrete racks and a wooden block is secured. In this case, wooden rafters are used. It takes a lot of time to build such a canopy.
Canopy frame
The frame for the canopy can be wooden or metal. Assembled using self-tapping screws or bolts. If you use laminated timber or dry boards during construction, then such a canopy will serve for many years.
The metal parts of the frame are usually welded. For a large canopy, it is better to choose a semi-arched shape.
Supports should be placed no more often than every 120 cm, and two posts are enough to the attached wall. For a tile roof it is better to lay timber often, but for polycarbonate it is pointless.
Very often, supports and rafters made from profiles have different thicknesses. This depends on the location of application of a particular canopy element. The pillars must be positioned strictly vertically.
Beautiful examples
When choosing a lean-to carport, many people want not only practicality, but also originality. You can get ideas from the Internet or specialized literature, or you can bring your ideas to life.
You can illuminate the canopy with additional lanterns, or hang bright flowerpots with flowers.
If it is a wooden canopy, then the racks or individual elements can be decorated with carvings. This style will be especially relevant at the dacha; it will create the look of a cute country house.
Canopies with a completely transparent roof also look impressive. For this, transparent polycarbonate is used.
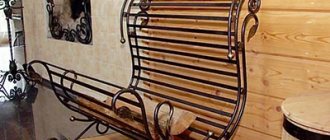
And metal frames look good with additional forging.
Whatever the canopy, everyone notes its practicality. This is an inexpensive and high-quality alternative to a garage.
How to make a lean-to carport with your own hands, see the following video.
Initial work
The very first thing you should do is clear the area where the canopy is located of any debris. After this, it is leveled with sand and gravel. A complex and large canopy requires a foundation.
Make recesses for the racks and lay the electrical cable. Determine the spacing of the racks. If there is a body of water nearby, then the supports should be primed and waterproofed.
Roof
Slate can be of several types:
- Fiber cement is very reliable and durable. Can withstand heavy loads, but is rarely used during construction;
- Asbestos-cement is a very popular type. Sheets of such slate can be flat or wavy.
- Corrugated sheeting is a very strong and durable material with good ultraviolet resistance.
- The metal profile can be hollow, with a cross-section of different shapes. Used for rafters and posts.
Lumber:
- board;
- beam;
- plywood.
Plywood is used for lining under the roof.
Roofing felt is rarely used, usually for waterproofing.The awning is also rarely used. It is a seasonal roof option.
Drawing of a barn with a pitched roof
One of the most important buildings on a summer cottage is the barn. There is always room in it to store various household supplies for the home, garden and vegetable garden. And if the size of your shed allows, then you can also accommodate a toilet room and a shower section. If you approach the construction of a shed as seriously as possible, then this work will not take you much time and effort. There are many different types of such buildings. For beginners in the construction business, we advise you to try to start with the simplest ones - frame structures. The rules for assembling a frame shed are given below. First, familiarize yourself with them and get started.
Choosing a location for the future barn
If you want to understand how to build a shed with your own hands, then in addition to modern information, you should look at projects for such buildings. In order for your shed to serve you for a long time, you need to find a good place for it. To choose the location of the shed, you need to build on the location of other objects on the site. For some, it is convenient for the shed to be located in the farthest corner of the territory, while for others it is convenient to have a shed near the house. Surely there is a place on your site that is not affected by garden plantings and beds. This is the most rational place to start construction. Before starting construction, do not forget to think through everything in advance: take into account all the dimensions of the future building and other data close to it. At the same time, do not forget that your barn should look harmonious and be combined with other buildings on the site.
What you need to build a shed
If you have determined the location of the shed, then it is important to prepare everything necessary for quality construction. So, to build a shed you will need:
- Wood processing machine. The work will be easier with it, but you can do without it.
- Jigsaw.
- Hand-held circular saw.
- Screwdriver.
- Electric drill.
- Electric planer.
- Chain Saw.
- Boards.
- Logs.
- Fiberboard.
- Ruberoid.
- Fastening elements.
- Lighting accessories.
- PVA glue.
- Sockets.
- Oilcloth.
How to build a base for a shed
From this article you can learn how to build a shed with your own hands. Any construction begins with pouring the foundation. In order for the building to withstand, a reliable and solid foundation is necessary.
To build the base of a barn, you can use a columnar, monolithic, strip or pile-screw foundation. Basically, for such a construction, a columnar type of base is chosen.
- First you need to mark the area of the foundation. To do this, you can use a tape measure, a cord and various pegs. The width and length of the future structure are measured with a tape measure. All parameters must be as accurate as possible.
- To install the pillars it is necessary along the perimeter: in the corners and places where the partitions intersect, dig small holes about 50-70 cm deep (it can be deeper, but this depends on the freezing of the soil). The most acceptable distance between pillars is 1.2 - 1.5 m.
- Install supports from asbestos pipes filled with reinforcement and concrete or brick pillars - it’s your choice. After installing the pillars, be sure to check the levelness using a building level.
- Then the area around the supports must be filled with a mixture of sand and gravel to 150 mm of the height of the pit, and the rest must be filled with concrete.
- Now we need to “rest” the foundation for a few days. To ensure that the base of your shed lasts a long time, before backfilling and concreting, you can treat the pillars with specialized mastic.
We recommend reading the portal’s article: How to mix high-quality concrete mortar yourself
Wooden barn skeleton
If the foundation is already ready, now we begin assembling the frame of the shed. Before laying wooden blocks, check that the entire tree has been treated with a special antiseptic. This will allow the tree to last longer. The most common means is impregnation with color. It is very convenient to use and those places that are not treated will not be very noticeable.
We lay the wooden beams on the finished base. Choose the dimensions of the timber in accordance with the dimensions of your future building.
Metal profile canopy
For roofing a canopy made from a profile, it is recommended to use grade “N” corrugated sheeting.
Making a canopy from a metal profile
It is necessary to calculate the weight of the structure. Based on the data obtained, the material for the frame is selected.
It is not recommended to install corrugated sheets in windy weather. Sheets of the required size are cut using metal scissors. If the walls are not insulated, there is no need to waterproof the roof.
The profile is attached starting from the bottom of the roof. The new sheet is laid with a slight overlap. To make the joints airtight, you can use mastic. The sheets are attached to the sheathing using self-tapping screws.
DIY construction of a pitched roof
We have figured out how to correctly calculate the angle of inclination, choose roofing material and design structures for a pitched roof, now it’s time to move on to practice.
Tools
- Hand saw, for wood and metal;
- A chainsaw, or better yet, a miter saw on a stand;
- Jigsaw;
- Screwdriver;
- Axe;
- Hammer;
- Set of chisels;
- Construction bubble level and hydraulic level;
- Roulette;
- Plumb;
- Stapler (useful when you start installing insulation).
Option #2. Roof for garage
In general, the installation of a garage roof is not much different from the installation of the roof of a large house, the same rafters, supports, beams and other components, but the material can be purchased cheaper, and the assembly is simpler.
Video 1.
Video 2.
Video 3.
Video 4.
Polycarbonate canopy
This option is the most popular. This material is quite light and durable. It can withstand quite heavy loads. It is very easy to cut and drill.
The factor that makes polycarbonate canopies popular is the availability of a wide range of colors for this material.
Design
The design of a lean-to canopy is quite simple for DIY installation. It consists of support posts, trusses, sheathing and the polycarbonate coating itself. Construction stores sell ready-made kits for self-assembly, however, calculating and making the drawings yourself is not much more difficult. During the project creation process, the following factors are taken into account:
- Canopy slope. This parameter is determined by assessing the climatic conditions of the construction area. For regions characterized by a large snow load, canopies are built with a slope of 35-45 degrees to prevent the destruction of the slope under the weight of the snow cap in winter. If the area is famous for intermittent winds, flatter canopies are built with a slope of no more than 20-25 degrees. In central Russia, structures with slope angles of 30-35 degrees perform well.
- Rafter system. Rafters and sheathing of canopies are made of wood or profiled metal pipes. Wood has a shorter service life because it does not withstand moisture well; it is treated with antiseptic agents and coated with paint. Metal lathing is a better option for constructing sheds; it is lighter and more durable.
- Type of polycarbonate. In the assortment of construction stores there are polycarbonate sheets of different colors and with different structures. This material is distinguished by a wide selection of colors and textures. For awnings and green, blue or bronze colors. Cool shades create a feeling of coolness and freshness.
- Accommodation. Shed roof structures can be extensions to the main house or stand off to the side. The construction of attached sheds makes it possible to save on support poles and protect the structure from the wind on one side.
Making a polycarbonate canopy
Polycarbonate sheets are cut, and then the edges are covered with punched tape. It is recommended to use a lightweight frame. The thicker the sheet, the wider the sheathing should be. The lower protective film is removed at the beginning of installation, and the upper one at the end.
Having completed the arrangement of the canopy, drain gutters should be installed and the area under the canopy should be arranged. A large number of photos of DIY canopies can serve as an example and source of inspiration for creating your ideal canopy.
Shed with pitched roof 3x6
The roof will be hip. Here is an explanatory picture to make it more clear:
Closer photo:
The roof is almost ready:
Made the roof sheathing:
Corrubite was chosen as the roof covering.
I laid the roof and began to sheathe the barn with a block house under the timber:
I installed windows and doors, and this is how I got this nice little shed:
Construction took about two weeks.
I'm also thinking about lining the bottom of the shed with something like flat slate to cover the concrete pillars. Well, you can add steps.
The frame of the shed is built on the foundation that we prepared in the last stage. We will use beams and boards for the frame.
This is interesting: Types of foundation pillows