Types of polymer
- monolithic or block made in the form of a sheet with a thickness of 0.5 cm or more. Used in the manufacture of protective armored glass.
- cellular consists of two sheets of plastic connected to each other by vertical jumpers at a distance of 2 cm from each other. Stiffening ribs increase the strength of the material by 3 times, but reduce its flexibility. Thanks to the air layer between them, the thermal insulation capacity of the material increases.
- sheet in appearance resembles glass, light transmittance is 98%.
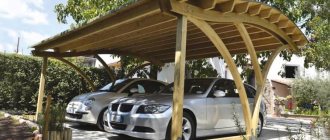
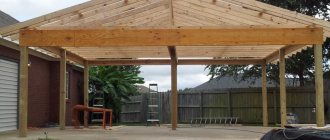
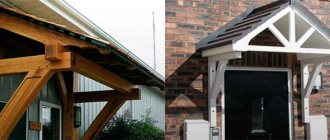
Gable canopy frame
There are at least two ways to assemble a canopy with two slopes: from two or more (depending on the length of the canopy) triangular rafters or from two rectangular frames with sheathing, secured with crossbars. The second option is shown in the figure below, and the first will be a little further.
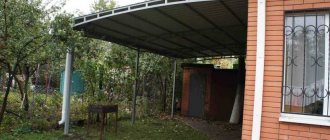
A canopy with a house is one of the popular options
Method one
Two quadrangles are assembled from a timber or thick board, which are united by a ridge board. The angle of inclination of the slopes is set by cuts on the ridge, fixed by crossbars - a spacer bar. Since the roofing material is laid from the ridge down, the sheathing strips are laid in the opposite direction. A continuous flooring is required under soft tiles. This can be moisture-resistant plywood or OSB.
How to make a canopy over a door in the shape of a house
Also, brackets are assembled on the ground - stops that will transfer the load from the canopy to a large area of the wall. It is better to assemble the structure on the ground (without fastening the roofing material). In order to lift and secure the canopy, assistants or the services of a manipulator will be required.
Method two
The second option is the assembly of individual rafter structures. Maybe this option will seem easier to you - all gable roofs are assembled according to this principle.
An example of a gable porch with a rafter system
Here, too, a frame is assembled from timber and brackets are needed. But the frame lies in a horizontal plane, supported by brackets. Two or three triangles are assembled from rafters, which rest on a ridge beam, and it rests on a post, the other end of which is fixed to the frame. It turns out a mini-model of a conventional rafter system.
To improve the appearance, bevels are placed near the counter. In the photo above they are curved, but this is far from necessary. You can simply make it from timber, sawing it at the desired angle. It is also better to assemble the system on the ground - it will not be possible to connect it smoothly at a height.
Made of metal
If the canopy frame is made of a metal pipe, everything is much simpler. The pipe has a high load-bearing capacity, so there are much fewer supporting and auxiliary elements.
Two identical triangles are cooked - according to the size of the future canopy. They are connected by jumpers, the length of which is determined by the “depth” of the visor. To prevent the cladding from bending, additional crossbars are welded.
Gable canopy over a porch made of metal pipe
The finished canopy structure is complemented by brackets - stops. In the picture above, the canopy over the porch has only a stop without slopes. For regions with little snow in winter, this is enough, but to hold a significant mass of snow, you will need a mow or stand. Or maybe both (as in the diagram below).
Beautiful gable canopy over the entrance, made of steel pipe with figured stops and pillars (diagram with dimensions)
Decorative elements are an optional part. There may be an ordinary triangle here.
Advantages of polycarbonate
- 1 Availability of material due to low cost.
- 2 High ability to transmit light and not create dark areas.
- 3 High strength, 1 m2 of canopy can withstand 50 kg of freshly fallen snow,
- 4 Low weight, m2 of panel material with a thickness of 4 mm weighs 0.8 kg, and a thickness of 1 cm weighs 1.7 kg, which is 7 times lighter than glass.
- 5 Inert to the environment.
- 6 Frost-resistant, withstands temperatures down to -1400 C.
- 7 Durable material.
- 8 Safe, does not burn, does not form sharp cutting edges in case of mechanical damage, does not emit toxic substances.
- 9 Easy to care for, does not accumulate dust, does not rot, bacteria and mold do not multiply on the surface, are not damaged by insects, and does not require additional protective coating.
Disadvantages of polycarbonate
- When washing, do not use a metal scraper or sandpaper, it is easy to scratch.
- When heated, the material expands. This is taken into account when installing the structure.
- Glare in the sun.
Types of canopies:
- Free standing structure
- Adjacent polycarbonate canopy to the wall of the house, summer kitchen.
Canopy design:
- A lean-to is erected as a separate structure or adjacent to the wall of another building,
- Gable - with a sloping roof connected at the top by a ridge.
- Arched - a semicircular canopy, the manufacture of which requires certain professional skills when working with the material and installing it on the roof.
Configuration of polycarbonate canopies
Unlike glass, polycarbonate is an excellent material for constructing flexible structures. Different degrees of inclined surface are available. In this case, flat and spherical shapes of canopies can be joined end-to-end.
Design variations:
- Shed canopy - to divert water runoff or snow cover to slide to one side.
- A gable canopy is protection in the form of a roof, has a low windage, counteracting strong winds. The large angle of inclination removes accumulated snow well.
- A multi-level cascade design is a complex architectural design that has much in common with an arched canopy attached to the walls.
- An arched canopy is often used for a porch, gallery or covered walkways between buildings. It is intended to install bent sheets.
- The dome shape (oval or round) is a spectacular canopy, characterized by complex assembly, accessible to professionals, and is used instead of large gazebos and covered areas.
Work planning and material procurement
Draw a plan of the proposed design, taking into account the size of the car and your height. If the shed is built close to the house or adjoins it with one wall, it is necessary to consider the general appearance of the structure and how it will fit into the design of the site development. Sketch the canopy.
There are examples of manufactured canopies on the websites of construction companies. By selecting a photo of a polycarbonate canopy, you can calculate the amount of material required.
Canopy requirements
If you want a forged canopy over a canopy with polycarbonate to last a long time and maintain its good appearance in all weather conditions, it is important to look at:
- the structure is designed so that it can withstand not only its own weight, but also the weight of precipitation (rain, snow, wind);
- design the canopy so that it covers not only the front door to the house, but also the entire porch;
- provide a place for draining waste water in the shed to make it more convenient to leave the house;
- choose polycarbonate so that it blends harmoniously with the design of the house.
By following these simple requirements, you will receive a forged polycarbonate canopy over your porch, which will not only be beautiful in appearance, but also have all the necessary technical characteristics.
Arched
Concave
Gable
Dome extended
Dome
Marquise
Single-pitch with valance
Single-pitch
Preparing the site for construction
Clear the site of debris, bushes, and remove uneven areas. It is recommended to remove the fertile layer of soil. Its thickness is 3-7 cm and depends on the type of soil on the site. Make markings using pegs and twine, outlining the future base of the polycarbonate canopy in the yard along the perimeter.
Selecting the direction of the slope
The smooth polycarbonate rolls snow off perfectly. If you point the slope at the threshold of the porch, in winter you will have to work with a shovel often and a lot. The issue of safety is also important, because polycarbonate structures are usually not equipped with snow guards (in principle, they can be installed, but aesthetics will suffer). These are the two main arguments in favor of placing the ramp(s) away from the steps. This way there is less risk of one day getting a good portion of snow by the collar, and it will be much easier to clean the entrance area.
Irbis
Visor with three straight slopes.
Connar
Visor type
Irbis
Gable arched design.
Installation of support pillars
The canopy is a lightweight structure. The type of foundation is selected taking into account the depth of soil freezing and the proximity of groundwater. The hole for the post is dug below the freezing depth, which for each region is determined by climate conditions, but not less than 0.7 meters.
A layer of gravel and sand is placed at the bottom of a dug hole or trench under a shallow strip foundation and compacted tightly; this will provide a cushion during soil heaving in winter and will not cause the structure to move. If groundwater approaches close, the bottom under the base can be covered with roofing felt.
Note!
Do-it-yourself porch to the house - the best projects and construction ideas (125 photos of new products)
DIY brick barbecue: diagrams, drawings, photos, dimensions. Review of simple and complex structures on a summer cottage!
House with a bay window - 150 photos of the best planning and design ideas. Overview of all features of an architectural element
The distance between the support pillars is 1.7-2 m in length, and 3 m in width of the canopy. If the width exceeds three meters, reinforcement trusses are used to install the roof frame.
To make a support post, wooden beams and beams, metal pipes and a profile with a diameter of 6-10 cm are used. For wooden beams, metal or concrete embedded elements are used. This will protect the tree from moisture and prevent the post from rotting.
After installing the vertical posts, they are concreted with a mixture of cement, sand and gravel. The cement used is grades M 200-M 300. The concrete takes 2-3 days to dry. Between the pillars we make a spacer jumper from a 4x4 or 4x6 cm profile, connecting the supports to each other. The height from the ground and the top of the structure is at least 70 cm.
A polycarbonate canopy adjacent to the house requires the construction of three walls, one of which is made by the wall of the house.
Drawing
Simple canopy diagram
Let's say you decide to make a carport. It can be a free-standing building or a supporting structure. When developing a drawing, we take into account the class of the car. Next, 100 cm is added to its dimensions on each side - this will be the size of the site.
Now you can move on to the design of the canopy. We take into account the slope of the upper surface. Drawing for a machine that measures 1.6 x 4.2 m. The platform will have dimensions of 2.6 x 5 m.
The roof can have different shapes and meet certain requirements for wind and snow loads. When making a drawing, we plot all the dimensions of the elements that are involved in construction.
Let's give an example of the simplest typical canopy.
To install polycarbonate sheets with a thickness of less than 8 mm, a step of 600-700 mm is sufficient.
It will require:
- cellular polycarbonate, 8 mm thick;
- purlins with profile pipe 40x25x2 and 50x25x2 mm;
- arched truss (30x30x2 mm);
- beam (60x60x3 mm);
- support posts (60x60x3 mm);
- heels for racks (30x30x6 mm);
All communications must be established in advance. The surface of the site can be a concreted area or tiles.
A canopy over the door is available to every novice home owner or builder. To do this, draw a straight or curved sheet with a frame. The fastening will be carried out directly above the door. Dimensions 1400x1000x300 mm.
What is it needed for?
A designed and drawn up drawing will save your time in the future:
- Firstly , drawing up a competent document will make it possible to choose the right location and design.
- Secondly , you can decide on the amount of material, thereby saving money.
- Thirdly , the choice of an original appearance that will be in harmony with the landscape design.
What data should it contain:
- Basic structural elements with drawings.
- Sketch of the entire structure.
- Calculated data on the snow load of the roof.
- Calculated roof windage data.
- Calculation of the strength of trusses and supports.
- Design and estimate documentation. All types of materials and their costs are described in detail here.
How to correctly create:
- Don’t forget about additional dimensions, for example, for a car.
- Keep in mind the prevailing wind when making calculations.
- Consider a direct approach to the shed, no turns.
- Access from all sides.
- An accessible and simple drawing (load-bearing structures and frame made of profile pipes).
- Minimum costs.
- Create a harmonious project that takes into account the nearby house and garden plot.
We mount the rafters
A beam is installed on top of the support pillars along the perimeter, onto which the rafters are attached. The rafters are connected with purlins onto which the sheathing is installed. For lathing, profiles or timber with a diameter of 20x20 mm are used. The distance between the lathing depends on the type of polycarbonate and its weight and must be at least 60 cm. The structure is mounted using welding or bolts.
Note!
- Do-it-yourself tandoor made of brick: ready-made drawings, dimensions, step-by-step instructions + 100 photo ideas
How to make a gate with a wicket with your own hands: step-by-step instructions, drawings, design dimensions, design, assembly and installation
Veranda attached to the house - 150 photos of beautiful and practical DIY options
When installing a polycarbonate canopy with your own hands, do not forget to take into account the overhang of the roof to form a canopy. It must be at least 10 cm. The visor will protect against streams of rainwater and snow.
The minimum roof slope for a single-pitch canopy is 300, for a gable canopy from 450.
Secrets of choosing material thickness
Depending on the chosen shape of the structure, it is recommended to use different sheet thicknesses:
- For an arched structure, the thickness is chosen to be about 8 mm;
- Roofs of small areas (above a door entrance, for example) may have a smaller thickness (6 mm);
- For large areas of canopies with a slope, it is recommended to use panels with indicators of at least 10 mm;
- Horizontal extensions with a slight slope require a thickness of up to 16 mm, taking into account the possible delays of a thick layer of snow.
The correct selection of building materials guarantees the durability and reliability of the structure while maintaining all its functional purposes.
Installation of polycarbonate
The polycarbonate sheet is screwed onto the sheathing using self-tapping screws 40-60 mm long and special thermal washers.
Important! With thermal expansion, the material increases in size by 05-2 mm. This is taken into account when drilling a hole for a self-tapping screw. It is made larger in diameter and the material is fixed with a thermal washer.
The sheets are connected to each other using a connecting or detachable profile made of plastic.
The gable roof at the junction of the roof planes is equipped with a ridge.
Note!
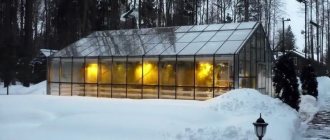
Do-it-yourself greenhouse - a review of the best ideas on how to build a good greenhouse on a summer cottage (80 photo ideas)
Do-it-yourself firewood rack for a summer residence: photos, examples of designs, dimensions. Review of simple and complex options for storing firewood on the site
Do-it-yourself wooden gazebo - step-by-step instructions on how to build a beautiful wooden gazebo (100 photo ideas)
Types and features of design
First of all, the construction site is determined.
The project can be done in several ways:
- Use the Internet.
- Get a service from professionals.
- Do it yourself.
- Buy a ready-made design, with the proposed drawing.
It depends on this what kind of support there will be:
- Console. It is a small canopy in front of the entrance to the house. Supported by mortgages or mensols.
- Consular-supporting. Also an extension to a house, only supported by mortgages or brackets. And they are located in the wall.
- Beam-supported. One side of the structure focuses on a horizontal beam in the wall, the other stands on supports.
- Separate. When the roof is supported by support posts.
Canopy construction technology
Scheme of connection of the structure: 1 – Decorative cover TP-03; 2 – Profile TP-01; 3 – Sealant TPU-01; 4 – Polycarbonate; 5 – Self-adhesive seal; 6 – Self-tapping screw; 7 - Anti-dust tape; 8 – End profile UP; 9 – Substructure element.
- We are preparing a place for a canopy.
- We mark the points for the support posts. We make holes 50 cm deep, manually or using a drill.
- We are installing the supports and filling them with mortar. We wait for the solution to dry completely for about three days. To prevent the surface from cracking, water it with water for three days.
- Next, we carry out the execution of the upper trim, where we use an electric welding machine.
- We secure the transverse elements of the structure.
- The upper part can be a horizontal, arched, gable or single-pitch structure.
- We clean and polish the weld seams.
- We prime and paint the metal frame.
- The next step is to attach the polycarbonate panels.
Required materials and tools:
- on support pillars, profile with a square section 10×10, 8×8, 6×6 cm;
- for purlins, take a profile pipe with a cross-section of 6×4 or 6×6 cm;
- for sheathing – 4×4 cm (profile pipe);
- arched design;
- It is more reliable to take 10 mm polycarbonate, as it has excellent characteristics, an attractive appearance, and is easy to use;
- press washers and screws;
- crushed stone, mortar (sand and cement);
- screwdriver;
- drill, knife;
- a circular saw;
Attaching canopy posts to embedded elements
Step by step guide:
- We make blanks from polycarbonate plates using a circular saw. Moreover, do not forget to make allowances on sheets of 10-15 cm in length. During fastening, we open the protective film in those places where fastening will be done, and do not touch the rest. Since we use it to guide the fasteners. We place the panels with the film facing out. It is on this side that they are protected from ultraviolet radiation.
- We place the joining profile at a distance equal to the expanded polycarbonate.
- We fasten the sheets with self-tapping screws , for which we first make holes with a drill, slightly larger (2 mm) than the size of the press washers. Next, insert the washer, then tighten the screws and close them with protective caps. We also cover the edge of the sheet with protective tape to prevent dirt from entering.
- We repeat the process until we have laid all the panels.
Application of anti-corrosion coating
After installing the roof, all metal or wooden canopy structures require additional treatment with protective coatings. The wood is coated with impregnation and then painted or varnished. They must be for outdoor use.
Metal profiles and corners, especially at joints, are painted with enamel or alkyd paints.
A carport made of polycarbonate is an affordable, lightweight method of protection that you can make yourself. It protects against dust, dirt, insects, precipitation and direct sunlight.
Choosing beautiful and durable panels
Polycarbonate is a lightweight and durable modern material, indispensable for creating translucent structures - domes, canopies, canopies of any size, as well as those that are reliable and airtight.
It itself is a thermosetting plastic, produced in the form of a monolithic or honeycomb sheet. All its types have fairly good strength and are therefore suitable for both private and industrial construction. And the variety of colors pleases the soul of even the most demanding designer!
Types and types of polycarbonate for private housing construction
According to the internal structure, polycarbonate today is produced as follows:
To understand what the cells look like, look at the side of a cut polycarbonate sheet. You will see a honeycomb pattern formed from stiffening ribs. These are rectangular and triangular cavities with air, thanks to which the necessary heat and sound insulation of the material is achieved. Of course, the more complex the structure of cellular polycarbonate, and the thicker it is, the stronger the roof will be.
Polycarbonate without honeycomb is called monolithic. It consists of one continuous transparent slab, which looks like ordinary glass, only much stronger and lighter in weight. It is excellent as a covering for a country canopy.
Today they also produce profiled panels with a wave shape, which is popularly called “transparent slate”. This material is as simple to work as regular polycarbonate, the only thing is that it requires special profiles:
By the way, corrugated polycarbonate is so durable that it is not even damaged by hail or scratched. A really useful new product for the construction market.
Which is better: colored or transparent sheets?
Thanks to a large selection of shades, you can build a polycarbonate canopy of such a design that it will please the eye and not become boring. Just look at the yellow color, which looks sunny in any bad weather and lifts your spirits!
Here are the most popular polycarbonate shades and profiles:
Today they produce gold, silver, and bronze sheets. In general, colored panels are a little more expensive, but they are painted over their entire volume in the factory, so they do not lose their richness of shade even over time.
And when choosing the color itself, take into account this funny feature of a translucent canopy: everything that will be under it will be painted the color of the roof. That is, if you install blue polycarbonate over a kebab grill, don’t be surprised that the meat will look unappetizing.
It’s quite annoying when a luxury car in its new parking lot under a beautiful roof suddenly takes on such a dull hue that it’s embarrassing to show it to guests. Therefore, in terms of aesthetics, focus not so much on the color of the canopy roof, but on whether all the cats under it will turn gray.
Here is an interesting video review of modern polycarbonate for small construction:
We will separately point out such a pitfall. Since polycarbonate is needed in our case specifically for a canopy, it is logical that it will protect from the sun. This means that polycarbonate sheets will be constantly exposed to direct sunlight. Just high-quality sheets for this purpose are covered with a special film against ultraviolet radiation.
This is an important co-extrusion layer, and low-quality products are sometimes produced without it. As a result, the service life of the material is at least 10 times lower. To understand whether there is ultraviolet protection on the sheet, carefully examine the cut, which should shimmer in the sun with a faint blue tint. And do not confuse the UV protection of the protective transport film, which is easily removed from the panels after installation.
Also, at this stage, you need to decide which accessories you will use to attach the polycarbonate. This will largely determine the longevity of the canopy and how often it will require repairs.
After all, the fastening step does not always decide everything - the quality of fasteners is also important. For example, there are often cases when a completely solid canopy roof was destroyed due to the fact that the head of the screw was torn off from it or the washer itself pressed through the polycarbonate.
Calculation of the load-bearing capacity of polycarbonate
So, as for the parameters of the sheets, start from the fact that most of them produce 210 centimeters wide and about 2-2.5 cm thick. The length is 6 or 12 meters. Despite its apparent visual lightness, this material still has weight, which is important to take into account when making polycarbonate canopies: about 800 g per square meter.
The extent to which the selected type of polycarbonate can withstand snow pressure is always indicated on its packaging. In total, when designing the sheathing, be guided by the following data:
There is also such an unpleasant moment: panels made from insufficiently strong connecting profiles can simply jump out under load, if not burst. And most often, unfortunately, this happens with arched structures.
The weakest points, whose load-bearing capacity is almost 1.5 times lower, are located in the ridge and eaves zones of a gable or arched transparent roof. Therefore, in these places it is necessary to reduce the pitch of the sheathing by 2-3 times than throughout the rest of the roof.
Also keep this in mind: removing snow from polycarbonate is quite difficult, plus it easily damages the coating, so initially count on maximum loads. And not only on the roof, but also on the structure of the canopy as a whole.
The fact is that if the polycarbonate itself collapses, it will cost “little loss” - the panels do not form fragments and are quite easily replaced. But a cap of snow, which could not break through the roof, but will break the racks, will lead to much more serious consequences.
It would seem that there is nothing complicated in such calculations. But keep in mind that European manufacturers often indicate only the critical load, and not the design load. This is a destructive value to which a reduction factor must be applied. That is, if, for example, the critical load is 250 kg, then when applying a coefficient of 1.4, the result will be significantly less - 178.5 kg/m2.
In addition, parameters from different manufacturers cannot be directly applied to similar materials, even if they look almost identical to each other. The fact is that a lot depends on the thickness of the sheet, the pitch of the stiffeners and even the raw materials used for production.
And not all of the above can be determined by eye. That is why, the lighter the version of almost identical sheets than the second, the more fragile it is and the less able to withstand loads. Don’t be lazy to find out all the necessary information about the products you are purchasing!
Selection of fasteners for quality construction
The main difference between polycarbonate and many modern roofing materials is that it has a high coefficient of thermal expansion. This gives a lot in terms of ease of installation, because... Now the sheets have some “space”.
And your main task is to make sure that this space is as airtight as possible, for which there are special fastening systems. They are quite easy to use and do not require the use of special equipment or tools.
In Russia today, polycarbonate sheets are predominantly fastened together using profiles, but abroad the locking system is more popular. In our country, such locking systems are just coming into use, so when you see them on sale or on a specialized website, you will now recognize them.
Also carefully select washers: there must be a seal that will ensure a tight connection, and a high-quality cap with a plug.