Documents receiving
This point is very easy to lose sight of if all the work on building a terrace from start to finish is done independently. The veranda design and other technical documentation will help you obtain permission to change the design and technical certificate of the house. By law, construction approval is required by the following authorities:
- local government;
fire safety authorities;
It seems that once the built house and land are your property, you are free to do whatever you want with them - including adding a terrace. However, without all the permits and a documented project, the terrace will be legally considered an illegal extension to the house. This will make it impossible to sell the object, donate it, or exchange it; It will also be impossible to get a bank loan using the house as collateral.
Construction of the foundation
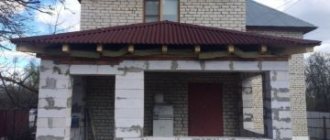
Once the project is completed and all permits have been obtained, the actual construction work can begin. And their first part is the construction of a high-quality and reliable foundation. How to do this part of the building correctly?
The main requirement is this: the base of a closed or open veranda attached to a private house must correspond in its technical characteristics to the foundation of the main building. First of all, its depth should be the same. If this requirement is not met, when the air temperature drops due to uneven deformation of materials, parts of the house will separate, and a gap will appear between the terrace and the wall.
Attaching a new foundation to an old one is done in different ways, depending on how long ago the house was built.
- A new house is usually in the process of shrinking, so a rigid connection will lead to the destruction of a less durable structure - most likely it will be a terrace. In this case, the veranda is built using the tongue-and-groove method - it will slide around the house, as if on rails, and the difference in shrinkage rates will not harm the structure in any way.
- If the house has been standing for a long time and the shrinkage has completed, a rigid connection of the terrace to it is allowed. In this case, a gasket made of waterproofing material (for example, roofing felt) is used and the joint is treated with polyurethane foam.
It will not be possible to make the foundation unified if the terrace was not conceived at the design stage of the house, but nevertheless, you should try to combine the bases of the veranda and the house as efficiently as possible.
The type of foundation is selected depending on the design features of the terrace, primarily its mass, as well as the type of soil.
- Lightweight construction on moist soil is best placed using a columnar foundation - for example, screw piles - on which a lightweight frame of wooden beams or steel beams is then laid.
- If the soil is marshy, a concrete foundation is preferable - for example, a strip foundation - which can support a large mass. To prevent the terrace from going underground, the base should be tied as securely as possible to the foundation of the main house.
How to secure joists
How to attach floor joists to the frame
You should think about the method of attaching the joists at the design stage, since the height of the floor depends on this. The fact is that the logs can be fixed end-to-end, forming a surface of the same height with the support beam, or they can be fixed directly to the strapping beam, raising the floor level by the thickness of the logs.
The photo below shows the options for attaching the joists.
Formation of flooring
Whether the planned veranda is closed or its main attribute is complete openness, in any case, the floor of the terrace must be durable, warm and protected from destruction.
Most often, even if the rest of the veranda is made of concrete or brick, the floor is made of wood. This is due to both the practical and aesthetic properties of this material:
- wood prevents heat from escaping into the ground;
- it is durable;
- wood is completely safe for health;
- such a floor practically does not require decorative treatment, since the material itself is very beautiful - you just need to cover it with a layer of varnish to protect it from damage.
The floor on the finished foundation is built in the following order.
- Insulation is carried out - this can be done in any convenient way. The best option is to fill the space between the ground surface and the boardwalk with a layer of expanded clay.
- The structure is protected from moisture - for this you can use roofing felt or liquid polymer waterproofing material.
- Wooden logs are fixed above the foundation.
- Boards are laid. To prevent blowing from under the floor and to prevent the aesthetics of the coating from being disturbed by cracks, the joints of the boards should be treated with silicone sealant.
All wooden elements of the veranda must be treated with antiseptic and antibacterial impregnations. This will protect the terrace floor from rotting, damage by fungi and other microorganisms, significantly extending its service life.
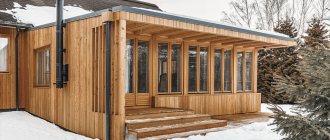
Installing the roof and floor
As a rule, the veranda has a pitched roof, flatter than the roof of the main building.
Let's learn how to install a roof and floor with your own hands:
- We install dense sheathing to the rafters (you can take uncut boards to save the budget calculated for the project);
- On the sheathing we make a flooring from roofing felt or take any other roofing material (if you want to additionally protect the space from moisture, you need to put a layer of waterproofing material);
- When laying the floor with your own hands, we nail edged boards about 3-4 cm thick onto the joists (to treat the boards we use an antiseptic, this will protect the floor from rotting and fungi);
- Next, we paint the boards or cover them with a floor covering (for example, linoleum).
After installing the frame, installing the roof will not cause you any problems. The photo below shows the assembled frame structure.
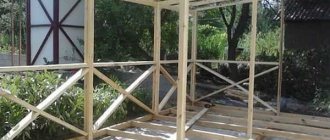
Walling
Walls, unlike the floor, are an optional attribute of attached verandas. Instead, it is quite possible to build a regular fence in the form of a railing. The veranda may not have any fencing at all - some projects for adding a veranda to the house involve the use of plants and hedges as a fence. If you plan to make full-fledged railings, walls and roofing, the next stage after the formation of the floor will be the construction of the frame.
A lightweight wooden frame is made like this.
- Along the perimeter of the floor, beams are laid, connected to each other with a direct lock. Grooves should be made on them for attaching the racks in increments of about 50 cm.
- The racks are fixed in the grooves using metal brackets.
- The top of the racks is tied with timber.
- We make rafters for the roof.
A lightweight metal frame is erected in a similar way. If the foundation allows, the frame can be made of concrete or brick. The thickness of the load-bearing structural elements may differ from the characteristics of the walls of the main house. Roof supports must be at least 1.5 bricks thick, fence posts must be 125 mm thick.
Terrace walls can be finished using a variety of materials:
- wooden or plastic lining;
- metal siding;
- beam;
- decorative brick and much more.
The main thing is that the design of the terrace decoration matches the appearance of the house.
The walls of the veranda must be connected to the wall of the house in the same way as the foundations of the structures. For this purpose, steel embedded elements are used. They are fixed in the main wall using deep holes, and in the wall structures of the terrace they are laid at the construction stage and secured with cement-sand mortar.
If the veranda is made open, railings are erected instead of walls. They can also be made from wood, metal, WPC, brick or concrete. This type of fence consists of posts, balusters and railings.
Construction of a wooden veranda
First of all, you need to make a frame:
- A beam is placed on the floor for strapping, in which grooves are cut for attaching the racks. The racks are installed and fixed with nails. Those that are adjacent to the main building must be secured with anchor bolts. A step must be taken equal to the width of the window in the place where it is planned. It is best to leave a place for the door somewhere at the end to avoid drafts.
- Another beam is attached to the racks on top to create an upper frame.
- Where the roof slope of the main house is located, you need to attach the purlin beam with anchor bolts.
- The rafters are being installed.
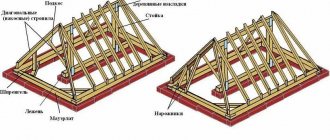
Roofing "pie"
The roof is created according to the same principle as in the main house, only it is usually made pitched and more sloping. An important point is that a vapor barrier on the veranda is not needed, since there is no under-roof layer. It also does not need to be done when insulating walls and floors. Steam should not accumulate inside and will escape into the attic where it will escape from the house. Most often, for waterproofing, a superdiffusion film is laid, which allows moisture to pass through only in one direction. However, when using metal tiles, they are not used, since the metal will rust from condensation. In this case, you should buy a special condensate film.
75d1e35715edc3035db78a241ca54329.jpe
c86fe39b8cd70ec052b1d3ec59684c62.jpe
42139d3df4b581bfdfb86133d46a19de.jpe
9bddee2da33a2d258da15210d9fc0754.jpe
Roofing
The roof of the terrace can be removable, but it is better to securely fasten it to the frame if you plan to build a durable veranda. Like the floor, the main part of the roof is made of wood. The reliability and durability of the structure depend on how accurately the construction technology is followed.
The main element of the terrace roof is a rafter system consisting of wooden beams and sheathing made of boards. The purpose of this system is to hold the roofing material in place and withstand external influences, such as precipitation pressure. Therefore, a lot depends on the quality of the rafters.
First of all, the rafters are treated with antiseptic agents. Next, the following work is done.
- The rafters are fastened together and connected to the main house.
- Roofing material is being installed. For the terrace, it is best to choose the same roof as on the roof of the main house. However, you can use a different style, using, for example, transparent slate that allows sunlight to pass through.
After all the main elements of the veranda have been completed, all that remains is to make a few finishing touches - do the interior decoration, install electrical wiring and, if necessary, heating, and install lounge furniture.
The listed construction work is only the basic part of the technology that any veranda extension requires. The remaining elements - stairs, decorative elements - are made in accordance with the project. Having built the main parts of the terrace, you can probably easily cope with the additional ones.
Extension calculation
Before you start construction, and indeed, buy materials, you need to calculate the extension to the house made of aerated concrete. That is, you need to determine its dimensions, the number and location of openings, the thickness of the walls and the design of the foundation and roof. For example, the conditions of the problem would be:
- To the end of a house with a span of 9 m, you want to attach a room 5 m wide with a wall height of 2.5 m and a thickness of 0.3 m.
- The foundation will be slab, with a height of 40 cm. Its perimeter is calculated taking into account the protruding part of 15 cm on each side: 9.3 * 2 + 5.3 * 2 = 29.2 m (some calculators calculate it themselves). How to check the depth mark of the sole was described above.
- The plinth is made of brick, 380 mm wide and 450 mm high.
- The roof of the extension will be pitched.
- One window size 2100*1400 mm.
Foundation and plinth
You can pre-calculate the materials for an extension made of aerated concrete blocks using an online calculator. By entering the requested data into it, you will receive the following calculation:
Plate:
- Perimeter – 29.2 m.
- Horizontal area – 49.29 m².
- The end area is 8.76 m².
- The volume of concrete is 14.8 m².
- Concrete weight - 34.749 tons.
- Ground load – 0.071 kg/cm².
Fittings:
- The diameter of the longitudinal rods is 12 mm, the total length is 1200 m, weight is 1065 kg.
- The diameter of the transverse rods is 6 mm, the total length is 329 m, weight is 73 kg.
- Grid with cells 20x20 cm.
- The overlap of the reinforcement is 56 cm.
Formwork:
Board with a cross section of 30-150 mm, length 6000 mm – 12 pcs. Fasten after 1 m.
Brick base (380*450 mm):
- The masonry area is 135 m².
- The number of bricks is 20812 pieces.
- Brick weight – 74.924 tons.
- Brick volume – 40.58 m³.
- The volume of mortar per masonry is 8.62 m³.
- Masonry mesh for reinforcement – 450 m.
- Load on the foundation – 0.8 kg/cm².
Material for masonry walls
Considering the light weight and ease of processing of the masonry material, an extension made of aerated concrete can easily be built with your own hands, and the material for it can also be calculated using a calculator.
Since our extension walls will have a thickness of 300 mm, it is logical to use blocks measuring 600*300**200 mm. Depending on the manufacturer, you can also see products with the following parameters on sale: 625*300*250 mm. Let's take the first option as an example and turn to the online calculator again.
Since we need to build a room adjacent to the old house, we will build three walls with a total length of 23 m. The window area is 2.94 m². The calculator calculated that minus the opening area, 55 m² of masonry remains. Taking into account the necessary stock for cutting, we will need 17 m³ (363 pcs) of blocks. Since the blocks are sold not individually, but in pallets, you will have to buy 400 pieces - 10 pallets. To install this number of blocks, 19 25 kg bags of glue are needed.
Installing jumpers
Don't forget about the window lintel. You can purchase a finished factory product with internal reinforcement. To cover a span of 2100 mm, the length of the lintel must be 2500 mm. In terms of thickness, the wall can be covered with two 150 mm thick timber lintels. The height will be the same as that of the block – 200 mm.
You can also block the window span by using U-shaped blocks, which will serve as permanent formwork for pouring the monolith. Their general parameters are similar to ordinary blocks, the only difference is that they have a recess inside into which the frame is laid and concrete is poured. For an opening with a width of 2100 mm, you will need to buy 5 U-blocks with a length of 600 or 4 pieces with a length of 625 mm.
Ceiling and roof
The easiest way is to make a frame ceiling from wooden beams over the extension. Since our roof is single-pitched and there will be no attic above, it is enough to take a 25*150 board and lay it on the edge with a pitch of 60 mm.
Roofing materials can also be calculated using a calculator. We enter the following data into it:
- Width and length of the base.
- The lifting height due to which the slope is formed (ours is 200 cm).
- Length of overhangs (50 cm).
- Covering (metal tiles).
- Lathing (from boards 150*25 mm), with a pitch of 350 mm.
As a result, we get the following calculation:
- The area of the slope is 57.47 m².
- The tilt angle is 21.8 degrees.
- The quantity of roofing felt with an overlap of 10 cm is 4.2 rolls.
- The length of the rafters is 639 cm and there are 6 cross-section options to choose from. Minimum 40*200 mm.
- Number of rafters – 16 pcs.
- The volume of lumber is 0.82 m³.
- Lathing – 14 rows with uniform spacing of 341 mm.
- The number of 6-meter boards is 21 pieces, the volume of lumber is 0.47 m³.
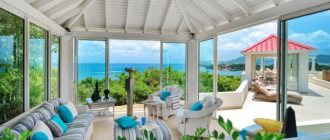
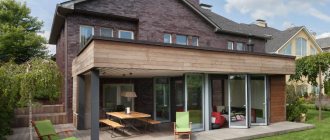
Design Basics
It is necessary to consider the veranda as part of the house, and not to single it out as an independent structure. The peculiarity of the veranda is that its construction can be carried out simultaneously with the main building or some time after the completion of the house. As a rule, the extension is carried out from the facade or from the end, that is, in any case, a ready-made doorway is required. Sometimes, the absence of a door does not stop the flight of design ideas, but a decision is made to create another door in the required location.
- open. In this case, the walls are partially (upper half) missing. The roof is installed on beams;
- closed. In this case, half or most of the walls are glazed.
The veranda should continue the style of the house
When developing a veranda project, the style of the house should be taken into account; its size and shape should harmoniously serve as a continuation of the main building, while the choice of materials should also be appropriate. The most suitable sizes for it are within the following limits:
A smaller area can turn the veranda into a cramped room of unknown purpose, and a larger one can disrupt the harmony and comfort that such a structure should create.
Heating of the veranda, including indoor spaces, is most often not provided.
Rules for constructing a veranda at the dacha
You can attach a veranda to a finished house after obtaining documents and permits.
Owners often plan to attach a veranda to a country house several years after the completion of the main construction work. You should think about the legal registration of a new property. If you build it without permission, without the consent of government officials, you can pay a large fine and receive a demolition order.
Initially, you need to think about the size of the room. If a small veranda in the garden will harmonize well with a small one-story house, then for a two-story mansion you should design a wide and spacious building. On the one hand, it will look harmonious, and on the other, it will significantly increase the usable area of the building.
You need to be extremely precise with the dimensions so as not to change them after the project is approved. You should start processing it in advance, as the procedure is lengthy and can take several months. It should be taken into account that the approval of the local government body, BTI, fire department, sanitary and epidemiological station and nature protection structure will be required. If several people are registered at the dacha, each person’s written consent will need to be attached to the application.
If problems arise with the preparation of planning documentation, you can contact one of the trustworthy companies involved in the construction of turnkey private real estate. This will prevent mistakes and save time and nerves.
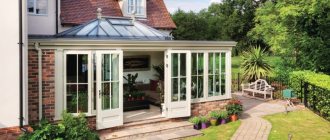
DIY polycarbonate veranda: a modern solution
Polycarbonate is a modern material that successfully competes with traditional materials.
Polycarbonate - a modern material
Polycarbonate is a very durable material and, therefore, its manufacturers rightly claim that it is safe to use. The material has good flexibility, and its deformation does not require special thermal preparation or devices; it can be worked with at any temperature. The cost of the material is relatively low. If we compare it with glass, the price difference between these materials is significant.
Due to a significant increase in the deformation coefficient, temperature changes have a negative impact. For specialists, this factor is nothing more than a certain inconvenience when glazing. The linear expansion of the material can be leveled by increasing the gaps between the frame and the glazing material.
Sketch of a polycarbonate veranda
Polycarbonate scratches easily, which can lead to rapid clouding. In addition, with prolonged exposure to ultraviolet radiation, the material may take on a yellowish tint. In order to prevent this phenomenon from occurring, a protective film is used, which, in addition to its main function, additionally strengthens the polycarbonate.
We build a frame, balustrade and veranda parapet
How to assemble a veranda frame. Racks are installed on the lower frame, the top frame is mounted on them, and then the structure is strengthened with struts. Note that one of the architectural trends involves making a frame from very massive beams with a cross-section of 200 × 200 mm or even more.
What to make a balustrade from. The traditional material for it is wood. Posts and railings can be purchased ready-made at a construction supermarket, ordered from a workshop, or made yourself (this will require an electric router, jigsaw, plane and sander). Not long ago, the combination of beams with transparent screens made of monolithic polycarbonate became fashionable, but ordering such a structure without consulting an architect is risky.
It is not necessary to insert windows into the openings of the veranda walls - you can limit yourself to curtains or grow a green curtain from climbing plants
How to build a parapet for a glazed veranda. A continuous parapet is made according to the usual panel design; There is no need to insulate it too much, but on a sunny day the inner surface of the fence should not get too hot. As a rule, to do this, it is enough to install mineral wool slabs 50–100 mm thick between the frame elements, covering them with a moisture-proof film on the outside and a vapor barrier film on the inside.
DIY veranda made of wood: environmentally friendly and beautiful
The most common material is wood. With the presence of new materials on the building materials market and innovative construction technologies, the leading position of this material remains unchanged.
When constructing a veranda, the choice of construction method is quite wide. It can be made of frame-panel, timber or log. The last option is suitable for a house built in the form of a log house. For constructing a building with your own hands, a frame-panel veranda is most suitable due to its simplicity and cost.
A wooden extension is lightweight, safe for the environment and people, and will also have a relatively low cost.
It should be understood that wood is quite a fire hazardous material. In addition, it requires special treatment to protect it from the effects of biological factors.
Advantages and disadvantages of aerated concrete extensions to a brick or wooden house
One of the most valuable qualities of aerated concrete is its low thermal conductivity, due to which the thickness of block walls can be much smaller than brick ones. Even when compared with porous hollow bricks, an aerated block with a density of D500, which is quite sufficient for a small extension, will have a thermal insulation coefficient that is half as high (0.11 versus 0.22 W/m*C). And the lower this indicator, the warmer the walls will be.
Also, aerated blocks have a number of other advantages relative to bricks:
- Light weight. A cubic meter of aerated block weighs two to three times less than a brick (depending on the hollowness of the latter), and this not only reduces the load on the foundation, but also makes the work easier in general.
- Ease of processing. Unlike brick, which is quite difficult to cut into halves, a gas block can be cut with a hand hacksaw.
- Construction speed. An extension made of aerated concrete to a brick house will be built much faster, since 1 m² of brick masonry takes 3 hours, and aerated concrete - only 0.88 hours.
- Low price. The cost of an aerated block, even from well-known manufacturers, autoclaved, of good quality, rarely exceeds 4,000 rubles per 1 m³. A brick, even the cheapest, ordinary one, will cost at least 5,600 rubles/m³.
Aerated concrete has only one drawback: it absorbs moisture much more strongly than brick, and requires mandatory external finishing. You should choose its option based on the appearance of the main house. If its walls, for example, are made of sand-lime brick, it can also be used to decorate aerated concrete masonry, using a material of good quality.
Laying aerated concrete blocks and bricks can be carried out in parallel, but always with a ventilation gap and vents, connecting the walls to each other with flexible connections or a mesh. In this case, you can take a heat-insulating gas block (density D300 or B400). You can do the finishing much simpler, and do without bricks at all. For example, select façade panels with the appropriate texture and veneer the block masonry with them.
An aerated concrete extension to a wooden house will have even more advantages. The most significant thing is the absence of shrinkage - at least for autoclave blocks. For wood, this is a long process, after which cracks appear on the frame and the crown joints open. As a flammable and biologically unstable material, wood requires impregnation with a fire-retardant primer, which lasts only a few years. And this is also an extra cost.
Expert opinion Vitaly Kudryashov builder, aspiring author
Ask a Question
Note: It is much easier to make an extension from aerated concrete to a wooden house. So that it does not look alien in the exterior of the building, the walls can be sheathed either with clapboard boards or with siding that imitates timber or logs.
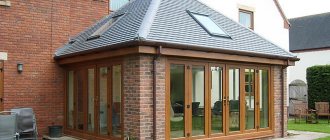
DIY brick veranda. Popular material
Constructing a brick veranda has a number of advantages. On hot days, this room remains cool. The material does not require special care, has a long service life and is fireproof. The brick structure has exceptional reliability and strength.
If such a room is additionally insulated and double glazed, then, if there is heating in it, you can pleasantly spend time on the veranda at any time of the year.
Due to the fact that the brick structure has a significant mass, it is imperative to organize a reinforced foundation.
Installation of load-bearing beams
Place the support for the attached outdoor porch on the brickwork. At the other end of the holder, place the support post on a flat, hard surface. Once you are sure the level is correct, mark the height on the support post. Use a nail gun to secure the support post. Install another support post on the other side of the support and secure it with a nail gun. Use a spirit level to make sure it is still level. We drill holes for the columnar foundation. Drill the beam at the center point above the hole you made for each foundation post. The hole in the holder is for a threaded rod.
Note!
Do-it-yourself columnar foundation for a gazebo: detailed instructions from A to Z + photo
DIY economy class garden gazebo - instructions on how to build quickly and cheaply. Photos, diagrams, drawings, layout and design
Do-it-yourself garden path using a mold: a review of original and inexpensive ideas + step-by-step instructions with photos
How to build a veranda - step-by-step instructions for the craftsman
Foundation
If the foundation has not been laid, it should be built in accordance with the selected type. As a rule, a strip or column type foundation is constructed. If the area of the planned construction is swampy, then the use of piles is necessary. In order to select it correctly, the combination of the following factors should be adequately assessed: the material used, the type of foundation of the main structure, the characteristics of the soil and its slope.
The strip foundation is made of concrete, blocks, brick, stone. For its installation, a cushion of sand or gravel is provided. In most cases, it is not connected to the house and is erected as a separate building.
For lightweight structures, a columnar type foundation is constructed. These include structures made of wood or polycarbonate. Brick or reinforced concrete pillars are installed on a sand bed. They are waterproofed, after which the joists and floors are laid.
Columnar foundation
Frame
As a frame for the structure, you will need a beam with a cross-section of about 100x100 mm or logs of the appropriate size. The lower belt of the harness must be made of dense wood, preferably oak.
Veranda frame
Connections in the corners of the structure are made in half a tree. The bottom trim must be made with a double layer of material. Lags are inserted into it to organize the floor. The racks are fastened using spikes to the lower belt of the strapping with fixation with nails and staples. It is possible to replace beams made of solid material with prefabricated racks made of boards. The strapping of the upper chord is fixed to the racks and later the rafters are mounted on them. Fastening occurs in the same way - using spikes and nails.
A horizontal beam is fixed to the wall of the main building. It, as well as the racks that are adjacent to the wall, are strengthened with anchors.
It is important that the roofs of the veranda and the house meet, with the latter going under the roof of the main building.
Roof
The roof of the veranda is made of a pitched roof with a greater slope compared to the roof of the house. It is desirable that the roofing material of the veranda and the house be the same. This optional requirement is due to aesthetic considerations. The choice of roofing material is not a fundamental issue.
It should be understood that the use of a metal profile sheet will require sound insulation measures.
The construction of the roof begins with the installation of the sheathing. For this purpose, unedged boards are used, laid in a horizontal plane at certain intervals. Roofing material is placed on the sheathing. The small slope of the veranda roof makes it necessary to lay it with a slightly larger overlap than is usually done. Experts recommend organizing waterproofing using roofing felt.
The boards that will make up the floor are laid on logs that were previously prepared. The boards must be at least 40 mm thick. Before starting work, the material is treated with antiseptic. Upon completion of installation, the boards are painted.
To circulate air masses, ventilation holes are installed in the underground.
Window installation
The veranda has windows that are larger than those in the main building. This is due to the fact that the room is intended to be used in the warm season, when the sunlight is sufficient to illuminate the room. The location of the window sill board should be at a distance of about 500 mm from the floor.
Most often, windows have single glazing. The frames can be mounted on racks, which will result in a showcase type of glazing. The gaps are eliminated using construction foam, which is then covered with platbands.
Walls
The choice of wall material depends on the preferences of the home owners and the requirements described above for the design of the veranda.
The easiest option for do-it-yourself installation is to use tongue-and-groove boards, which are connected to each other in the same way as lining and attached to the racks.
Features of the veranda rafter system and roof connections
The roof of an extension to a house is usually covered with the same roofing material as the house itself. The connection of the veranda roof structure to the wall of the house can be done in several ways. One of the most reliable options is considered to be the one in which the roofs of the terrace and the house are, as it were, one whole, continuing one another. This arrangement allows you to completely eliminate the penetration of precipitation into the under-roof space.
Such a wiring diagram can be implemented as follows:
- an upper frame is attached to the posts or load-bearing wall of the veranda, encircling it around the perimeter;
- Ceiling beams are nailed to the frame or upper support beam. In the future, ceiling lining material will be attached to them - lining, plasterboard panels, etc.;
- the rafters of the house are shortened along the wall connecting to the terrace;
- the rafters of the veranda are cut at an angle so as to fit tightly to the rafters of the house (see figure below);
- both elements are connected using perforated metal plates;
- if the angle between the rafter structures of the house and the veranda is too large, then spacers (anti-snow supports) can be installed between them to increase spatial rigidity. In winter, they will help retain snow and wind loads.
Important! If there is a significant difference in the heights of the roofs of the attached veranda and the house (the house is much taller), the rafter connections can be significantly simplified. To do this, it is enough to simply extend the rafters of the main building, making them longer by the amount of the terrace overlap and the required roof overhang.
The second, somewhat less reliable, but simpler, therefore a common way of connecting the roof of an extension to a house is to connect the veranda rafter system to the wall of the main structure. The rafter legs of the attached room are attached to the upper strapping beam. A groove is selected in the wall of the house into which a wall profile is installed - it will cover the junction of the roofing of the veranda with the wall. As a covering, it is recommended to choose flooring made from metal tiles or corrugated sheets - they have significant rigidity and can be installed fairly quickly.
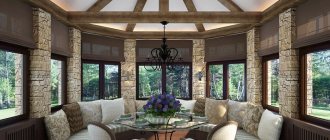
Veranda: photos of interesting solutions
The veranda is the decoration of the site. Look at photos of different porches for inspiration.
Veranda with sliding wall
Veranda with stairs
Veranda with curtains
Location
Veranda of a country house
As a rule, a veranda is located in front of the main facade, but it is not forbidden to place it in front of the side facade, if necessary. It is important that the veranda is clearly visible from the gate (the main entrance to the courtyard) and has a passage to the rooms of the house.
The determining role in calculating the length of the veranda is played by the length of the facade of the house along which it will be built. With the width, everything is much simpler; it is usually about two and a half meters.
Before starting construction, do not forget to prepare the workplace, i.e. clean the area, dismantle the porch and canopy over the entrance.
Which design is preferable for construction on a suburban site?
Initially, the construction of a veranda is designed as a room that is maximally suitable for recreation and auxiliary purposes, especially in the warm season. A veranda in a country house is associated with a light, unheated structure on which you can store some household items and even use it as a hallway. For a residential building, such a room can be a winter garden, part of a storage room, or even an entrance hall.
All existing veranda schemes can be divided into two large groups:
- Insulated or warm buildings;
- Cold structures, often with a semi-open or completely open room;
- Universal systems in which window openings can be closed with sliding, hinged or removable glazed frames.
Which design is best for your home depends on the characteristics of the building itself and its intended use. The easiest way is to build an open veranda with your own hands. To set up a winter cottage or in a house equipped with a heating system, you will need to build and attach a full-fledged foundation to the house with your own hands.
Choosing a design option for summer cottage construction always starts with a lightweight open structure, usually on a wood or steel frame. If the location for a summer cottage turns out to be successful, the house is gradually settled in and insulated, turning it into a winter option. The process of stage-by-stage arrangement of a dacha plot leads to the construction of a cellar, a garage, the summer veranda at the dacha turns into an insulated structure, and the place to relax is transferred to the terrace or gazebo.
In addition, the design and arrangement of the veranda must correspond to the design of the house. For a log house or a house made of profiled timber, a frame structure is perfect; a brick building will require the construction of a more capital and massive structure, at least on a stone foundation.
Where and how to place the veranda
Even the simplest construction of a summer veranda cannot begin until a decision has been made on the key issues of construction:
- firstly, choose the size and location of the site;
- secondly, the material and method of constructing the foundation;
- thirdly, think over the structure of the roof of the room.
The construction of a veranda can be done in the form of:
- A narrow and long building stretched along the wall of a house;
- Attach a structure in the shape of a rectangle, square, bay window, round or polygonal to the main building;
- Divide the room into mating parts in the form of the letter L, located along the mating walls of the house.
An enclosed space with an elongated, rectangular shape can be attached with a smaller plane to the facade or rear wall of the building. This scheme is most often used in the construction of a warm veranda, for example, as a place of relaxation or a study, with a winter garden or a miniature greenhouse.
The standard roof structure involves the use of a shed system or covering the base of a second-floor balcony.
If the design of the veranda requires solid protection from rain and wind, you can use the ceiling as a base for an open terrace.
The construction of the above scheme will require a small but fairly rigid base with the structure tied to the load-bearing elements of the building, therefore such verandas are most often built from laminated veneer lumber on a concrete strip.
Building materials for arranging a veranda
To build a veranda frame, it is quite rare to use steel profiles and sheet metal as load-bearing structures; the use of expensive metal profile elements is justified only if the design or characteristics of the building or load-bearing supports require the most durable, rigid and light material.
If lighting in the room is of paramount importance, the veranda box can be assembled from aluminum double-glazed windows or using wooden frames made of larch or walnut.
In the construction of most amateur and professional structures, glued or profiled timber, decking boards, foam blocks and reinforced concrete castings are most often used. For finishing a summer veranda, lining made of coniferous wood and ondulin are suitable.
Which floor to choose for an extension
If the foundation is of a strip type, you can choose any floor (wooden, concrete) for the frame extension. If it is columnar, then it is only wooden.
Let's consider both cases:
- Concrete . After pouring the foundation, 30-35 cm of soil is selected inside the concrete rectangle. Next, sand is poured into this mini-pit, and crushed stone or expanded clay is poured on top. The thickness of the layer is 20 cm. A reinforced lattice is installed on top of this pillow and a full-fledged screed is poured. A completely flat surface is achieved, after which tiles, laminate or wood are laid on top.
- Wood. Install massive floor beams on top of the waterproofing, connecting them to the foundation with anchors or other fasteners. Next, logs are stuffed onto the beams, they are insulated, and the flooring is laid on top.
It is recommended to pre-treat wooden structures with an antiseptic to prevent decomposition.
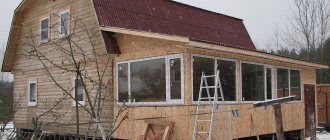
How easy it is to build a veranda
For your first construction experience, you can choose the design of a frame veranda made entirely of timber and boards. In this case, the building can with equal success be made only for summer, with an open space under the roof, or converted into an insulated winter version, with glazed frames, insulated floors and ceilings.
Construction of a summer version of the veranda
A lightweight structure made of wood does not require a massive, rigid foundation, but in this case, the choice of foundation for constructing a veranda with your own hands must be made based on the quality of the soil. On rocky soil, it is enough to install columnar supports as a foundation or make do with the construction of a shallow belt. Due to the light weight of the structure, it is not threatened by settlement or tilting.
It is much worse if construction is to be carried out on very heaving soils. In this case, there is only one way out - to install the structure on screw steel piles or TISE piles. Any intermediate bored pile installed above the freezing level of the soil can be squeezed out to the surface.
We carry out the construction of a light veranda step by step:
- Prepare the site, trim the turf and mark the contour, punch holes to a depth of 70-80 cm for installing pillars. A layer of gravel and sand is poured onto the bottom, carefully compacted, after which the pillars can be laid out of brick, as in the photo, or sections of asbestos-cement pipes can be used in the construction of the foundation;
- We glue two-layer sections of waterproofing onto the installed supports with mastic, after which we tie them with timber with a cross-section of 100x100 mm. Cross members and joists with a cross-section of 50x100 mm are laid along the contour of the framing for laying the subfloor. The strapping of the base of the veranda must be secured to the base of the house;
- We install vertical supports on the strapping beam, align the pillars and fasten them to a bolted connection with the installation of struts. The heads of the supports must be cut to height and tied with an upper transverse beam. Between the supports, a beam of median strapping is sewn, playing the role of a fence railing;
- After filling the floorboards and installing the steps, a horizontal beam is sewn onto the wall of the house, which will serve as support for the upper ends of the rafters during the construction of the roof frame. OSB or moisture-resistant plywood is sewn onto the rafters and sheets of ondulin are stuffed.
The construction of the foundation of a light veranda made of timber or logs for a fresh wooden house should be carried out according to a swinging pattern. In this case, the horizontal platform of the veranda rests on two lines. The first line is formed by a series of pillars or screw piles embedded in the ground parallel to the front wall of the house at a distance of 1.5-2 m; a beam sewn onto the wall of the house is used as the second supporting surface.
If the soil on which construction is planned is heavily waterlogged and there is a risk of flooding with rainwater, a drainage and drainage system will need to be installed on the supports. This system allows the veranda to maintain the integrity of the structure during any movement of the soil and settlement of the building. A lighter veranda structure can be raised to a greater height than the base of the house, but thanks to the “swinging” effect, the veranda structure remains intact.
How to build a warm veranda
In the construction of permanent buildings on a concrete foundation, it is customary to use a universal rule - the foundation of the extension is carried out according to the same scheme as the foundation system of the main house.
For example, for a dacha on a deep strip foundation, a heavy warm veranda can be installed on a concrete strip of similar depth, or in a cheaper way on pillars or piles with a powerful grillage.
Often, the construction of a veranda on a solid foundation is dictated by technological necessity. For example, a box with a non-standard design and location, which has a huge windage, should be firmly tied to the ground surface, and thereby reduce the effect of swaying under the pressure of the wind. But more often, a concrete foundation is used in the construction of a veranda as a foundation for a future warm extension to the house.
The construction of a closed, warm veranda on a stone foundation can be done in two ways - on a slab foundation and on a concrete strip. A super-rigid slab poured with concrete makes it possible to build a very nice aquarium veranda structure with a maximum degree of glazing.
It would be cheaper and more practical to build a veranda on a regular strip foundation. In this case, the initial stages of constructing a veranda will look exactly the same as during the construction of a conventional building. A clear example of building a strip foundation with your own hands in the video:
On the prepared and marked site for the construction of the foundation, we dig a trench 30 cm wide and at least 50 cm deep, onto the bottom of which gravel, sand, a layer of waterproofing are successively laid, and reinforcement and formwork are installed. After pouring concrete, you will need to insulate the floor and make waterproofing and concrete screed. In this case, you can get rid of dampness, rodents and other troubles that accompany unpaved underground floors.
The reinforcement of the strip foundation of the building must be tied to the reinforcement frame of the base of the house. Both foundations will be separated from each other by an expansion joint, 2-3 cm wide, and will exist separately, which will ensure good stability and the absence of cracks in the walls.
The construction of the foundation box can be done in the shape of the letter U; this option is suitable for a frame structure. For the construction of heavier brick walls or masonry from “soft” wood concrete or aerated concrete, experts recommend making a closed loop or base ring.
For new buildings, no more than 3-4 years old, the owners prefer the construction of a temporary frame structure, since as the foundation of the house shrinks, the foundation of the veranda still “plays” and settles along with the house. For buildings over 5-7 years old, you can safely install brick or aerated concrete.
To assemble a wooden veranda frame, you will need to raise the basement part of the veranda building to a height of 40-50 cm. It is rare that it is possible to make the concrete foundation strip perfectly level across the horizon. Therefore, the most difficult stage of wall construction will be laying out the first row of bricks or cinder blocks; the nuances of starting masonry with your own hands are in the video:
Rolled waterproofing and fine-mesh steel mesh are laid on top of the plinth, used as protection against rats and mice. If the walls are made of wooden beams, the mesh must be raised along the wall 40-50 cm above the base.
Vertical posts are installed on the laid base beam, intercepted by horizontal cross members and reinforced with struts. After laying the thermal insulation and vapor barrier film, the outer walls of the building are sheathed with siding.
The rafters of the roof of the house and the veranda are assembled according to the diagram below.
Glazing: what and how
Even a large open veranda can be glazed if desired. The easiest way is to call a measurer from a company that sells metal profile windows and listen to their proposals. They may offer windows that open or not. Here the choice is yours. The glazing of the veranda looks like the photo below. For a summer residence, this option may be unsafe: if the territory is not guarded, it can be broken up.
b76aad4ce6a766298c8387ed903857fb.jpe
4c85e95761ad41d4d91c4185895aaee8.jpe
Glazing of a large veranda
Even with this solution, questions arise:
- Install single or double frames. If you have finances, it’s better to bet double. They hold heat much better. Even if you only come to your dacha in winter to check how things are going, in spring or autumn it will be much warmer. To the point that if the veranda is on the south side, while the house is heated, you will bask on the veranda: the sun heats the air, and the frames retain the heat. It will be especially warm if you make an insulated floor. But even with a single deck, the temperature in the glazed extension will be much higher than in the house.
- The windows must be burglary resistant or not. If there is no security nearby, then even the best ones will be able to break into it. Even tempered reinforced glass will not last long against brick. And in order not to provoke thieves, the entrance to the house should be behind a reliable metal door, but the entrance to the veranda can be equipped with simple doors.
In the photo below, the veranda at the dacha was glazed with double windows. With a cracked floor in the spring, the extension is much warmer than in a log house.
When deciding how to glaze the veranda at the dacha, keep in mind that double races retain heat better even in an unheated extension
Large glazing area - large sashes. If you order double frames made of wood, they will open inward (the same as fiberglass). If the veranda area is small, they can get in the way. There are several options here. First: order ones in which both frames will open outward (there are some). The second is to install sliding ones. One point: sliding ones are made only from aluminum profiles. Even if they can make you one from wood, they will cost a lot (this type of window, even made from aluminum, is not cheap at all). You can see the glazing of the country veranda with sliding metal-plastic windows in the photo.
Sliding windows made of aluminum profiles on a country veranda: comfortable and warm
If the veranda in a house is made of logs, and it was cut down along with the house and was originally planned as open, the white windows in it will look, to put it mildly, “not very good.” Not everyone can afford windows with wooden frames over a large area; metal-plastic is still cheaper. The solution is simple: there is laminated aluminum. A film imitating the surface of wood is glued onto it. You select the required color and everything looks good (an example of such glazing of a veranda on two floors is in the photo below).
Glazing of a veranda at the dacha made of logs (the mounting foam is visible, it will then be covered with flashings)
After the veranda has been glazed, I want to build an open gazebo. How? Read here.
Another option is frameless glazing. In this case, a strong strapping is made at the top and bottom, special glasses are inserted between them, and the gaps between them are sealed with rubber seals or covered.
Frameless glazing of the veranda in combination with a log house is not the best solution
Wood and polycarbonate combine better. Its advantage is that you can install it yourself: make frames with a quarter removed, install polycarbonate sheets in them with sealant. They are attached to the frame with self-tapping screws with special thermal washers that compensate for different temperature expansion. The seams between the sheets are filled with transparent sealant, but there are special mounting profiles for joining the sheets.
Glazing the veranda with polycarbonate: you can do it yourself
You can glaze the veranda yourself in this way. Polycarbonate weighs relatively little, is not so demanding on transportation conditions, and is easier to work with than glass. Due to its cellular structure, it retains heat even better than glass: it is used in greenhouses and greenhouses. So a veranda at the dacha can not only be built with your own hands, but also glazed.
Open type
An open veranda is a frame building without walls, and the roof is mounted on beams. This design has a number of advantages and disadvantages.
Advantages and disadvantages
Among the undeniable advantages of an open veranda, it is worth noting the following:
- Easy to install. Its construction requires a minimum of materials and time. It is not difficult to erect it.
- Easy care. Such a veranda is more of a part of the street than of a house. Therefore, to keep it clean, it is enough to sweep the floor regularly.
- An open veranda will allow you to enjoy the view and breathe clean air while on it.
Open terrace
Like all man-made works, open-type construction also has disadvantages:
- Not suitable for use in the cold season.
- It is impossible to install upholstered furniture on an open veranda, since it will be impossible to care for it, and, therefore, staying here will be deprived of a certain home comfort.
- Difficulties may arise with the choice of finishing materials, as they will be subject to negative environmental influences.
The open veranda is not glazed and no walls are erected on it. It is often used as a gazebo. It is built using a frame method.
Tools and materials
For construction you will need:
- Concrete pillars for the foundation.
- Beam for the frame with a section of 150×150 mm.
- Cement and sand.
- Beam for strengthening the frame with a section of 120×120 mm.
- Bracket for connecting timber.
- Lathing for the lower part of the veranda. This can be OSB, forging or slats in the form of slabs or balusters.
- Wood screws 100 mm and 25 mm for fastening OSB or wooden lining.
- Wooden lining.
- Beams for roof installation 150×150 mm.
- Anchors 150–200 mm.
- Krokva 60×120 mm.
- Roofing material, for example, metal tiles or ondulin.
- Boards for making roof sheathing.
- Logs 100×100 mm.
- Wind board.
- Floor board 30–40 mm.
- Paint and varnish products for wood processing.
- Rolled waterproofing for foundations.
- Drill and saw.
- Level.
Construction site marking
After the construction plan has been drawn up and all the documents required by law have been received, we proceed to marking the selected site for construction. This is done by the following steps:
- Around the perimeter of the site, 15 centimeters of earth is removed for work. This soil can be used for flower pots, vegetable gardens and other purposes. We will no longer need it in construction.
- The resulting area is leveled.
- Next, the marking itself is performed. To do this, you need to prepare pins made of wood or metal, and then drive them into the corners of the planned building. Then distribute the required number of pegs between them every 1.5 meters. After this, the rope is pulled tight, securing it between the pins. This procedure is necessary for orientation during laying the foundation.
Making a subfloor
After the foundation for the veranda is ready, it should be covered with two layers of roofing material. Then you can move on to making the subfloor. It can be made of concrete or wood. Wood will be suitable for construction with wooden walls. It is better to use concrete for a brick veranda.
So, if you are planning a wooden veranda, then the floor is made as follows:
- It is necessary to secure the lower frame beam to the base, for example, using an anchor. To connect the beams, you must first make cuts at the joint points and then fasten them with galvanized nails.
- We fasten the wooden logs to the bottom frame using the method described above in increments of 0.5 meter level.
- We fill the resulting distance between the joists with expanded clay;
- Using plywood or unedged boards, we construct the flooring. To do this, the listed materials should be about 5 centimeters in thickness. The flooring is attached to the joists using self-tapping screws or galvanized nails.
For a concrete floor, the following steps are carried out with the obligatory use of a level for the most even screed:
- The foundation for the veranda is covered with sand. The thickness of its layer should be 10 centimeters;
- An expanded clay layer is poured on top of it;
- Next, use a mesh made of reinforcement with rods 6-8 mm in diameter with 25*25 cm cells. It is installed on the work surface;
- The last step is pouring concrete.
Roof
Construction process
Undoubtedly, the roof of the veranda should be a continuation of the roof of the house. It is recommended that it be made from the same roofing material, but other types can also be used. The roofing material is attached to the wooden sheathing. The sheathing is installed either at intervals or closely (depending on the type of roof).
- The boards are fastened closely when using rolled material. When attaching the flooring to the rafters, the nail heads should be recessed into the wooden surface (they should under no circumstances protrude). The rolled material is secured at the edges with nails, and for additional fixation, slats are nailed to the coating. The protruding edges of the roll should be folded inward and secured with nails.
- If steel roofing material is used for the roof, it is attached to the sheathing with nails and joined with a “seam” seam.
- Asbestos cement sheets are installed with an overlap. In this case, the top sheets overlap the bottom sheets by at least 14 cm. They are fastened into pre-drilled holes with nails or screws.