During the construction and improvement of a private house, it is almost impossible to take into account all the nuances. That is why the question of how to insulate a veranda for winter use arises only when the extension already exists. The thing is that initially it is planned as a summer area where you can spend leisure time in the summer. However, over time, plans may change, as a result of which the veranda needs to be insulated and made suitable for living. How to efficiently and reliably insulate an extension without damaging the structure? Let's figure it out.
Why insulate the veranda?
At the moment, not everyone can boast of a full-fledged residential extension, which they really regret. The fact is that an insulated veranda is an additional and multifunctional space, suitable for use both in summer and winter. Here you can equip a warehouse for storing food and equip a summer kitchen. In addition, insulation is needed to prevent the creation of temperature changes inside the room, which means moisture, which has a detrimental effect on the interior space.
Dependence on the main structure
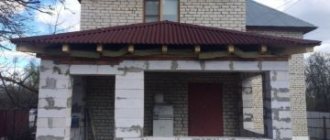
Of great importance in the construction of a veranda is the overall configuration of the house, which can be simple and laconic (square or rectangular), or complex, with many external and internal corners, niches and other architectural features.
The more complex and bizarre the configuration of the house, the fewer extension options it allows. On the contrary, simple forms of living space practically do not limit the owner’s imagination.
The veranda can have a rectangular shape, resemble a hexagon or a circle. In most cases, a rectangle is selected.
A veranda that occupies half the wall of a large house will look beautiful.
If the house is small, then it would be logical to make an extension along the entire width of the wall.
The extension can be any size, but it should not look larger than the house itself. The foundation for the veranda and the house should be located on the same level.
Freezing areas
A veranda is an extension to a house designed for summer use. Based on this, the places where freezing is obvious are the floor, walls and ceiling. Simply put, a veranda is an unheated extension where there is no preliminary preparation to retain heat. It is worth noting that the building material used to construct the structure does not play a role.
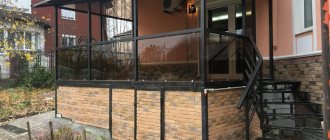
Windows are another source of heat loss. The problem can be solved by installing double-glazed windows or completely replacing the windows with better ones. In addition, you need to insulate the front door from the street, separating it by a built-in hallway or an entrance group (porch) built on the street. The result is a double entrance, where there is an air “cushion” between the doors, equalizing the temperature difference. In general, the entire veranda needs insulation with the exception of the wall, which is shared with a private house.
Where to place the insulation?
For high-quality insulation of the veranda, 3 options for placing thermal insulation material are used:
- Internal.
- External.
- Laying insulation in the wall space.
The choice of location of the insulation depends on the material, as well as the type of extension. If the veranda is made of wood, then the walls can be insulated internally, but brick walls are usually insulated from the outside, since the interior decoration will accelerate the destruction of the brick. As for the floor and ceiling, they are insulated from the inside, because there is no underground space or attic in the veranda.
Types of thermal insulation materials
Depending on the production, all insulation materials can be divided into two categories:
- Mineral.
- With a chemical component.
The first include basalt wool, which does not burn, glass wool and the well-known mineral wool. The main disadvantage of mineral insulation is that they require additional insulation.
As for insulation with a chemical component, these include:
- Expanded polystyrene - used for insulation of brick buildings.
- Polystyrene foam is an inexpensive and reliable insulation material that is easy to install.
- Polyurethane foam is an expensive and high-quality material.
Methods for insulating veranda walls
Internal insulation of the extension
The first and most inexpensive method for insulating an extension is to independently finish the veranda from the inside. It is worth noting that this is the optimal solution, since interior work can be done in any weather and at any time of the year, in addition, such finishing is considered the most inexpensive.
First you need to prepare the surface of the walls by removing the finishing material and sealing all the cracks. After this, using a construction stapler, you need to secure a vapor barrier film, on top of which a wooden sheathing is nailed, the pitch of which depends on the width of the thermal insulation material. As insulation for the veranda, you can use mineral wool, which needs to be “covered” on both sides with an insulating film. The final stage is finishing the walls with plywood, finishing strips or plasterboard.
Important! There should be no gaps between the sheathing bars and the insulation.
External insulation of the veranda attached to the house
External insulation of the veranda is an alternative solution that has several nuances. First of all, you will have to face the problem when joining the insulation to the roof, since a gap will form, affecting the quality of the work done. As a result, the upper corner of the veranda will constantly freeze. The solution to the problem is to replace the roof or reconstruct the roof.
As an external finishing material, you can use plywood, plaster, facing lath or gypsum board. Thermal insulation material for external use is polystyrene foam, which does not require the use of insulating film. It is worth noting that the external facing material must be fireproof, so plaster is the optimal solution. If plasterboard sheets (GKL) are chosen, then you need to install lathing, and for plaster you need a reinforcing mesh.
For external insulation, it is enough to secure the foam sheets to the wall using self-tapping screws with a large head, sealing the cracks with polyurethane foam. After this, the structure must dry, the excess is cut off with a knife and proceed to the installation of the day or lathing for the subsequent finishing of the veranda.
Equipment installation
The winter veranda is warm and cozy, you can sit in a comfortable chair, drink warm cocoa or have dinner with your family. But in such situations, light music will not hurt. Therefore, you could install a radio or a small music center here. If you like to watch the evening news or your favorite TV series, then a small TV and maybe a DVD player won't hurt. In general, it’s up to you to think about technology, but we recommend not to forget about it, because the complex of work and sleep (without any entertainment) quickly leads to a state of apathy.
Thermal insulation of floor and ceiling
In order to insulate the floor, you need to install logs made of wooden beams, the pitch between which depends on the width of the insulation. Similar to walls, it is enough to lay thermal insulation material between the joists, fill the gaps with polyurethane foam, and then cover it all with floor covering.
As for the ceiling on the veranda, the roof space excludes the presence of an attic, which is why it is necessary to install a sheathing on the ceiling with the required distance between the bars. Foam plastic can be used as insulation, however, when finishing the ceiling, the use of insulating film will be necessary. The finishing material for the veranda ceiling is plasterboard sheets.
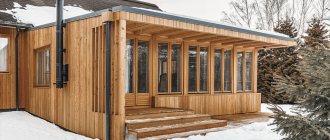
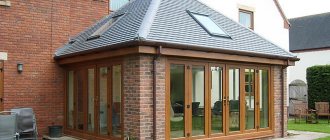
Ultimately, after carrying out all the procedures for insulating the veranda, you can get a full-fledged room suitable for living. In winter, the veranda will retain heat, but in summer it will be able to keep cool, providing comfortable conditions.
We build a veranda for the house with our own hands step by step: instructions for creating simple extensions
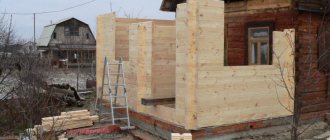
First, preparatory work is carried out. These include: dismantling the porch with a canopy (if the room is on this side), clearing the area of plants and stones, removing turf, preparing a convenient place for building materials. When everything is ready, it’s time for the most important stage of construction.
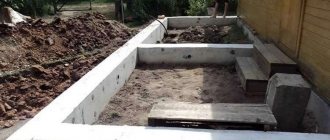
Foundation
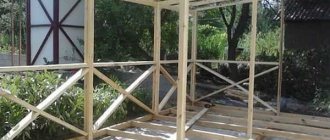
Small structures that are light in weight (made of wood, polycarbonate), especially in swampy areas, can be erected on a columnar foundation. It is not tied to the foundation of the house. If you are planning a small space, it is enough to install four piles in the corners. A large frame will be more stable with intermediate posts. The optimal distance between them is 50 cm.
Procedure
- Dig holes at least one meter deep so that the new foundation matches the old one and does not crack due to freezing of the soil.
- Place 20 cm of sand at the bottom of each hole, and 10-15 cm of gravel or crushed stone on top of it.
- Pour concrete (15 cm) on top and leave to harden.
- Install the pillars. They can be made of bricks, concrete and metal piles. Asbestos pipes are also suitable. The support is raised to the height of the building's base.
- Coat the posts with bitumen mastic to protect them from moisture.
- Fill the gap between the ground and the support with sand and the cavities of the pillars with gravel.