and receive painting as a gift. Until the end of the promotion:
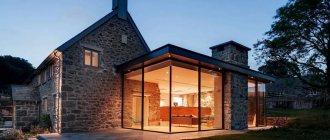
EXTENSION TO A HOUSE MADE OF FOAM BLOCKS
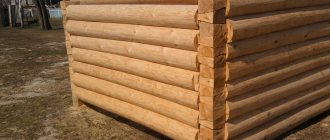
Foam block is a reliable and durable building material that is extremely popular among developers. Foam blocks are light in weight and have the correct shape, so they are easy to build with and it is not difficult to erect a structure of any size and shape, including a two-story one.
They do not create a large load on the foundation, so for an extension it is not necessary to build a foundation that is costly and time-consuming. In addition, for the same reason, foam blocks are acceptable for use in loose and viscous soils. In terms of construction speed, foam block walls are comparable to frame walls.
An extension to a house made of foam blocks practically does not shrink and has no cracks that need to be additionally insulated. This is a solid, warm and durable structure, with a service life of at least 50 years. Like wood, this material “breathes”, which provides a pleasant microclimate in winter and summer.
The price of foam blocks is moderate, so such extensions are always inexpensive. Our company will help you build and finish the extension. We will make it the way you imagined! At your disposal are dozens of ready-made projects that are already posted on the site - closed, with a veranda, two-story, blind. You can make changes to any of them so that you end up with the building of your dreams!
Building with pleasure is real! Do you need an extension to your house made of foam blocks, but where to start is unclear? Are you delaying the construction process because you understand how much trouble it will bring?
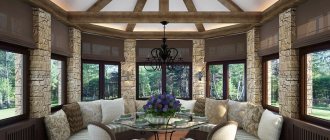
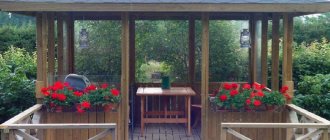
We at DachaMaster provide our customers with comfortable construction: we support the project at all stages - we develop drawings, create estimates, build, perform rough and fine finishing. There is no need to look for contractors, delve into the nuances of construction, selection and delivery of materials, look for where to find equipment, overpay when each successive contractor demolishes the work of the previous one and begins to redo it; You get a ready-made room that you can immediately use; the extension can be built in any part of the house, on any soil and at any time of the year - we always know what to do; the cost of services is transparent and inexpensive - you will always know how much you paid for a particular service and will never overpay. Call to find out how much it costs extension or place an order! 8 8 (929) 611-24-50 Reliable extension of a veranda to a house made of foam blocks Construction of a foundation for a veranda Construction of walls from foam concrete blocks Extension to a house: additional points Features of adding a veranda from foam blocks to a wooden house The house is built, the plot is in order, but everything is something is still missing. Every owner dreams of a cozy veranda or terrace where they can relax after a hard day, sit and drink tea with the whole family. Most often, at the stage of building a house, they forget about it or there is simply not enough money for its construction.
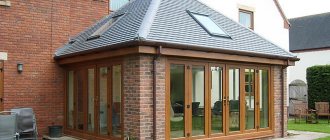
To realize this dream, it is enough to make an extension. You can choose any material to build a veranda. This can be brick, timber, aerated concrete blocks and other materials. Adding a veranda to a house made of foam blocks would be the most suitable option. The veranda is a great place to relax and gather the whole family over a cup of tea in warm weather. Foam concrete blocks are a fairly new material.
They have a low cost. In addition, these blocks are light and easy to construct. To build an extension from foam blocks you do not need to have special skills. They are easy to saw, in addition, foam concrete does not absorb moisture, so it is perfect for external walls. Before you start adding a veranda, you need to collect some information about the main building: Scheme of adding a veranda to the house.
dimensions and type of foundation; condition of the walls; condition of the roof; soil properties. In addition, you need to think about the design of the extension itself. Will it look like a summer terrace, or will it be a covered veranda? As with any construction, you first need to decide on the size and layout of the future extension. You also need to answer the following questions: Is there a need to dismantle the existing roof or some of its elements? What will be the method of connecting the extension and the main building? How will the veranda be entered: a separate entrance or through rooms inside the main building? After answering all these questions and After collecting information about the house, you can begin construction.
Construction of a foundation for a veranda
Construction of the foundation for the veranda.
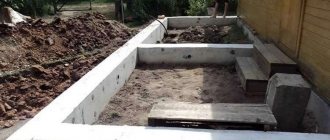
So, the veranda project has been chosen, you can start laying the foundation. You should examine the foundation of the house; for this you need to make a pit measuring about 1x1 m.
The depth of such a hole should be such that the base of the foundation of the old building is visible. It must be remembered that the foundation of the extension should be, if possible, the same type and depth as that of the main building. Otherwise, it is necessary to arrange an expansion joint.
Depending on the foundation of the old building, you can choose a columnar or strip type of foundation for the extension. The construction of a strip foundation is carried out by pouring concrete. The columnar foundation is made of brick. The latter will require less financial and labor costs.
After receiving information about the quality of the soil, you can begin digging a pit for the extension. Its depth should not be greater than the depth of the foundation of the main building. After installing the foundation, it should be covered with waterproofing.
Return to contents
Preparatory stage
The preparatory phase mainly involves analysis and planning. First of all, you need to pay attention to the following:
- Foundation of the main building;
- Wall and roof structure;
- The condition of the soil at the proposed construction site;
- Most common wind direction and strength;
- Snow depth.
Construction of walls from foam concrete blocks
Scheme of constructing a veranda wall from foam concrete blocks.
First of all, you need to think about how to connect the wall of the main building with the newly erected wall. This can be done using metal brackets or fittings.
The construction of walls made of foam blocks (also brick and aerated concrete) must begin from the corners. For this, light solutions or special adhesive mixtures are used.
The surface of the block is smooth, which allows you to apply the solution in a thin layer. To improve adhesion, it is necessary to moisten the lower part of the foam block with water. The thickness of the seam of the first row of blocks should not be more than 3 cm.
Next, the verticality of the masonry is checked by level. Deviations can be leveled out with mortar by increasing or decreasing the thickness of the seam. Unevenness in masonry can always be removed with a grinding tool.
When building a veranda from foam blocks, it is necessary to follow the dressing rules. The second row of blocks needs to be shifted 10-15 cm relative to the first. This will make the structure more durable.
Return to contents
Finishing the extension
Light cement-based mineral plasters are ideal for finishing a veranda made of block materials. Their main difference from traditional mixtures is the type of sand used: instead of quartz, a light perlite filler is added to the composition.
Thanks to this, the finishing layer puts less load on the walls and has a high degree of vapor permeability and heat retention. Experts also recommend using this particular type of plaster, as it is quite resistant to cracks and other mechanical damage.
Important! During finishing, it is very important to maintain a constant temperature regime and not allow the finishing layer to dry out or freeze. Otherwise, cracks will quickly appear on the surface of the walls.
There is a certain order for finishing walls with a mineral mixture:
- Clean the surface of the wall from dirt, level it using a mixture for laying blocks.
- Use a float and brush to remove uneven surfaces after the reinforcing mortar has dried.
- Apply the bottom layer of plaster using a float.
- Lay out the plaster mesh, straighten it and press it into the uncured mortar.
- Apply a second layer of plaster to the wall and smooth it with a trowel. Wait for the wall to dry.
- Apply a final thin layer of finish and level it with a float, giving the surface the desired structure.
- After the facade has completely dried, paint it with special paint for external work.
Extension to the house: additional points
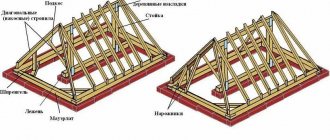
Scheme of a veranda roof made of metal tiles.
Laying window and door lintels. For window and door lintels when building a veranda from foam concrete blocks, special U-shaped blocks are used.
They are lightweight, which makes it possible to avoid lifting equipment. In addition, such blocks make it possible to make openings longer than 1.75 m. For the lintel, it is necessary to install U-shaped foam blocks and formwork made of metal profiles and wooden beams.
Then reinforcement is installed into the groove of the block. The last step in installing the lintel will be filling the block with heavy concrete, which should be carefully compacted and leveled with the rest of the blocks. Installation of a reinforced belt. U-shaped foam blocks are also used to construct a reinforced belt.
Most often, the reinforcement is adopted with a diameter of 1 cm. Its ends are attached to the wall of the main building. The reinforced belt is designed to protect the walls from destruction and cracking.
Its installation occurs in the same way as the installation of lintels. Roof installation. The final stage of adding a veranda to the house is installing the roof. It can be made either single or double slope.
A pitched roof requires less financial investment, but this roof structure is cooler. In order to decide on the type of roof, it is best to contact specialists. In addition, it is better to insulate the finished roof, this will reduce heat loss.
Return to contents
Preparing for construction
Adding a veranda is not an easy task. This will require not only time and effort, but also the elimination of a number of paper formalities. Here is the work plan according to which construction will take place:
- Obtaining permission to build an extension.
- Preparing the construction site.
- Construction of a foundation for a future structure.
- Laying walls.
- Installation of windows and doors.
- Finishing.
- Cleaning and decoration.
The beginning of work should be devoted to choosing a location and creating working conditions. It is recommended to choose the end or front part of the house with a minimum width of 3 m and a length of 6 m. The foundation is an important part of the attached veranda; without it nothing will work.
In this video you will learn how to make a veranda out of brick:
If you had an old porch at the construction site, then dismantle the remains. Remove the canopy, dismantle old elements that may interfere with construction in the future. Keep the area clear of trash. To save time, determine where the storage area for building materials and the waste disposal area will be located.
Having dealt with positioning, it is necessary to prepare tools and materials for the process. The tools you need are a classic set for working with brickwork: trowel, hammer-pick, jointer, cord-mooring, ordering, plumb line, building level, usually a mortar shovel. The choice of materials is a much more serious matter, requiring increased attention. For construction you will need:
- brick;
- gravel;
- concrete;
- bitumen;
- ondulin, slate, metal or roof tiles;
- crushed stone;
- slats;
- roof beams;
- lathing boards;
- sand.
Features of adding a veranda made of foam blocks to a wooden house
Based on materials from the site: https://ostroymaterialah.ru
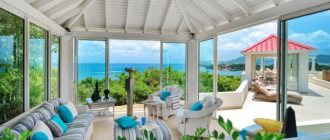
The veranda in the house performs several important functions at once. Firstly, it protects the front door and hallway from rain and snow. Secondly, this light extension gives the building a harmonious and complete appearance.
And thirdly, the veranda is a very convenient place for summer outdoor recreation. A structure of this type must, of course, be built in compliance with certain technologies. Further in the article we will look into all the details of how to attach a veranda to the house correctly.
Veranda or terrace, what's the difference?
Many people who do not understand construction may confuse these two structures. The difference is quite obvious and simple. The first structure is adjacent directly to the house and shares the same foundation with it, while the second is erected directly on the surface of the earth or on a small pad.
The terrace always has an open area, which can be adjacent to the house either on one side only, or encircle it along the entire perimeter. That is why you can only use it in summer.
Modern verandas for summer cottages and beyond can be used both in warm and cold periods - it all depends on its insulation.
Work plan
Before you start building a veranda, you should definitely draw up a project.
It must include drawings of the structure from the two facades, as well as its plan from above. Of course, you must first make all the necessary calculations. This work is carried out guided by the following recommendations:
The foundation of the veranda should lie at the same depth as that of the house itself. If this condition is not met, in the spring the extension will simply move away from the wall. The roof of the veranda should be flatter than that of the main building. The walls of the veranda, like its foundation, are not rigidly connected to similar structures of the house.
These two structures have different weights, and therefore they will shrink differently. The gaps between the walls of the house and the veranda are closed in different ways, depending on the material used in construction. The dimensions of the veranda should not exceed 1/3 of the area of the house itself. Otherwise, this light extension will look ugly in the overall exterior of the building. It is best to choose the same material for the veranda that the building itself is made of.
This rule is especially true for houses assembled from timber or logs. A foam block or brick extension next to such structures will not look very nice. In this case, it is better to build a panel or log veranda.
The correct answer to the question of how to attach a veranda to a house (photos of beautiful and durable structures of this type can be seen on the page) - durable and comfortable - also lies in the selection of high-quality materials for it. Despite the fact that the structure is small and not as important as the residential building itself, it should be erected thoroughly, adhering to all recommendations.
Choosing veranda sizes
The size of the veranda depends on the size of the house and is selected based on the maximum harmonious combination with the main building. However, some users approach the problem from an operational point of view. They consider functionality first, and appearance is considered last. This approach seems more rational, although architectural criteria should not be discounted.
As a rule, the veranda occupies the facade (entirely or only part). Less often, it is made into a corner, occupying a section of the facade and the end side of the house. The choice depends on the preferences of the owner and the configuration of the site - sometimes the distance from the walls of the house to the fence does not allow the construction of a full-fledged extension. Sometimes other buildings or landscaping elements get in the way. Therefore, when choosing a size, you should take all factors into account. It is recommended to draw up a site plan (to scale) and mark the proposed veranda on it. This will allow you to visualize the location and area of the extension, and ensure that the distances to the fence (at least 1 m) or other objects are maintained.
Pouring the foundation
When answering the question of how to attach a veranda to a house, first of all you should decide on the type of foundation for it. The foundation for such a light extension is usually made of columnar or strip. The choice of a specific variety depends on what materials are used to build the extension.
For panel and cobblestone construction, an inexpensive columnar one is also perfect. A strip structure should be erected under brick and foam block verandas. The order of work in this case will be as follows:
- A trench is dug under the foundation, the depth of which should be slightly lower than the concrete base of the house foundation strip. A layer of sand is poured onto its bottom (to the level of the base) with compaction. Formwork from boards is installed on the sides of the trench. Wooden blocks 5 cm thick are laid on its bottom. A reinforcement frame is installed on them, knitted from a 12 mm rod. Then everything is filled with a concrete mixture (cement x sand x crushed stone in a ratio of 1: 3: 4).
The question of how to properly attach a veranda to a house also comes down to constructing a reliable foundation. Therefore, it is impossible to deviate from the technology described above.
The concrete mixture for the foundation of the veranda should be of high quality, and the reinforcement should be knitted from a fairly thick rod. The formwork is removed a day or two after pouring. After another 25-26 days, you can begin waterproofing the tape and building walls.
Consumables and tools
What supplies and tools will be needed to build the extension:
Container, shovel, mixer for mixing solutions (cement-sand, as well as glue).- Tools for marking (construction cord, rulers (square), tape measure, levels, pencil).
- Hacksaw for cutting blocks.
- Trowel for tile work (with teeth).
- Rubber hammer, foam concrete plane, brushes for moistening the concrete surface, trowel.
- Cement, sand, gravel (up to 15 mm), running water, plasticizers for preparing cement mortar, pouring the foundation and backfilling the sinuses.
- Wall chaser for making grooves.
- Dry construction adhesive.
- Reinforcement in the form of steel rods or reinforced mesh.
- Materials for formwork for lintels and the formation of a concrete ring.
When performing masonry work, it is important to correctly fill joints and apply mixtures. It is especially worth paying close attention to the laying of the first tier of blocks.
The amount of materials and necessary tools is determined at the preparation stage.
Extension to a cobblestone house
Well, the foundation is poured. What's next?
And then you can start building the walls. The technology of this process depends on the material chosen for assembly. First, let's figure out how to attach a veranda to a house made of timber.
This option will be an excellent solution for a wooden building. Cobblestone and log houses with such verandas look very beautiful. However, wood is a capricious material, and when using it, it is imperative to adhere to the prescribed technology.
First of all, you will need to choose the right timber itself. It is better if it is “winter”. This material cracks much less and shrinks less.
After the foundation is waterproofed with two layers of roofing material on bitumen mastic, you can begin laying the first crown.
It is attached to the base of the house using anchor bolts cast into the foundation. Next, the joists are installed under the floor. Then the walls are assembled, connecting the beams at the corners using the “half-tree” method.
If the veranda to the timber house is intended to be closed, the laying of the material continues up to the roof. If it is open - to the required height. In the latter case, at the next stage, racks are installed in the corners, which are best mounted on galvanized metal corners.
Types of materials for construction
Financial costs largely depend on what the veranda is made of. This also affects the complexity and strength of the structure.
Let’s not forget about the house, namely the materials from which it is made; the designs should complement each other. Mainly used:
- Tree. A wide selection of wood, different price ranges and fairly easy construction technology. To increase the service life, the wood should be treated with the necessary impregnations.
- Brick. Strength, durability, and thermal insulation of the veranda are guaranteed, but you need to take into account the weight of the resulting extension and strengthen the foundation in advance.
- Glass, polycarbonate. Easily erected, lightweight design will provide more light in the room. This material goes well with brick, wood, and metal.
In order to build a veranda yourself, you need to prepare a tool, starting from a hacksaw and ending with a screwdriver.
Brick structures
Next, let's look at how to attach a veranda to a house made of brick or concrete. Of course, a light wooden veranda will fit well into the exterior of such a building.
However, a solid house will look much more solid with a brick extension of this type. It is not too difficult to build such a veranda yourself. The masonry mortar is prepared as follows: mix three shovels of sand and one of cement in some container and fill it all with water in such an amount to form a plastic mortar.
The laying of pillars is carried out with bandaging of seams, using plumb lines and orders. The thickness of the joints between bricks should be about 0.8-1 cm.
Long metal rods should be poured into the foundation at the location of the pillars (under the roof). The masonry is carried out around them using the one and a half brick method. The space in the center is filled with concrete.
The question of how to attach a veranda to a brick house also comes down to the construction of a reliable parapet.
Its assembly begins after the supporting pillars are ready. When assembling the parapet, a good solution would be to use some original masonry method. For example, with the installation of bricks at an angle of 45 degrees. The parapet can also be made of wood or a spectacular forged one can be installed.
Foam block buildings
This is also a good material for constructing a veranda.
Lightness, like wood, and durability, like brick, are its main advantages. Most often, closed structures are built from foam blocks. The only difference between such a veranda and an ordinary extension is its very large windows.
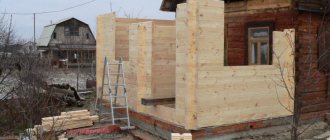
However, purely technologically, masonry from this material is somewhat more complicated than from brick. So, let's see how to attach a veranda to a house made of foam blocks. In this case, laying begins from the corners.
When using foam blocks, moorings must be installed. If even the slightest distortion is allowed during the masonry process, cracks may subsequently appear along the fragile walls due to the stresses arising in them. Each subsequent row is shifted by 10-15 cm relative to the previous one.
When laying, not a cement mixture is used, but a special adhesive solution. Only the first row of blocks is laid on cement. After the walls are built almost to the very top, an insulated armored belt should be installed on them.
Features of aerated concrete
Aerated concrete is a building material with specific working qualities. It has a porous structure formed during the manufacturing process. This provides aerated concrete with many useful properties:
- light weight, which allows you to seriously save on the construction of the foundation and do without lifting mechanisms during installation;
- low thermal conductivity. Air is an effective heat insulator, and the abundance of bubbles in the mass of material allows you to save thermal energy in the premises;
- ease of processing. Construction from piece materials requires constant processing and production of additional blocks. Aerated concrete can be sawed with a hand hacksaw and get neat pieces with an exact size.
However, the presence of air cavities gives aerated concrete a lot of disadvantages:
- fragility;
- low load-bearing capacity;
- lack of strength;
- inability to tolerate pressure or multidirectional loads (tension, bending;
- hygroscopicity.
If the mechanical characteristics of aerated concrete can be somehow managed by choosing the thickness of the walls in accordance with the magnitude of the loads, then the hygroscopicity of aerated concrete is a very dangerous property. All types of concrete tend to absorb moisture, but they do not have pores and quickly release water when favorable conditions arise. Aerated concrete accumulates water in its pores, which in winter leads to freezing and destruction of the material. It is difficult to dry the material, since a large amount of moisture requires the creation of the most favorable conditions - temperature and drying duration. This cannot be achieved in winter, and it is impossible to stop the destruction process. Therefore, it is important to protect aerated concrete from contact with rainwater and to properly organize the removal of steam from residential premises.
The construction of a veranda also requires taking into account the characteristics of the material. Since the room is not heated, the amount of water vapor in the air is not as high as in living rooms. However, the humidity on the veranda is still increased due to the assimilation of internal air and its penetration from living quarters. This process is clearly visible on the glazing of the veranda - in autumn and winter the glass sweats and freezes. Therefore, it is recommended to organize steam output in accordance with the requirements of SNiP, as is done in the main part of the house.
Joining walls
Thus, we have figured out how to attach a veranda to a house using materials such as brick, foam blocks and timber.
However, the owners of suburban areas who decide to build such a structure will definitely have a question about how to properly join the walls. As already mentioned, the house and the veranda are not immediately firmly connected due to shrinkage. It is best to simply foam the gaps between the foam block or brick wall and the house.
You can also use special movable fasteners with grooves. If the veranda was built from wood, the gaps are usually covered with vertical beams. In most cases, a tarred board is laid between the foundations of the veranda and the house.
Roof
The question of how to attach a veranda to a house also comes down to how to properly assemble its roof.
This structure is usually covered with a pitched roof. The racks are attached to the crowns of the cobblestone walls on one side. Next, the rafters are laid.
If the walls are brick, they can be fixed to ordinary corners, having first assembled the Mauerlat. If the building is made of cobblestones, it is better to use special “sled” fasteners. The fact is that cobblestone verandas shrink very strongly due to the drying of the wood.
The next step in assembling the roof should be waterproofing. To protect the tree from moisture, a plastic film is mounted on the rafters with a slight sag. Then the sheathing is filled and the roof itself is assembled.
Advantages of building a winter veranda
The veranda is practically no different from a living space (it has a roof, walls, windows, foundation), except that it does not have a heating wiring.
Important! In modern verandas with glazing and heated floors you can stay in any weather and at any time of the year.
- Therefore, the advantages of this extension are not much different from any residential part of the house:
- the ability to protect the owners and guests of the house from weather conditions (burning sun rays, rain, wind, snow);
- additional protection of the facade wall from negative factors;
- performing the function of a temporary storage room for things needed in the future that are not intended for storage outside, especially if the house does not have an attic;
- the opportunity to better feel unity with nature at any time of the year, improve the positive impact on the psychological state (staying on the veranda allows you to relax and forget about troubles);
- the ability to be used as a full-fledged living room;
- a place for relaxation, New Year's holidays in winter and other events at other times of the year close to nature, without feeling the effects of atmospheric manifestations in an area closed to them.
Floors
At the final stage of construction, the floors are installed in the veranda (they can be assembled before laying the walls). If the structure is completely open, a decking board should be used to assemble them. This material is not at all afraid of moisture.
If this option seems too expensive to the home owners, you can take a regular edged board. However, in this case, when assembling the floor, it is worth leaving small gaps (2 mm) between the boards. Water that gets inside the veranda will go into them.
Well, we hope we have answered the question in sufficient detail about how to attach a veranda to a house with your own hands.
This matter is actually not particularly difficult. The most important thing is to adhere to the required technologies, and then you will get a beautiful, high-quality, reliable and durable summer extension to your house. Reliable extension of a veranda to a house made of foam blocks. Construction of a foundation for a veranda. Construction of walls from foam concrete blocks. Extension to a house: additional points. Features of adding a veranda from foam blocks to a wooden house. built, the garden plot is in order, but still something is missing. Every owner dreams of a cozy veranda or terrace where they can relax after a hard day, sit and drink tea with the whole family. Most often, at the stage of building a house, they forget about it or there is simply not enough money for its construction.
To realize this dream, it is enough to make an extension. You can choose any material to build a veranda. This can be brick, timber, aerated concrete blocks and other materials. Adding a veranda to a house made of foam blocks would be the most suitable option. The veranda is a great place to relax and gather the whole family over a cup of tea in warm weather. Foam concrete blocks are a fairly new material.
They have a low cost. In addition, these blocks are light and easy to construct. To build an extension from foam blocks you do not need to have special skills. They are easy to saw, in addition, foam concrete does not absorb moisture, so it is perfect for external walls. Before you start adding a veranda, you need to collect some information about the main building: Scheme of adding a veranda to the house.
dimensions and type of foundation; condition of the walls; condition of the roof; soil properties. In addition, you need to think about the design of the extension itself. Will it look like a summer terrace, or will it be a covered veranda? As with any construction, you first need to decide on the size and layout of the future extension. You also need to answer the following questions: Is there a need to dismantle the existing roof or some of its elements? What will be the method of connecting the extension and the main building? How will the veranda be entered: a separate entrance or through rooms inside the main building? After answering all these questions and After collecting information about the house, you can begin construction.
Advantages of foam concrete for construction
A veranda made of foam blocks, insulated with foam plastic, is an excellent solution for many reasons. Such an extension can be used in a variety of ways, as it will be reliably insulated from cold, wind and precipitation. Insulation will allow you to maintain a comfortable temperature all year round.
Why should you choose foam concrete for construction? This is a material made from natural ingredients: cement, sand and water; in addition, the mixture acquires special properties thanks to special foam. Due to its porous structure, the foam concrete block has some very important advantages:
- Good thermal insulation and noise insulation qualities. Foam concrete will create a quiet and cozy room that will be comfortable both in winter and in summer.
- Correct geometric dimensions. The foam block is larger in size than a brick, in addition, it has a completely flat surface. This speeds up and simplifies masonry, and even people far from the construction industry can handle it.
- Strength combined with relatively low weight. Foam blocks have been used in low-rise construction for a long time, they have proven their effectiveness. With their help, you can build a reliable structure that will last for many years.
Knowing how to build a veranda from foam blocks, you can save on the work of professionals, and the materials themselves will be inexpensive. Often construction is carried out from the remains of blocks after a large construction. One of the few disadvantages of this material is its low decorative qualities, so the veranda will have to be additionally finished.
Design of a veranda made of foam blocks and construction of a foundation
A veranda made of foam blocks with your own hands is most often built on a strip foundation, which must be correctly attached to an existing foundation. The choice of connection depends on whether the extension was originally planned and when the main building was built. If the construction of a veranda was included in the project, both the house and the extension are built on a common monolithic foundation, which is a single concrete strip along the perimeter of the structures. It is possible to build a veranda on a strip foundation made of foam blocks, for example brand D1200.
If the house was first built, and then the question of creating a veranda arose, two options for attaching the foundations are possible:
- If the house was built a long time ago, and the main shrinkage processes have been completed, then a rigid fastening can be used. It is created using metal pins that are inserted into drilled holes in an existing base.
- If the house itself was recently completed, a rigid grip is unacceptable. The processes of settlement of the building and veranda will continue, and they may proceed unevenly, which will lead to the appearance of cracks. In this case, an expansion joint is laid between them: for this purpose, a wooden shield can be used, which is laid between the foundations and filled with concrete.
They are then tied to the new reinforcement cage and it is poured with concrete. As a result, the new foundation will become a full part of the overall foundation of the house.
The foundation is built in the same way as a regular strip foundation. A trench is dug along the perimeter of the building, into which special reinforcement with a diameter of at least 10 mm is installed, formwork is installed, and the trench is filled with concrete.
To ensure that there are no voids in the foundation, the space in the frame is pierced with sticks, or you can use a special construction vibrator to compact the mortar. The poured concrete base must be completely dry, which may take several weeks. The formwork is disassembled, after which you can proceed to the construction of walls.
Construction of a foundation for a veranda
Construction of the foundation for the veranda.
So, the veranda project has been chosen, you can start laying the foundation. You should examine the foundation of the house; for this you need to make a pit measuring about 1x1 m.
The depth of such a hole should be such that the base of the foundation of the old building is visible. It must be remembered that the foundation of the extension should be, if possible, the same type and depth as that of the main building. Otherwise, it is necessary to arrange an expansion joint.
Depending on the foundation of the old building, you can choose a columnar or strip type of foundation for the extension. The construction of a strip foundation is carried out by pouring concrete. The columnar foundation is made of brick. The latter will require less financial and labor costs.
After receiving information about the quality of the soil, you can begin digging a pit for the extension. Its depth should not be greater than the depth of the foundation of the main building. After installing the foundation, it should be covered with waterproofing.
Return to contents
Construction of walls from foam concrete blocks
Scheme of constructing a veranda wall from foam concrete blocks.
First of all, you need to think about how to connect the wall of the main building with the newly erected wall. This can be done using metal brackets or fittings.
The construction of walls made of foam blocks (also brick and aerated concrete) must begin from the corners. For this, light solutions or special adhesive mixtures are used.
The surface of the block is smooth, which allows you to apply the solution in a thin layer. To improve adhesion, it is necessary to moisten the lower part of the foam block with water. The thickness of the seam of the first row of blocks should not be more than 3 cm.
Next, the verticality of the masonry is checked by level. Deviations can be leveled out with mortar by increasing or decreasing the thickness of the seam. Unevenness in masonry can always be removed with a grinding tool.
When building a veranda from foam blocks, it is necessary to follow the dressing rules. The second row of blocks needs to be shifted 10-15 cm relative to the first. This will make the structure more durable.
Return to contents
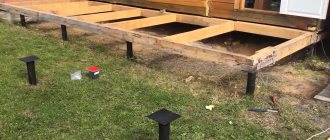
Construction of an open veranda
Now that the foundation has been poured and photos of the open verandas attached to the house have been studied, you can begin construction directly. To do this, follow these steps:
- Let's put a waterproofing layer three to five centimeters thick. This will allow the future structure to be separated from the concrete.
- Let's make the bottom strapping using a brace 150 by 150 cm. All wooden elements should be impregnated with an antiseptic.
- We install logs using metal structures.
When choosing a floor, you should choose concrete, as it is durable and it will be easier to lay tiles on it in the future. Wooden floors, in turn, are not so practical and durable.
Extension to the house: additional points
Scheme of a veranda roof made of metal tiles.
Laying window and door lintels. For window and door lintels when building a veranda from foam concrete blocks, special U-shaped blocks are used.
They are lightweight, which makes it possible to avoid lifting equipment. In addition, such blocks make it possible to make openings longer than 1.75 m. For the lintel, it is necessary to install U-shaped foam blocks and formwork made of metal profiles and wooden beams.
Then reinforcement is installed into the groove of the block. The last step in installing the lintel will be filling the block with heavy concrete, which should be carefully compacted and leveled with the rest of the blocks. Installation of a reinforced belt. U-shaped foam blocks are also used to construct a reinforced belt.
Most often, the reinforcement is adopted with a diameter of 1 cm. Its ends are attached to the wall of the main building. The reinforced belt is designed to protect the walls from destruction and cracking.
Its installation occurs in the same way as the installation of lintels. Roof installation. The final stage of adding a veranda to the house is installing the roof. It can be made either single or double slope.
A pitched roof requires less financial investment, but this roof structure is cooler. In order to decide on the type of roof, it is best to contact specialists. In addition, it is better to insulate the finished roof, this will reduce heat loss.
Return to contents