Preserving fresh vegetables until the new harvest is the main task of every owner of a summer cottage. Cellars for storing vegetables will help with this, which differ from ordinary basements in that it is necessary to create an optimal microclimate in them so that the food remains fresh and does not rot. In addition, the crop must be protected from rodents and diseases that may begin to develop at elevated temperatures or humidity.
From this article you will learn how to build a cellar for storing vegetables with your own hands and how to arrange a vegetable storage room inside. In addition, the article will provide examples of arranging boxes and containers for storing vegetables, and photos and videos will help to properly arrange the cellar under the house.
- How to sheathe
- Potatoes and carrots
- Special means
Features of an earthen cellar
There are a great many types of cellars and basements. Some of them are distinguished by their primitive execution, others amaze with the breadth of their scope and the majesty of their construction.
You can make your own cellar even from basic available materials. By the way, a simple earthen cellar also belongs to ordinary buildings. But when choosing it for your site, you should know that this type may not suit you.
If your land is located in an open area, then there is a possibility that strong winds will cause the building to quickly collapse.
To at least try to prevent such troubles, you can plant shrubs near a self-made cellar.
But remember that under no circumstances should you plant large trees here, because their large roots can only speed up the process of destruction, especially of walls.
There is an opinion, and this is true, that in earthen cellars it is much easier to maintain a microclimate in which fresh vegetables will feel very comfortable, and you can enjoy their taste for a long time.
And this happens with the help of moisture; because of it, vegetables rarely dry out and become unsuitable for consumption. Often, when people are harvesting a new harvest, they are surprised to discover that last year’s is still in perfect condition.
Disinfection of a cellar for storing vegetables
Before storing vegetables, the basement must be inspected in order to take timely measures to eliminate fungi, mold or signs of bacterial damage (Figure 8).
Note: If you ignore disinfection, fungi will begin to actively develop in the storage, which will lead to rapid spoilage of the crop in conditions of high humidity.
The first stage of disinfection is treating the walls with copper sulfate. Next, you need to remove all remnants of mold with a spatula or scraper, re-plaster the walls and paint them.
You should also inspect the basement for rodent damage. The cracks in the walls and floors should be sealed with glass wool and concrete, and poison for mice and rats should be spread throughout the entire storage area or special traps should be installed.
Cellar floor
The floor in such cellars is usually earthen. On the one hand, this is a very economical and budget option, but on the other hand, there are a number of risks.
For example, if your cellar stands on loose and loose soil, then during a spring flood the building may simply soften in the water.
The ideal soil for an earthen floor is clay. It compacts perfectly and becomes dense, like concrete.
If the cellar is flooded, be prepared for the fact that you will have to pump out the water from the inside, and if you do not have a pump, the procedure will become completely unpleasant.
An important advantage of this floor is its excellent ability to maintain the optimal temperature for storing vegetables.
- Summer shower at a summer cottage: review of designs, materials, and schemes for self-construction
Do-it-yourself tandoor - a traditional oriental stove in a summer cottage, photos of completed projects
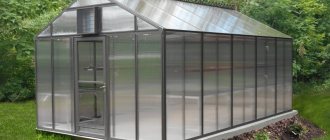
A polycarbonate greenhouse is a joy for a gardener, let’s understand the structures step by step (photo + video)
There are adobe floors. Many choose them as the best and optimal option. And all because clay can prevent the appearance of mold and mildew indoors. And even in spring it will not allow water to leak.
Cellar for storing vegetables: how to build and equip
There are several types of cellars for storing vegetables. The most popular are underground, above-ground and semi-buried.
If you are planning to arrange a room under a residential building or garage, an underground structure is suitable for you. Above-ground and semi-buried, as a rule, are separate buildings and are erected if the groundwater in the area is located too close to the surface.
Assessment of terrain and soil composition
Before building a cellar on a site, it is necessary to objectively assess the characteristics of the site, the composition of the soil and the level of groundwater, since not only the type of storage facility, but also the features of its construction will depend on this.
Assessing the groundwater level is one of the most important conditions for construction. If underground streams are located near the surface, it is not recommended to deepen the cellar too much, since in the spring the room will be flooded with water. In this case, it is better to give preference to ground storage.
Note: If groundwater is close, it is better to build a cellar on a natural hill, or a small mound, poured by hand. This will protect vegetables and preparations from moisture.
If the groundwater is low, a basement can be made under the house or garage. But in this case, it is necessary to evaluate the composition of the soil. This will determine what waterproofing materials and insulation materials will have to be used to create an optimal microclimate in the storage facility. The best is clay soil, which has a high density and does not allow moisture to pass into the storage facility. If your site has sandy soil, the hole dug for the basement needs to be further compacted, or, best of all, concreted.
Selection of optimal materials
The choice of materials for construction primarily relates to covering the floor and walls of the pit. The easiest way is to concrete the basement, but there are other options that do not require the purchase of additional materials (Figure 1).
Figure 1. Overview of popular materials for cellar construction
First of all, the cellar can be made earthen. But this design is only suitable for areas with dense soil. In this case, a hole is simply dug in the area, but the walls are made at a slight slope to prevent the soil from collapsing. The floor is thoroughly compacted, adding approximately 10-15 cm of broken brick or small crushed stone. The ceiling is reinforced with supports and covered with a clay mixture.
Note: The earthen version is best suited for storing potatoes. In such a basement, an optimal microclimate is created for the tubers, and they practically do not fade during the winter.
If you have the financial resources, the interior space can be lined with stone or brick. This design is more durable than an earthen or concrete cellar, and also makes it easy to create a microclimate suitable for fresh vegetables. However, the construction of such a basement requires certain skills in laying stone or brick.
Technologies and nuances of construction
Do-it-yourself basement construction is carried out using a certain technology. First, you need to choose the right site. Regardless of the type of cellar, a dry area on a small hill is most suitable for it. This will make it easier for you to protect the interior of the room from moisture and save on waterproofing the room (Figure 2).
If the cellar is located under the house, try to build it in an area where groundwater lies no more than half a meter from the base of the basement. If a suitable site is not found, and the storage facility must be built in a low-lying area, the floor of the storage facility is additionally compacted using a layer of sand and gravel.
Note: The optimal shape for a basement is square and rectangular. It is most convenient to place shelves, racks and containers in such a room.
Often the cellar is a separate structure, consisting of two parts: a storage facility buried in the ground and a burial chamber - a small house that performs a protective function. It can also be used to store tools and equipment.
Figure 2. Scheme for constructing a cellar for vegetables with your own hands
In order for the cellar to be reliable and the vegetables in it to remain fresh for a long time, it is necessary to take into account the following features of the storage facility construction:
- It is better to make walls from durable material: wood, brick or concrete;
- The door is made on the north side to limit the flow of fresh air in summer;
- The walls are insulated immediately after construction, and the roof is covered with a material that does not transmit heat well.
After choosing a place for construction, they begin to dig a pit. It is better to decide in advance how many products will be stored in the room, and calculate its area so that all vegetables and preparations can fit freely inside on racks and shelves, and there is also free space for aisles.
The finished pit must be compacted by laying a layer of greasy clay on the floor and compacting it. The clay is laid in separate layers, and each of them is compacted. The same manipulations should be carried out with the walls of the pit. The floor and walls are covered with wooden boards or a thin layer of concrete.
A ceiling is made of wooden boards or beams over the pit. A layer of thermal insulation (clay, expanded clay or dense soil) is laid on top, and an insulated hatch is also installed. In addition, it is necessary to arrange supply ventilation inside by making a hole in one of the walls at ground level.
Concrete screed
The most popular floor is concrete screed. Even a beginner can make a floor from concrete screed. To do this, lay a sand and gravel cushion on the bottom of the pit. You can put plastic film on top of it; it is advisable to lay it not in one, but in several layers.
Instead of film, you can use sheets of roofing felt. Now all this can be safely poured with concrete, but not more than 4 cm thick. Otherwise, your screed will simply spread.
The easiest way to carry out work is with pre-set beacons. After the concrete has hardened, the beacons must be removed and the resulting holes must be sealed with the same mixture.
In a cellar that you made yourself, this floor will protect you from many misfortunes and troubles. For example, with such a floor you are definitely not afraid of any groundwater - it will not let it in either completely or capillarily.
Construction of a cellar for storing vegetables
After the pit has been dug and compacted, it is necessary to begin the internal arrangement of the basement and the cladding of the external walls and roof.
The arrangement of the cellar includes cladding of external and internal walls for thermal insulation and protection from moisture. For external insulation, you can use ordinary polystyrene foam or roofing felt, but such insulation must be sheathed on top with plywood or fiberboard sheets.
In addition, waterproofing and insulation must be done indoors. It is also necessary to provide storage racks, drawers, containers and compartments for fresh vegetables.
How to sheathe
The inside of the cellar walls must be insulated so that the optimum temperature is maintained inside. As mentioned above, external insulation can be made with polystyrene foam or mineral wool. However, it should be taken into account that polystyrene foam is easily damaged by rodents, so the material must be treated with special impregnations and covered on the outside with sheets of plywood or fiberboard (Figure 3).
Figure 3. Methods of external and internal cladding
In addition, external and internal wall insulation is carried out only on a previously prepared surface. To do this, you need to level their surface, putty and whitewash the walls with slaked lime to protect them from fungus.
In some cases, wall insulation is not enough to maintain the optimal temperature. In this case, you need to additionally insulate the floor: make a concrete screed, lay a thick plastic film on top of it, install joists, and lay insulation in the space between them. The floor is covered with boards on top and covered with oil impregnation and paint.
Containers and boxes for storing vegetables
You can buy ready-made boxes for storing vegetables, but if you have boards and beams, you can make them yourself (Figure 4).
Note: It is advisable to make containers and boxes from planks located at a short distance from each other. This will ensure the necessary air circulation and prevent premature rotting of the products.
The placement of boxes and containers in the basement should be planned in advance so that their size and location can be accurately calculated.
If you plan to place containers on top of each other, try to keep the bottom shelf 10 centimeters or more from the floor. This way you can easily clean the room without moving the drawers.
Figure 4. Types of boxes for storing vegetables
When placing boxes on top of each other, place wooden beams between them, which will create free space for air circulation. When storing vegetables on the floor, dividing partitions are made from boards. This condition is especially relevant if both fruits and vegetables will be stored in the same cellar. The dividing partition will prevent the smells of different vegetables from mixing, and the food will spoil more slowly.
It is advisable to arrange separate basements for vegetables and fruits, but if this is not possible, they can be placed in one storage facility, but at the maximum possible distance from each other.
The author of the video will tell you more useful information about the internal arrangement of a cellar for storing vegetables.
Stone floor
The brick floor in the cellar, which you built yourself, can be made not only from the material, but also from simple natural untreated stone.
To make such a floor, you need to lay it with the selected stone. But this won't be enough.
You also need to fill it with diluted clay. When dry, it becomes hard, like concrete, and also perfectly insulates water. In terms of their properties, they will be no worse.
Rules for collecting vegetables
Let us briefly mention the rules, without which no tricks for storing vegetation in the cellar will help you protect the crop from rotting, drying out and other problems. They relate to the autumn harvest of crops grown by you on your own plot, and the arrangement of space for their long-term storage.
Before studying storage rules, understand the rules for collecting vegetables.
1. So, all the fruits that you expect to store all winter must be removed from the beds on time, that is:
- upon reaching their peak of growth, at which the taste and nutritional qualities of a particular item are in the required condition (ripe);
- in dry and, preferably, sunny weather, so that they can dry under natural conditions, which has a beneficial effect on further storage.
2. Only those vegetables that are suitable for storage are:
- do not have long-lasting effects;
- not affected by diseases or pests.
We say right away that bursting, half-rotten vegetables will not be left. It's better to eat them if possible, or throw them in the compost heap.
How to use compost correctly?
3. A room in which long-term storage vegetables will lie through the winter is necessary before filling with fruits:
- dry (for example, the cellar is successfully dried using a corrugated pipe and a heat gun);
- disinfect with non-toxic means;
- remove thoroughly.
Only if you follow all the rules listed above, the secrets of storing fruits listed later in the article will be effective.
Vegetables harvested according to the rules will delight you all year round
Read more about harvesting rules in a special article.
Wooden floor
Wood is not the best material when building an earthen cellar. No matter how you process it, over time it will undergo a process of rotting and then problems cannot be avoided. You can use it in the form of boards, but only in a dry basement.
If you still opt for a wooden floor, then first of all provide a mound of sand and gravel mixture, then lay waterproofing material, and then put boards on it.
Do not forget to treat all wooden elements with a special product.
How to treat a cellar for storing vegetables
Underground storage for vegetables must be treated annually against bacteria and fungi. If these measures are not taken, the walls will become moldy and the crops will rot.
There are several ways to treat a cellar intended for storing vegetables. To do this, you can use both special chemicals and folk remedies available at hand.
Special means
There are special chemicals that will help quickly eliminate the fungus and prevent the spread of rodents. For example, in order to prevent damage to vegetables by rodents, the premises are fumigated with sulfur bombs.
Note: To treat an average cellar, two sulfur bombs are enough, which are placed on a metal surface, set on fire and left indoors for a day. After this, the room must be thoroughly ventilated to eliminate the unpleasant odor.
Disinfection concerns not only the walls and floor of the room, but also shelves and drawers. If they are made of wood, they need to be taken out into the sun, dried and treated with special antiseptics.
Figure 8. Methods for disinfecting the cellar: slaked lime, copper sulfate and sulfur bombs
The walls of the storage facility are washed with a 10% solution of copper sulfate. It allows you to get rid of all signs of fungus and mold. But after such treatment, all surfaces must be whitened with slaked lime.
Walls and roof
Many owners of earthen cellars advise making walls from bricks. But much more material will be used on the walls than on the floor. This means that such walls are very expensive. Therefore, wooden walls would be an ideal option here. You can use inexpensive timber.
But the design of the roof depends solely on your preferences. The main thing here is to adhere to a single, but very important rule - the roof must be absolutely waterproof.
Allowing the slightest dampness in an earthen cellar is simply unacceptable.
Why buyers choose plastic cellars
Practice has shown that the best material for a cellar is plastic. It has a number of important advantages, including:
- environmental safety, chemical neutrality, absence of harmful fumes;
- mechanical strength, moisture resistance, resistance to aggressive substances, pests, fungi;
- reliability and durability - the product will last more than 50 years;
- ease of care.
The main advantage of polyethylene or polypropylene storage facilities is the price. The cost of the products is lower than the cost of building a stone or brick analogue. Buyers choose a plastic cellar for a summer house or country cottage, guided by considerations of practicality, profitability and ease of use of polymer products. Proving that the best cellar is plastic, manufacturers test models, issue quality certificates and certificates for products. The best argument in favor of plastic cellars is reviews from users who have experience installing storage facilities in households.
Turnkey cellar - convenient and easy
Construction of brick or concrete storage facilities is a complex, expensive and labor-intensive process. Choosing and buying a plastic cellar in our store is easier, faster and more profitable. The buyer receives a tested and certified product with a manufacturer’s warranty and, if desired, delivery and installation. By purchasing a turnkey cellar, you save money, effort and time. Installation of storage facilities is carried out by professionals within 1 day. The container can be placed on the site or under the house. The structure is ready for use immediately after installation.
We build a cellar with our own hands
If you do not have the opportunity to equip a vegetable storage in the basement, you can build a cellar yourself. First, decide which type of cellar is most optimal for you. There are 3 main types: aboveground, underground and semi-buried.
Types of cellars by type of construction.
Your choice should be based on factors such as site size, availability of certain building materials, time frame, groundwater level and soil moisture.
Turning the basement into storage
If your home has a comfortable and spacious basement, you can use part of its space to store fruits, vegetables and canned goods.
Storing canned food, vegetables and fruits
Start by separating the required area with a wooden partition. Keep in mind that the standard cellar size is 2 by 2 square meters. Further work on arranging the cellar depends on your answers to the following questions:
- whether there are pests and mold in it;
- does the winter temperature drop below 0°C;
- Is there a musty smell in the room due to lack of ventilation?
- Are the stairs to the basement steep and unsafe?
If you answered yes to some of these questions, you will need to do some additional work before installing storage shelving.
How to dig an underground cellar pit
All construction work should be carried out only in summer, when it is dry outside. Initially, they begin to dig a pit:
- The size of the drainage is also added to the size of the cellar itself, and digging begins with this in mind;
- The bottom of the cellar should be such that it is convenient to store vegetables on this perimeter;
- If there are no more structures on the site and it is easy to get to the designated place, digging is carried out with an excavator. In this case, you need to make sure that the walls do not begin to collapse. If there is no way for machinery to pass, you will have to dig manually;
- If you are digging loose soil that can collapse, you need to dig the hole under a slope;
- You need to immediately install beams in the corners to which the ceiling will be attached;
- The soil from the pit does not need to be taken away or stored far from the digging site. It will serve as the top floor for the future structure;
- Once the hole is ready in size, it needs to be left for a while to test the groundwater. If they have not come to the surface within a certain period of time, work can continue. If water appears, it is either pumped out or a new place for construction is sought.
Safety ladder
The importance of a safe basement staircase cannot be overstated. Every year, dozens of summer residents receive serious injuries when falling from the stairs. Going down into the basement every day with a lot of things, a person loses his vigilance and exposes himself to serious danger. For this reason, pay special attention to this issue.
Even after you equip your vegetable storage with a convenient ladder, do not forget about safety precautions. Don't carry heavy things alone and don't try to do the job too quickly.
When the vegetable storage facility is prepared, you can begin arranging it. Racks and boxes for storing canned food and harvest are selected depending on the area and features of your cellar. In some cases, choosing suitable ready-made furniture is difficult or almost impossible. Then you can benefit from individually designed built-in shelving that fits perfectly even in a small cellar.
Cellars for every taste in Capacity-online.ru
The most convenient way to buy a cellar in Moscow is in our store. The assortment includes products from all popular brands. Our company is an official dealer of manufacturers and all products are supplied at the lowest prices. Here you can select and buy a plastic cellar inexpensively based on photos, characteristics, and descriptions of products. Are you unsure about your choice? Our consultants will help you decide. Submit your application right now - live comfortably and enjoy the gifts of the earth to the fullest.