Review author: Terrari School of Design
A veranda is an ideal solution to increase the usable area of your home. How wonderful it is to gather there in a large, noisy group on warm summer evenings, or to retire with a fascinating book.
But what to do if it was not included in the project during the construction of the house. But there’s nothing wrong with that, because this type of extension can be done at any time, you just need to know some nuances about how to properly attach a veranda to the house.
Veranda or terrace, what's the difference?
Many people who do not understand construction may confuse these two structures. The difference is quite obvious and simple. The first structure is adjacent directly to the house and shares the same foundation with it, while the second is erected directly on the surface of the earth or on a small pad.
The terrace always has an open area, which can be adjacent to the house either on one side only, or encircle it along the entire perimeter. That is why you can only use it in summer.
Modern verandas for summer cottages and beyond can be used both in warm and cold periods - it all depends on its insulation.
Preparing the area
The first stage in construction is preparing the territory. In order to begin constructing a veranda, it is necessary to clear the area of various kinds of objects, plants, shrubs and trees.
After the earth remains absolutely clean, you need to remove the fertile layer - 15 cm from the surface of the earth.
We recommend reading:
How to build a bathhouse from timber - 125 photos of the best projects and ideas on how to build a bathhouse correctlyDo-it-yourself canopy: step-by-step description of how to build a canopy correctly. The best ideas and beautiful design options (95 photos)
Beautiful canopy over the porch - installation options, design options and installation tips (95 photos)
After the fertile soil layer has been removed, it is necessary to level and mark the area. The breaking of the earth occurs by driving in metal stakes and tying twine around them.
The outer layer of the breakdown corresponds to the dimensions of the entire structure, and the inner one indicates the contour of the foundation.
Types of verandas
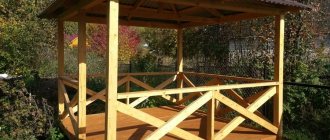
In total, there are two main veranda designs - open and closed. How are they different?
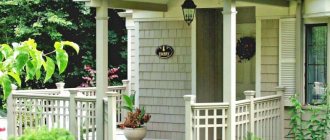
- Open. There are no walls, but there is a roof and a perimeter fence - railings. This type of extension is used exclusively as a summer kitchen, summer recreation area and can serve as a covered porch.
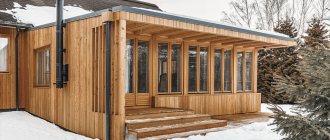
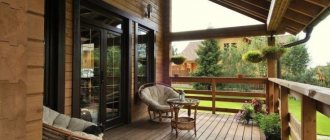
- Closed. Thanks to the presence of walls and a roof, you can increase the total area of the house by placing on it a living room, office, greenhouse, hallway and much more, which is enough for your imagination. The most important thing is to think about how to properly insulate the veranda so that you don’t experience discomfort later in the cold season.
To decide on the type of extension, you must first pay attention to the climate. After all, in the southern region you can choose the open version, while in cooler regions it is best to choose the closed version. In addition, it will serve as additional insulation for a private home.
Based on the shape, you can consider different options for verandas:
- in the shape of a square;
- round;
- polygonal;
- rectangular;
- corner
The most common is rectangular, since it is the easiest to build yourself. It should be remembered that the veranda should complement the home, and not stand out from its background.
Layout highlights
When planning the construction of a structure, the following should be taken into account:
Location. It can be located differently depending on the functionality.
If you plan to equip an additional room on the veranda, then it may not have access to the street, but only to the inside of the house. If additional protection from wind and precipitation is needed, then it is best to place it adjacent to the front door.
Illumination. Considering the natural conditions, you can place it on the side where there is the most sunlight. This will provide an additional source of heat and light.
Soil features. You should not lose sight of this point, since the type of soil, groundwater, and freezing depth will influence the choice of foundation.
Construction area. It depends on the size of the house, you shouldn’t make it bulky or small, you need to choose the optimal size.
Financial opportunities. It is worthwhile to sensibly evaluate the material side in order to build a veranda without harming your wallet.
Selecting a location
The construction site is selected taking into account many factors:
- Location of the entrance to the home. The extension can combine the functions of a porch and a resting place.
- The location of the house relative to the cardinal directions. For example, a terrace in the northern part of the house will provide an opportunity to enjoy coolness in the summer heat.
- Opening view.
- Soil characteristics - the type of foundation depends on the type and characteristics of the soil on the site.
- Features of the relief - the extension should not disturb the overall style of the yard and be combined with the house.
If there is a pool or natural reservoir on the site, the terrace is often placed as a separate building. The location of the structure relative to the house determines the following types of terraces:
- detached terrace;
- attached to one of the walls of the house;
- a terrace surrounding the entire house is an ideal option for a house with a small plot, where it is impossible to build a large terrace along only one of the walls.
Terraces come in any shape: oval, polygonal, asymmetrical.
A good option for implementing the project is a multi-level terrace, a practical and beautiful building. This type of terrace makes it possible to get rid of the construction of separate steps or stairs, especially steep ones, and also allows for the implementation of a high-quality drainage system.
Veranda decoration
It is clear that the attached structure significantly changes the total area of the house; in order to avoid future problems with the sale or donation of real estate, it should be legalized. To do this, before starting construction, you must sign the necessary documents with the supervisory authorities:
- administration;
- fire department;
- SES;
- electricians, etc.
After this, register the property with the BTI, providing them with a complete package of documents: application, consent of the owners, project, technical passport, and certificate of ownership.
You can submit this package yourself, or you can fill out an application through State Services. After completion of construction, report this to a higher authority and obtain a new certificate by paying the state fee first.
Ladder
Once the floor is ready, it's time to tackle the stairs. The first step from above should be located at the level of the floor part. After this, the elements of the straight staircase must be attached to the bowstrings. There are two of them and they are located at a certain angle. The result should be the following: the level of the last step and the ground should coincide, the ends are tightly fitted to the bowstring and secured with nails.
Then inserts cut according to the template are installed. It follows the outline of the boards on the side. The inserts are attached to the same bowstring. Between the inserts there is a support board along with a riser.
Note!
Do-it-yourself garden path using a mold: a review of original and inexpensive ideas + step-by-step instructions with photos
- Do-it-yourself gazebos for a summer residence - 300 photos of exclusive ideas. Instructions for building a beautiful gazebo (diagrams, drawings, foundation, roof)
- How to insulate a veranda for winter living: floor, ceiling, walls. Examples of insulation from the inside and outside (instructions + photos)
Types of materials for construction
Financial costs largely depend on what the veranda is made of. This also affects the complexity and strength of the structure.
Let’s not forget about the house, namely the materials from which it is made; the designs should complement each other. Mainly used:
- Tree. A wide selection of wood, different price ranges and fairly easy construction technology. To increase the service life, the wood should be treated with the necessary impregnations.
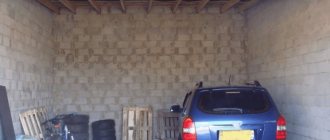
- Brick. Strength, durability, and thermal insulation of the veranda are guaranteed, but you need to take into account the weight of the resulting extension and strengthen the foundation in advance.
- Glass, polycarbonate. Easily erected, lightweight design will provide more light in the room. This material goes well with brick, wood, and metal.
In order to build a veranda yourself, you need to prepare a tool, starting from a hacksaw and ending with a screwdriver.
Location factors
It is important to think about where the extension will be located. To do this, several factors must be taken into account. First, study the information and drawings that are easy to find on the Internet. Consider also how long the selected side will be illuminated by the sun.
Another important factor is the landscape from the site.
It is better if the terrace overlooks the garden or utility yard. Think in advance about the shape of the extension - circle, rectangle, square or pentagon.
Also consider what size you can create. It all depends on the amount of free space and budget.
Main types of foundations
Most of all, either columnar or strip foundations are used. The first one is more economical and easy to construct. It is used if the extension is light and small.
When using brick as the main material when building a veranda, it is better to opt for the second type of foundation. For a columnar foundation you need:
- dig meter-long recesses for the pillars at a distance of three meters from each other;
- prepare a sand and gravel cushion about thirty centimeters thick;
- pour a fifteen-centimeter base and let dry;
- install pillars from the required material.
Algori:
- perform marking;
- dig a trench of the required depth;
- install wooden formwork;
- pour sand first and then crushed stone, forming a cushion;
- make a reinforcing layer from reinforcement;
- pour concrete and let dry.
Another possible method is a slab foundation. This is when the entire site is filled with concrete.
This method is used quite rarely when constructing a veranda, except when at the very beginning of the construction of a private house, a monolith was poured taking into account the further extension of this structure.
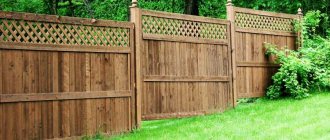
Railings and trim
Railings on a wooden veranda are intended for fall protection and spatial fencing. Planed beams or metal (profiled) are intended for them. Usually the height is taken as a basis, equal to a meter. The supporting parts are placed at a distance sufficient for the given type of structure and weight parameters. Some support for the roof is provided by the overhang of the railing. Railings with balusters look unusual and interesting.
The actual finishing begins when all installation work is completed. When the general installation is completed, the wooden veranda fencing is treated with stain, etched or painted with oil paint for better protection.
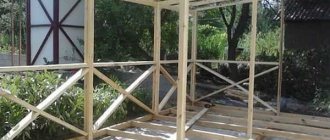
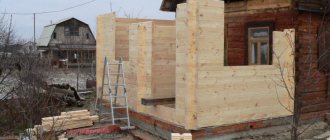
Construction of an open veranda
Now that the foundation has been poured and photos of the open verandas attached to the house have been studied, you can begin construction directly. To do this, follow these steps:
- Let's put a waterproofing layer three to five centimeters thick. This will allow the future structure to be separated from the concrete.
- Let's make the bottom strapping using a brace 150 by 150 cm. All wooden elements should be impregnated with an antiseptic.
- We install logs using metal structures.
When choosing a floor, you should choose concrete, as it is durable and it will be easier to lay tiles on it in the future. Wooden floors, in turn, are not so practical and durable.
Construction project
Eighty percent of errors can be avoided thanks to a properly designed veranda for a wooden house. The main thing is to think it over thoroughly in all details. Then there will be enough material, and there will be a minimal amount of flaws. It is interesting to prepare your own wooden veranda project, and then turn to the Internet for clarification of unclear places. When it is compiled, the sequence in which the work will be performed must be indicated. Then all stages of construction of the structure are better visible.
The addition of a veranda made of wood is usually carried out from the end part. In this case, there is an entrance door opening inside the room. The length of the structure is commensurate with the dimensions of the walls. The width is two or three meters. Then the total area is calculated.
The photo shows a ready-made version of an open veranda made by hand.
Note!
DIY metal bench: instructions with step-by-step guide (100 photo ideas)
- Blinds for gazebos: wooden, metal, bamboo. Instructions for installing blinds yourself
- Adding a terrace to your house with your own hands: step-by-step instructions on how to easily and quickly add a veranda or terrace (100 design photos)
Installation of a covered structure
The algorithm for building a closed veranda at the initial stage will be similar to an open one, only during the second step the following should be done:
- install racks made of wood, brick or other suitable material;
- build walls;
- lay the floor;
- make strapping on the racks for further installation of the rafter system;
- secure the trim from edged boards;
- spread waterproofing material;
- lay the finishing coating (it should be the same as on the house);
- glaze the veranda.
Once the veranda frame is ready, you can begin installing the doors and finishing the room. Here you can use plaster, lining, artificial stone, etc. depending on finances.
Don’t forget that the erected structure is primarily a place for relaxation, so in future photos, the veranda from the inside should look beautiful and cozy, so it’s worth thinking about the interior, choosing appropriate furniture, curtains, and thinking about lighting. And then it will become a favorite place for spending leisure time in the house.